
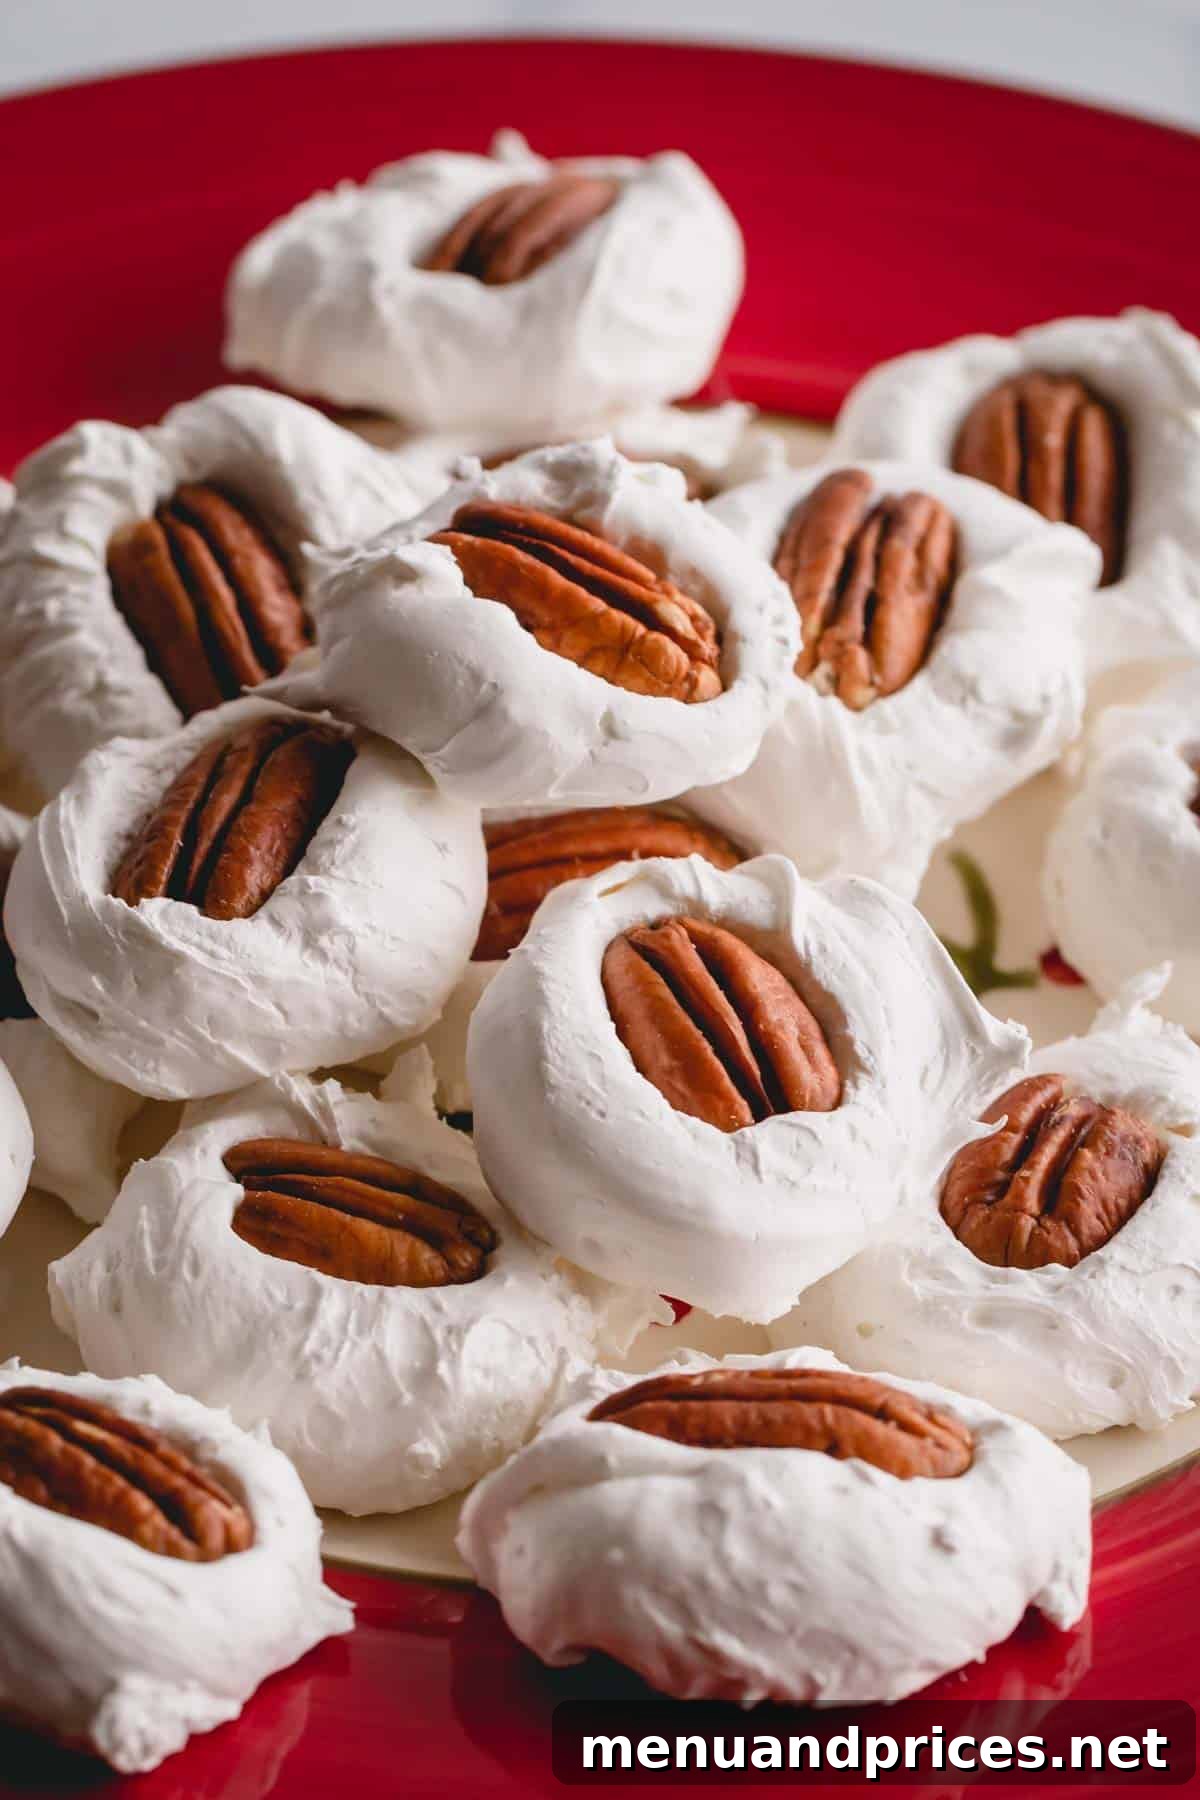
Discover the enchanting world of **Divinity Candy**, a light-as-air, sweet, and creamy Southern confection that captures the heart of holiday cheer. This beloved old-fashioned divinity recipe is renowned for its delicate, melt-in-your-mouth texture and irresistible sweetness, making it a staple treat for festive seasons and special occasions. With our comprehensive guide, filled with time-tested tips and expert tricks, you’ll master the art of homemade divinity, ensuring a perfect batch every time. Embrace the tradition and create this truly divine Southern delight that promises to impress.
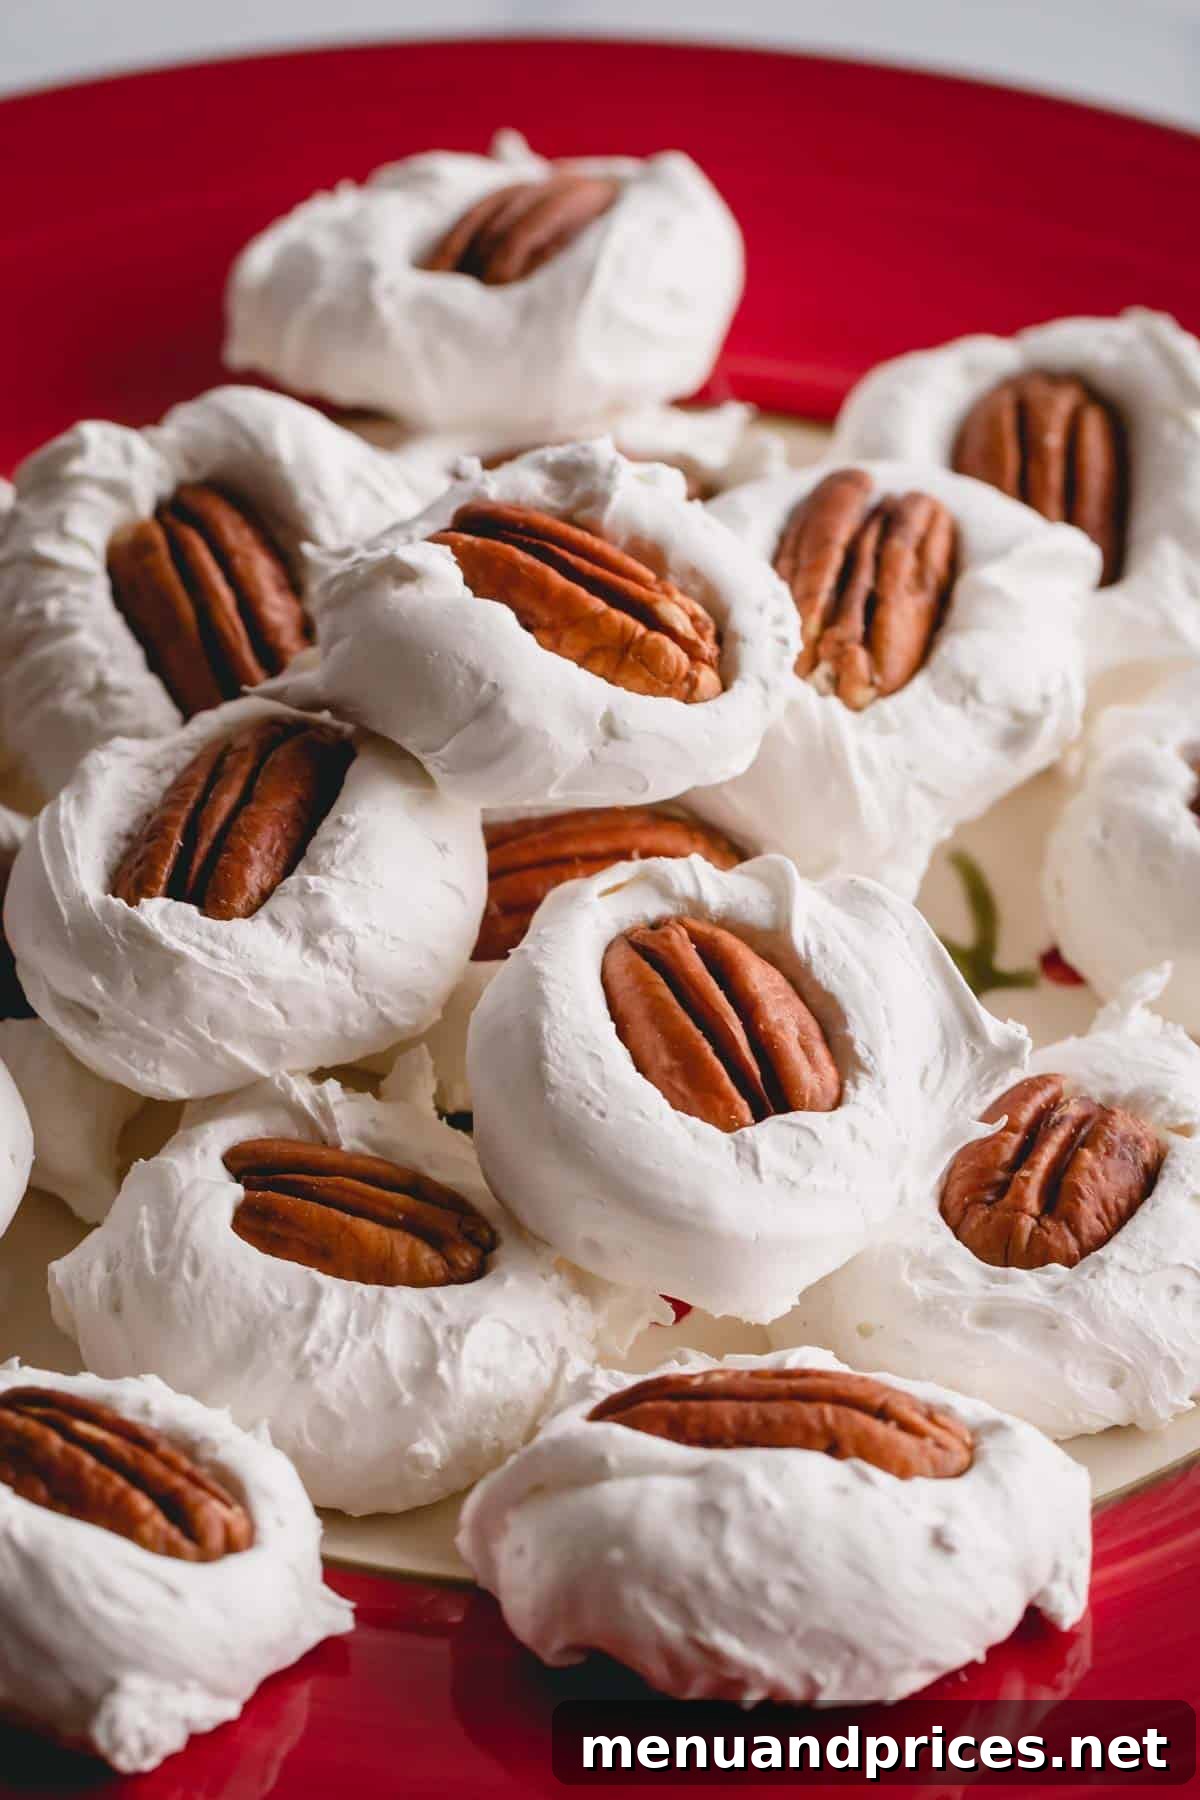
For over a decade, ever since my cherished mother-in-law first shared her secrets to making divinity, this ethereal candy has become an indispensable part of my family’s holiday traditions. Each year, as the festive season approaches, I eagerly prepare a fresh batch, always ensuring to share these sweet morsels with her. It’s more than just a recipe; it’s a culinary journey back to heartwarming memories, recalling hours spent together in the kitchen. I can still vividly recall the faint, almost-burnt scent of her trusty hand-held electric mixer, straining under the glorious weight of the fluffy meringue, a testament to the effort and love poured into every piece. These moments, filled with laughter and the sweet aroma of sugar and vanilla, are what make this old-fashioned divinity so much more than just a dessert – they’re edible memories.
What is Divinity Candy? A Classic Southern Delight
Divinity is a quintessential Southern Christmas treat, often described as a nougat-like confection. At its core, this delightful candy is crafted from a simple yet magical combination of stiffly beaten egg whites, a meticulously cooked sugar syrup (made from granulated sugar and corn syrup), and a touch of vanilla. The result is a profoundly sweet, creamy, and wonderfully soft texture that quite literally melts in your mouth, offering a unique sensation that sets it apart from other candies. Its name, “divinity,” perfectly encapsulates the experience it offers – a taste that is truly divine!
Historically, divinity candy has graced Southern tables for generations, particularly during the festive period. It embodies the rich culinary heritage of the South, where homemade sweets are a cornerstone of hospitality and celebration. Unlike crisp meringues or chewy fudges, divinity boasts a unique, airy yet substantial quality, making it a standout holiday favorite. There’s truly nothing that ushers in the spirit of holiday cheer quite like a freshly prepared batch of this old-fashioned divinity, promising nostalgic flavors and sweet moments.
Mastering Divinity: Essential Ingredient Insights
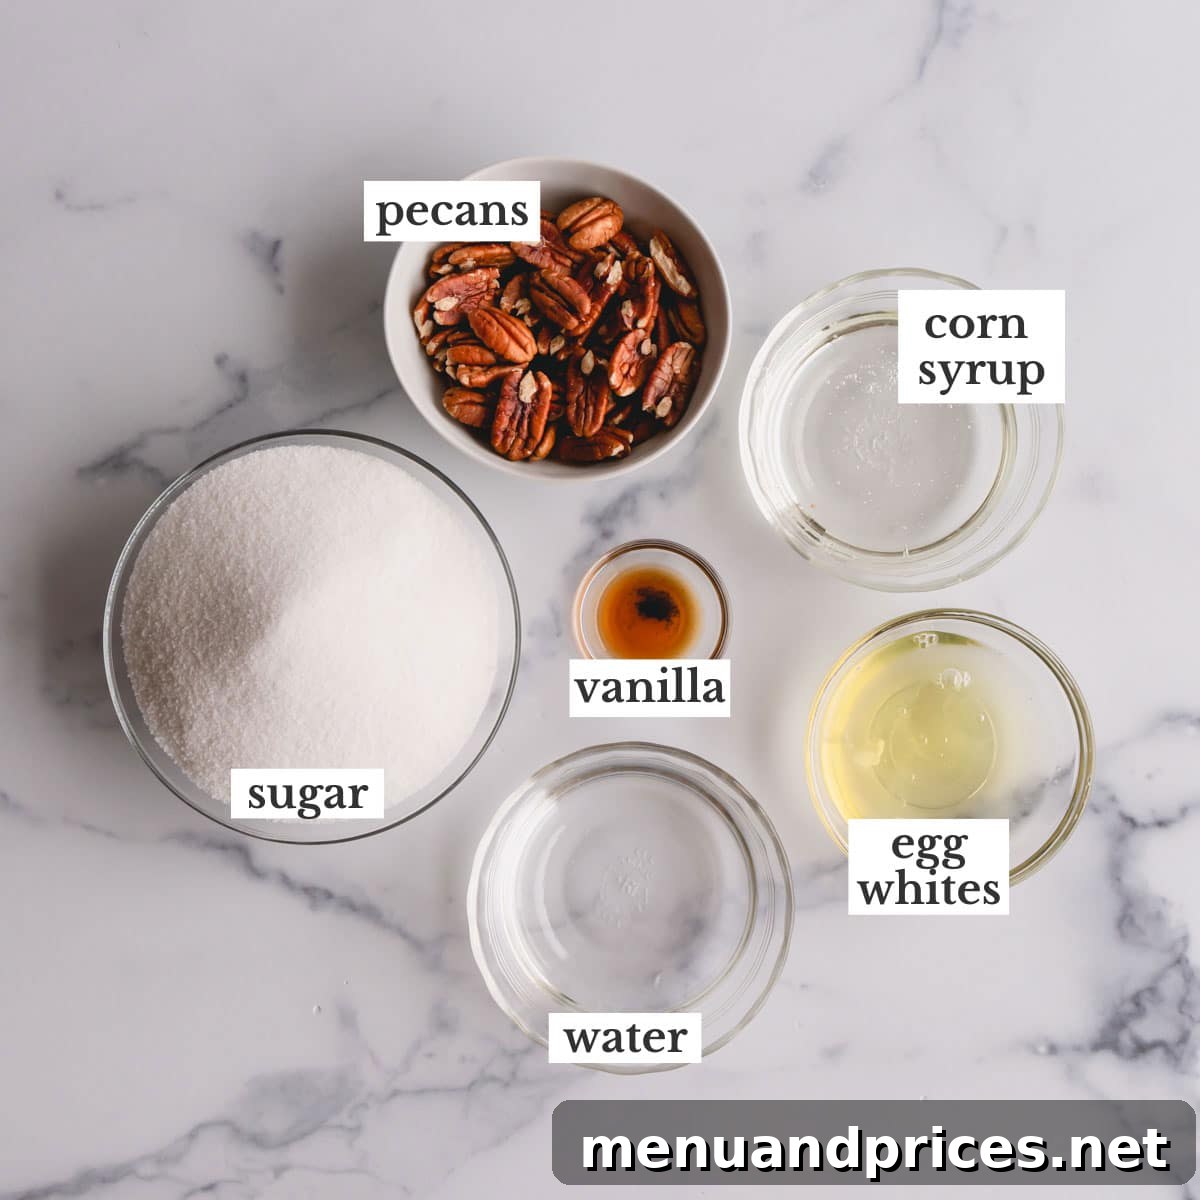
Creating perfect divinity candy relies on understanding the precise role each ingredient plays. While the list is short, quality and careful handling are paramount for achieving that signature melt-in-your-mouth texture.
- Granulated Sugar: As one of the main components, sugar is not just for sweetness; it forms the very structure of the candy. There is no suitable substitution for granulated sugar in this recipe, as its crystalline structure is essential for the syrup and subsequent setting of the divinity. Ensure you use fresh, high-quality granulated sugar for the best results.
- Corn Syrup: This is a crucial ingredient for preventing sugar crystallization, which can ruin the smooth texture of your divinity. Corn syrup acts as an invert sugar, ensuring the sugar syrup remains pliable and doesn’t become grainy or brittle. While some recipes might suggest alternatives like honey or maple syrup, they often alter the flavor and texture significantly, making light corn syrup the preferred choice for authentic divinity.
- Egg Whites: The foundation of divinity’s airy structure. It is absolutely vital that your egg whites are completely free from any trace of fat, grease, or egg yolk. Even a tiny speck can prevent them from whipping into a stable, voluminous meringue. Use room-temperature egg whites for optimal volume.
- Vanilla Extract: Traditionally, some vintage recipes recommended clear imitation vanilla to maintain the candy’s pristine white color. However, I am a passionate advocate for using pure vanilla extract. In my extensive experience, a good quality pure vanilla extract imparts a far superior flavor profile without significantly impacting the bright white appearance. A slight cream hue is a small price to pay for authentic, rich vanilla notes.
- Pecans: These are the classic and most beloved addition to divinity candy, providing a delightful textural contrast and a rich, nutty flavor that perfectly complements the sweet, creamy base. However, walnuts are also a very popular option and offer a slightly different but equally delicious taste. Ensure your nuts are fresh for the best flavor.
Your Step-by-Step Guide to Perfect Old-Fashioned Divinity Candy
Creating exquisite divinity candy is a process that requires attention to detail and patience, but the results are undeniably rewarding. Follow these clear steps to achieve that perfect airy, creamy texture.
1. Crafting the Essential Sugar Syrup
The sugar syrup is the heart of your divinity, and its precise temperature is non-negotiable for success.
- Begin by combining the granulated sugar, water, and corn syrup in a heavy-bottomed medium (2-quart) saucepan. The heavy bottom helps to distribute heat evenly and prevent scorching. Cook the mixture over low heat, stirring continuously until all the sugar crystals have completely dissolved. This initial stirring is crucial to prevent crystallization later.
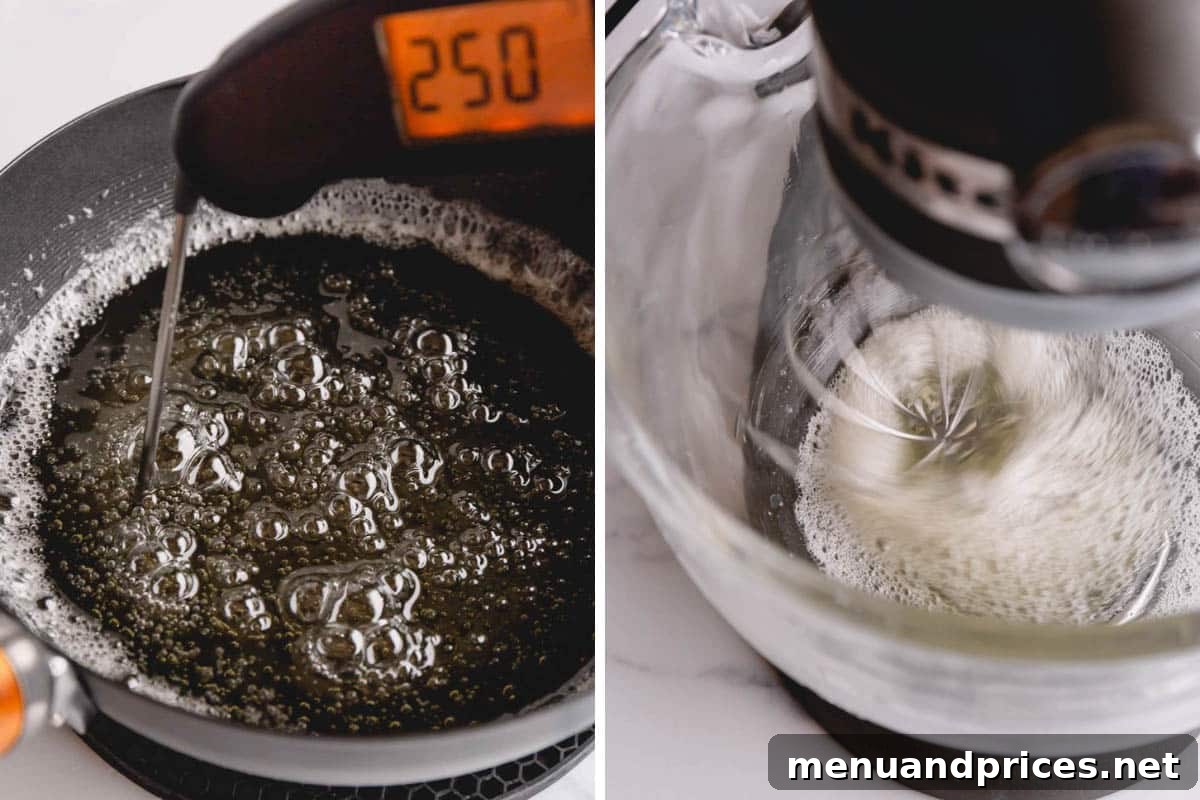
- Once the sugar is fully dissolved and the mixture appears clear, increase the heat to medium-high. From this point, it is imperative to *stop stirring*. Continue to cook the syrup without agitation until it reaches a precise temperature of 250°F (121°C) on a reliable candy thermometer. This temperature corresponds to the “hard ball” stage, which is vital for the divinity to set correctly.
- As your sugar syrup approaches the 240°F (115°C) mark, it’s time to multitask. Begin preparing your egg whites for whipping, as you’ll need them ready once the syrup hits its target temperature.
2. Transforming into Divine Confection
This stage is where the magic happens, as the simple ingredients transform into the iconic divinity texture.
- In a large mixing bowl fitted with a whisk attachment (a stand mixer is highly recommended for this recipe), begin beating your egg whites. Increase the speed gradually until firm, glossy peaks form. The egg whites should be sturdy enough to hold their shape when the whisk is lifted.
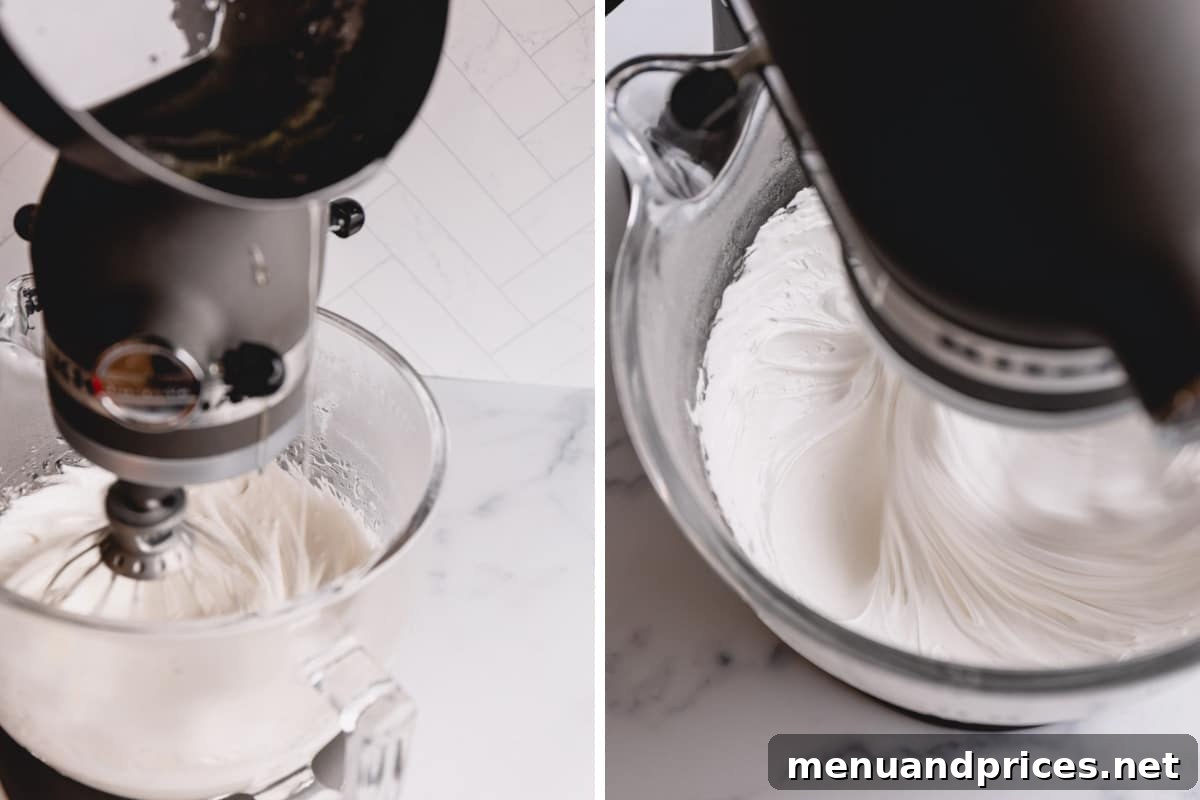
- Once your egg whites have reached stiff peaks and your sugar syrup is precisely at 250°F (121°C), reduce the mixer speed to low. Carefully and continuously pour the hot sugar syrup into the whipped egg whites in a thin, steady stream. Aim for the side of the bowl, allowing the syrup to incorporate slowly without deflating the egg whites. This slow addition gradually cooks the egg whites and forms the candy’s unique structure.
- Once all the syrup has been incorporated, add the pure vanilla extract.
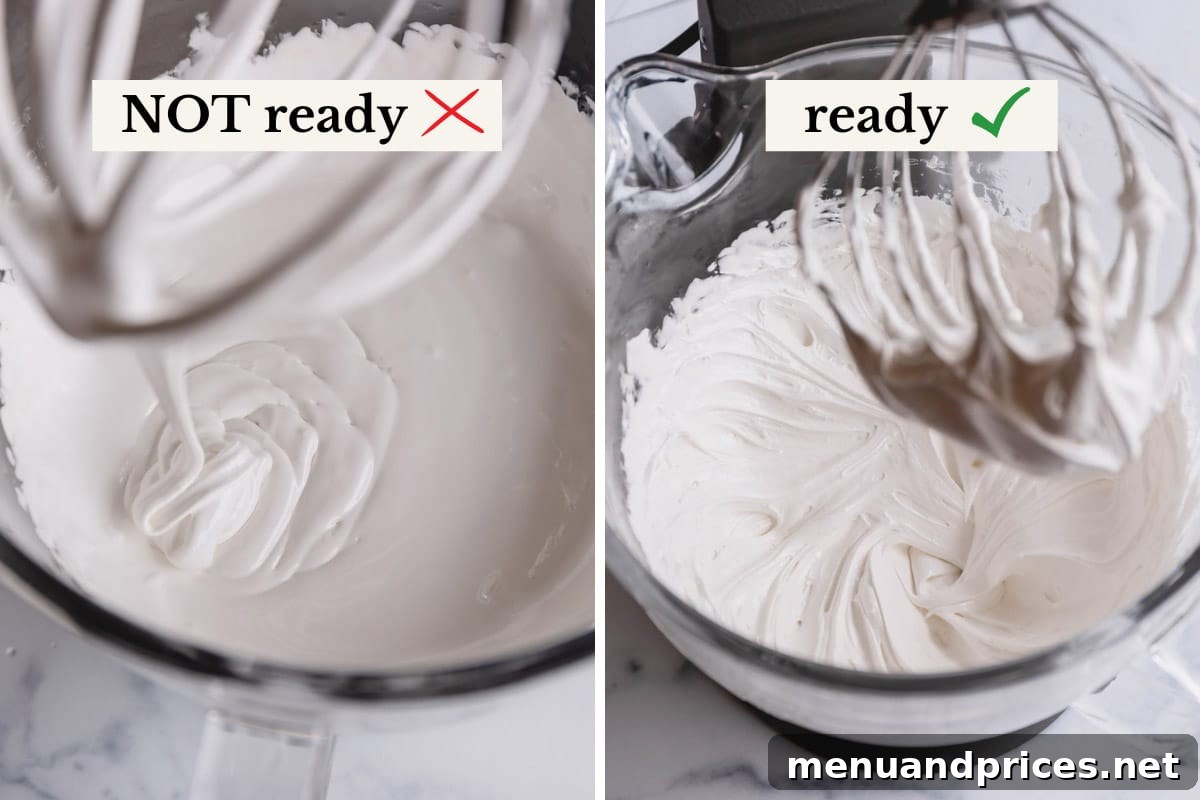
- Increase the mixer speed back to high and continue to beat the mixture vigorously. This is the longest part of the process, typically taking about 15 minutes or more. You’ll observe the mixture gradually lose its glossy sheen, becoming matte and opaque. It will also thicken considerably and begin to hold its shape when the beater is lifted. After 15 minutes, check the consistency: if it’s still runny or too shiny, continue beating for another 5 minutes and re-evaluate. The goal is a thick, ribbon-like consistency that holds its form beautifully.
Expert Tip: Knowing When Your Divinity is Ready
Your divinity mixture is perfectly ready for shaping when it becomes significantly thick, loses all its glossy appearance, and develops a distinct matte finish. When you lift the beater, the mixture should fall slowly in a thick ribbon and, crucially, hold its shape without spreading or collapsing. This is often referred to as the “ribbon stage” or “firm-peak stage” for the candy itself, indicating it has enough structure to set.
3. Shaping and Setting Your Divine Creations
Once the divinity batter is ready, speed is of the essence for perfect results.
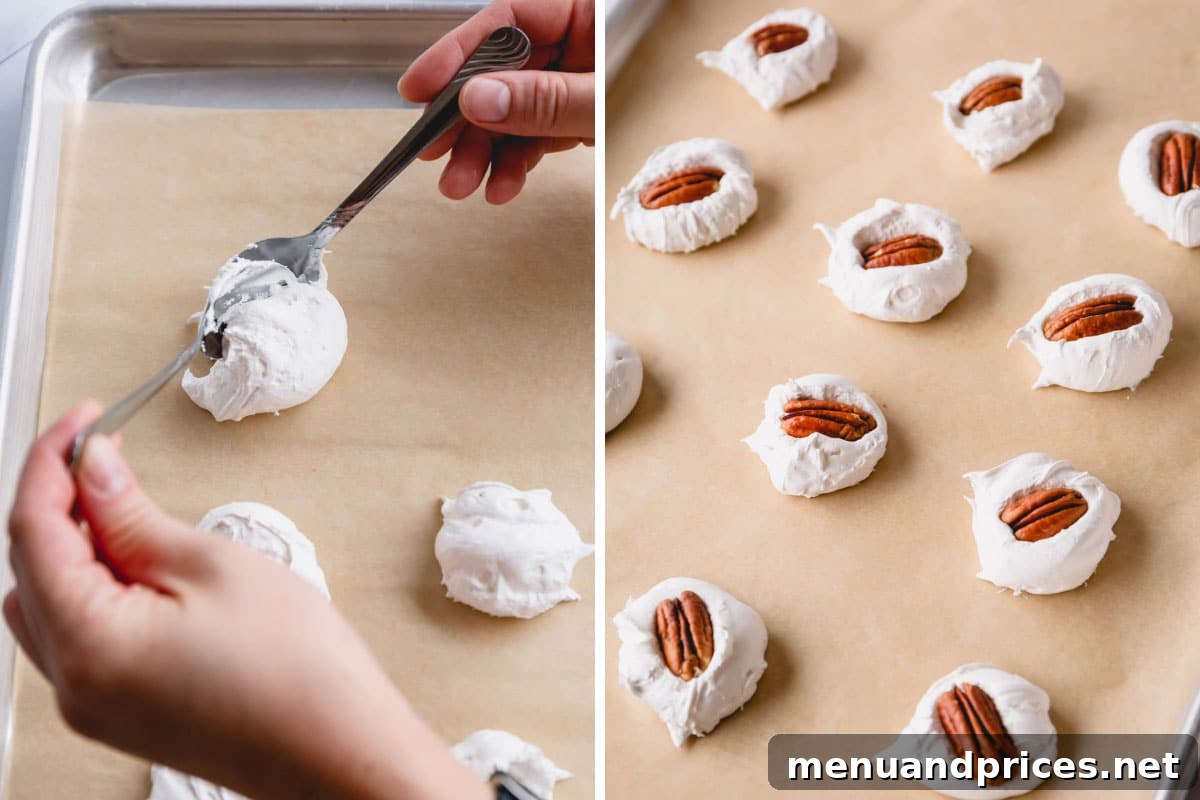
- Line a large baking sheet with wax paper or parchment paper. To facilitate easy shaping and release, lightly spray two spoons with a non-stick cooking spray. This will prevent the sticky divinity from adhering to your utensils.
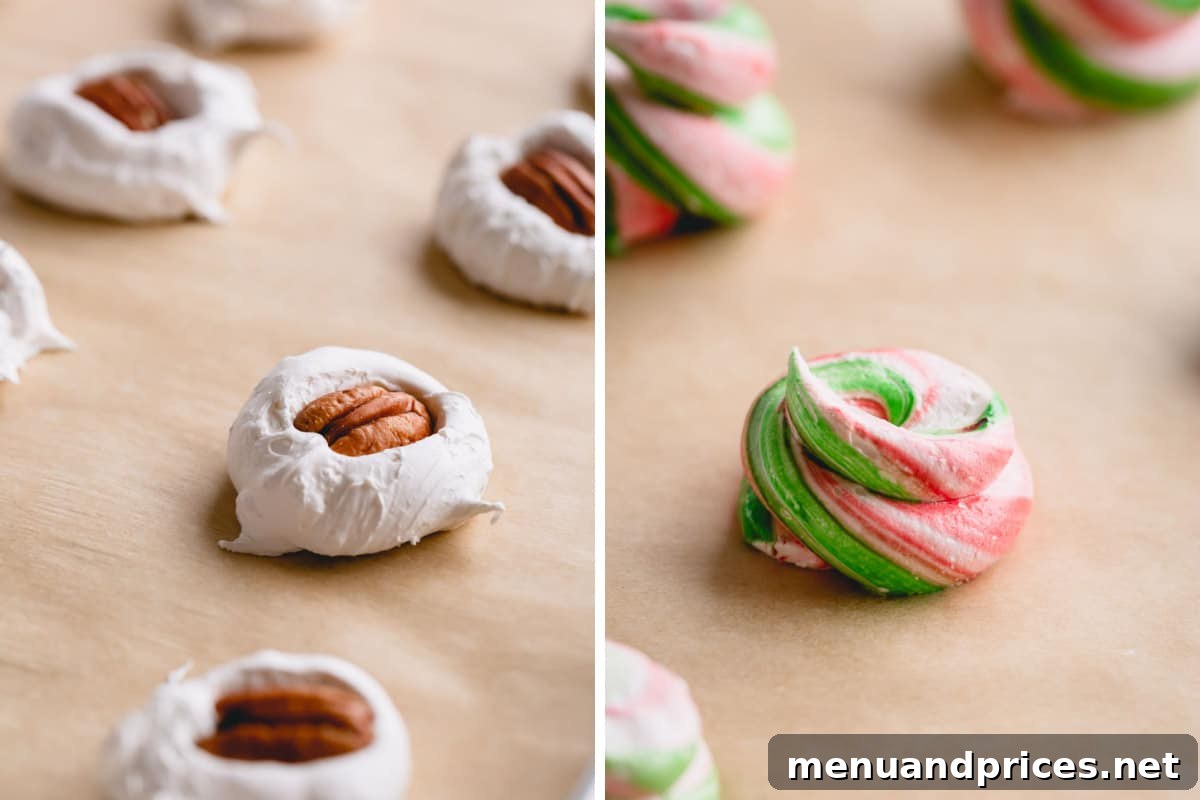
- Working quickly, use the prepared spoons to drop spoonfuls of the divinity mixture onto the lined baking sheet. You can create various shapes, from classic dollops to more elongated forms, as desired. If adding pecan halves, gently press one onto the top of each divinity immediately after shaping. Alternatively, you can fold chopped pecans directly into the batter before shaping.
- Allow the shaped candies to set at room temperature for up to 2 hours. During this time, the divinity will firm up and develop its final, stable texture. Ensure they are in a cool, dry place away from direct sunlight or excessive humidity.
Urgent Tip: Act Swiftly!
The moment your divinity batter reaches the perfect consistency, it’s crucial to work rapidly to shape the candies. Divinity sets quickly, and a delay can make it difficult to form neat, attractive pieces.
Guaranteed Divinity: Essential Tips for Success
Achieving perfect divinity every time can feel like a delicate balance, but these tried-and-true tips will significantly increase your chances of success and help you avoid common pitfalls.
- Choose a Dry Day: This is arguably the most critical tip for making divinity. Sugar is highly hygroscopic, meaning it readily absorbs moisture from the air. High humidity, whether from a rainy day or simply a very moist climate, can dramatically impede the setting process. It will take considerably longer for your sugar syrup to reach the correct temperature, and even longer for the divinity mixture to thicken and for the final candies to set properly. If it’s a humid or rainy day, it’s genuinely better to postpone your divinity-making plans for a drier day.
- Invest in the Right Tools: A stand mixer and a reliable candy thermometer are not just helpful; they are truly your best friends in the divinity-making process.
- Stand Mixer: The continuous, high-speed beating required to transform the egg whites and syrup into thick divinity is simply too strenuous and time-consuming for a hand-held mixer, which often lacks the power and can overheat or burn out its motor. A stand mixer allows for consistent whipping while you focus on pouring the hot syrup safely.
- Candy Thermometer: Precision is key when cooking sugar syrup. Without a quality thermometer, accurately reaching the hard ball stage (250°F / 121°C) is nearly impossible. If the syrup isn’t cooked to this exact temperature, your divinity will not set, resulting in a sticky, gooey mess – a truly sad outcome for your efforts.
- Embrace Patience: Even with the most powerful stand mixer, transforming the glossy, liquid batter into perfectly matte, firm divinity takes time. Do not be tempted to rush the beating process. It requires a fair amount of continuous whipping – typically 15 to 20 minutes – to achieve that ideal consistency where the mixture loses its gloss and holds its shape beautifully. Patience here will be rewarded with delightfully airy and stable candies.
The Indispensable Role of a Stand Mixer in Divinity Making
While stories of grandmothers making divinity by hand are charming, the reality of manually whipping divinity batter for 15+ minutes is an exhausting and often impractical feat for modern home cooks. This labor-intensive process demands consistent, high-speed beating for an extended period, something a stand mixer excels at without faltering.
Beyond the sheer physical effort, a stand mixer significantly enhances the safety and ease of the process. It allows you to beat the egg whites steadily with one hand while safely and slowly pouring the very hot sugar syrup with the other. This two-handed operation is much safer and more efficient than trying to manage both with a hand-held mixer, especially when dealing with scalding hot syrup. Unless you have a dedicated helper with incredibly strong arms, allowing the mixer to handle the relentless whipping frees you to monitor the transformation, ensuring a perfectly aerated and set divinity without the intense physical workout.
Creative Divinity Variations: Adding Your Personal Touch
Divinity candy, while perfect in its classic form, also offers a wonderful canvas for creative customizations. By simply mixing in different add-ons, you can create a variety of flavors and visual appeals to suit any taste or occasion.
- Chopped Nuts: For a slightly different texture and easier biting, you can finely chop the pecans (or walnuts) and fold them directly into the divinity batter just before shaping. This ensures an even distribution of nutty goodness throughout each piece.
- Alternative Nuts: Beyond the traditional pecans, consider using other nuts like finely chopped walnuts, or for a bolder flavor, the distinct taste of black walnuts. For a touch of vibrant color and a unique flavor, pistachios can also be a delightful addition. Always ensure nuts are fresh and lightly toasted for maximum flavor.
- Chocolatey Indulgence: Introduce a luxurious twist by folding in mini chocolate chips. Dark chocolate offers a sophisticated contrast, while milk chocolate adds more sweetness. For a refreshing note, incorporate mint chocolates or crushed peppermint candies, especially fitting for holiday divinity.
- Maraschino Divinity: A truly classic variation! Gently fold in chopped, well-drained maraschino cherries for a burst of color and a sweet, subtly fruity flavor. The red cherries make this a stunning choice for Christmas.
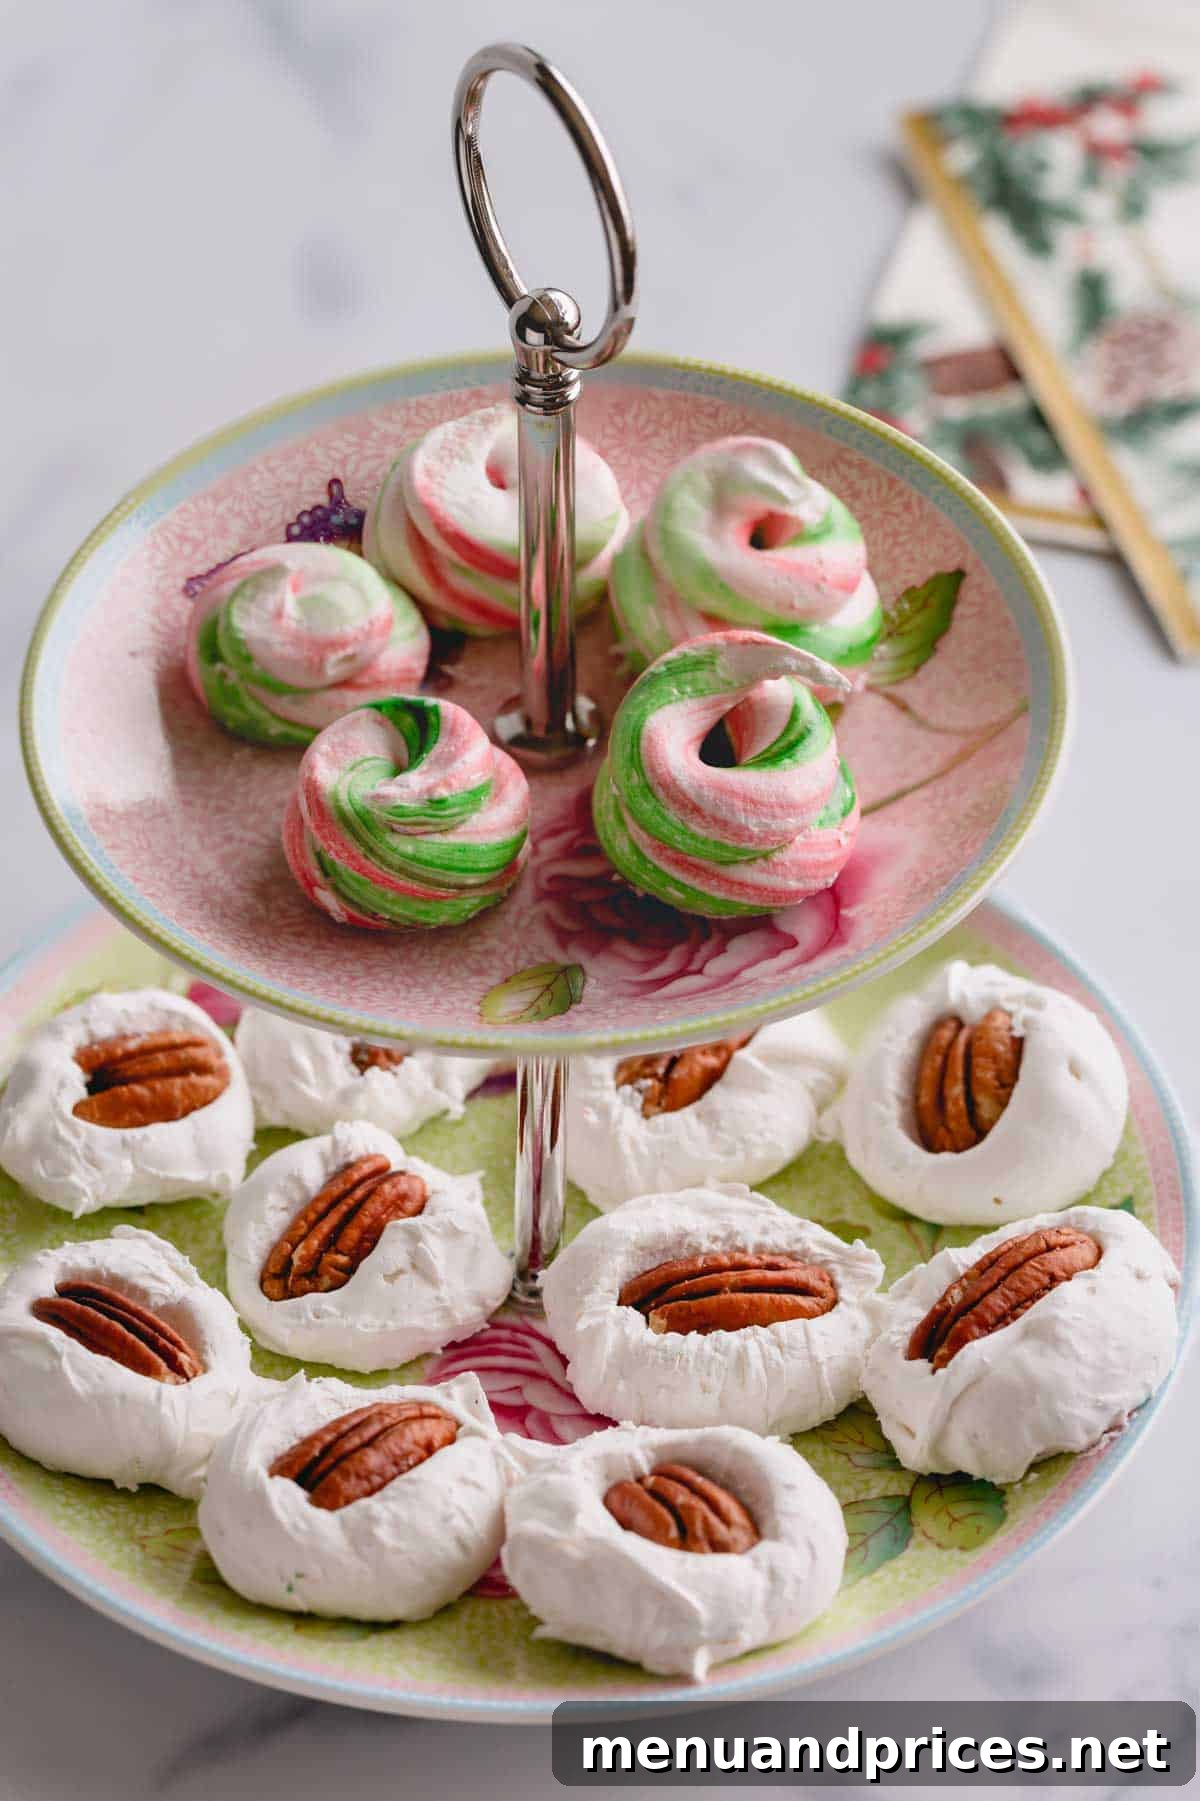
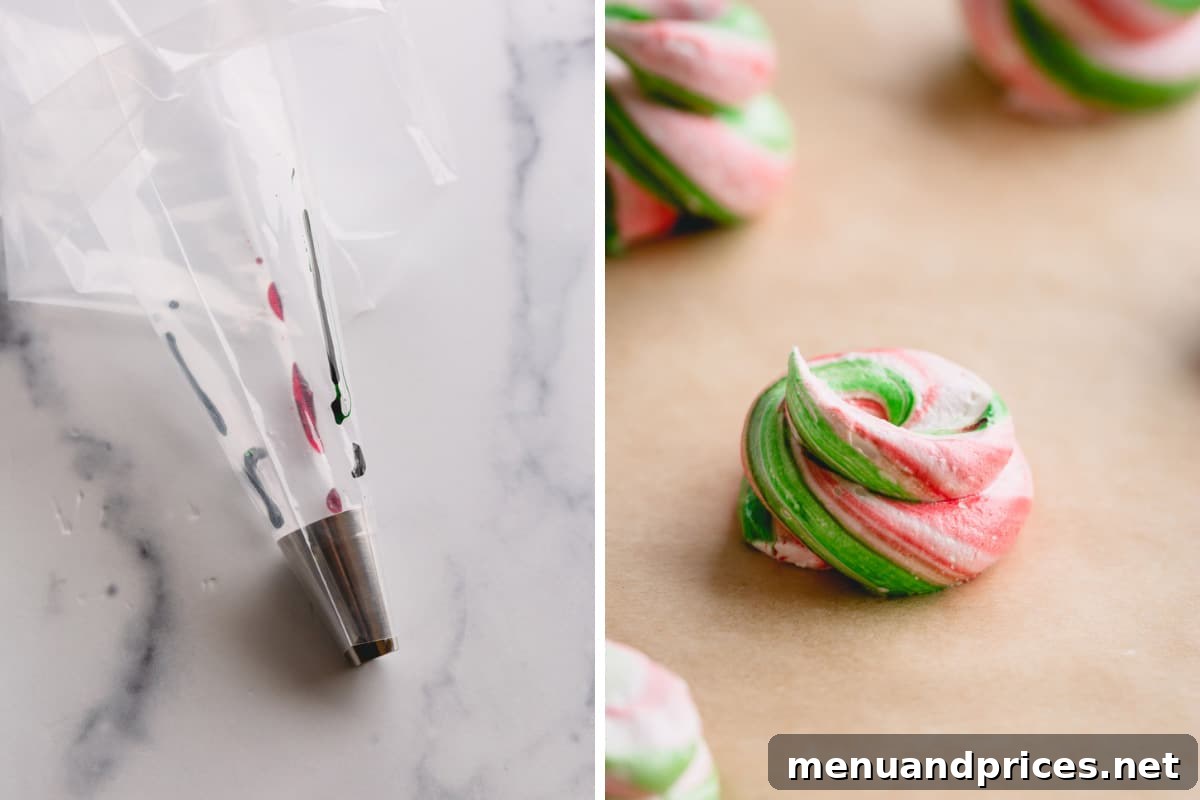
- Colored Divinity: Unleash your artistic side with food coloring to add a fun, festive twist. To create a marbled effect, smear thin red and green gel food coloring strips inside a piping bag before adding the divinity mixture. Then, pipe the divinity into beautiful swirls or any desired festive shape onto your prepared baking sheet. This technique creates a visually striking candy that’s perfect for holiday platters.
Optimal Storing Tips for Fresh Divinity Candy
Proper storage is essential to maintain the delicate texture and freshness of your homemade divinity. Once your divinity candies have fully set and are firm to the touch, transfer them to an airtight container. To prevent sticking and preserve their shape, arrange them in single layers, separating each layer with a sheet of parchment paper or wax paper. Store the container in a cool, dry place at room temperature for up to 1 week. Avoid refrigeration, as it can cause the candy to become sticky and absorb moisture.
For longer preservation, divinity freezes exceptionally well. Place the set candies in an airtight, freezer-safe container, again separating layers with parchment paper. They can be frozen for up to 2 months. When ready to enjoy, simply thaw them at room temperature until softened.
Frequently Asked Questions About Divinity Candy
Divinity is primarily crafted from a combination of egg whites, granulated sugar, and corn syrup. These three core ingredients are responsible for its distinctive light and airy texture. Optional, but highly recommended, additions include pecans or walnuts for a delightful crunch, and pure vanilla extract or other flavorings for enhanced taste.
While both divinity and meringue share similar fundamental ingredients (egg whites and sugar), they differ significantly in their preparation, texture, and final form.
Divinity is a type of soft, chewy candy, akin to a nougat or fudge. It’s made by slowly incorporating a very hot sugar syrup, cooked to the “hard ball” stage (around 250°F / 121°C), into stiffly beaten egg whites, then whipping extensively until the mixture cools and sets.
Meringue, on the other hand, is a crisp, light, and delicate confection. It’s typically made by whipping egg whites with granulated sugar (or sometimes a slightly cooler sugar syrup, around 240°F / 115°C for soft ball stage), then slowly baking it at a low temperature to dry it out and achieve its characteristic crisp, airy texture.
While it’s true that traditional cooks might have attempted divinity by hand, modern methods strongly advocate for a stand mixer due to the intense and prolonged beating required. Whipping the batter for 15 minutes or more to achieve the correct matte, firm consistency is physically strenuous and nearly impossible to do by hand consistently. A stand mixer also provides a much safer way to slowly pour scalding hot sugar syrup into the whipping egg whites, preventing accidents and ensuring even incorporation. It transforms a challenging, exhaustive task into an easily manageable and enjoyable process, guaranteeing better results.
The most common reasons for divinity not setting are either humidity in the air or the sugar syrup not reaching the correct temperature. Ensure you’re making divinity on a dry day. Also, double-check your candy thermometer’s accuracy and make sure the syrup reaches precisely 250°F (121°C). Insufficient whipping time can also contribute, so be patient and continue beating until the mixture loses its gloss and holds its shape.
While some experienced candy makers might attempt to judge the sugar syrup’s temperature using the cold water test (checking for a “hard ball” consistency), it’s highly recommended to use a reliable candy thermometer. Precision is absolutely crucial for divinity to set correctly, and even a few degrees off can lead to a runny or overly brittle candy. For consistent, successful results, a thermometer is an indispensable tool.
Old-Fashioned Divinity
Pin Recipe
Comment
Print Recipe
Ingredients
- 2 cups (400 g) granulated sugar
- ½ cup (120 ml) light corn syrup
- ½ cup (120 ml) water
- 2 (70 g) egg whites
- 2 teaspoons pure vanilla extract
- Pecan halves
Instructions
To make the syrup:
-
In a heavy-bottomed medium (2qt) saucepan, mix together sugar, water and corn syrup. Cook the mixture on low heat, stirring continuously until sugar is dissolved.
-
Once the sugar is dissolved, turn the heat up to medium high and continue to cook the mixture without stirring until it reaches 250°F on thermometer.
To make divinity batter:
-
As the syrup approaches 240°F, start whipping the egg whites.
-
In a large mixing bowl with whisk attachment, beat the egg whites until hard peaks form.
-
Reduce the speed to low and slowly and continuously pour the hot syrup mixture in to the egg whites.
-
Stir in vanilla extract.
-
Increase the speed to high and continue to beat the mixture until it loses its gloss and holds its shape, about 15 minutes. Check the consistency after 15 minutes. If the mixture is stilly runny and shiny, beat for another 5 minutes and check again.
To shape and set:
-
Line a baking sheet with wax or parchment paper and spray 2 spoons with non-stick cooking spray.
-
Using the buttered spoons, drop a spoonful of divinity mixture onto the prepared sheet.
-
Push a pecan half on top of each divinity. Alternatively, you may chop the pecans into smaller pieces and stir them into the divinity batter.
-
Let the divinity set at room temperature for up to 2 hours.
⭐️ Did you make this recipe?
Please leave a review and let us know how you liked it!
Tips & Notes
To make colored divinity, prepare a piping bag with a large round tip. Draw a few alternating lines with red and green gel food coloring inside the piping bag. Then, transfer the divinity mixture into the prepared piping bag and pipe out 2-inch swirls onto the prepared sheet.
To store: Once the divinity candies are set, place them in an airtight container with parchment paper in between layers and store at room temperature for up to 1 week. You can also freeze them in an airtight container for up to 2 months.
Nutrition

This recipe was originally published on December 18th, 2013, and has since been updated with additional tips and expanded content for your success.