Ultimate No-Bake Neapolitan Cheesecake: A Decadent Layered Delight
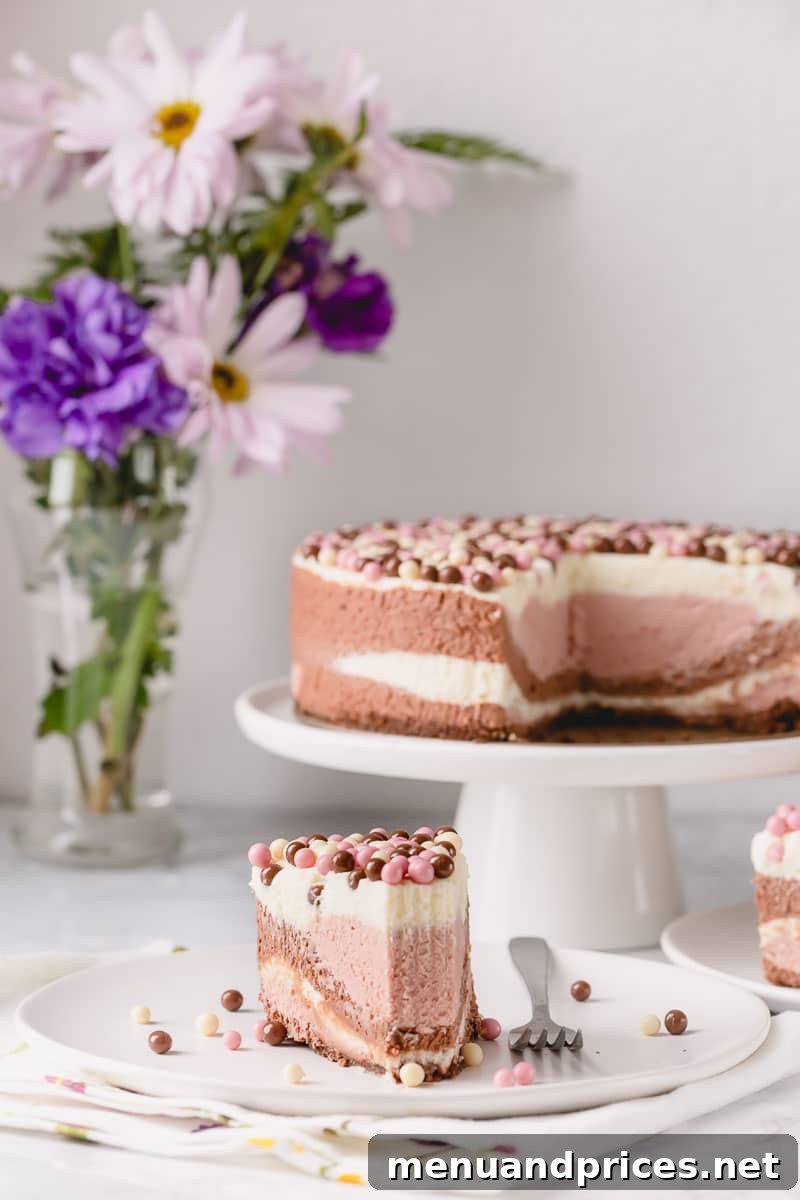
Prepare to be enchanted by the **Ultimate No-Bake Neapolitan Cheesecake**, a dessert that effortlessly combines elegance with incredible flavor. This masterpiece layers rich dark chocolate, sweet strawberry, and creamy white chocolate cheesecake fillings over a perfectly buttery graham cracker crust. Forget complicated baking schedules or oven woes; this recipe is designed for ease, delivering a surprisingly simple yet utterly impressive result. Its light, airy, and velvety smooth texture, coupled with a perfectly balanced sweetness, makes it an absolute showstopper for any gathering or a delightful treat just because.
Pin this recipe to save for later!
Pin It
Why You’ll Adore This No-Bake Neapolitan Cheesecake
This isn’t just another cheesecake; it’s an experience waiting to unfold with every bite. The allure of this no-bake Neapolitan delight lies in several key aspects that make it a favorite for both bakers and dessert enthusiasts alike:
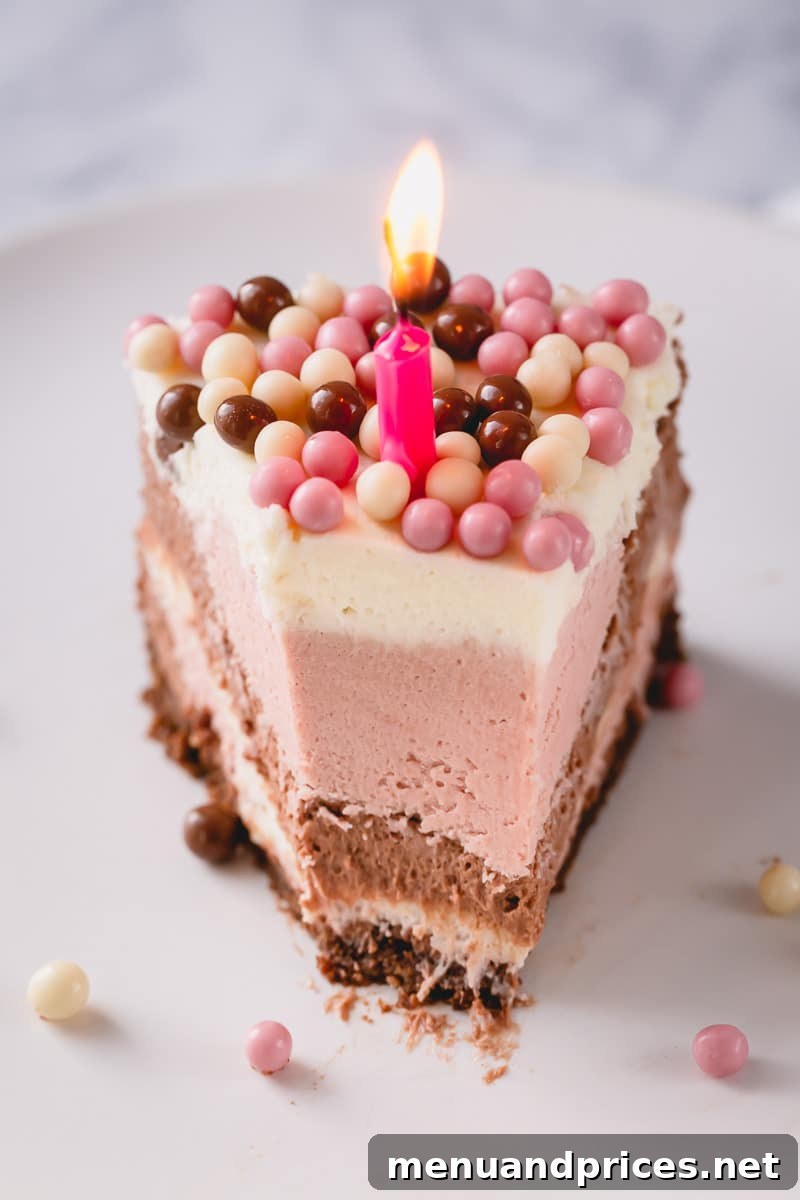
- **Layers of Pure Bliss:** Imagine sinking your fork through distinct, vibrant layers of dark chocolate, sweet strawberry, and delicate white chocolate cheesecake. Each flavor profile is perfectly balanced, offering a harmonious blend that tantalizes your taste buds and leaves a lasting impression. It’s a delightful surprise in every single slice!
- **Effortlessly Impressive:** While its stunning striped appearance might suggest hours of intricate work, the reality is wonderfully different. This no-bake recipe requires significantly less effort than traditional baked cheesecakes, yet it delivers a visual and gustatory impact that will surely impress your guests. It’s the perfect dessert when you want to look like a culinary genius without the stress.
- **Unforgettable Texture:** Prepare for a cheesecake experience unlike any other. This recipe boasts an incredibly light, airy, and smooth texture that literally melts in your mouth. Unlike denser baked cheesecakes, the no-bake method, enhanced by sweetened condensed milk, yields a dessert that is moderately sweet, intensely flavorful, and refreshingly delicate. It’s a delightful contrast to the rich, buttery graham cracker crust.
- **Perfect for Any Season (No Oven Required!):** Whether it’s the scorching heat of summer or a cozy winter evening, this no-bake cheesecake is always in season. Without the need to turn on your oven, it’s an ideal dessert for warm weather entertaining, keeping your kitchen cool and stress-free.
- **Customizable Delight:** While the classic Neapolitan flavors are phenomenal, this recipe provides a fantastic base for experimentation. Feel free to adjust chocolate types or even experiment with different fruit purees for the strawberry layer to tailor it to your preference.
From its vibrant presentation to its exquisite taste and texture, this Neapolitan cheesecake is destined to become a staple in your dessert repertoire.
Mastering the No-Bake Neapolitan Cheesecake: Step-by-Step Guide
Despite its luxurious appearance, crafting this Neapolitan cheesecake is surprisingly straightforward. The secret to its beautiful, distinct layers and harmonious flavors lies in a clever technique: instead of preparing three separate cheesecake batters, we create one versatile base and then gently incorporate the different melted chocolates. This streamlines the process significantly, making it accessible even for novice bakers. Let’s break down each stage to ensure your success in creating this show-stopping dessert.
Step 1: The Foundation – A Perfect Graham Cracker Crust
Every great cheesecake begins with an outstanding crust. For this Neapolitan delight, we opt for a robust yet tender base that complements the creamy filling. While chocolate graham crackers are our preferred choice for an extra layer of chocolatey depth, don’t hesitate to get creative with your crust.
- **Crust Options:** Beyond chocolate graham crackers, crushed Oreo cookies (with the cream filling scraped off for a less sweet, more crisp crust) or even classic honey graham crackers work wonderfully. For a touch of sophistication, consider using digestive biscuits or vanilla wafers.
- **Quantity & Pan Size:** This recipe calls for a minimal crust, focusing on the base. We use a 7-inch springform pan, which is ideal for achieving the impressive height and clean slices of this layered cheesecake. If you prefer a thicker crust or one that extends up the sides of the pan, feel free to double the recipe for the crust ingredients. Just ensure it’s evenly pressed for a consistent foundation.
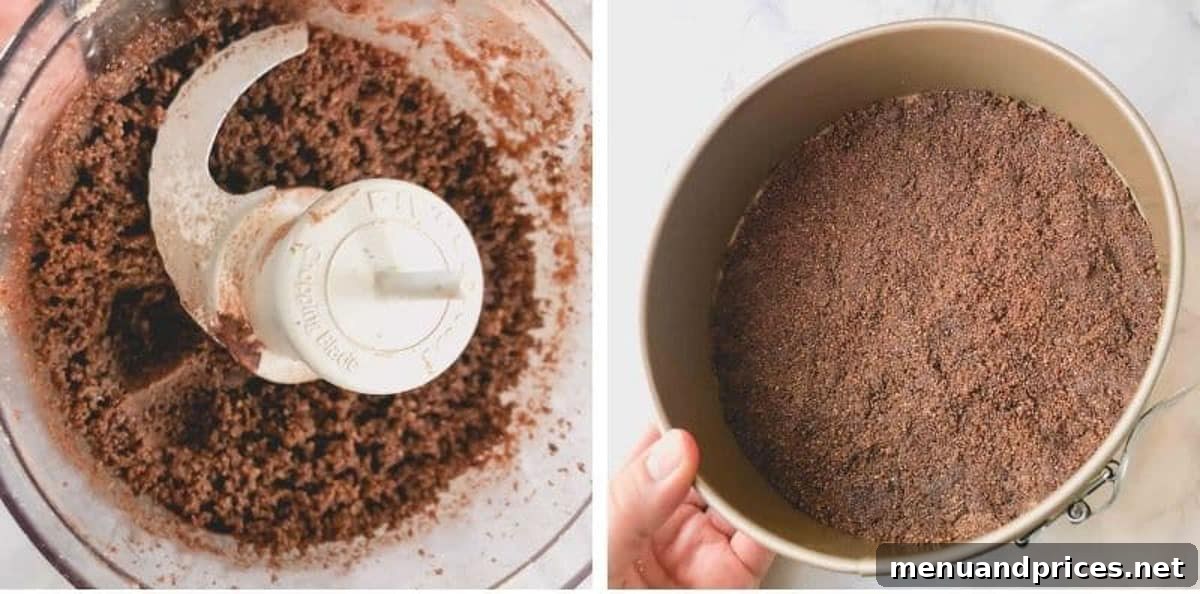
- **Preparation & Chilling:** The key to a sturdy crust is proper packing. Use the bottom of a glass or a flat measuring cup to firmly press the mixture into the bottom of your springform pan. Once packed, immediately transfer it to the refrigerator. Chilling the crust while you prepare the filling helps it firm up and prevents crumbling when sliced, providing a solid base for your elegant layers.
Step 2: Crafting the Velvety Cheesecake Filling
The heart of our Neapolitan cheesecake is its incredibly smooth and airy filling. This step involves a few crucial components coming together to create that signature melt-in-your-mouth texture.
**Prepare the Gelatin: The Secret to Stability**
Gelatin is the unsung hero of many no-bake desserts, ensuring your cheesecake sets beautifully and maintains its form, even on warmer days. Don’t worry, it won’t make your cheesecake rubbery; instead, it provides a subtle firmness that’s essential for clean slices.
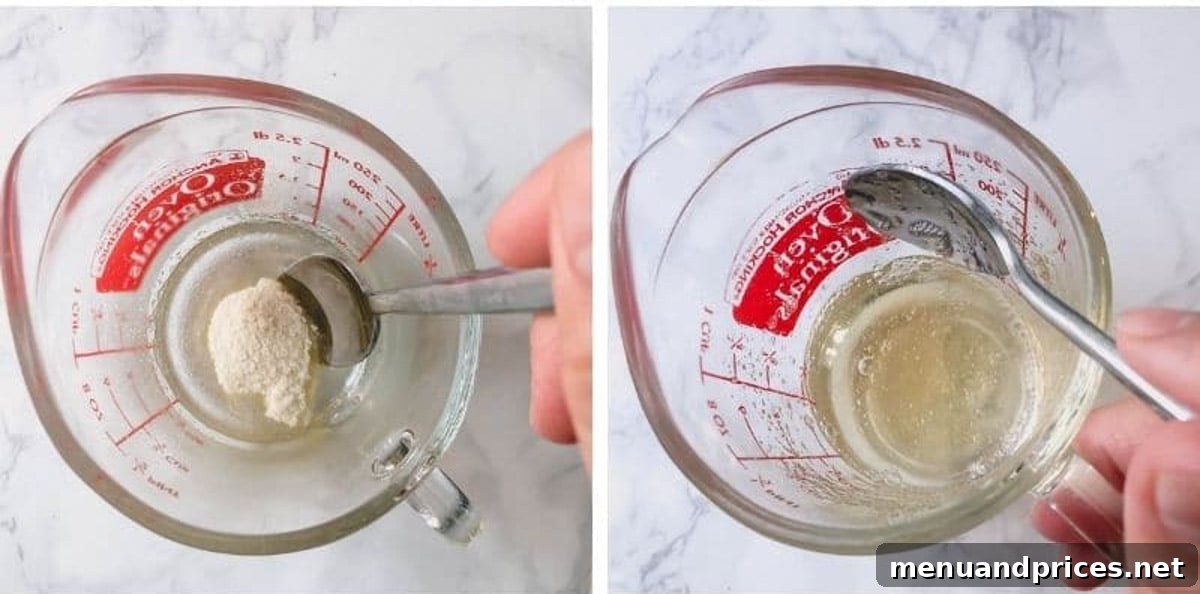
- **Blooming:** In a small bowl, sprinkle the gelatin powder evenly over the specified amount of cold water. Let it sit undisturbed for about 5 minutes. This process, known as “blooming,” allows the gelatin granules to absorb the liquid and swell, preparing them for liquification.
- **Liquifying:** Once bloomed, the gelatin will look like a wobbly gel. Microwave it for about 10 seconds (or use a double boiler) until it completely liquifies, becoming clear and fluid. Be careful not to overheat it, as this can diminish its setting power. Let it cool slightly before adding to the main mixture.
**Melting the Chocolates: A Flavorful Trio**
The distinctive Neapolitan layers rely on three types of chocolate: dark, white, and strawberry. Proper melting ensures a smooth incorporation into the cheesecake base.
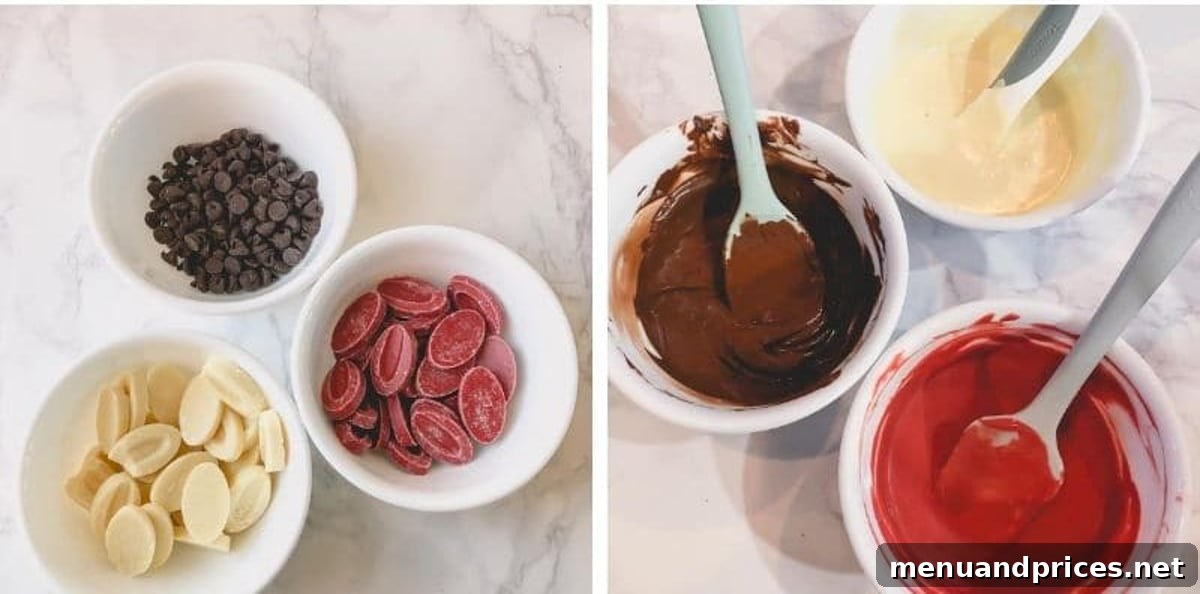
- **Separate Bowls:** Place each chocolate type (bittersweet, white, and strawberry) into separate microwave-safe bowls. This prevents cross-contamination of flavors and ensures each chocolate melts independently.
- **Gentle Melting:** We recommend melting chocolate in the microwave using short bursts at reduced power (see our detailed guide below) to prevent scorching. Stir frequently until each chocolate is completely smooth and free of lumps. Allow the melted chocolates to cool slightly before mixing into the base, ensuring they are still fluid but not hot.
**Creating the Silky Cheesecake Base**
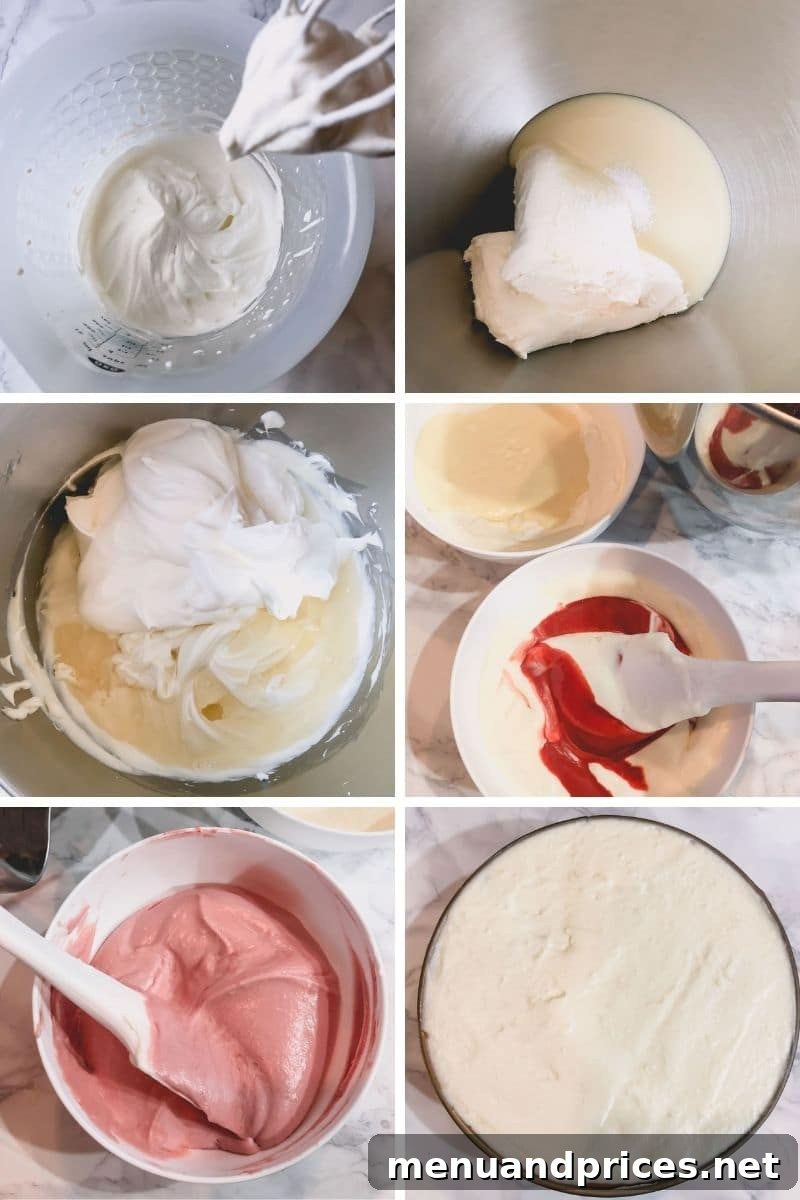
- **Whip the Cream:** In a large mixing bowl, whip cold heavy whipping cream until stiff peaks form. Stiff peaks mean that when you lift the whisk, the cream holds its shape firmly. This airy component is crucial for the light, ethereal texture of the no-bake cheesecake. Transfer the whipped cream to another bowl and set aside.
- **Cream Cheese & Sweetened Condensed Milk:** In the same mixing bowl (no need to wash it!), beat softened cream cheese, sweetened condensed milk, and a pinch of salt until the mixture is beautifully smooth and lump-free. The sweetened condensed milk provides the perfect sweetness and contributes to the cheesecake’s unique texture without adding granulated sugar.
- **Combine & Incorporate:** Gently fold the whipped cream and the slightly cooled liquified gelatin into the cream cheese mixture. Mix until everything is just combined and homogenous. Be careful not to overmix, which can deflate the whipped cream.
- **Divide and Flavor:** Now for the magic! Divide this smooth cheesecake base into three equal portions. Into each portion, gently fold in one of your cooled melted chocolates (dark, strawberry, and white). The key here is to fold gently until just combined, ensuring the airiness of the batter is maintained and the colors remain distinct.
Tip for a Smooth Batter: Room Temperature is Key!
For the smoothest, most luxurious cheesecake batter, always ensure your cream cheese and sweetened condensed milk are at room temperature. Cold cream cheese can lead to lumps in your batter, and a too-cold base can cause the melted chocolate to seize and become grainy when added. Planning ahead by taking these ingredients out of the refrigerator at least an hour before you start is a game-changer.
Step 3: The Art of Assembling Your Neapolitan Cheesecake
This is where the visual magic truly happens! Layering the different cheesecake batters creates the iconic Neapolitan look. Achieving clean, distinct layers is simpler than you might think with these step-by-step instructions.
- **Prepare Your Crust:** Retrieve your chilled graham cracker crust from the refrigerator. Ensure it’s firm and ready to support the cheesecake layers.
- **First Layer (Dark Chocolate):** Begin by carefully pouring or spooning half of the dark chocolate cheesecake mixture directly into the center of the crust. Don’t spread it to the edges just yet; let it naturally spread a little.
- **Second Layer (Strawberry):** Immediately after the dark chocolate, gently pour or spoon half of the strawberry cheesecake mixture right into the center of the dark chocolate layer. It will naturally push the dark chocolate layer outwards.
- **Third Layer (White Chocolate):** Follow with half of the white chocolate cheesecake mixture, again pouring it precisely into the center of the strawberry layer. You’ll observe the layers gracefully expanding.
- **Repeat the Process:** Continue this layering process with the remaining half of each cheesecake mixture, always pouring directly into the center. This concentric pouring method is key to creating those beautiful, defined rings of color.
- **Smooth and Chill:** Once all the mixtures are layered, gently smooth out the very top with an offset spatula if needed. Cover the springform pan tightly with plastic wrap to prevent any odors from the fridge from being absorbed. Refrigerate for at least 8 hours, or preferably overnight. Adequate chilling time is paramount for the cheesecake to fully set and achieve its sliceable texture.
The anticipation of seeing those perfectly defined layers after chilling is part of the fun!
How to Ensure a Perfectly Set No-Bake Cheesecake
The fear of a runny no-bake cheesecake is common, but with the right techniques, you can achieve an unbelievably airy, light, smooth, and velvety texture that slices beautifully. Here are our top two tips:
- **The Magic of Gelatin:** Incorporating gelatin powder is a foolproof way to guarantee your cheesecake sets firm and holds its shape, even during the warmest gatherings. When used correctly, gelatin won’t result in a firm, rubbery texture. Instead, it provides a stable structure that allows the cheesecake to be perfectly sliceable while maintaining its delicate, smooth consistency. Ensure it’s properly bloomed and liquified before adding to your mixture.
- **The Secret to Airiness: Whipped Cream:** This ingredient is vital for the signature light and airy texture that distinguishes a truly exceptional no-bake cheesecake. Whipping heavy cream until stiff peaks are formed, then gently folding it into the cream cheese mixture, introduces air that results in a dessert that literally melts in your mouth. This aeration prevents the cheesecake from becoming too dense and gives it that silky, smooth finish. Do not overmix after adding the whipped cream, as this can deflate the air.
By following these two simple yet crucial steps, you’ll consistently create a no-bake cheesecake that is structurally sound and delightfully ethereal.
Expert Tips for Melting Chocolate in the Microwave
Melting chocolate can be a delicate process, but the microwave offers a quick and convenient method when done correctly. The key is low power and patience to prevent burning or seizing.
- **Initial Melt:** Place your chocolate (chips or finely chopped bars) in a clean, microwave-safe bowl. Microwave it for **1 minute at 50% power**. This gentle heat starts the melting process without overheating. (Note: Microwave wattages vary. If you have a high-power microwave, you may need to reduce the power to 40% or even 30% to avoid scorching.)
- **First Stir & Continue:** Remove the bowl and stir the chocolate thoroughly. Even if it doesn’t look fully melted, stirring helps distribute the heat. Return it to the microwave for another **30 seconds at 50% power**.
- **Final Bursts:** Stir again. At this point, most of the chocolate should be melted, with perhaps a few small lumps remaining. Continue microwaving in **15-second intervals at 50% power**, stirring well after each interval, until the chocolate is completely smooth and glossy. The residual heat will often melt the last few pieces as you stir.
Choose the Right Bowl for Melting Chocolate
When melting chocolate, opting for a plastic or silicone bowl is often preferable to glass. Glass bowls retain heat longer, which can inadvertently lead to overheating the chocolate, causing it to seize or burn even after it’s out of the microwave. Plastic and silicone bowls cool down more quickly, providing better control over the melting process.
Selecting the Best Chocolates for Your Neapolitan Cheesecake
The quality of your chocolate significantly impacts the flavor of your cheesecake layers. Investing in good quality chocolate will elevate this dessert from delicious to truly extraordinary. Here are our top recommendations and why they shine:
- **Bittersweet Chocolate:** For the dark chocolate layer, a good quality bittersweet chocolate offers depth and a pleasant contrast to the sweetness of the other layers. We often use Ghirardelli bittersweet chocolate bars or chips. Look for chocolates with a cocoa content of 60-75% for a robust, rich flavor without being overly bitter.
- **White Chocolate:** A creamy, high-quality white chocolate is essential for a smooth and decadent layer. We highly recommend Ghirardelli white chocolate bars (avoiding white chocolate chips, which often contain stabilizers that prevent smooth melting) or Valrhona Ivoire 35% White Couverture Chocolate Feves. Valrhona, in particular, delivers a superior, velvety texture and complex vanilla notes that truly stand out.
- **Strawberry Chocolate:** This unique chocolate adds a beautiful color and a burst of fruity flavor to the Neapolitan trio. We absolutely love Valrhona Strawberry Inspiration Feves. These feves (small, oval-shaped chocolate pieces) are made with real fruit powder, providing an incredibly authentic and bright strawberry flavor that perfectly complements the other chocolate layers. If Valrhona is unavailable, you can achieve a similar effect by using a good quality white chocolate mixed with a touch of freeze-dried strawberry powder and a hint of red food coloring for vibrancy.
Choosing quality ingredients is a small step that makes a monumental difference in the final taste of your homemade Neapolitan cheesecake.
Elevate Your Dessert: Neapolitan Cheesecake Decoration Ideas
Once your no-bake Neapolitan cheesecake is perfectly set and unmolded, it becomes a canvas for beautiful decoration. A thoughtful garnish not only enhances its visual appeal but can also add complementary textures and flavors. Here are some ideas to make your cheesecake truly shine:
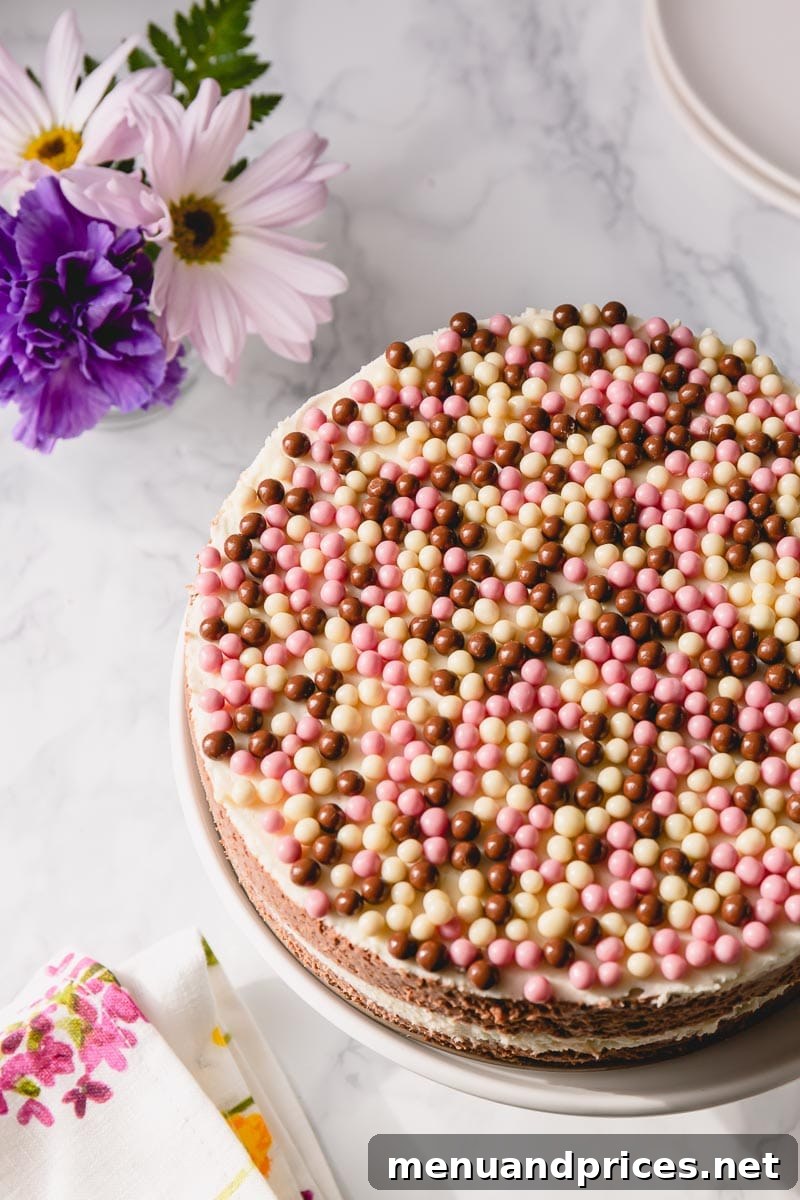
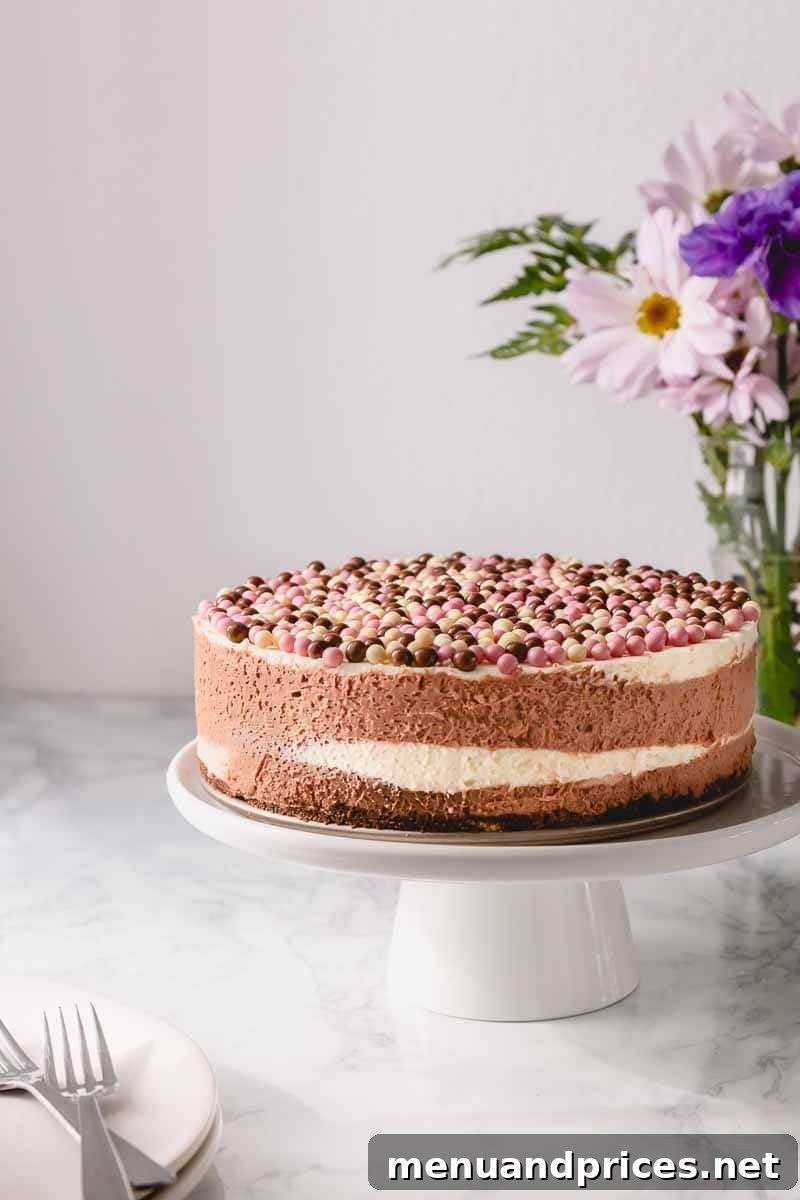
- **Crispearls:** As pictured, a blend of Callebaut’s Strawberry, White Chocolate, and Milk Chocolate Crispearls offers a delightful crunch and extra burst of flavor, perfectly matching the Neapolitan theme.
- **Fresh Berries:** A vibrant assortment of fresh strawberries, raspberries, or even blueberries can add a beautiful pop of color and a refreshing tartness that cuts through the richness of the cheesecake.
- **Chocolate Shavings/Curls:** Use a vegetable peeler or grater on a block of dark, milk, or white chocolate to create elegant shavings or curls. A mix of all three chocolates would tie into the Neapolitan theme beautifully.
- **Chocolate Drizzle:** A simple chocolate ganache or melted chocolate drizzle over the top adds a touch of sophistication. You can use dark, milk, or white chocolate, or even all three in a striped pattern.
- **Whipped Cream Rosettes:** Pipe delicate rosettes of freshly whipped cream around the edge of the cheesecake for a classic, elegant finish.
- **Powdered Sugar or Cocoa Dusting:** A light dusting of powdered sugar adds a delicate touch, while cocoa powder (especially over the white chocolate layer) can create a beautiful contrast.
- **Sprinkles:** For a fun and festive look, colorful sprinkles or themed nonpareils can be scattered over the top.
No matter how you choose to decorate, a little effort goes a long way in making your Neapolitan cheesecake an unforgettable centerpiece.
Explore More Delicious No-Bake Cheesecakes
If you’ve fallen in love with the ease and delightful texture of no-bake cheesecakes, then you’re in for a treat! Here are some other fantastic recipes to expand your repertoire of oven-free desserts:
- Lemon Raspberry No-Bake Cheesecake: A refreshing and tangy option, perfect for spring and summer.
- Chai Latte No-Bake Mini Cheesecakes: For those who love warm spices, these individual cheesecakes are a delightful twist.
- No-Bake Circus Cookie Cheesecake Recipe: A fun, nostalgic, and colorful dessert that’s a hit with kids and adults alike.
Each of these offers a unique flavor profile and the same coveted ease of preparation, proving that you don’t need an oven to create truly spectacular desserts.
Neapolitan No-Bake Cheesecake
Shinee Davaakhuu
25 mins
8 hrs 25 mins
12 servings
Comment
Print Recipe
Ingredients
For crust:
- 2 oz (60 g) chocolate graham crackers (4 full sheets)
- 2-3 tablespoons (30 g) unsalted butter, melted
For filling:
- 1 packet (7 g) powdered gelatin
- 4 oz (115 g) white chocolate
- 3 oz (90 g) strawberry chocolate
- 3 oz (90 g) bittersweet chocolate
- 16 oz (450 g) cream cheese, at room temperature (Note 1)
- 7 oz (200 g) sweetened condensed milk, at room temperature
- 1 cup (240 ml) heavy whipping cream
- ½ teaspoon coarse kosher salt
Instructions
To prepare the crust:
- In a food processor, crush graham crackers until finely ground. Add 2 tablespoons of melted butter and pulse a few times until the mixture resembles wet sand. Add more butter, if needed, for desired consistency.
- Transfer the mixture into a 7-inch round springform pan. Evenly distribute and firmly pack the mixture over the bottom of the pan. Place it in the fridge to chill while you prepare the filling.
To make the filling:
- In a small bowl, mix together gelatin powder and 42g (approximately 3 tablespoons) of cold water. Stir well and let it stand for 5 minutes to bloom.
- Meanwhile, place each type of chocolate (white, strawberry, bittersweet) in separate microwave-safe bowls. Melt each bowl of chocolate separately in a microwave using the following method: Microwave for 1 minute at 50% power. Stir, then microwave again for 30 seconds at 50% power. Repeat in 15-second intervals until each chocolate is completely melted and smooth. Let cool slightly.
- In a large mixing bowl with a whisk attachment, whip heavy whipping cream until stiff peaks form. Transfer the whipped cream to another bowl and set aside.
- In the same large mixing bowl, beat cream cheese and sweetened condensed milk until fluffy and smooth. (TIP: Ensure cream cheese is at room temperature to prevent lumps and chocolate seizing.)
- Add the whipped cream and the liquified gelatin mixture to the cream cheese mixture. Whip until just combined.
- Divide the cream cheese mixture into 3 equal parts. Gently fold each melted chocolate (white, strawberry, bittersweet) into one of the divided portions until well combined and streak-free.
To assemble the cheesecake:
- Take the chilled crust out of the fridge. Pour half of the dark chocolate cheesecake mixture right into the center of the crust.
- Then, gently pour/spoon half of the strawberry cheesecake mixture into the center of the dark chocolate layer, followed by half of the white chocolate cheesecake mixture again into the center of the strawberry layer. The layers will naturally spread outwards. Repeat this layering process with the remaining mixtures.
- Smooth out the top surface of the cheesecake if needed. Cover the springform pan tightly with plastic wrap and refrigerate for at least 8 hours to allow it to set completely, or preferably overnight for best results.
- Once the cheesecake is fully set, carefully run a thin knife around the inner edge of the springform pan before releasing the clasp and removing the side of the pan. Decorate the cheesecake as desired with sprinkles, chocolate ganache, fresh berries, or crispearls.
⭐️ Did you make this recipe?
Please leave a review and let us know how you liked it!
Tips & Notes
STORAGE INSTRUCTIONS: Store the assembled cheesecake in an airtight container in the refrigerator for up to 5 days. For longer storage, you can freeze it in an airtight container for up to 1 month. Thaw in the refrigerator before serving.
Nutrition
1 slice
367 kcal
19 g
5 g
31 g
15 g
274 mg
Dessert
Greek