
Mastering the Art of Chocolate Tempering: Your Ultimate Guide to Professional Results
Diving into the world of confectionery, one skill stands out for its transformative power: chocolate tempering. It’s the key to turning ordinary melted chocolate into a brilliant, crisp, and stable medium perfect for an array of delightful creations. From elegant chocolate-dipped truffles and fresh, juicy strawberries to intricate decorative elements for cakes and cupcakes, mastering this technique will elevate your homemade treats to professional standards. This comprehensive guide will walk you through everything you need to know, from the fascinating science behind the process to my most reliable and straightforward methods.

If your goal is to achieve a visually stunning dessert that not only looks incredible but also holds its form beautifully, then understanding and applying the art of tempering chocolate is absolutely essential. It’s the difference between a good chocolate treat and an unforgettable one.
Why Temper Chocolate? Unlocking Professional Results
Tempering chocolate isn’t just a fancy technique; it’s a crucial step that imbues chocolate with desirable qualities that simply melting cannot. Here are the top reasons why tempering is non-negotiable for high-quality chocolate work:
- Achieves a Stunning, Shiny Finish: Properly tempered chocolate boasts a beautiful, reflective sheen that instantly elevates the visual appeal of your confections. It catches the light, making your creations look truly professional and inviting.
- Ensures a Dense and Solid Texture: When tempered, chocolate sets with a firm, solid structure, providing a satisfying weight and mouthfeel. This robust quality is vital for durable decorations and stable coatings.
- Delivers the Perfect Crisp Snap: Bite into perfectly tempered chocolate, and you’ll experience a distinct, clean snap without any crumbling or tearing. This characteristic “snap” is a hallmark of high-quality chocolate and a testament to its correct crystal structure.
- Resists Melting and Fingerprints: Tempered chocolate has a higher melting point, meaning it’s less prone to melting quickly at room temperature or from the warmth of your hands. This also prevents unsightly fingerprints, keeping your treats pristine.
- Guarantees Quick Setting Times: Perhaps one of the most practical benefits, tempered chocolate sets rapidly, typically within 3-4 minutes. This efficiency speeds up your production process and prevents distortion, especially when making intricate molds or dipped items.
Conversely, if you bypass the tempering process and merely melt chocolate, you’ll be left with a product that fails to impress on several fronts. Untempered chocolate tends to be disappointingly soft and pliable, taking an unacceptably long time to set. It melts almost instantly upon touch, leaving messy fingerprints and diminishing its visual appeal. Furthermore, instead of a satisfying snap, it will tear and crumble when broken. Visually, untempered chocolate often develops a dull, matte finish and can exhibit unattractive white streaks, known as “fat bloom,” significantly detracting from its overall quality.
The Science of Chocolate Tempering: Understanding Cocoa Butter Crystals
For many, tempering chocolate feels like magic, but once you grasp the simple yet profound science behind it, the entire process becomes incredibly logical and approachable. Understanding the “why” makes the “how” much easier to execute consistently and confidently. This knowledge truly transforms tempering from a daunting task into a fundamental step for any serious chocolatier.
At its core, tempering is about controlling the crystallization of cocoa butter, the fat component in chocolate. Let me demystify this fascinating process in simple terms:
- Melting Cocoa Butter: When we heat chocolate to temperatures between 113-122°F (45-50°C), the cocoa butter within it melts completely. This process dissolves all existing fat crystals, transforming the chocolate into a smooth, homogeneous liquid.
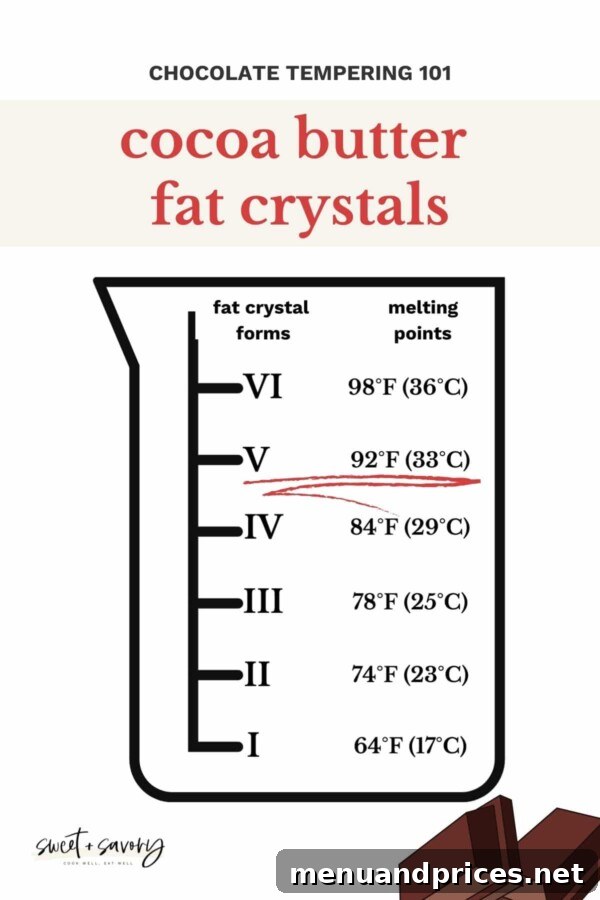
- Crystal Formation Upon Cooling: As this melted chocolate cools, the cocoa butter begins to solidify and form new fat crystals. These fat crystals are not uniform; they can arrange themselves into one of six distinct structures, often referred to as phases or forms (1 through 6). The specific structure that forms depends critically on the temperature at which the chocolate is held and the degree of agitation (stirring). Each of these crystal phases possesses a different melting point and distinct physical characteristics.
- The Ideal Structure: Form 5 (Beta Crystals): Our ultimate goal in tempering is to achieve and stabilize Form 5 crystals, also known as beta crystals. This specific crystal structure is the hero of tempered chocolate. When chocolate sets with a predominant beta crystal structure, it exhibits all the desirable qualities we seek: a beautiful, shiny finish, a satisfying crisp snap when broken, and a higher melting point that resists smudging and melting at body temperature. This is precisely why we meticulously control temperatures, heating, cooling, and re-heating throughout the tempering process – to encourage the exclusive formation of these perfect beta crystals.
- The Importance of Temperature Control: Without careful temperature management, the fat crystals will form randomly into various structures. This uncontrolled crystallization results in chocolate that is susceptible to a lower melting point, a dull appearance, and the dreaded white streaks of fat bloom. To ensure Form 5 beta crystals are the dominant structure, we must guide the chocolate through specific temperature stages.
- Encouraging Beta Crystal Growth: Beta crystals optimally form around 90°F (32°C). However, simply holding chocolate at this temperature can be a slow process for crystal development. To expedite crystal formation, we first cool the chocolate down further to approximately 82°F (27°C). While this encourages faster crystal growth, it also risks forming less desirable Form 4 crystals alongside the beta crystals. To correct this, we then gently raise the temperature back up to around 90°F (32°C). At this precise temperature, the unstable Form 4 crystals will melt, leaving behind only the stable, desirable beta crystals. This meticulous heating and cooling cycle is the essence of successful chocolate tempering.
Essential Tools and Preparation for Perfect Tempering
Before you begin, gathering the right tools and preparing your workspace will set you up for success. Precision is key in tempering, so having your equipment ready is half the battle.
Key Equipment:
- Reliable Thermometer: A digital instant-read thermometer or a candy thermometer is indispensable for accurate temperature monitoring.
- Double Boiler (Bain-Marie Setup): This is crucial for gentle, indirect heating. You’ll need a heat-proof bowl (stainless steel or glass) that fits snugly over a saucepan without touching the water.
- Rubber Spatulas: Essential for continuous stirring and scraping down the sides of the bowl.
- Dry Bowls and Utensils: Absolute dryness is paramount. Any moisture can cause chocolate to seize.
- High-Quality Chocolate: Always start with good quality chocolate chips, callets, or bars. The better the chocolate, the better your results. Avoid compound chocolate as it does not contain cocoa butter and cannot be tempered.
Workspace Preparation:
- Ideal Room Temperature: Aim for a cool room, ideally between 65-70°F (18-21°C). Working in an environment above 75°F (24°C) will make tempering incredibly challenging, if not impossible, as the chocolate will struggle to cool and crystallize properly.
- Ensure a Dry Environment: Keep water, steam, and excessive humidity away from your chocolate at all times.
How to Temper Chocolate: Tried-and-True Methods
Now that we understand the desired outcome – chocolate with a stable Phase 5 crystal structure – let’s explore the practical methods to achieve it. While techniques like tabling exist, I’ll focus on two of the simplest and most effective ways to temper chocolate, perfect for home bakers and budding chocolatiers.
Method 1: The Seeding Method – Precision and Reliability
The seeding method is widely regarded as the most reliable and foolproof technique for tempering chocolate, especially when you have a good thermometer at hand. It involves melting the majority of your chocolate and then introducing solid, untempered chocolate (the “seed”) to kickstart the formation of desirable beta crystals. Remember, maintaining an ideal room temperature of 65-70°F (18-21°C) is crucial for success, as working in warmer conditions (above 75°F/24°C) can make tempering incredibly difficult.
Crucial Tip
When employing a Bain-marie (double boiler) for heating, exercise extreme caution to prevent any water or steam from coming into contact with your chocolate. Even a single drop of water can cause the chocolate to seize, transforming it into a thick, gritty, and unusable mass.
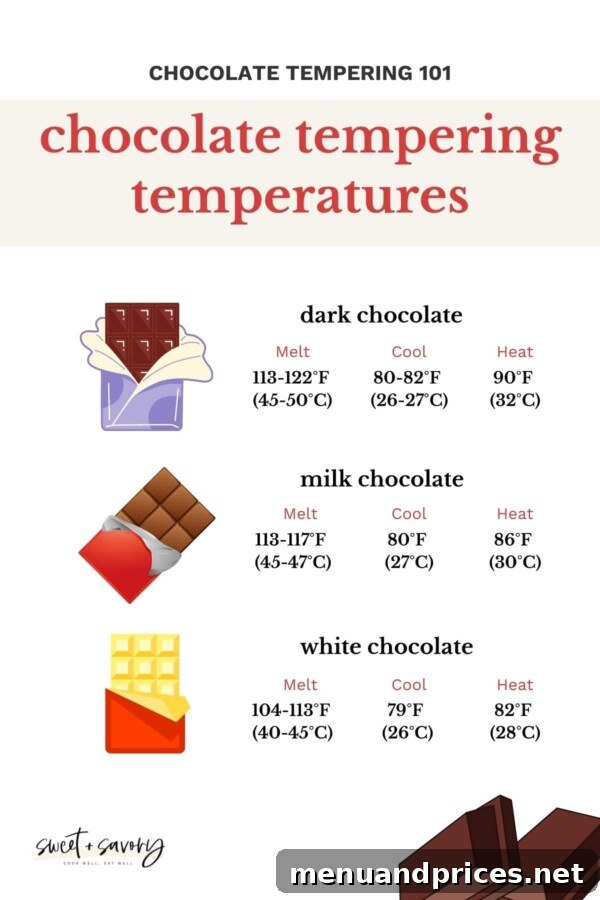
*Please note that the following temperature guidelines are specifically for dark chocolate. For milk and white chocolate, you will need to adjust the temperatures according to the chart provided below, as they have different fat compositions and ideal tempering ranges.
- Initial Melting Phase (Over Bain-Marie): Begin by finely chopping or using chocolate callets. Place approximately 60% of your total dark chocolate into a heat-proof bowl. Set this bowl over a saucepan containing a small amount of gently simmering water, ensuring the bottom of the bowl does not touch the water. Heat the chocolate, stirring frequently, until it reaches a temperature between 113-122°F (45-50°C). The water in the saucepan should be simmering very gently, not boiling vigorously, to prevent overheating and moisture contamination. The time required will vary based on the quantity of chocolate; for instance, 150g of chocolate typically takes about 3 minutes. This step fully melts all crystal forms.
- Seeding and Cooling Phase: Once the chocolate reaches its target melting temperature, immediately remove the bowl from the heat. Add about half of the remaining 40% (the “seed” chocolate) into the melted chocolate. Stir continuously and vigorously. As this solid chocolate melts, it will introduce stable beta crystals into the mixture and simultaneously help to cool down the overall temperature. Continue adding small amounts of the remaining solid chocolate, stirring constantly, until the mixture cools down to 80-82°F (26-27°C). At this point, you should have a smooth, well-mixed chocolate, laden with nascent beta crystals.
- Working Temperature Reheating Phase: Carefully return the bowl of chocolate to the Bain-marie, again ensuring the bowl does not touch the water. Gently reheat the chocolate, stirring constantly, until it reaches a working temperature of 90°F (32°C). This final gentle warming step is critical: it melts away any unstable, undesirable crystal forms (like Form 4) that might have developed during cooling, leaving only the stable beta crystals. This temperature also ensures the chocolate is fluid enough for working. Depending on the amount of chocolate, this stage can be very quick, sometimes just a few seconds.
Pro Tip
Vigorous and consistent stirring throughout the cooling and reheating phases is not just about even heat distribution; it actively promotes the formation of numerous, small, and stable beta crystals. This constant agitation helps to achieve the desired smooth texture and ideal crystalline structure.
Method #2: The Microwave Method – Quick Tempering for Small Batches
For those seeking a quicker, potentially thermometer-free approach, especially for smaller quantities of chocolate, the microwave method can be a game-changer. While it requires some initial experimentation to understand your microwave’s power and timing, once mastered, it becomes incredibly efficient. This method relies on the principle that any high-quality chocolate you purchase is already tempered. The goal is to melt it without exceeding the critical temperature that would break its stable temper, typically around 90°F (32°C).
This method is ideal for quick dipping tasks or small decorations where precision of the seeding method might feel like overkill. It’s also a fantastic way to utilize leftover tempered chocolate that has already set, breaking it down to a workable consistency again.
- Prepare the Chocolate: Begin by finely chopping or grating your chocolate into very small, uniform pieces. The smaller the pieces, the more evenly and quickly they will melt, reducing the risk of overheating. Place the chocolate into a plastic or silicone bowl. Avoid glass bowls, as they tend to retain heat more aggressively and could cause your chocolate to overheat rapidly.
- Initial Microwave Burst: Place the bowl in the microwave and heat it for 1 minute at 100% power. This guideline is for a standard 1000-Watt microwave; you may need to adjust for different wattages.
- Stir and Short Bursts: Remove the bowl from the microwave. Stir the chocolate thoroughly, even if it doesn’t appear fully melted. The residual heat will continue to melt the pieces. Return the bowl to the microwave and heat for an additional 10 seconds at 100% power.
- Continue Melting in Increments: Repeat step 3 (stirring and microwaving in 10-second intervals) until the chocolate is almost fully melted, with just a few small pieces remaining. At this point, remove it from the microwave and continue stirring vigorously. The residual heat from the melted chocolate will melt the remaining solid pieces, bringing the entire batch to a smooth, tempered consistency without exceeding the crucial temperature.
After your initial attempts, you can easily test the chocolate to ensure it’s properly tempered (as described in the next section). Based on your test results, you can then fine-tune the timing and power settings for your specific microwave. Once you’ve perfected your personal microwave tempering rhythm, you’ll be able to temper chocolate quickly and reliably, often without the need for a thermometer.
How to Test for Perfectly Tempered Chocolate
No matter which method you use, a crucial step is verifying that your chocolate is indeed perfectly tempered before you proceed with your creations. This simple test confirms that the beta crystals have formed correctly, promising a beautiful and stable finished product.
To perform this essential test for proper temper:
- The Dip Test: Dip a clean, dry spoon, a small piece of parchment paper, or the tip of a knife into your prepared chocolate. Ensure it’s coated evenly.
- Observe and Wait: Place the dipped item at room temperature (preferably within your cool, prepared workspace). While you wait for it to set, continue to gently stir the bulk of your chocolate to keep it in temper.
- Evaluate the Results: A properly tempered piece of chocolate should set and harden completely within 3 to 5 minutes. Upon setting, it should exhibit a beautiful, uniform sheen without any dull spots or streaks. When gently broken, it should yield a crisp, audible snap. If all these conditions are met, congratulations – your chocolate is perfectly tempered and ready for use!
- Troubleshooting a Failed Test: If your chocolate does not set within 5 minutes, or if it appears dull, streaky, or soft, it likely means it was heated too much during the process, breaking its temper. Don’t despair! Simply add a small amount of finely chopped, solid (untempered) chocolate into your batch and stir it quickly and thoroughly. This “seeds” the chocolate again and helps to cool it down slightly, encouraging the reformation of stable beta crystals. After stirring, repeat the dip test.
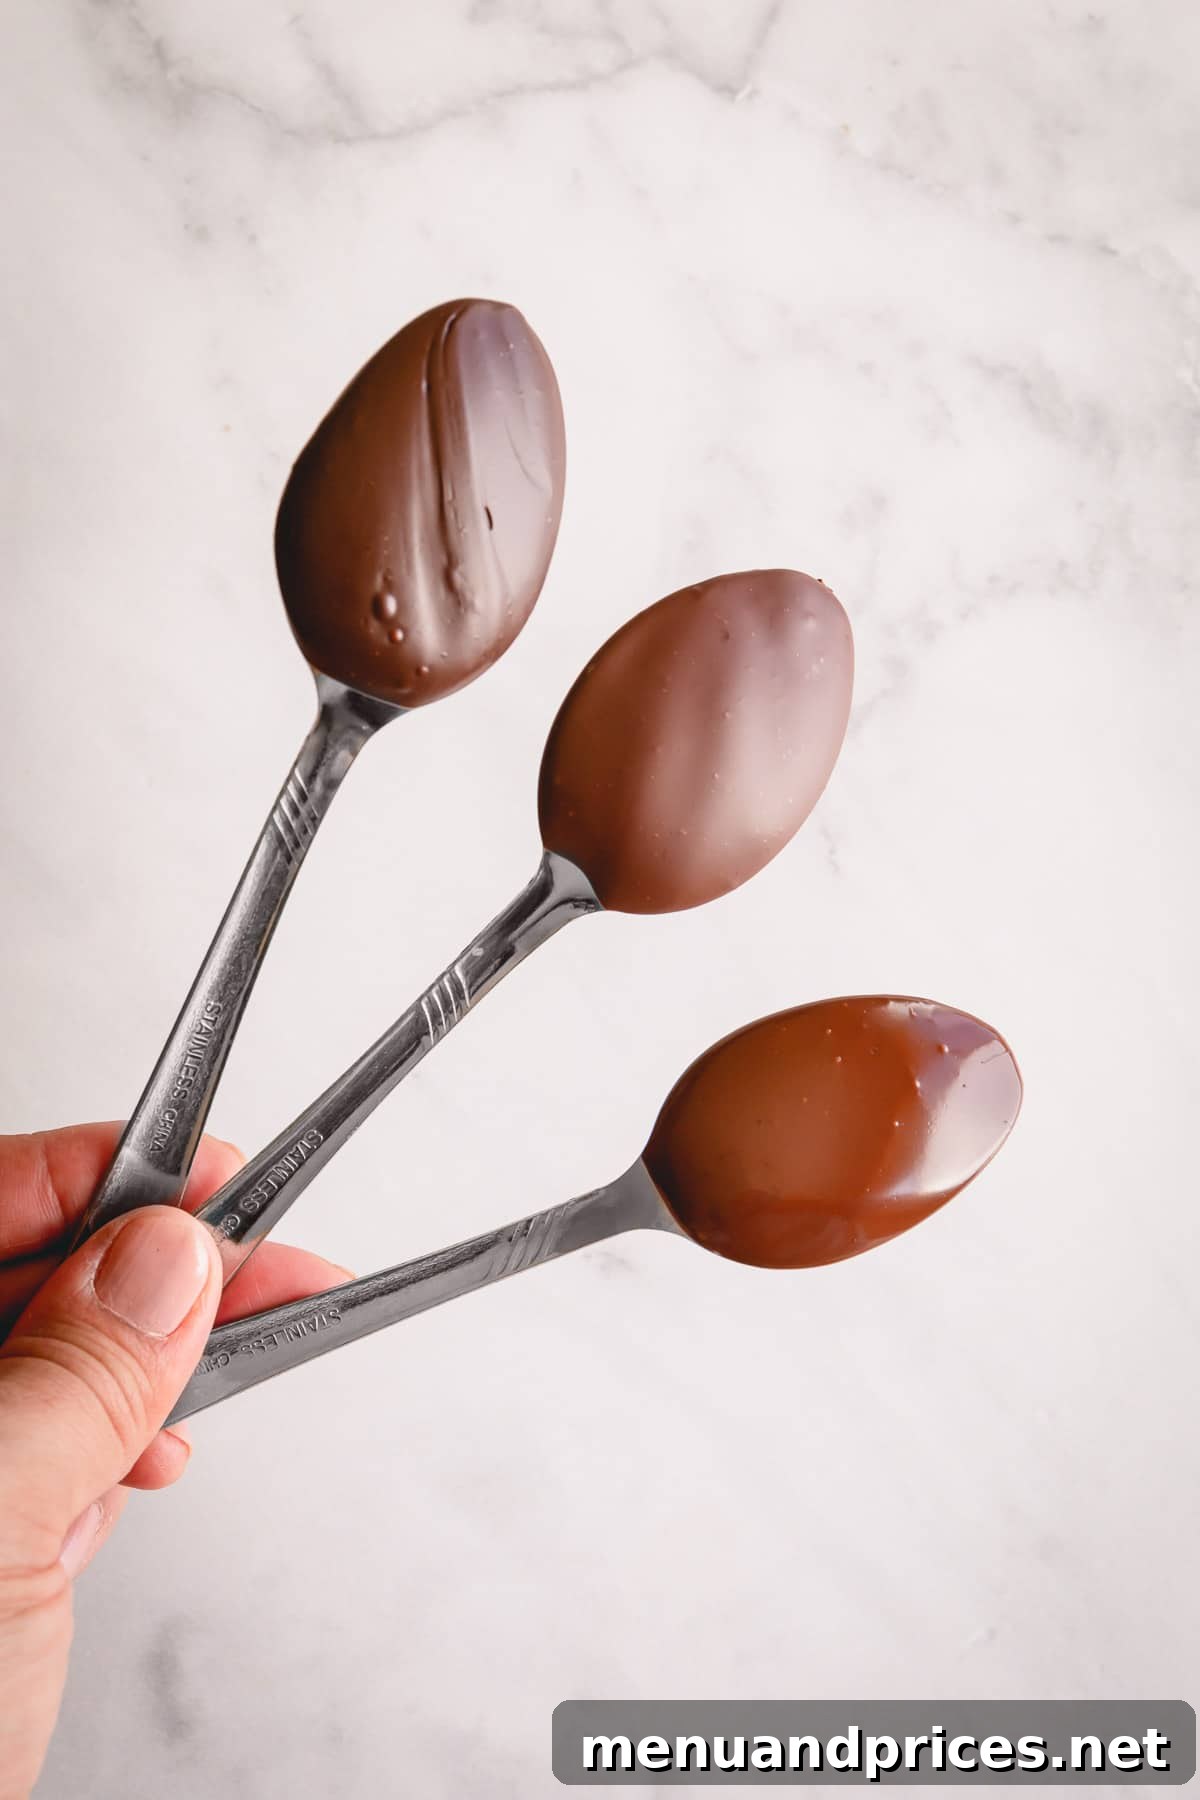
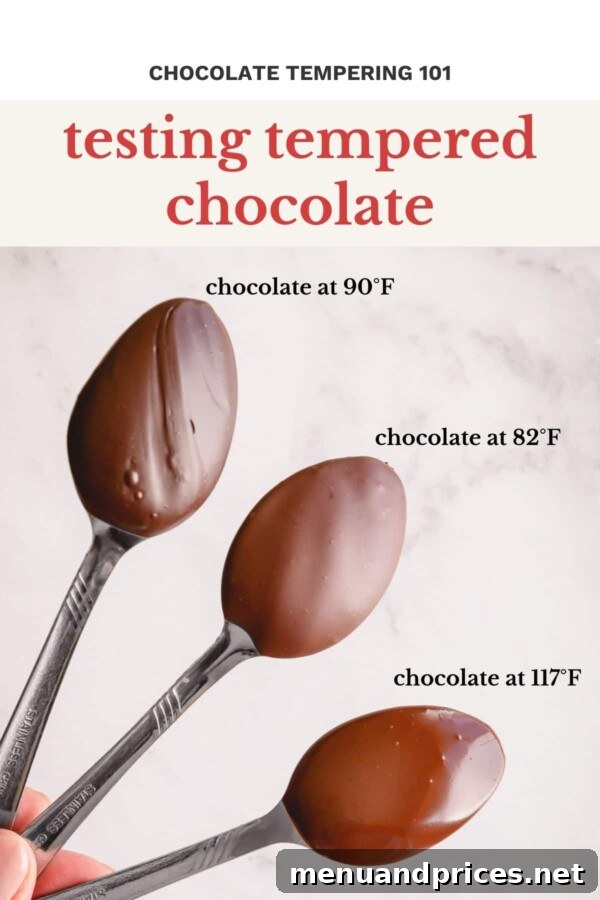
The visual differences between properly tempered and untempered chocolate are striking. Take a look at these three spoons, each dipped in chocolate prepared under different conditions and allowed to set for a period of time. Notice how each spoon displays a distinct finish:
- Spoon 1: Perfectly Tempered Chocolate – This spoon showcases the ideal result. The chocolate has set flawlessly with a vibrant, appealing sheen that reflects light beautifully. It would snap crisply if broken.
- Spoon 2: Almost Tempered Chocolate – Here, the chocolate did manage to set, but its appearance is noticeably duller and lacks the desired brilliance. This indicates that while some stable crystals may have formed, the overall temper was not perfectly achieved, often due to slight temperature deviations.
- Spoon 3: Simply Melted Chocolate (Untempered) – This chocolate appears extremely glossy initially because it hasn’t properly set or formed stable crystals. It will remain soft, melt easily, and will not snap when broken. Over time, it is highly prone to developing fat bloom.
Maintaining Tempered Chocolate: Working with Your Batch
Once your chocolate is perfectly tempered, it’s in its ideal working state and should be used relatively quickly. Tempered chocolate must remain within its specific working temperature range (around 88-91°F / 31-33°C for dark chocolate) to maintain its temper and fluidity. As it cools, it will begin to thicken and eventually set. If your tempered chocolate starts to cool down too much and becomes too thick to work with – typically falling below 80-86°F (26-30°C) – you can gently reheat it. Briefly return it to the Bain-marie or microwave for very short bursts, stirring constantly, until it reaches its ideal working temperature of 90°F (32°C) again.
It’s important to understand that once tempered chocolate cools completely and fully sets into its solid form, it will lose its temper in terms of fluidity. To work with it again, you will need to go through the tempering process from the beginning. The good news is that chocolate is remarkably forgiving: you can temper the same batch of chocolate over and over again without compromising its quality, as long as you don’t burn it!
Storing Leftover Tempered Chocolate
Sometimes you’ll have tempered chocolate left over after completing your project. Don’t let it go to waste! Properly storing it allows you to reuse it for future confectionery adventures. Here’s how to store it effectively:
- Cool and Set on a Mat: Simply pour any unused tempered chocolate onto a silicone mat or a sheet of parchment paper. Use a spatula to spread it into a thin, even layer. Allow it to cool completely and set at room temperature until it is hard and firm.
- Break and Store: Once the chocolate has fully set, it should be easy to break into smaller, manageable pieces or shards. Transfer these pieces into an airtight container. Store the container in a cool, dry place, away from direct sunlight and strong odors. There’s no need to refrigerate it, as this can introduce moisture and sugar bloom over time. When you’re ready to use it again, simply re-temper the chocolate using one of the methods described above.