
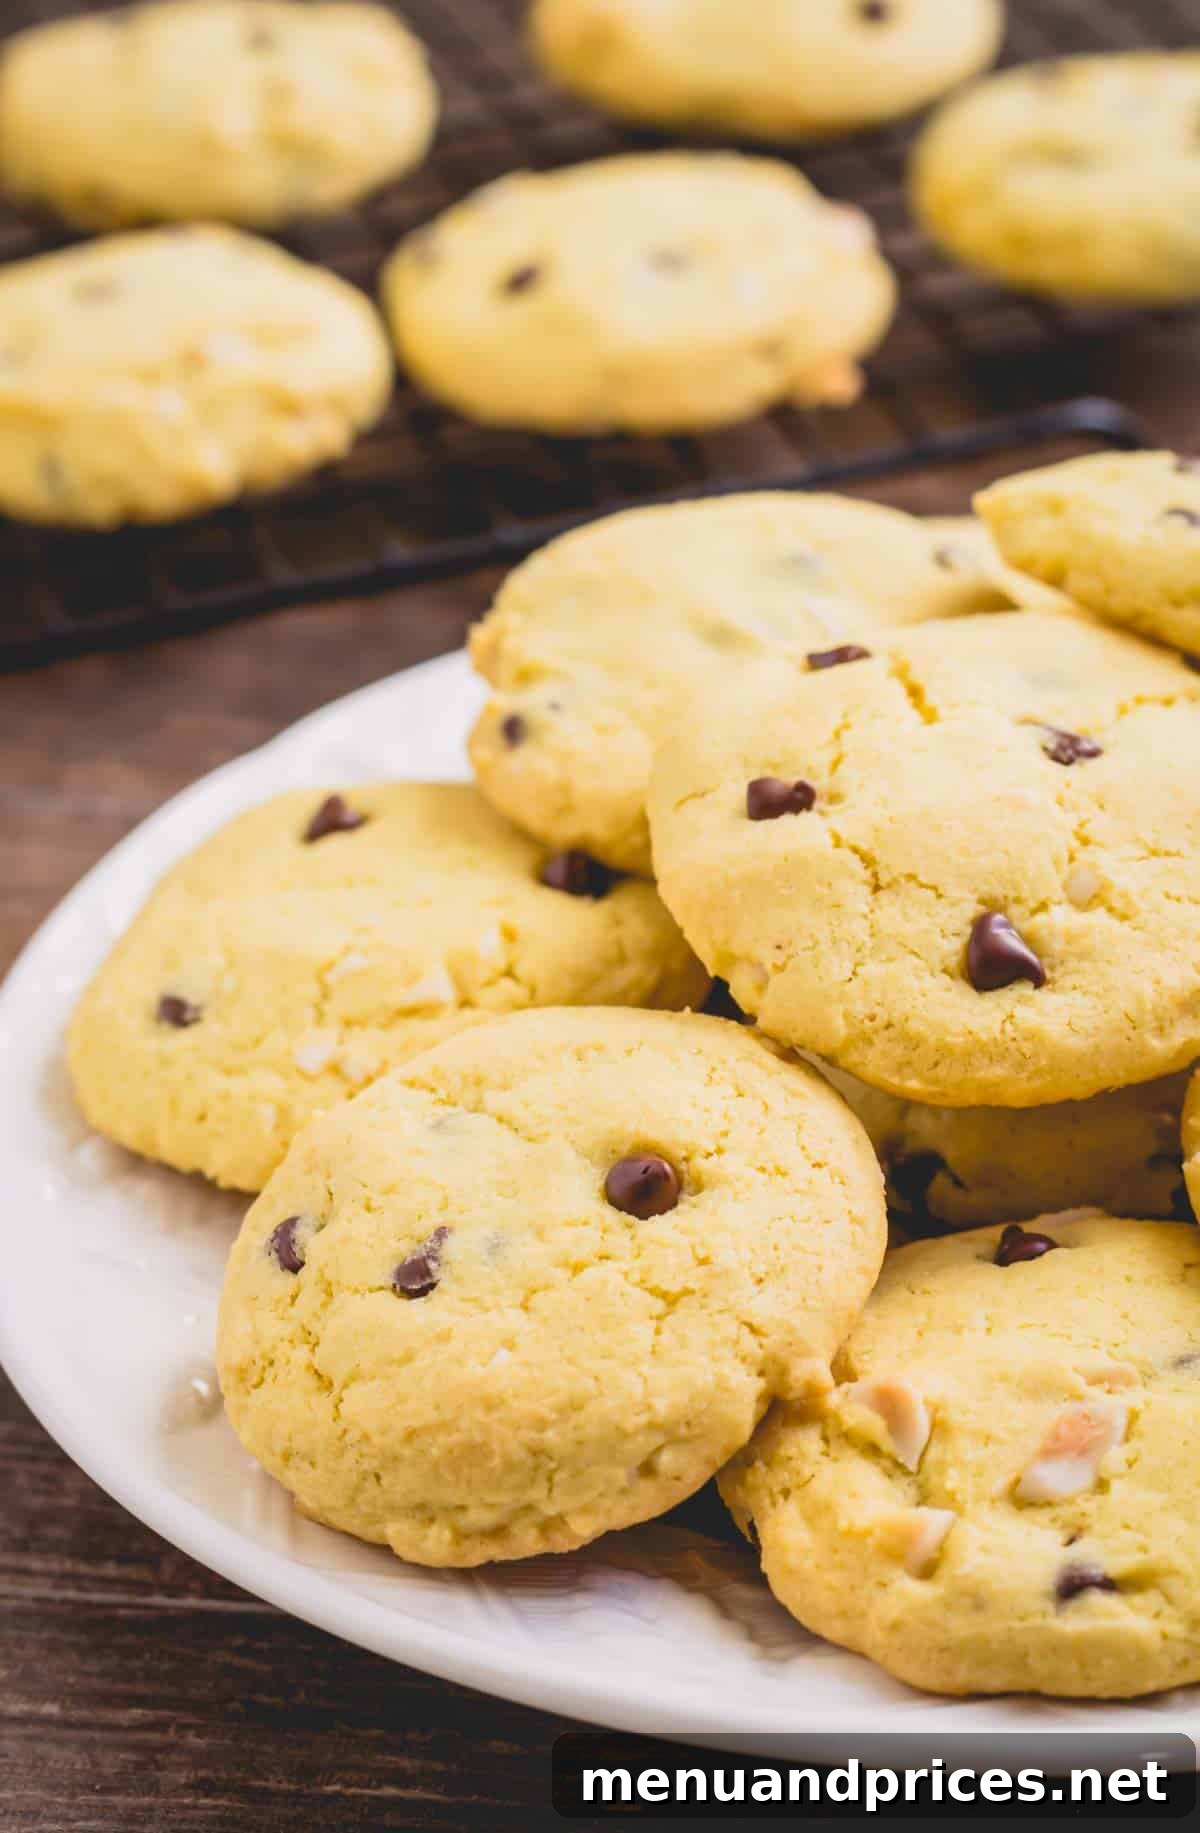
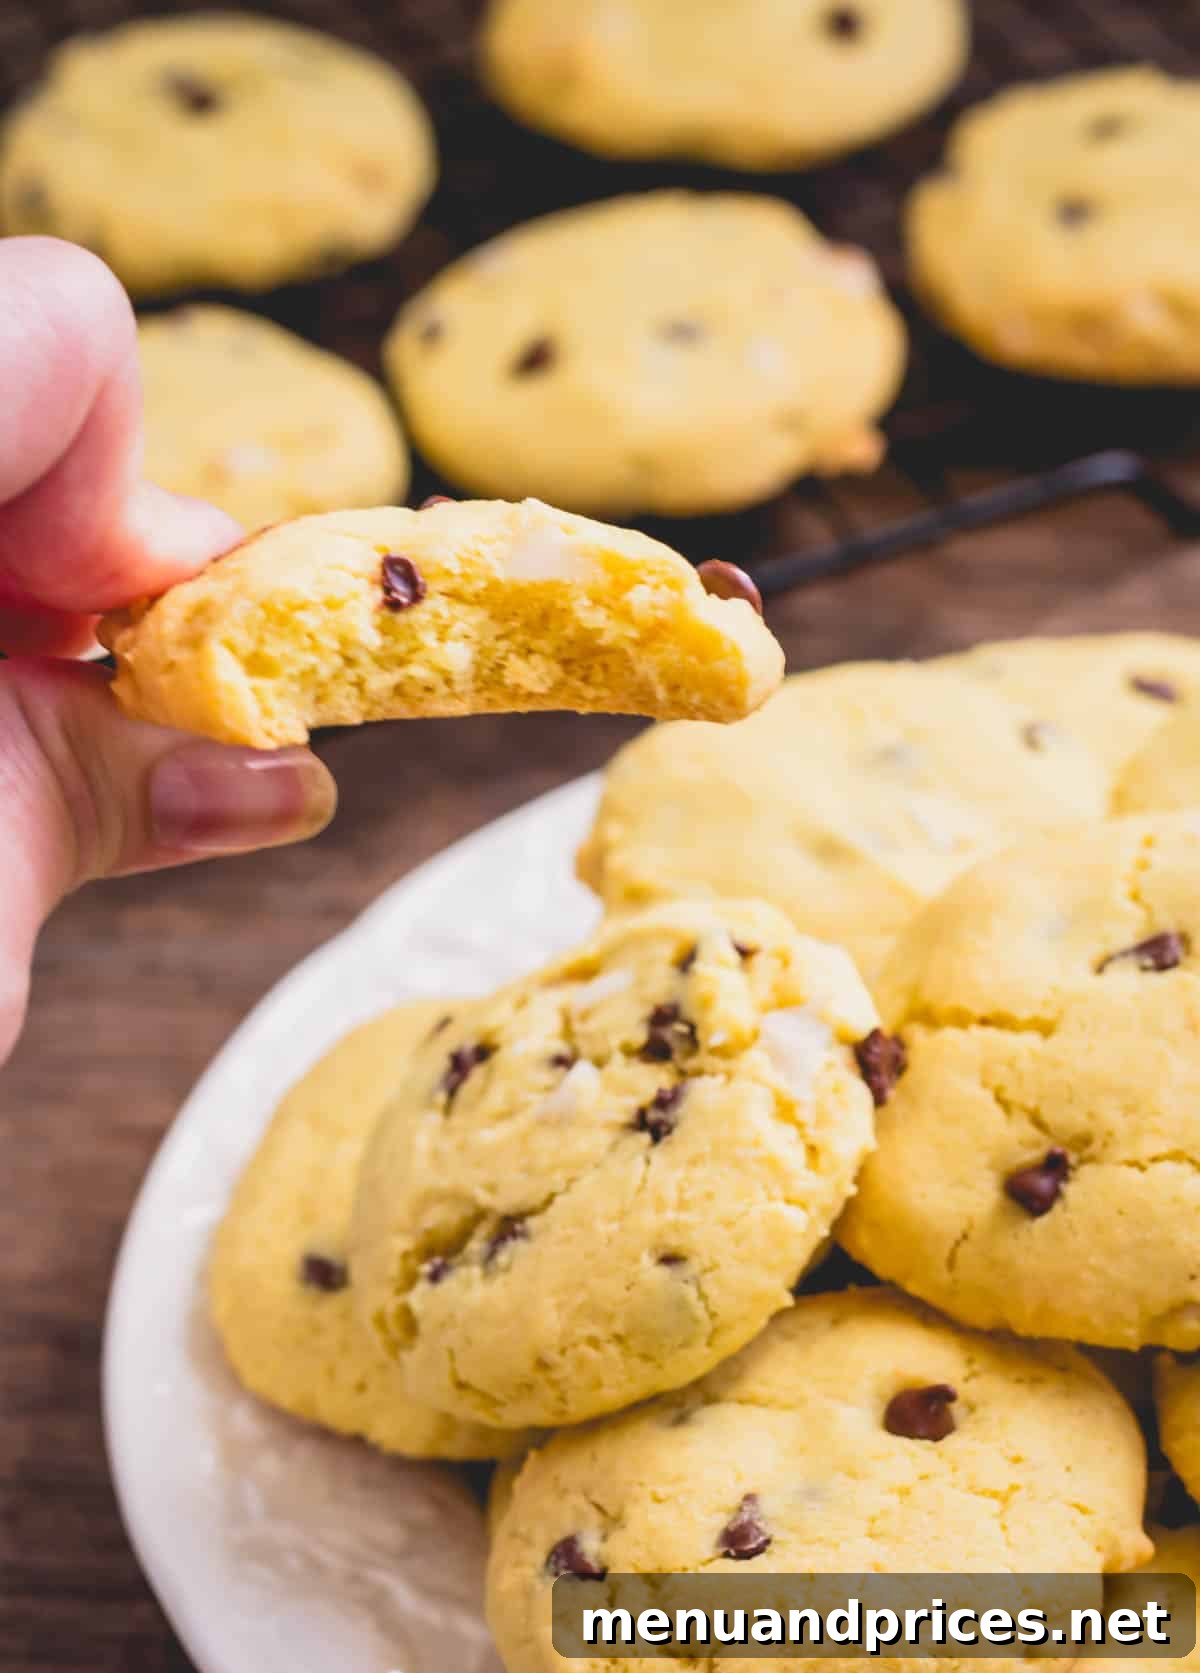
Looking for a delicious and innovative way to utilize those extra egg yolks? Look no further than these sensational **Egg Yolk Cookies**! Perfectly balancing richness with a delightfully soft and slightly cakey texture, these cookies offer just the right amount of chewiness in every bite. They are an absolute game-changer for anyone who frequently finds themselves with leftover egg yolks after making meringue-based delights.
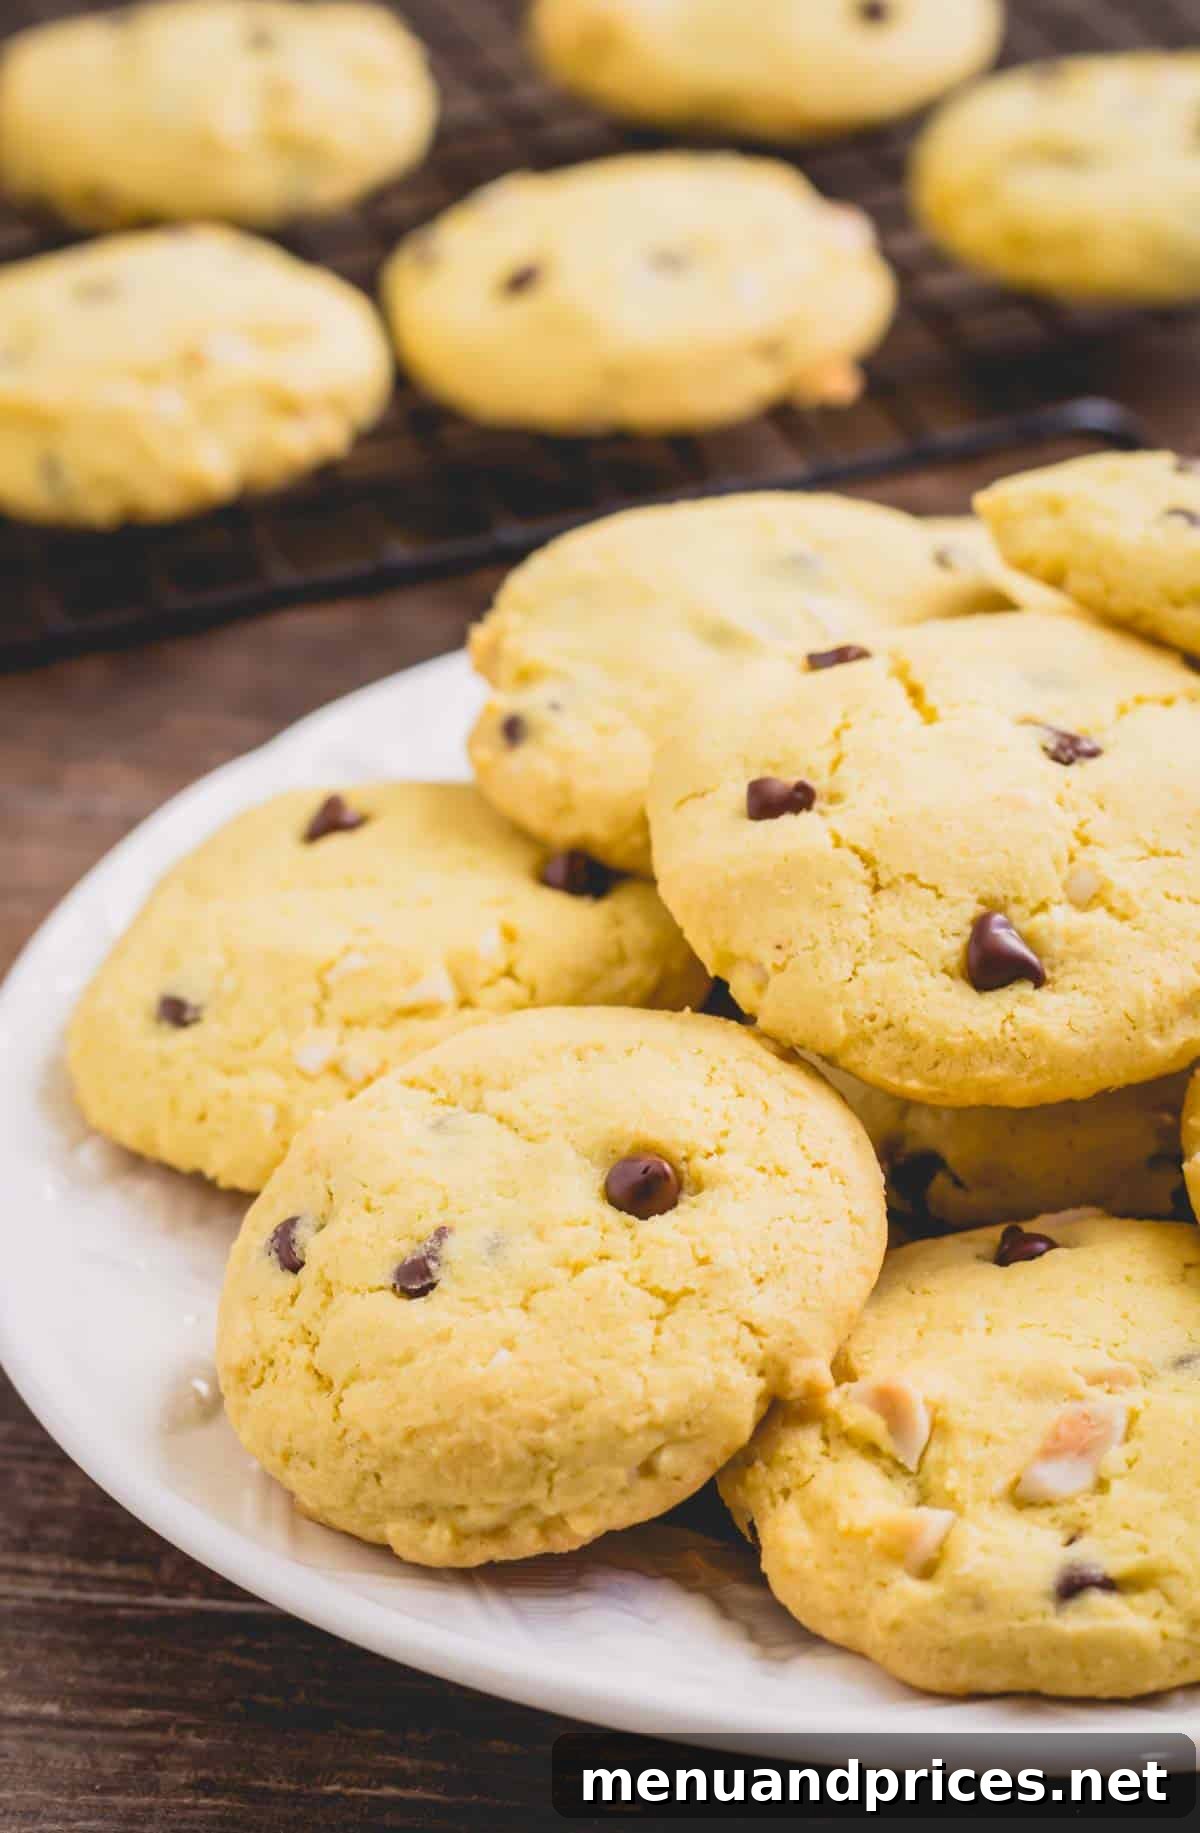
As an avid baker, I often find myself enchanted by the delicate beauty of meringue-based desserts such as elegant macarons or the airy lightness of angel food cake. While these confections are truly delightful, they inevitably leave me with a surplus of egg yolks. For a long time, my go-to solutions for these golden treasures included whipping up batches of flaky pie crusts or crafting luxurious homemade vanilla bean ice cream. However, I craved a new, equally satisfying way to put those precious yolks to good use.
It was this culinary quest that led me to stumble upon an intriguing cookie recipe. Intrigued by the concept, I decided to experiment. After a few minor adjustments and tweaks to perfect the ratios and flavors, the result was nothing short of spectacular. These egg yolk cookies quickly became a household favorite, proving that “waste not, want not” can lead to truly delicious discoveries!
Why These Egg Yolk Cookies Will Become Your New Favorite
If you’re a passionate home baker, you’re undoubtedly familiar with recipes that exclusively demand egg whites, leaving you with a bowl of unused yolks. The dilemma of what to do with them is a common one. Before you consider discarding them, know that these chocolate chip cookies offer a quick, easy, and incredibly rewarding solution. These buttery, decadent cookies are more than just a way to use up ingredients; they’re a delightful treat in their own right, boasting several irresistible qualities:
- Uniquely Light and Chewy: The high fat content of egg yolks contributes to an unparalleled tenderness and a satisfying chewiness that sets these cookies apart from traditional recipes. They provide a richness that ensures every bite is moist and delectable.
- Effortlessly Customizable: While classic chocolate chips are always a hit, this base recipe is incredibly versatile, allowing you to unleash your creativity with various mix-ins. From different types of chocolate to an array of nuts, sprinkles, or even dried fruits, the possibilities are endless.
- Perfect for Freezing: Whether you want to bake a fresh batch on demand or simply stock up your freezer with ready-to-eat treats, these cookies (and their dough!) freeze beautifully without compromising on flavor or texture. This makes them ideal for last-minute cravings or entertaining.
- Made with Pantry Staples: You likely already have most, if not all, of the necessary ingredients in your kitchen, making this recipe convenient and accessible for a spontaneous baking session. No special trips to the grocery store required!
- Rich, Soft-Baked Perfection: Egg yolks help these cookies puff up beautifully during baking, resulting in a rich, soft-baked interior that melts in your mouth and a delicate crispness around the edges. This distinctive texture is what makes them so utterly addictive.
The sublime texture and deep flavor of these egg yolk chocolate chip cookies make them an ideal companion for your morning coffee or an afternoon pick-me-up. For an extra special indulgence, try them with a cup of coffee adorned with sweet cream cold foam – a pairing truly made in heaven for any coffee enthusiast!
Essential Ingredients for Perfect Egg Yolk Cookies
Achieving the perfect egg yolk cookie hinges on understanding the role each ingredient plays. While the list comprises common pantry items, their quality and proper handling are key to success:
- Egg Yolks: The star of the show! Egg yolks are rich in fat, which is precisely what gives these cookies their characteristic soft, tender, and slightly cakey texture. Unlike egg whites, which primarily provide structure and lift in other baked goods, yolks lend moisture and richness, preventing dry or crumbly cookies. Using fresh, large egg yolks will yield the best results for both flavor and texture.
- Unsalted Butter: Butter is fundamental for flavor, structure, and moisture. Using unsalted butter allows you to control the overall saltiness of the cookies, crucial for balancing the sweetness. Ensure your butter is at room temperature and softened for optimal creaming with sugar, which is a critical step for incorporating air into the dough and achieving a light texture.
- Sugar (Granulated): Beyond providing sweetness, granulated sugar plays a vital role in the cookie’s texture. It helps the cookies spread during baking, contributing to their classic shape and golden-brown edges. The sharp sugar crystals, when creamed with softened butter, also create tiny air pockets, further aiding in a light and delightfully chewy outcome.
- All-Purpose Flour: Flour is the structural backbone of your cookies. The correct amount is essential for achieving the desired thickness and texture. Too little flour can lead to overly thin, flat cookies, while too much can result in dry, dense, and tough cookies. For best accuracy, especially in baking, weighing your flour with a kitchen scale is highly recommended to ensure consistent results.
- Baking Powder: This leavening agent is responsible for the lovely puffiness and slight cakey texture of these cookies. It reacts with moisture and heat to create carbon dioxide bubbles, lifting the dough as it bakes and giving the cookies their airy interior.
- Salt (Coarse Kosher): A touch of salt is crucial for balancing the sweetness and enhancing all the other flavors in the cookie. It cuts through the richness, preventing the cookies from tasting overly sugary and bringing out the depth of the chocolate and butter. Coarse kosher salt dissolves well and provides a clean, mild salty flavor.
- Mix-ins (Chocolate Chips, Nuts, etc.): While optional, mix-ins elevate these cookies from simple to spectacular. Classic chocolate chips (milk, semi-sweet, or dark) and chopped nuts (walnuts, pecans, or macadamia nuts) create the ultimate combo, adding delightful texture and flavor contrast. Don’t stop there! Consider white chocolate chunks, colorful sprinkles, M&M’s, peanut butter chips, or even chopped caramels for endless variations that cater to every taste.
- Pure Vanilla Extract: A staple in almost all cookie recipes, vanilla extract deepens and rounds out the flavor profile, adding a warm, aromatic note that complements the butter and chocolate beautifully. Opt for pure vanilla extract for the best flavor.
Step-by-Step Guide: Crafting Delicious Egg Yolk Cookies
Making these delightful egg yolk cookies is a straightforward process, requiring no specialized equipment beyond what most home bakers already possess. While I personally find a stand mixer convenient for its efficiency, a reliable hand-held electric mixer will work equally well to achieve the perfect dough consistency. Just ensure all your ingredients are prepped and measured before you begin!
1. Preparing the Cookie Dough: The Foundation of Flavor
The secret to a great cookie often lies in the dough preparation. Follow these steps carefully to ensure a light, airy, and flavorful base that will result in perfect cookies every time:
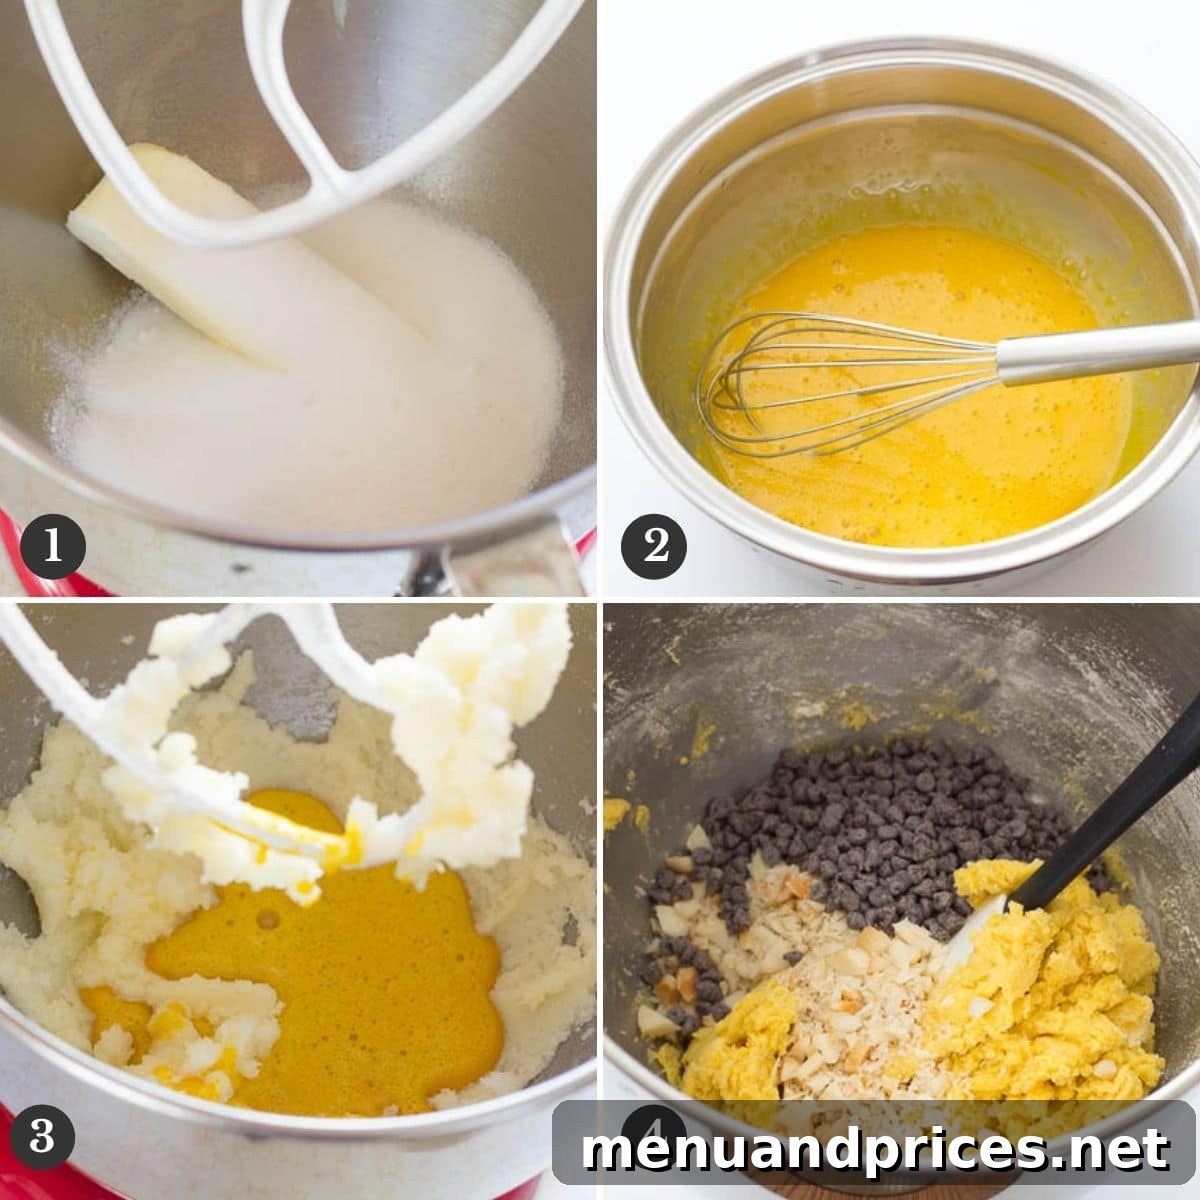
- Cream the Butter and Sugar: In a large mixing bowl, using a paddle attachment on a stand mixer or a hand-held electric mixer, cream together the softened unsalted butter and granulated sugar. Beat them on medium speed for about 2-3 minutes until the mixture becomes visibly light, fluffy, and pale in color. This crucial step, known as creaming, incorporates tiny pockets of air into the fat and sugar, which will expand in the oven, contributing significantly to the cookies’ signature chewy texture and slight puff.
- Whisk Egg Yolks and Vanilla: In a separate small bowl, gently whisk together the six egg yolks and one teaspoon of pure vanilla extract until they are well combined and slightly frothy. This ensures the vanilla is evenly distributed and the yolks are ready to be incorporated smoothly into the butter mixture.
- Combine Wet Ingredients: Gradually add the whisked egg yolk mixture to the creamed butter and sugar. Continue to beat on medium-low speed until all ingredients are thoroughly combined and the mixture appears smooth and emulsified. It’s important to pause and use a rubber spatula to scrape down the sides and bottom of the bowl periodically. This ensures that all the buttery goodness and egg mixture are fully incorporated, leaving no unmixed streaks that could lead to an inconsistent dough.
- Incorporate Dry Ingredients: In another medium-sized bowl, whisk together the all-purpose flour, baking powder, and coarse kosher salt. This step distributes the leavening agent and salt evenly. Gradually add this dry mixture to the wet ingredients in the large mixing bowl. Mix on low speed just until the flour is incorporated and no dry streaks remain. Be mindful to avoid overmixing the cookie dough at this stage. Overmixed dough can develop too much gluten, resulting in cookies that are tough, flat, and dense, rather than soft and delightfully chewy.
- Add Your Favorite Mix-ins: Once the dry ingredients are just incorporated, gently fold in your chosen mix-ins, such as chocolate chips and walnuts, if desired. Mix only until they are evenly distributed throughout the dough. Avoid crushing the mix-ins or overworking the dough further.
2. Shaping and Baking for Golden Perfection
With your dough perfectly prepared, the next steps are to shape your cookies and bake them to a golden, chewy finish. Precision here ensures every cookie is a delightful experience:
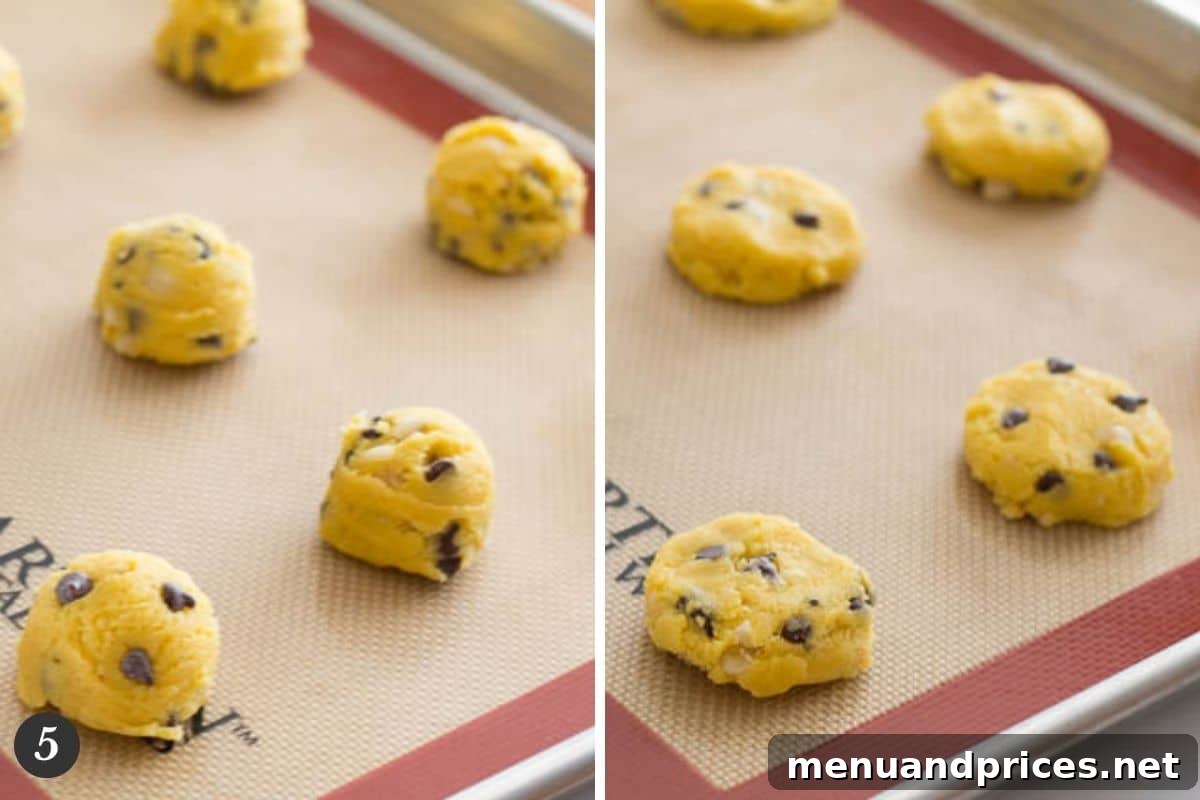
- Form and Space the Dough Balls: Using a medium cookie scoop (a 1.5-inch scoop is ideal for uniform sizing), form the cookie dough into neat, round balls. Place these balls onto a baking sheet that has been carefully lined with parchment paper or a silicone baking mat. Crucially, ensure you leave ample space (at least 2 inches) between each cookie dough ball, as these cookies will spread generously during baking. Crowding them can lead to uneven baking, misshapen cookies, and potentially, them merging into one giant cookie blob.
- Slightly Flatten Before Baking: For a slightly more uniform spread and a perfectly chewy texture throughout, gently flatten the top of each dough ball with the palm of your hand or the back of a spoon before placing the baking sheet into the oven. This small step helps achieve that ideal cookie shape and ensures even cooking from edge to center.
Pro Tip: Achieve Uniform Cookies with Ease
A medium cookie scoop is an invaluable tool in any baker’s arsenal. It not only ensures that each cookie is uniform in size, leading to consistent baking and a professional appearance, but also significantly speeds up the entire scooping process. This makes baking large batches less cumbersome and more enjoyable, guaranteeing perfectly portioned treats every time.
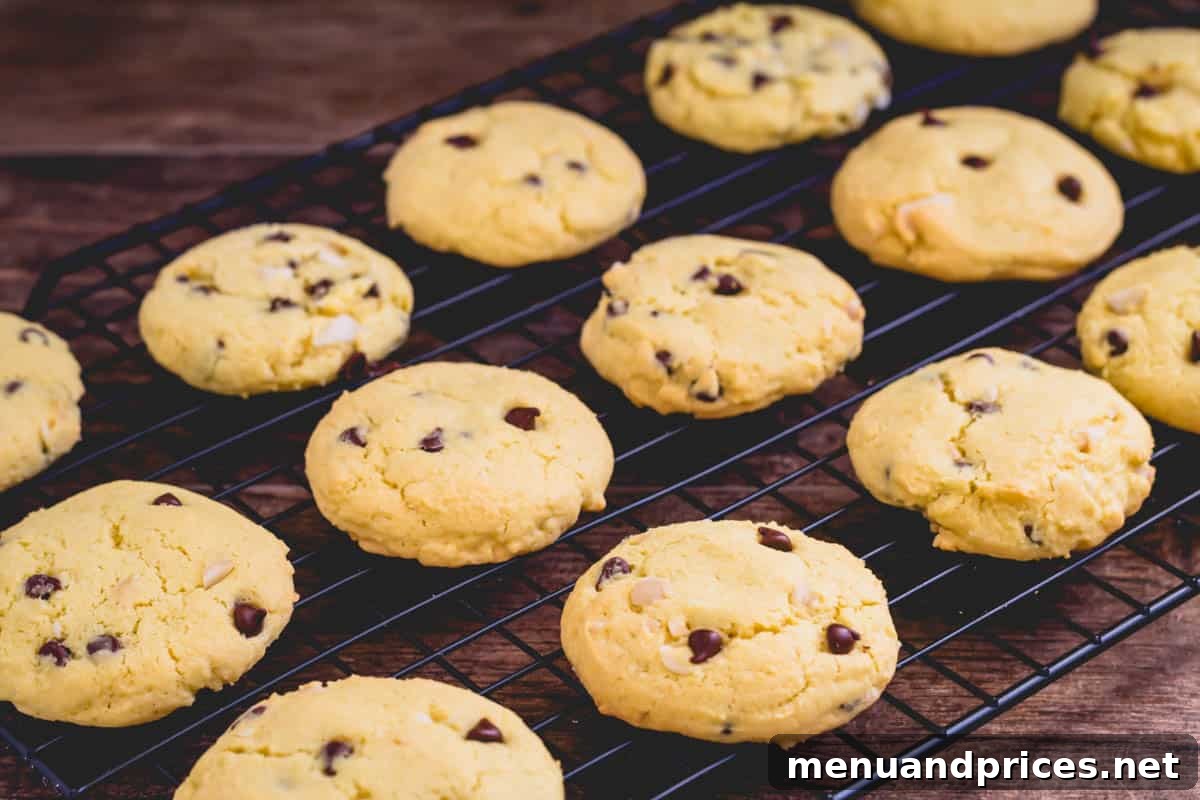
- Bake to Perfection: Bake the cookies in a preheated oven (set to 350°F or 177°C) for 8-10 minutes. The key to their signature soft and chewy interior is to remove them from the oven when the edges appear set and lightly golden, but the centers still look slightly under-baked or soft. They might even look a little puffy and pale in the middle. If the entire cookie looks completely done and firm while still in the oven, it’s likely already overbaked and will result in a hard, dry cookie once cooled. Trust the process – they will continue to set as they cool!
Essential Tips for Baking Your Best Egg Yolk Cookies
Baking is both an art and a science, and a few simple tips can elevate your egg yolk cookies from good to absolutely phenomenal. Pay attention to these details for consistently perfect results:
- Room Temperature Butter is Non-Negotiable: Always start with butter that is truly at room temperature. This means it’s soft enough to leave an indentation when gently pressed but still holds its shape, not melted or greasy. If your butter is too cold, it won’t cream properly with the sugar, leading to a denser cookie with an uneven texture. If you’ve forgotten to take it out in advance, you can soften cold butter quickly by microwaving it in 5-second intervals, turning it after each interval, until it reaches the desired softness.
- Weigh Your Flour for Accuracy: Flour is often the culprit behind dry or tough cookies when measured incorrectly. Volumetric measurements (cups) can vary wildly based on how densely the flour is packed. For consistent and perfectly textured dough, I strongly encourage weighing your flour using a digital kitchen scale (310g for 2.5 cups is a good target). This prevents accidental over-addition of flour, which is commonly leads to dry, crumbly dough that doesn’t spread correctly.
- Allow Cookies to Set on the Pan: When you first remove the cookies from the oven, they will be very delicate and soft, appearing almost under-baked in the center. Resist the urge to transfer them immediately. Allow them to cool on the baking sheet for a good 5-10 minutes. During this crucial time, the residual heat from the hot pan will continue to cook them gently, allowing them to firm up and set properly without becoming hard or breaking apart. After this initial cooling, transfer them carefully to a wire cooling rack to cool completely.
- Avoid Overbaking at All Costs: This is perhaps the most critical tip for achieving that coveted soft and chewy texture. As mentioned in the baking instructions, cookies continue to bake and firm up as they cool outside the oven. Always err on the side of underbaking slightly. The centers of your egg yolk cookies should still look a little wet, glossy, or slightly undone when you pull them from the oven. This ensures they remain soft, moist, and wonderfully chewy once fully cooled.
- Line Your Baking Sheets: To prevent your delicious cookies from sticking to the pan and to ensure easy cleanup, always line your baking sheets. Parchment paper is a fantastic, non-stick option for a single use. For an eco-friendlier and reusable alternative, silicone baking mats are an excellent investment and incredibly easy to clean and maintain.
- Don’t Overmix the Dough: After adding the dry ingredients, mix only until just combined and no streaks of flour are visible. Overmixing develops the gluten in the flour, which can lead to tough, dense, and less tender cookies, negating the soft texture that egg yolks provide.
- Preheat Your Oven Properly: Always allow your oven to fully preheat to the specified temperature (350°F or 177°C) before placing cookies inside. An oven that hasn’t reached the correct temperature can lead to cookies that spread too much, bake unevenly, or don’t achieve the right texture. Use an oven thermometer to verify accuracy if you suspect your oven runs hot or cold.
Make-Ahead and Freezing Tips for Convenience
These egg yolk cookies are wonderfully accommodating, making them perfect for meal prepping, entertaining, or simply having fresh cookies on demand whenever a craving strikes:
- Prepare Dough in Advance: While not strictly necessary for the recipe’s success, you can absolutely prepare the cookie dough up to two days in advance. Simply cover the mixing bowl tightly with plastic wrap or transfer the dough to an airtight container and store it in the refrigerator. When you’re ready to bake, let the dough sit at room temperature for about 15-20 minutes to soften slightly, making it easier to scoop, before proceeding with shaping and baking as directed.
- Freeze Pre-Scooped Dough Balls: This is my absolute favorite make-ahead hack and a true time-saver! Scoop the cookie dough into uniform balls using your cookie scoop and arrange them on a parchment-lined baking sheet or plate. Place the entire tray into the freezer until the dough balls are solid (this usually takes 1-2 hours, depending on size). Once frozen solid, transfer the dough balls to a freezer-safe bag or airtight container. They can be safely frozen for up to three months. When you crave a warm, fresh cookie, simply place the desired number of frozen dough balls on a prepared baking sheet and bake them directly from frozen. You’ll typically need to add an extra 1-2 minutes to the baking time to account for their frozen state. No need to thaw in advance!
Optimal Storing Tips for Freshness
To ensure your egg yolk cookies remain deliciously fresh and retain their perfect soft and chewy texture, proper storage is key. Follow these guidelines to keep your treats at their best:
- Cool Completely Before Storing: This is a crucial first step for any baked good. Ensure the cookies have cooled down completely on a wire rack before attempting to store them. Storing warm cookies in an airtight container will trap moisture, creating condensation that can make them soggy, alter their texture, and potentially shorten their shelf life.
- Room Temperature Storage: Once fully cooled, store baked cookies in an airtight container at room temperature for up to 4 days. A cookie jar with a tight-fitting lid or a sealed plastic container works wonderfully. For best results and to help maintain their softness, you can place a half slice of plain white bread in the container with the cookies; the cookies will absorb moisture from the bread. However, with these egg yolk cookies, they tend to stay soft naturally due to the richness of the yolks.
- Freezing Baked Cookies: Extend the life of your baked cookies by freezing them! Once completely cooled, arrange the cookies in a single layer on a baking sheet and flash freeze them until solid (about 30-60 minutes). This prevents them from sticking together. Then, transfer the frozen cookies to a freezer-safe bag or airtight container, separating layers with parchment paper if stacking multiple cookies. They can be frozen for up to three months without significant loss of quality.
- Thawing Frozen Cookies: To enjoy frozen baked egg yolk cookies, simply let them thaw at room temperature for an hour or two on a plate or wire rack. For a delightful “fresh from the oven” experience, you can warm a single cookie in the microwave for 5-10 second intervals until heated through and softened. Alternatively, a few minutes in a low oven (around 275°F / 135°C) can also work wonders for a larger batch.
Frequently Asked Questions About Egg Yolk Cookies
What can I do with unwanted egg yolks besides these cookies?
While these egg yolk cookies are certainly a fantastic option, the culinary world offers a myriad of delicious ways to use up leftover egg yolks! Their rich, emulsifying properties make them perfect for creamy sauces and decadent desserts. Consider making classic French custard desserts like crème brûlée or pastry cream (crème pâtissière), which is a staple filling in many pastries. Other excellent choices include luxurious homemade ice cream (like vanilla bean or lemon ice cream), rich mayonnaise, creamy carbonara sauce, decadent hollandaise sauce, silky chocolate pudding, or a classic coconut cream pie. Don’t let those golden yolks go to waste – they are culinary gold!
Do I need to chill the cookie dough for this recipe?
No, one of the wonderful aspects of this particular egg yolk cookie recipe is that chilling the dough is not required! While chilling cookie dough is a common practice in many recipes to prevent excessive spreading and deepen flavors, these egg yolk cookies are specifically formulated to achieve the perfect thickness and texture without the need for refrigeration prior to baking. This makes the baking process quicker and more convenient, getting you to delicious cookies faster and with less waiting time!
Why do my cookies get hard after they cool?
If your cookies are turning hard after cooling, the most common reason is overbaking. Cookies continue to cook and set up significantly as they cool down outside the oven. If they look completely “done” or firm when you pull them from the oven, they will almost certainly become hard, dry, and potentially crumbly once fully cooled. To ensure soft and chewy cookies, always aim to remove them from the oven when their edges are just set and lightly golden, but their centers still appear slightly under-baked, moist, or even a little gooey. This allows them to finish baking gently as they cool, resulting in that desirable soft and tender interior.
Can I make these cookies without an electric mixer?
Absolutely! While an electric stand mixer or hand mixer makes the creaming process quicker and easier, you can certainly make these cookies by hand. You’ll need a large bowl and a sturdy whisk or a wooden spoon. Just be prepared to put in a little more arm work to cream the butter and sugar until light and fluffy – this step might take 5-7 minutes manually. The rest of the mixing steps can be done efficiently with a spatula or wooden spoon, so don’t let the absence of an electric mixer deter you from making these delicious treats!
What’s the best way to measure flour for baking?
For the most accurate baking results, especially with flour, using a digital kitchen scale is highly recommended. Measuring by weight (grams or ounces) is far more consistent and reliable than measuring by volume (cups), as volumetric measurements can vary significantly based on how densely the flour is packed. If you’re using cups, use the “spoon and level” method: spoon the flour into your measuring cup until it’s overflowing, then level it off with a straight edge (like the back of a knife) without packing it down. Never scoop flour directly from the bag with your measuring cup, as this compacts the flour and can add significantly more than intended, leading to dry, dense cookies.
Creative Ways to Utilize Your Extra Egg Yolks
Beyond these incredible cookies, there are countless other delightful recipes where egg yolks truly shine. Don’t let any go to waste! Here are some more fantastic ideas to inspire your next culinary adventure and make the most of those golden treasures:
- Classic Pastry Cream (Crème Pâtissière): A fundamental French custard, pastry cream is incredibly versatile and perfect as a filling for tarts, éclairs, cream puffs, and various cakes. Its rich, velvety texture and smooth consistency are entirely thanks to those precious egg yolks.
- Homemade Vanilla Ice Cream: Achieve unparalleled creaminess and richness in your homemade ice cream with an egg yolk-based custard base. The yolks act as a natural emulsifier and stabilizer, preventing ice crystals from forming and ensuring a smooth, luxurious scoop every time.
- Bright & Zesty Lemon Ice Cream: Similar to vanilla, egg yolks are key to the silken texture and deep flavor of this refreshing citrus ice cream. They provide a beautiful, rich base that allows the vibrant lemon flavor to truly shine through.
- Classic Crème Brûlée: The epitome of elegant desserts, crème brûlée relies entirely on egg yolks for its rich, creamy interior and smooth, delicate consistency. This luscious custard is perfectly complemented by a crisp, caramelized sugar topping that cracks with satisfying delight.
- Easy French Buttercream: Unlike other buttercreams, French buttercream uses egg yolks, giving it an incredibly light, airy, and intensely buttery texture with a beautiful pale yellow hue. It’s an exquisite frosting, perfect for decorating delicate cakes and cupcakes.
- Homemade Mayonnaise: A kitchen staple, mayonnaise is a classic emulsion of egg yolks, oil, and acid. Making it from scratch is surprisingly simple and yields a far superior flavor and texture compared to most store-bought versions.
- Carbonara Sauce: Authentic Italian carbonara relies heavily on egg yolks (along with Pecorino Romano cheese and a touch of pasta water) to create its impossibly silky, rich sauce that beautifully coats every strand of pasta, creating a truly comforting dish.
- Hollandaise Sauce: This classic French mother sauce, often served with Eggs Benedict, is another brilliant and sophisticated use of egg yolks. It’s an emulsified sauce, where yolks are whisked with clarified butter and lemon juice to create a smooth, luxurious condiment perfect for vegetables, fish, or poached eggs.
Recipe: Soft & Chewy Egg Yolk Chocolate Chip Cookies

Egg Yolk Cookies
By Shinee Davaakhuu
These rich and tender egg yolk cookies are the perfect solution for leftover yolks, offering a wonderfully soft and chewy texture with every bite. Easy to make and even easier to love!
Bake Time: 20 mins
Total Time: 35 mins
Yields: 39 cookies
(Average Rating: 4.60 out of 5 stars from 114 votes)
View Ingredients |
Print Recipe
Ingredients
- 6 large egg yolks
- 1 teaspoon pure vanilla extract
- ½ cup (113 g) unsalted butter, softened
- 1 cup (200 g) granulated sugar
- 2 ½ cups (310 g) all-purpose flour
- 2 teaspoons baking powder (Note 1)
- ½ teaspoon coarse kosher salt
- ½ cup (60 g) walnuts, pecans, or macadamia nuts (optional)
- ¼ cup (60 g) chocolate chips (optional)
Instructions
- Preheat your oven to 350°F (177°C). Prepare baking sheets by lining them with parchment paper or silicone baking mats.
- In a small bowl, whisk together the egg yolks and pure vanilla extract until well combined. Set aside.
- In a large mixing bowl, using a stand mixer with a paddle attachment or an electric hand-held mixer, beat the softened unsalted butter and granulated sugar together on medium speed for about 2-3 minutes until the mixture is light, fluffy, and pale.
- Add the egg yolk and vanilla mixture to the creamed butter and sugar. Continue to mix until fully combined, ensuring to scrape down the sides and bottom of the bowl with a spatula several times to incorporate all ingredients.
- In a separate bowl, whisk together the all-purpose flour, baking powder, and coarse kosher salt. Gradually add this dry ingredient mixture to the wet ingredients in the large mixing bowl. Mix on low speed just until the flour is incorporated and no dry streaks remain. Avoid overmixing.
- If desired, gently fold in the walnuts (or other nuts) and chocolate chips until they are evenly distributed throughout the dough.
- Using a medium cookie scoop (approx. 1.5 inches), form the cookie dough into uniform balls. Place them onto the prepared baking sheets, ensuring generous space between each dough ball as they will spread during baking.
- Gently flatten the top of each cookie dough ball slightly with your fingers or the back of a spoon before baking.
- Bake for 8-10 minutes, or until the edges are set and lightly golden, but the centers still look slightly soft or under-baked. Remember, they will continue to set as they cool.
- Remove the baking sheets from the oven and let the cookies cool on the sheets for 5-10 minutes before carefully transferring them to a wire cooling rack to cool completely.
⭐️ Did you make this recipe?
Please leave a review and let us know how you liked it!
Tips & Notes
Note 1: You may substitute 1 teaspoon baking soda + 1 teaspoon cream of tartar for baking powder if you do not have baking powder on hand. This combination acts as a leavening agent, similar to baking powder.
Storing Tips:
- Always allow cookies to cool down completely before storing to prevent sogginess and maintain their crisp-chewy texture.
- Store baked cookies in an airtight container at room temperature for up to 4 days for optimal freshness.
- For longer storage, freeze baked cookies in a freezer-safe bag or container for up to three months. Flash freeze first to prevent sticking. Thaw at room temperature or warm briefly in the microwave for a fresh-baked feel.
Nutrition Information (per cookie)
- Servings: 1 cookie
- Calories: 88 kcal
- Carbohydrates: 12 g
- Protein: 1 g
- Fat: 4 g
- Sugar: 5 g
- Sodium: 30 mg
Note: Nutritional information is an estimate and may vary based on specific ingredients used, brands, and portion sizes.
Cuisine: American

Did you make this?
Leave a rating and your feedback. Your experience helps other bakers!