
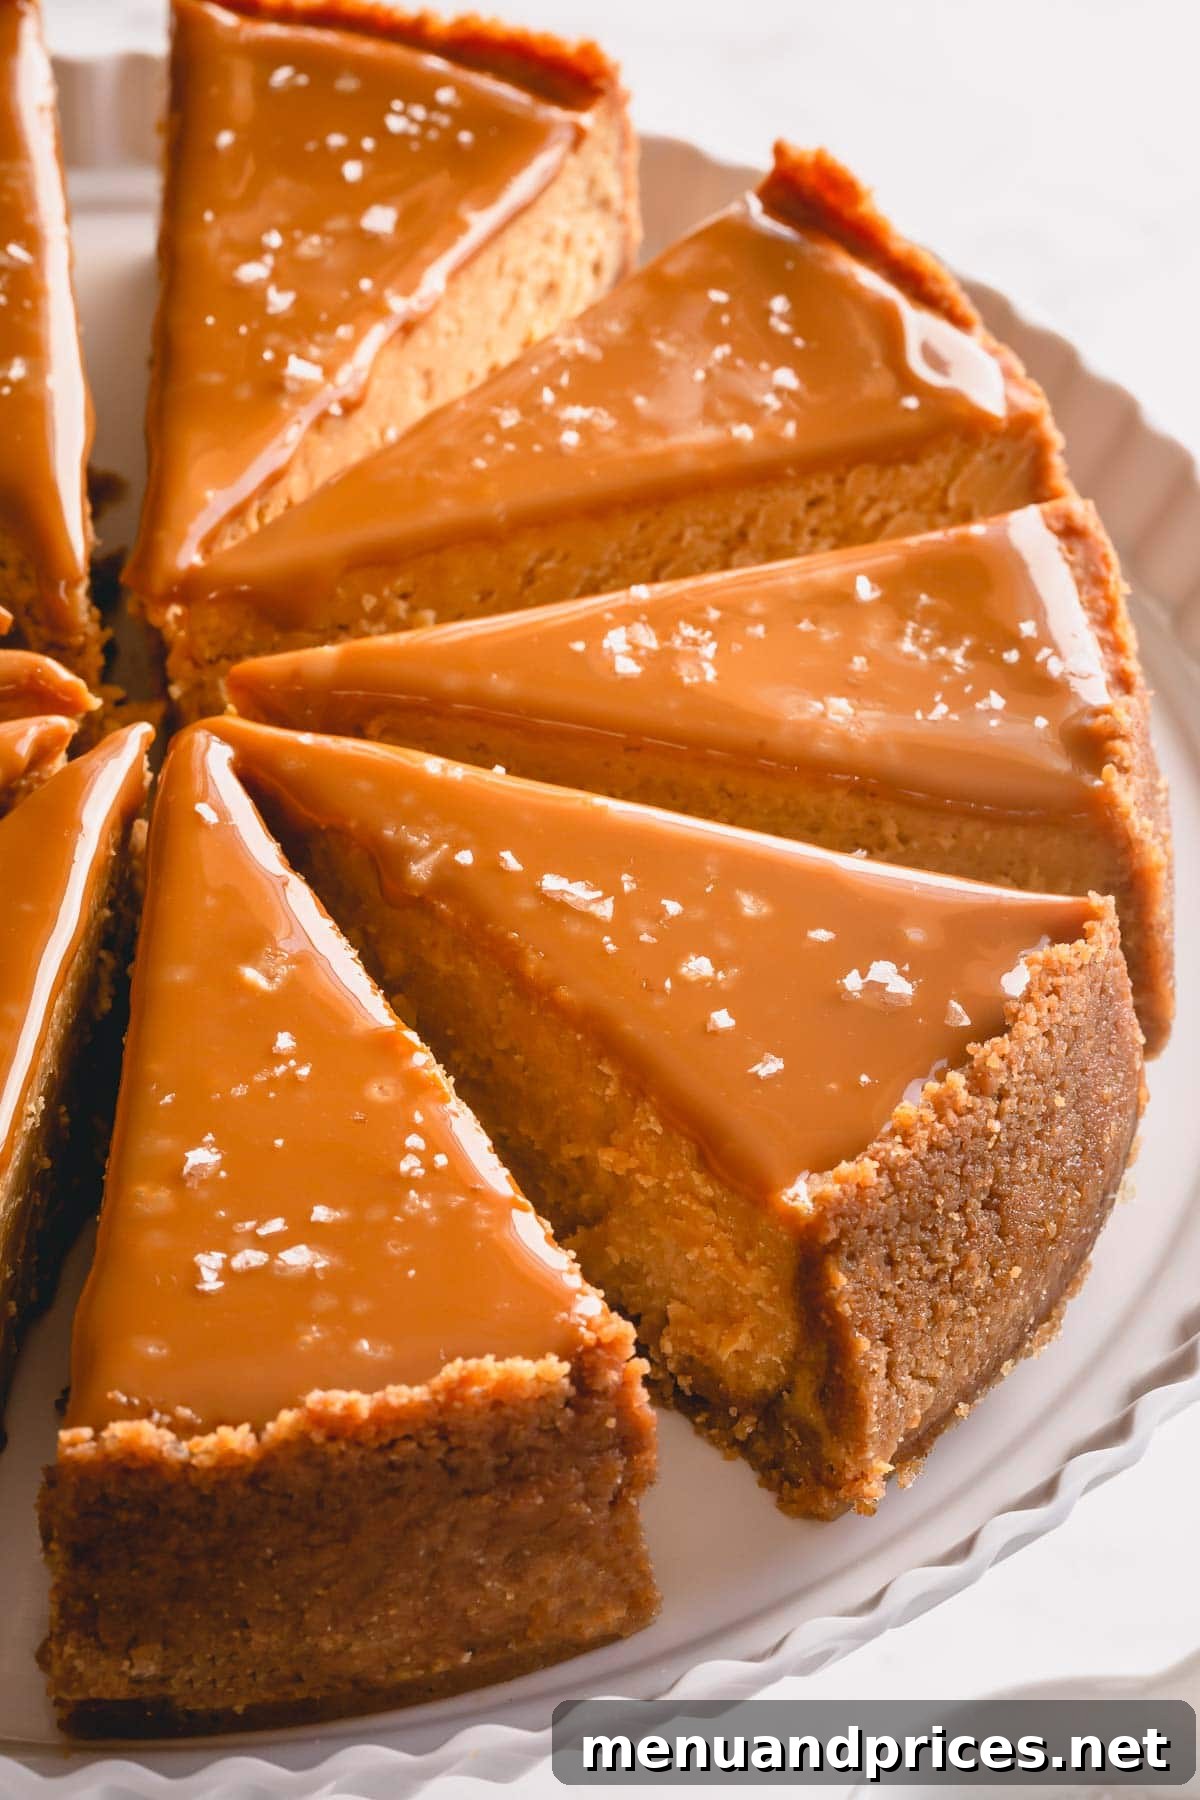
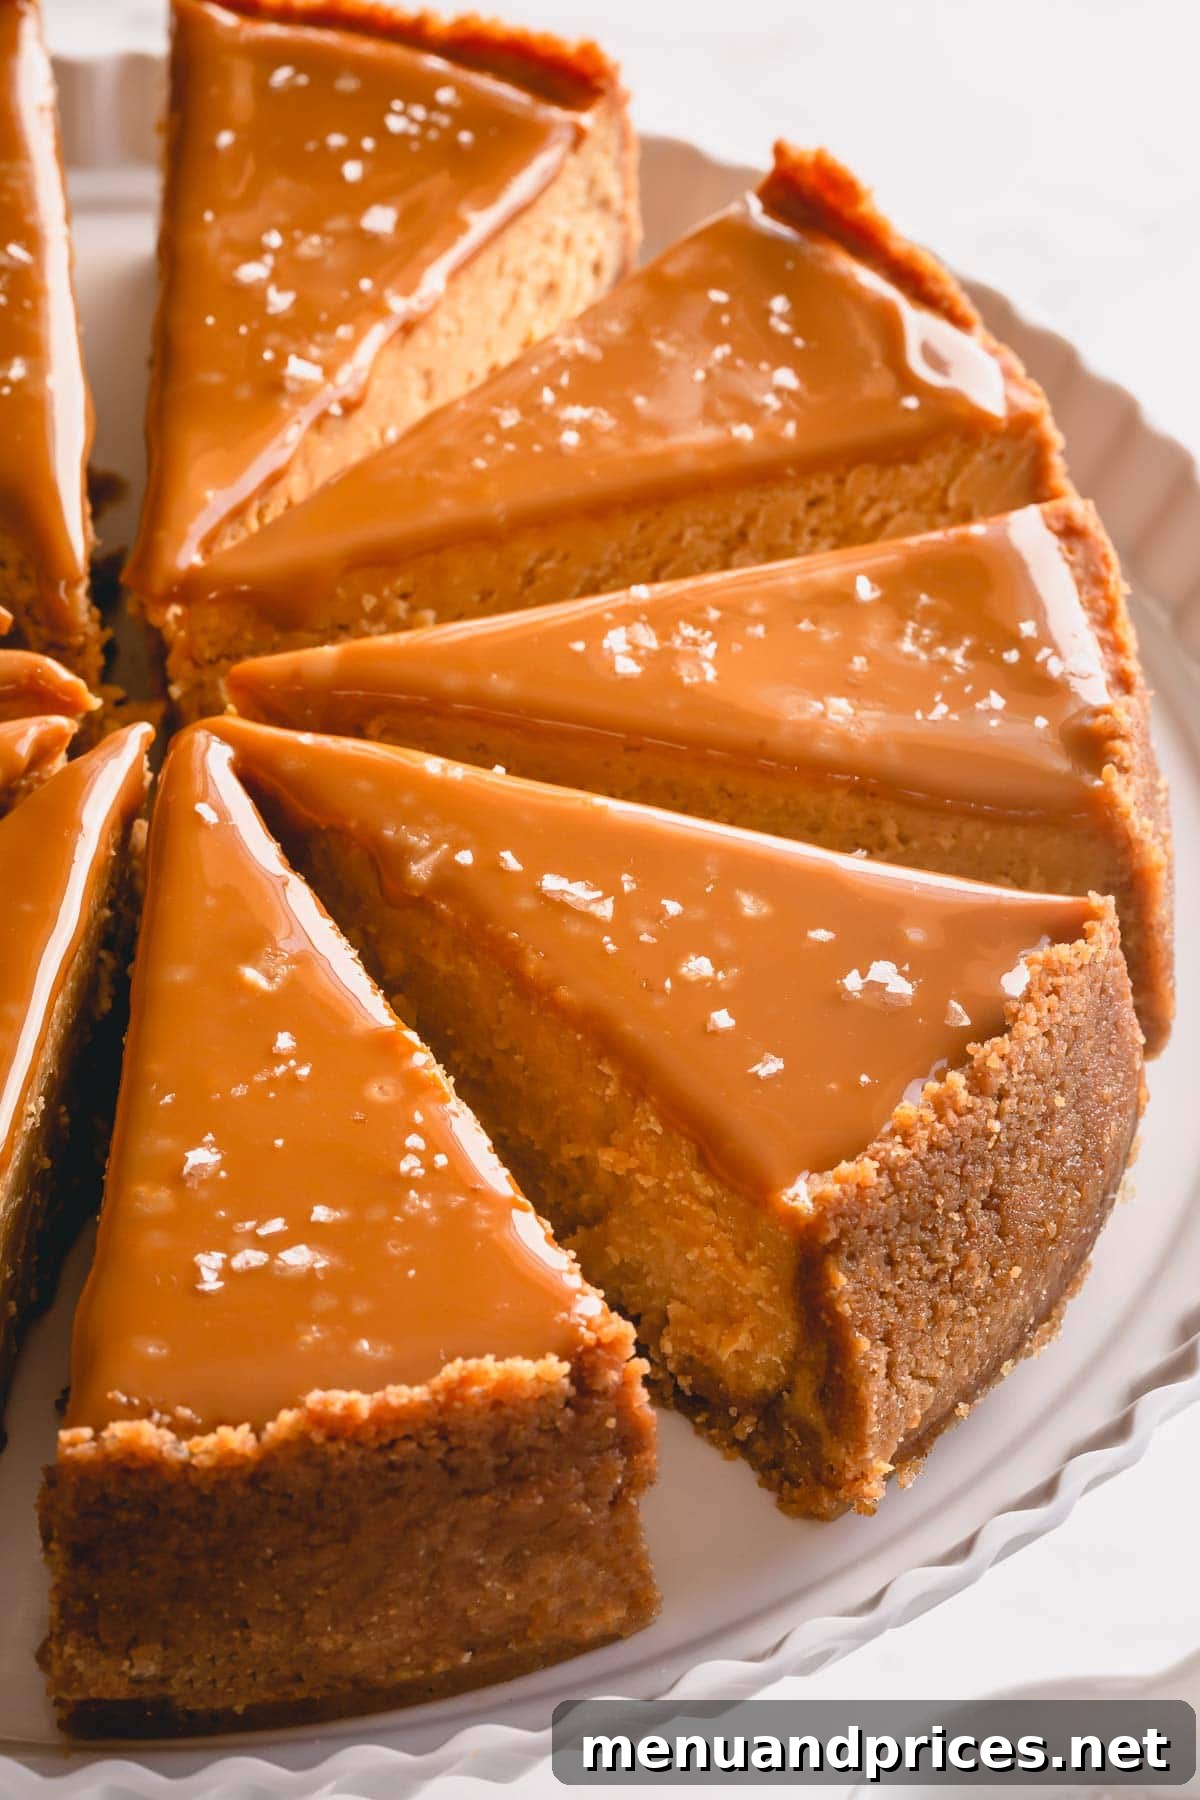
Prepare to indulge in the ultimate dessert experience with this exquisite Dulce de Leche Cheesecake. Imagine a dessert that seamlessly combines a rich, buttery graham cracker crust with an impossibly smooth and creamy cheesecake filling, all crowned with a luxurious layer of golden dulce de leche and a delicate sprinkle of sea salt. This recipe isn’t just about baking; it’s about crafting a masterpiece that promises pure bliss in every bite. Whether you’re a seasoned baker or new to the world of cheesecakes, our comprehensive guide, complete with step-by-step instructions, abundant expert tips, and a helpful video tutorial, will ensure your success in creating a show-stopping, crack-free dulce de leche cheesecake that will impress everyone.
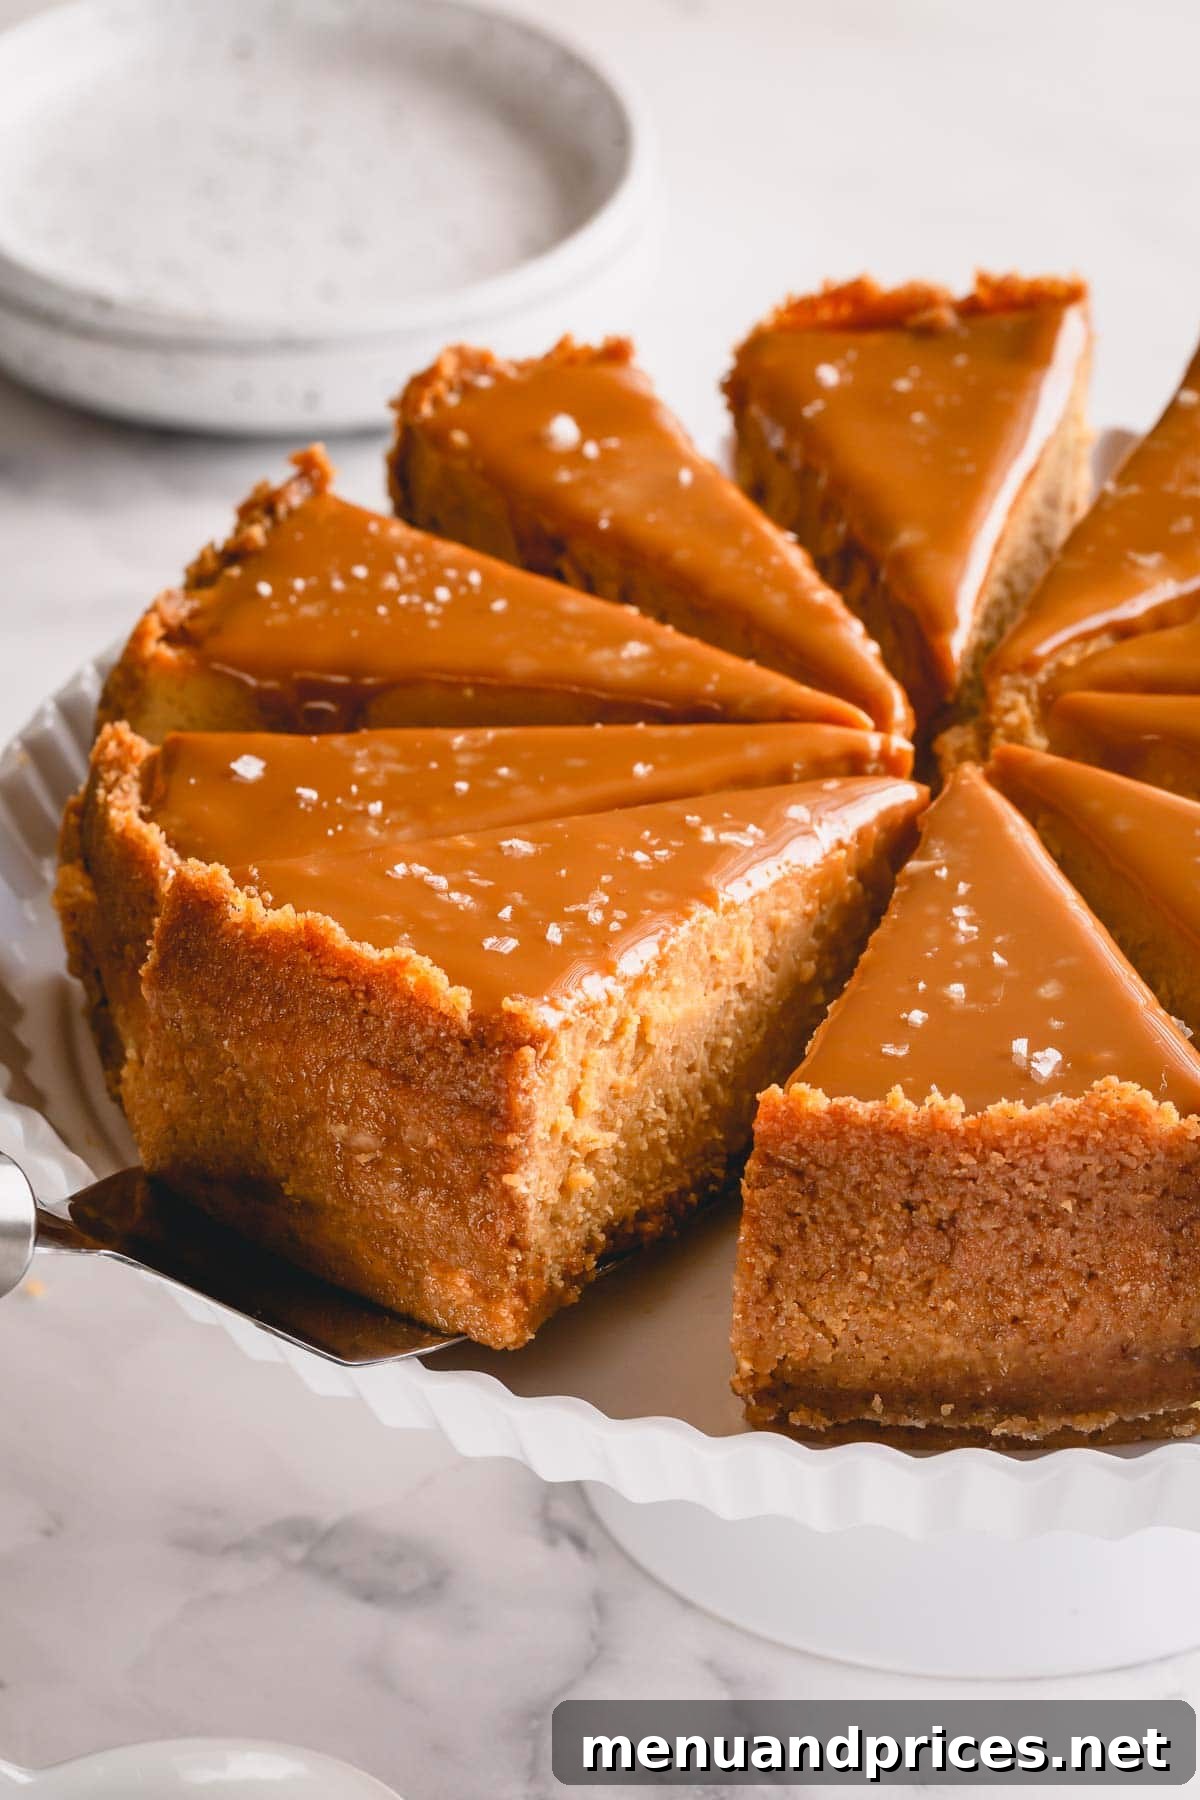
Why You’ll Fall in Love with This Decadent Dulce de Leche Cheesecake
For those who appreciate the finer things in dessert, especially a cheesecake that stands tall, boasts an irresistible creaminess, and features an abundance of perfectly baked crust, this recipe is crafted just for you. This Dulce de Leche Cheesecake isn’t just another dessert; it’s a culinary experience designed to delight every palate. Here’s why it’s destined to become your new favorite:
- Elevated Flavor Profile: Experience the perfect harmony of sweet and savory. The rich, buttery notes of the graham cracker crust beautifully complement the silky, deeply caramelized dulce de leche filling.
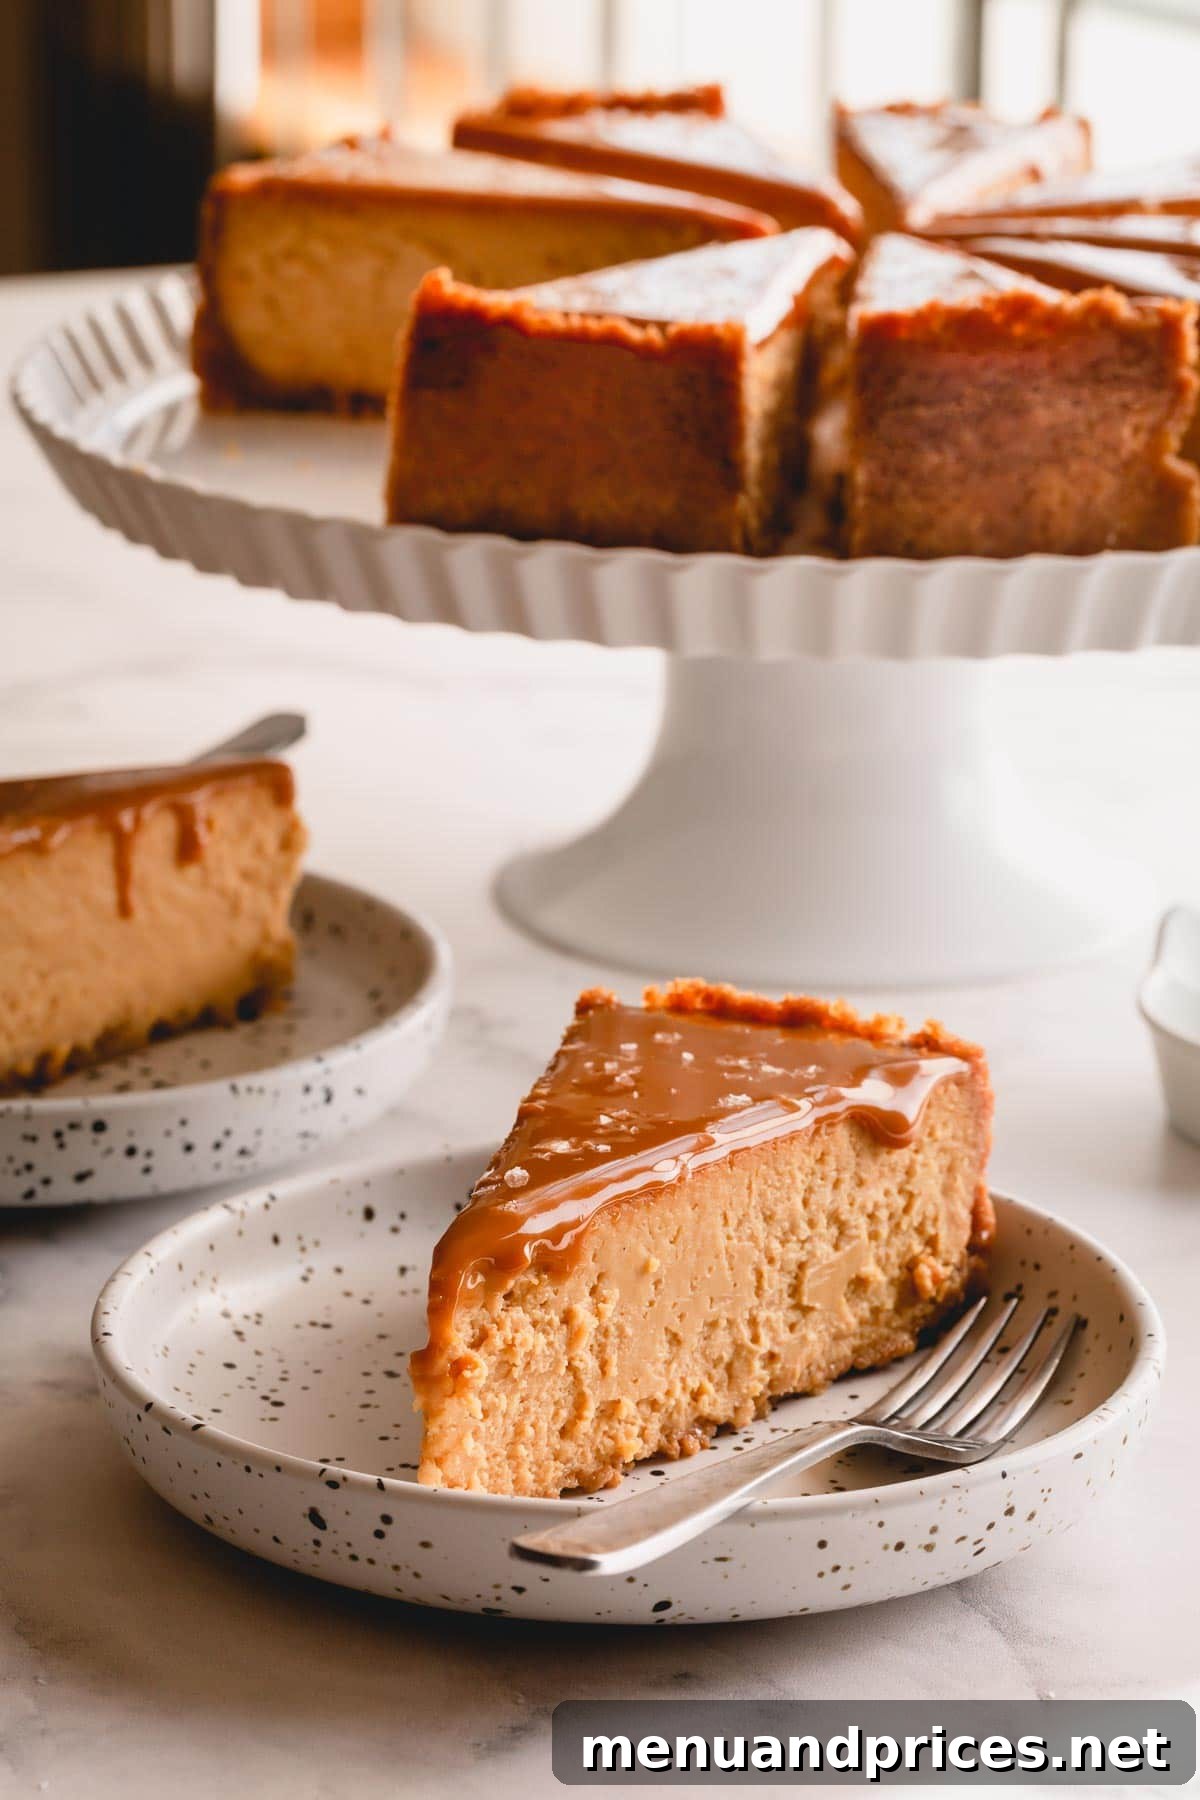
- Unmatched Creaminess and Texture: Say goodbye to dense or crumbly cheesecakes. Our recipe guarantees a filling that is incredibly smooth, velvety, and melts in your mouth, striking the ideal balance between light and indulgent.
- The Irresistible Dulce de Leche Topping: A generous layer of luscious dulce de leche forms the crown of this cheesecake, offering a depth of flavor that is both familiar and exotic.
- A Touch of Sea Salt Perfection: A delicate sprinkle of flaky sea salt on top isn’t just a garnish; it’s a flavor enhancer. It brilliantly cuts through the sweetness of the dulce de leche, creating a sophisticated balance that makes each bite utterly addictive.
- Surprisingly Simple to Make: Despite its gourmet appearance and complex flavors, this cheesecake is remarkably straightforward to prepare. We’ll guide you through every step, ensuring a stress-free baking experience.
And speaking of dulce de leche, don’t be intimidated by its elegant name! Dulce de leche is simply a rich, caramelized milk confection, essentially sweetened condensed milk that has been slowly cooked until it transforms into a thick, golden, intensely flavorful sauce. You can effortlessly make it at home with our easy video tutorial, or opt for a high-quality store-bought version for convenience.
Beyond its incredible taste, this cheesecake shines as a perfect make-ahead dessert, ideal for any gathering, holiday celebration, or simply a luxurious treat on a weeknight. Prepare it in advance, chill it to perfection, and simply unveil your masterpiece when you’re ready to serve!
Key Ingredients for the Perfect Dulce de Leche Cheesecake
Crafting a truly exceptional cheesecake begins with understanding the role each ingredient plays. While this recipe requires just 10 simple ingredients, selecting the right ones makes all the difference in achieving that signature creamy texture and rich flavor. Here’s a closer look at what you’ll need to create this indulgent dessert:
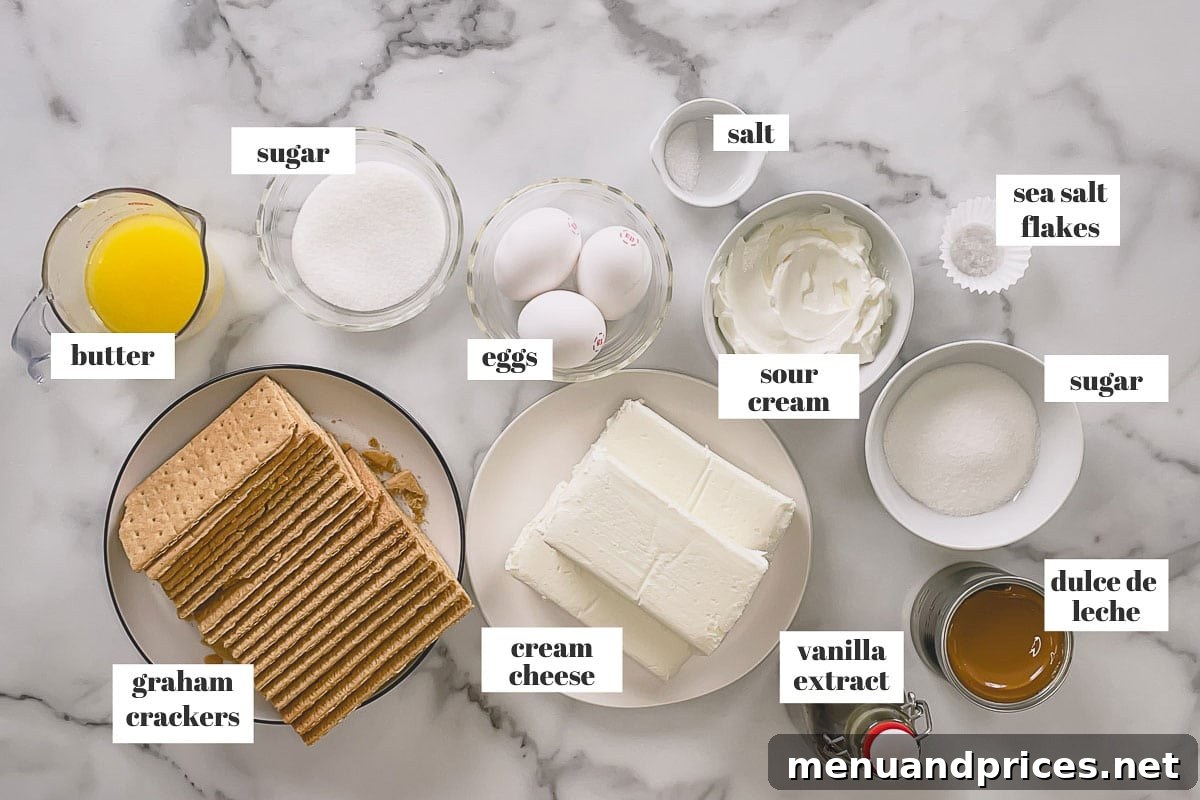
- Graham Crackers (or Digestive Biscuits): The foundation of our cheesecake. While plain graham crackers are a classic choice, don’t hesitate to experiment with honey, cinnamon, or even chocolate-flavored varieties for an extra layer of flavor. For our international bakers, digestive biscuits offer a fantastic alternative with a similar crumbly texture. Ensure they are crushed into fine, uniform crumbs for a cohesive crust.
- Full-Fat Cream Cheese: This is non-negotiable for a truly luscious cheesecake. Opt for brick-style, full-fat cream cheese. Avoid whipped, spreadable, or low-fat versions, as these contain higher water content and stabilizers that can lead to a less creamy, often runny, or grainy filling. Softened cream cheese at room temperature is crucial for a lump-free, smooth batter.
- Sour Cream (or Plain Greek Yogurt): A secret weapon for cheesecake perfection! Sour cream adds an incredible tang and richness, enhancing the creaminess of the filling without making it heavy. Its acidity also helps to tenderize the proteins in the cream cheese, contributing to that desirable smooth texture. If sour cream isn’t available, full-fat plain Greek yogurt can be used as a worthy substitute.
- Dulce de Leche: The star of the show! You can use either high-quality store-bought dulce de leche for convenience or, for an even more exquisite flavor, prepare your own homemade version. Our easy tutorial for homemade dulce de leche is a game-changer. If dulce de leche is completely out of reach, a premium caramel sauce can be a good substitute, though it will impart a slightly different flavor profile.
- Granulated Sugar: Provides the perfect level of sweetness, complementing the rich flavors of dulce de leche and cream cheese.
- Unsalted Butter: Essential for binding the graham cracker crust and adding that irresistible buttery flavor. Melting it first ensures even distribution.
- Pure Vanilla Extract: A splash of high-quality vanilla extract elevates all the other flavors, adding a warm, aromatic depth to the cheesecake filling.
- Kosher Salt: Just a pinch in the filling enhances all the sweet notes and balances the overall taste.
- Large Eggs (at Room Temperature): Eggs act as the primary binder and contribute to the cheesecake’s structure and creamy consistency. Using room temperature eggs is vital for achieving a smooth, uniform batter, as they emulsify more readily with other ingredients.
- Sea Salt Flakes (for Dusting): While optional, a sprinkle of chunky sea salt flakes on top before serving is highly recommended. It provides a delightful textural contrast and a crucial counterpoint to the sweetness, making the cheesecake taste even more balanced and sophisticated.
Essential Tools for Cheesecake Baking
Having the right equipment can make your cheesecake baking experience smoother and more successful. Here’s a quick list of what you’ll need:
- 9-inch Springform Pan: Crucial for easy release of your delicate cheesecake.
- Food Processor: For quickly transforming graham crackers into fine crumbs.
- Stand Mixer (or Hand Mixer): Essential for thoroughly creaming the cheese and blending the filling ingredients.
- Large Roasting Pan: For the water bath method, ensuring gentle, even baking.
- Heavy-Duty Aluminum Foil: To protect your springform pan during the water bath.
- Rubber Spatula: For scraping down the bowl and gently folding ingredients.
Step-by-Step Guide: How to Make This Decadent Dulce de Leche Cheesecake
Follow these detailed instructions to achieve a perfectly smooth, creamy, and crack-free dulce de leche cheesecake every time.
1. Prepare Your Springform Pan for a Water Bath
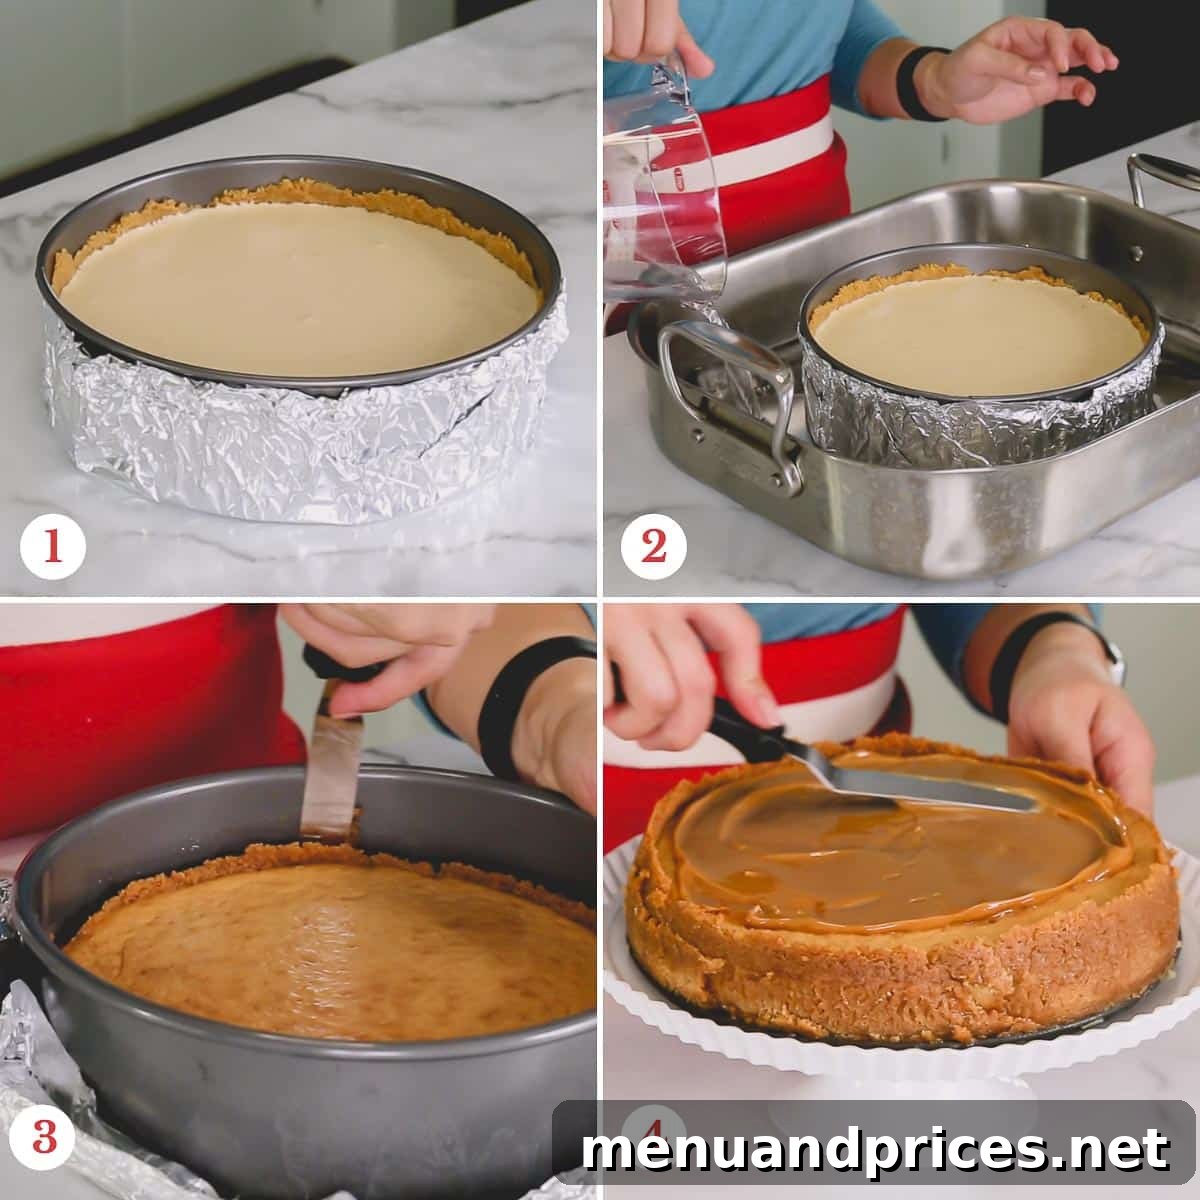
The secret to a beautifully smooth, evenly cooked cheesecake with no unsightly cracks lies in baking it in a water bath, often referred to as a “bain-marie.” This method provides a moist, gentle cooking environment, preventing the cheesecake from drying out and cracking. To safeguard your crust from becoming soggy, proper foil wrapping of your springform pan is paramount.
- Begin by laying out two large sheets of heavy-duty aluminum foil. Arrange them in a criss-cross pattern on a flat surface. This overlapping technique provides extra protection against water seepage.
- Carefully center your 9-inch springform pan on top of the criss-crossed foil sheets.
- Gently, yet firmly, wrap the foil up and around the sides of the springform pan. Ensure that the foil extends at least an inch or two above the rim of the pan, creating a tight seal. This forms a protective barrier, preventing any water from seeping into the crust during baking.
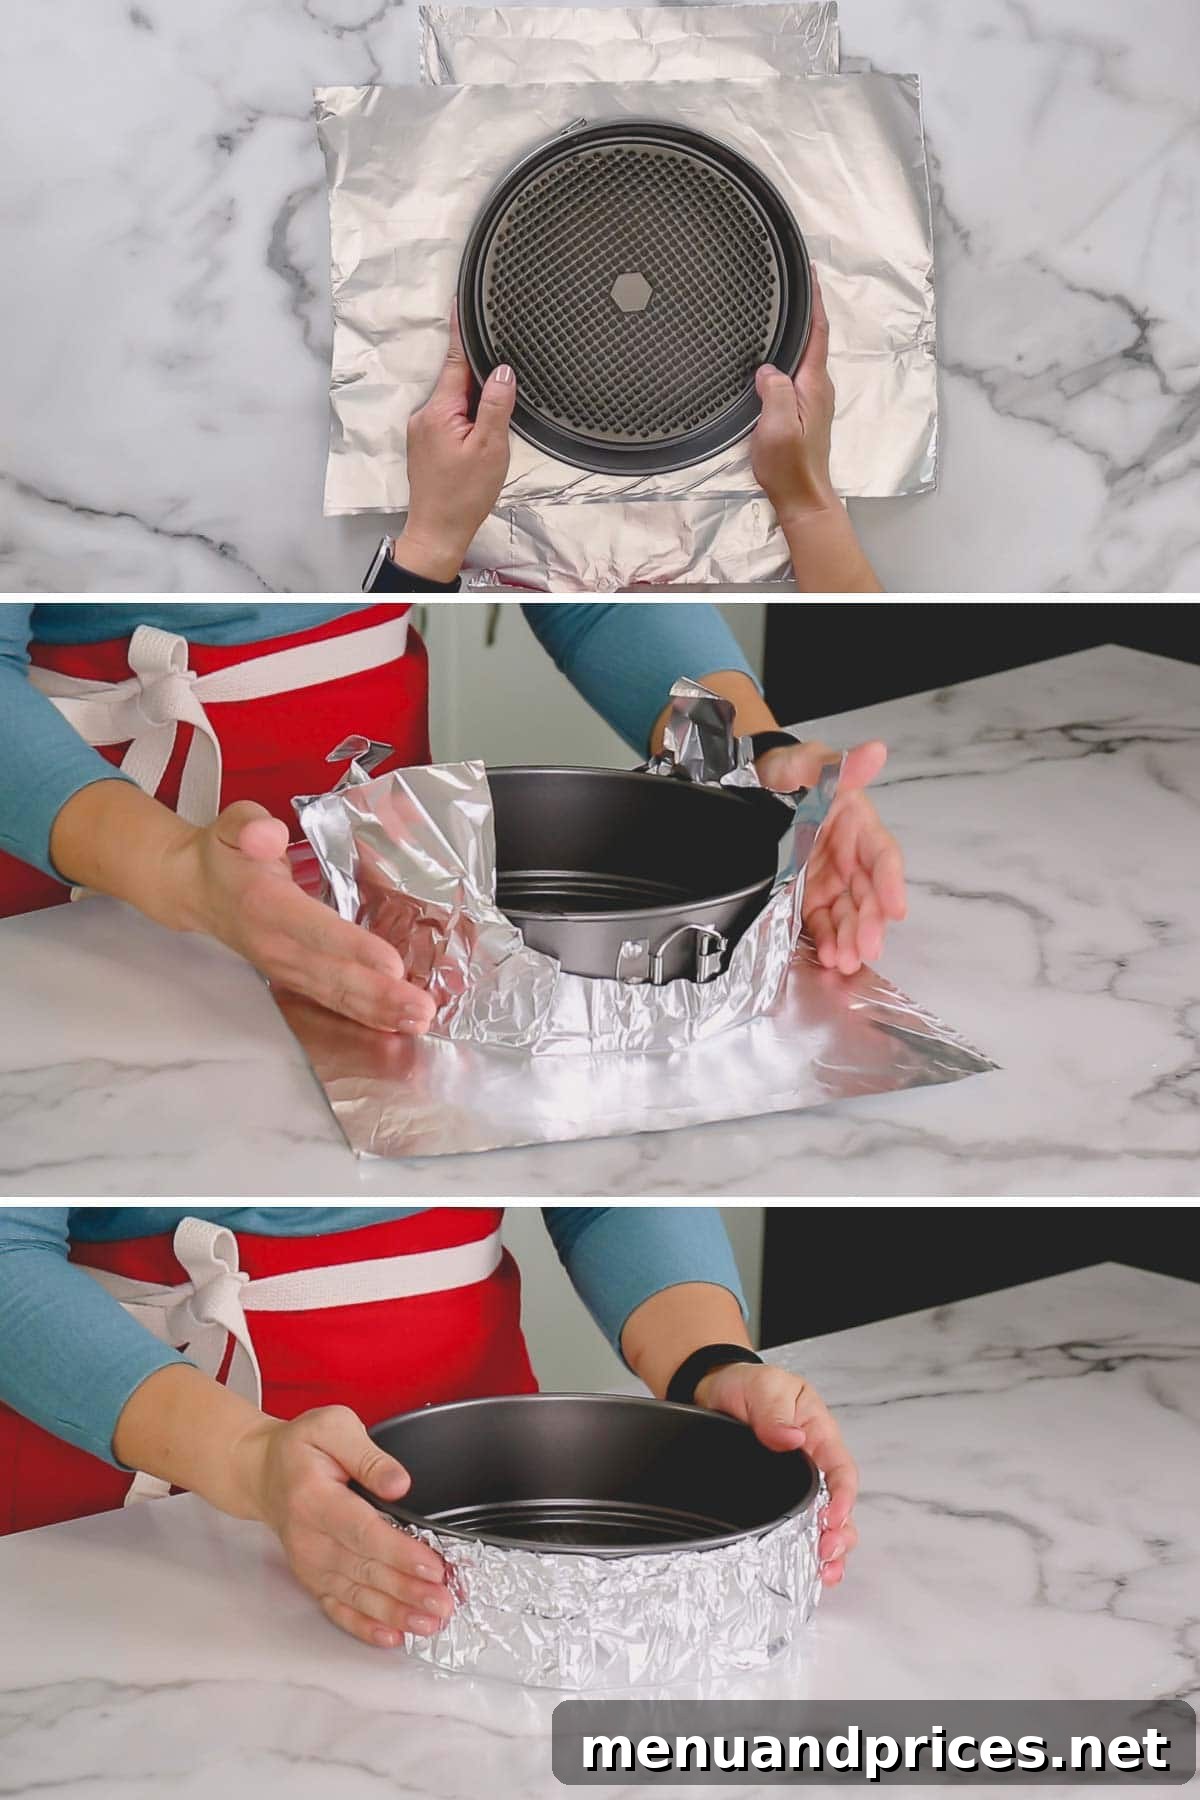
Pro Tip: Foil Protection
Handle the foil with care to avoid any tears or punctures. A single hole could compromise your water bath, leading to a soggy crust and defeating the purpose of this crucial step.
2. Craft the Perfect Buttery Graham Cracker Crust
A truly magnificent cheesecake starts with an outstanding crust. For this recipe, we’re aiming for a generously tall, buttery, and crumbly crust that not only serves as a delicious base but also elegantly wraps the creamy filling all the way up the sides, offering a delightful texture contrast in every bite.
To begin, place your graham crackers (or digestive biscuits) into a food processor. Pulse them until they transform into very fine, uniform crumbs. The consistency should be similar to fine sand, without any large pieces remaining. Next, transfer the crumbs to a mixing bowl, then stir in the granulated sugar, ensuring it’s well combined. Finally, pour in the melted unsalted butter and mix thoroughly until the entire mixture is evenly moistened. When properly mixed, the crumbs should resemble wet sand – moist enough to hold its shape when pressed together.
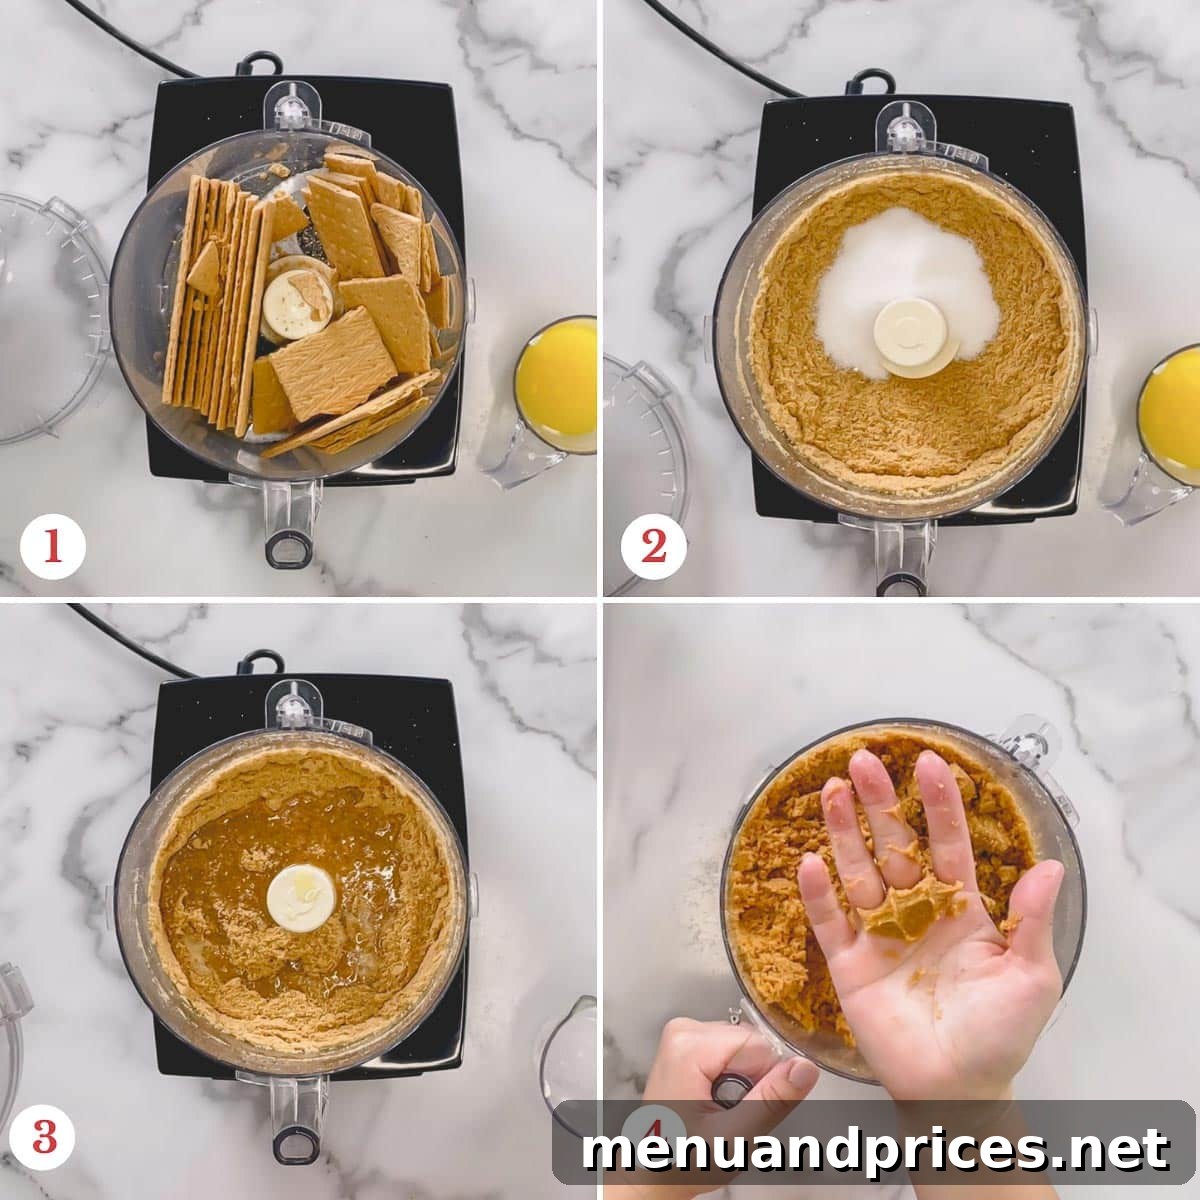
Pro Tip: Achieving the Ideal Crust Texture
To test for the correct consistency, squeeze a handful of the crust mixture in your palm. It should hold together firmly, much like a sandcastle. If it crumbles too easily, add a tiny bit more melted butter.
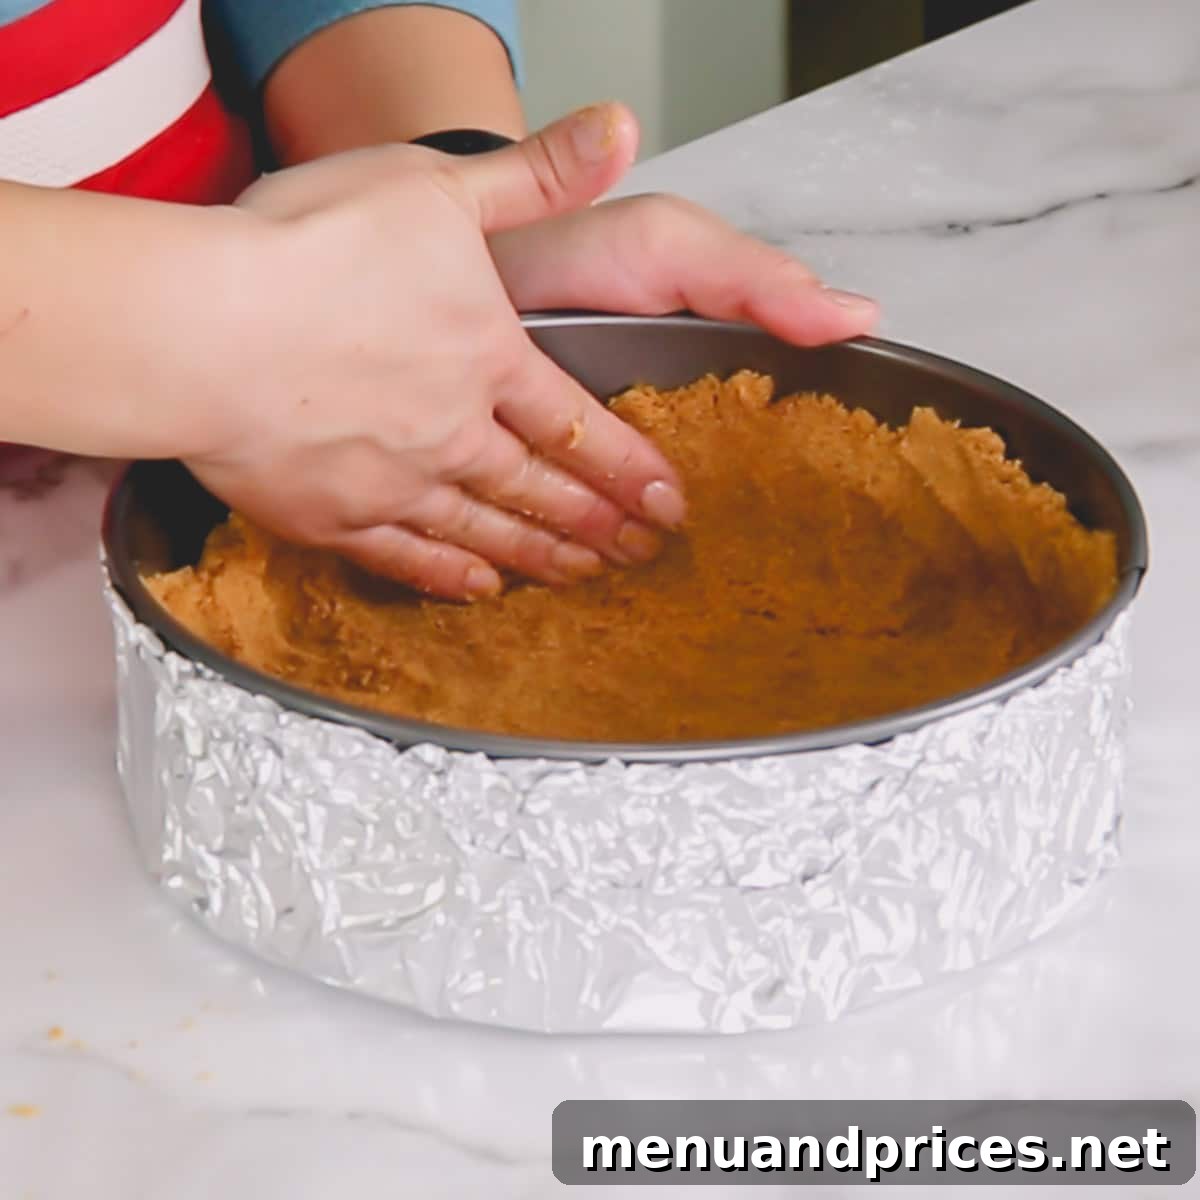
Once your crust mixture is ready, transfer it into the prepared, foil-wrapped springform pan. Using the bottom of a flat glass or your fingers, evenly spread and firmly press the mixture onto the bottom of the pan. Then, extend the pressing up the sides, creating a tall, sturdy wall. The denser and more uniform your crust, the better it will hold together after baking.
Place the pan with the pressed crust into the refrigerator while you proceed with preparing the cheesecake filling. Chilling the crust helps it set and prevents it from crumbling when sliced.
3. Create the Velvety Smooth Dulce de Leche Filling
The heart of our cheesecake is its incredibly smooth and creamy filling. Precision and gentle mixing are key here to achieve that coveted crack-free surface and luxurious texture.
In the bowl of a stand mixer fitted with a paddle attachment (or using a hand mixer), beat the softened, room-temperature full-fat cream cheese on medium speed for about 2 minutes, until it becomes wonderfully light and fluffy. Ensure there are no lumps remaining, as this sets the stage for a silky-smooth filling.
Next, add the granulated sugar, approximately three-quarters of your dulce de leche (reserving the rest for topping), sour cream, pure vanilla extract, and kosher salt. Continue mixing on medium-low speed until all ingredients are perfectly combined and the mixture is smooth. Remember to pause halfway through and scrape down the sides and bottom of the bowl with a rubber spatula to ensure everything is thoroughly incorporated.
Finally, it’s time to incorporate the eggs. Add them one at a time, mixing only until each egg is just combined before adding the next. This step is crucial: always mix on medium-low speed to avoid incorporating too much air into the batter. Excess air can cause the cheesecake to puff up during baking and then collapse and crack as it cools. After adding the last egg, scrape the sides of the bowl once more and mix for a final 30 seconds to ensure a uniform batter.
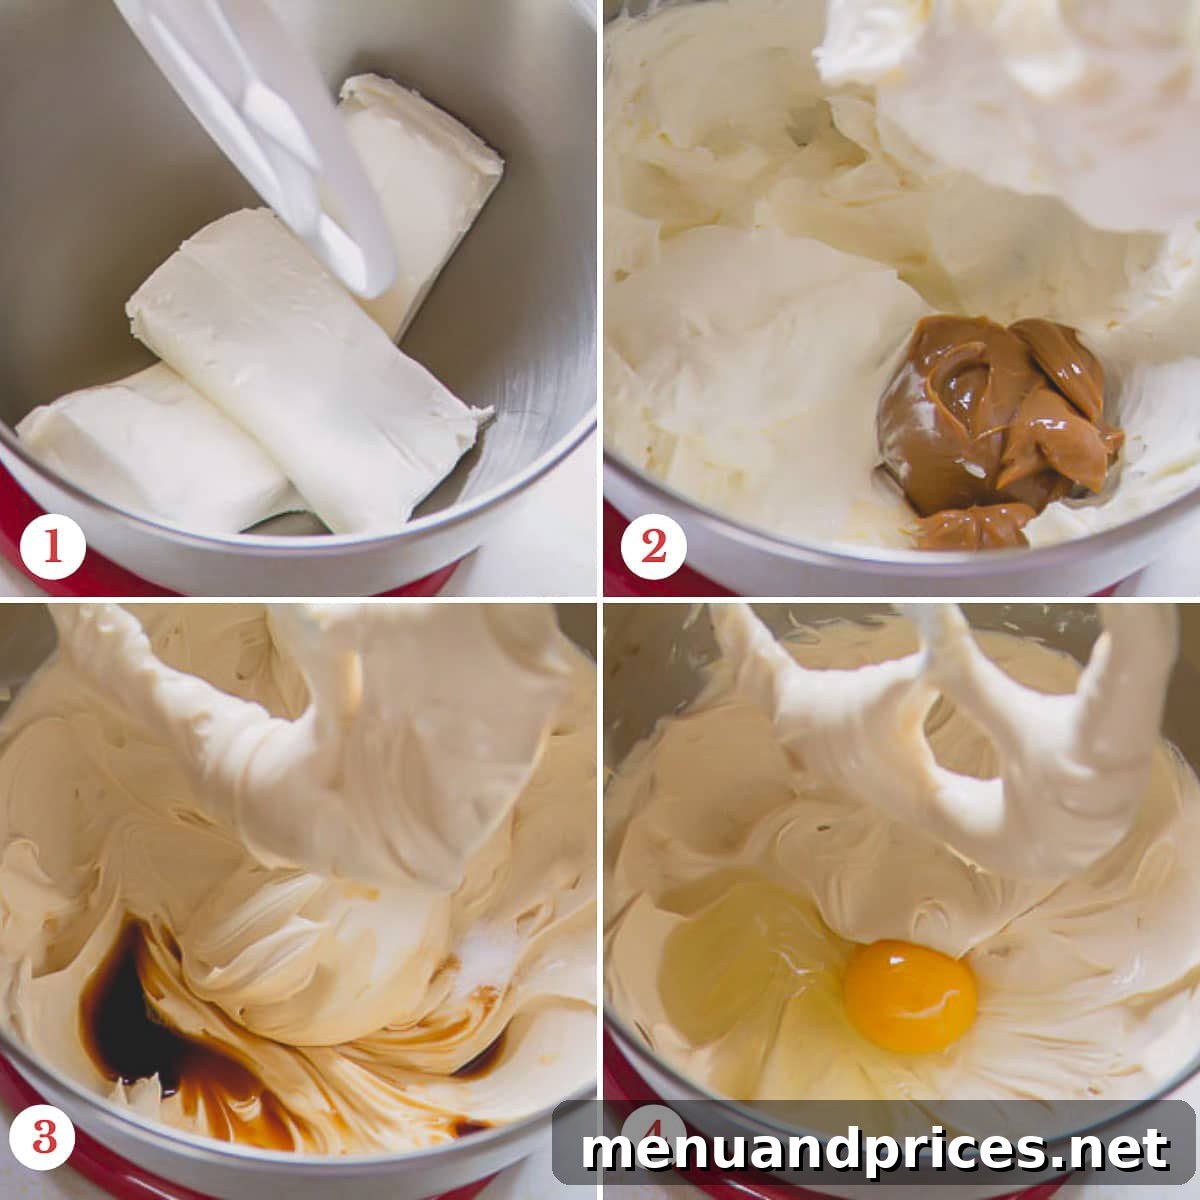
Pro Tip: Prevent Air Bubbles
Overmixing, especially after adding the eggs, is the primary culprit behind cheesecake cracks. Keep the mixer speed low and mix just until combined to minimize air incorporation.
4. Bake and Cool for a Flawless Finish
With your perfect filling ready, it’s time to bake your cheesecake to a golden, creamy perfection, ensuring a crack-free surface. This stage requires patience and attention to detail.
Carefully pour the luscious dulce de leche cheesecake filling into the prepared, chilled graham cracker crust. Once the filling is in the pan, gently tap the springform pan on your kitchen counter a few times. This simple action helps to release any remaining trapped air bubbles, which could otherwise rise to the surface and cause cracks during baking.
Next, place the foil-wrapped springform pan into a large roasting pan. Carefully pour 1 to 2 cups of hot water into the roasting pan, ensuring the water level comes about halfway up the sides of the springform pan, but without touching the foil line. This creates the essential water bath. If you don’t have a roasting pan large enough, an alternative is to place a separate baking pan filled with hot water on the bottom rack of your oven to provide a moist environment.
Bake your cheesecake in a preheated oven at 350°F (175°C) for approximately 1 hour. The cheesecake is done when the edges appear set and firm, but the very center (about 2-3 inches in diameter) still has a slight jiggle or wobble when gently shaken. Overbaking can lead to a dry cheesecake and potential cracks.
Once baked, turn off the oven heat immediately. Prop the oven door open slightly with a wooden spoon and allow the cheesecake to cool slowly inside the turned-off oven for at least 1 to 2 hours. This gradual cooling process is another critical step in preventing temperature shock, which is a major cause of cracks.
After slow-cooling in the oven, remove the cheesecake and place it on a wire cooling rack to cool completely to room temperature. This can take several hours. Once completely cool, cover the cheesecake tightly with plastic wrap and refrigerate it for at least 4 hours, or preferably overnight. Chilling is crucial for the cheesecake to fully set, firm up, and develop its optimal flavor and texture.
Just before serving, run a thin offset spatula or a butter knife around the edges of the chilled cheesecake to loosen it, then carefully release the springform sides. Spread the remaining reserved dulce de leche generously over the top, creating an inviting glossy finish. Finally, sprinkle some chunky sea salt flakes to enhance the flavors and add a beautiful touch.
Pro Tips for a Flawless, Crack-Free Dulce de Leche Cheesecake
Achieving that perfectly smooth, unblemished cheesecake surface is a hallmark of a master baker. Follow these essential tips to prevent common pitfalls and ensure your Dulce de Leche Cheesecake is nothing short of perfection:
- Ensure All Dairy is at Room Temperature: This is perhaps the most crucial tip! Cold cream cheese and eggs will not incorporate smoothly, leading to lumps in your batter and an inconsistent texture. Plan ahead and bring your cream cheese, sour cream, and eggs out of the refrigerator at least 1-2 hours before you begin mixing. Softened ingredients emulsify beautifully, creating a silky-smooth filling.
- Mix on Low Speed and Avoid Overmixing: When preparing the filling, especially after adding the eggs, resist the temptation to crank up the mixer speed. High-speed mixing incorporates too much air into the batter, which expands during baking and then collapses dramatically as the cheesecake cools, resulting in cracks. Mix on medium-low speed, just until ingredients are combined, scraping the bowl frequently.
- The Power of the Water Bath (Bain-Marie): This technique is your best friend for a crack-free cheesecake. A water bath creates a humid, gentle, and even baking environment, preventing the edges from cooking faster than the center and the cheesecake from drying out.
- Why a Water Bath is Essential: It ensures that your cheesecake cooks uniformly and slowly, resulting in a beautifully flat top and an incredibly creamy interior, free from cracks.
- Water Bath Alternatives: If you don’t have a roasting pan large enough for your springform, don’t despair! You can place a separate baking dish filled with 1-2 inches of hot water on the bottom rack of your oven. While not as effective as a direct water bath, it still adds crucial moisture to the oven environment. Alternatively, disposable foil roasting pans can be an affordable and convenient option.
- Prevent Sudden Temperature Changes: Cheesecakes are sensitive to abrupt temperature shifts, which can cause them to contract rapidly and crack. Once your cheesecake is baked (edges set, center slightly wobbly), turn off the oven but leave the cheesecake inside with the door propped open for 1-2 hours. This allows it to cool very gradually, minimizing stress on its delicate structure.
- Thorough Chilling is Non-Negotiable: After cooling to room temperature, your cheesecake needs ample time in the refrigerator to fully set. Chilling for at least 4 hours, or ideally overnight, allows the flavors to meld and the texture to firm up perfectly. Attempting to slice a warm or insufficiently chilled cheesecake will result in a messy, unset dessert.
- The Magic of Sea Salt Flakes: Don’t skip the final flourish! A sprinkle of flaky sea salt (like Maldon sea salt flakes, which are exceptional) on top of the dulce de leche topping is a game-changer. It provides a delightful textural crunch and, more importantly, a crucial savory counterpoint that perfectly balances the sweetness, elevating the entire dessert.
Storing Your Dulce de Leche Cheesecake for Maximum Freshness
One of the many benefits of this decadent Dulce de Leche Cheesecake is its excellent shelf life, making it an ideal make-ahead dessert for entertaining or simply enjoying over several days. Proper storage ensures it retains its incredible flavor and creamy texture:
- Refrigeration: Once completely cooled and chilled, whole or sliced cheesecake should be stored tightly covered with plastic wrap or in an airtight container in the refrigerator for up to 3-5 days. Ensure it’s well-sealed to prevent it from absorbing odors from other foods.
- Freezing: For longer storage, this cheesecake freezes beautifully. After it has completely cooled and chilled, you can freeze individual slices or the entire cheesecake (without the final dulce de leche topping, which can be added after thawing). Wrap it tightly in several layers of plastic wrap, then an additional layer of aluminum foil, to protect it from freezer burn. It can be stored in the freezer for up to 1 month. Thaw frozen cheesecake overnight in the refrigerator before serving. Add fresh dulce de leche topping and sea salt after thawing.
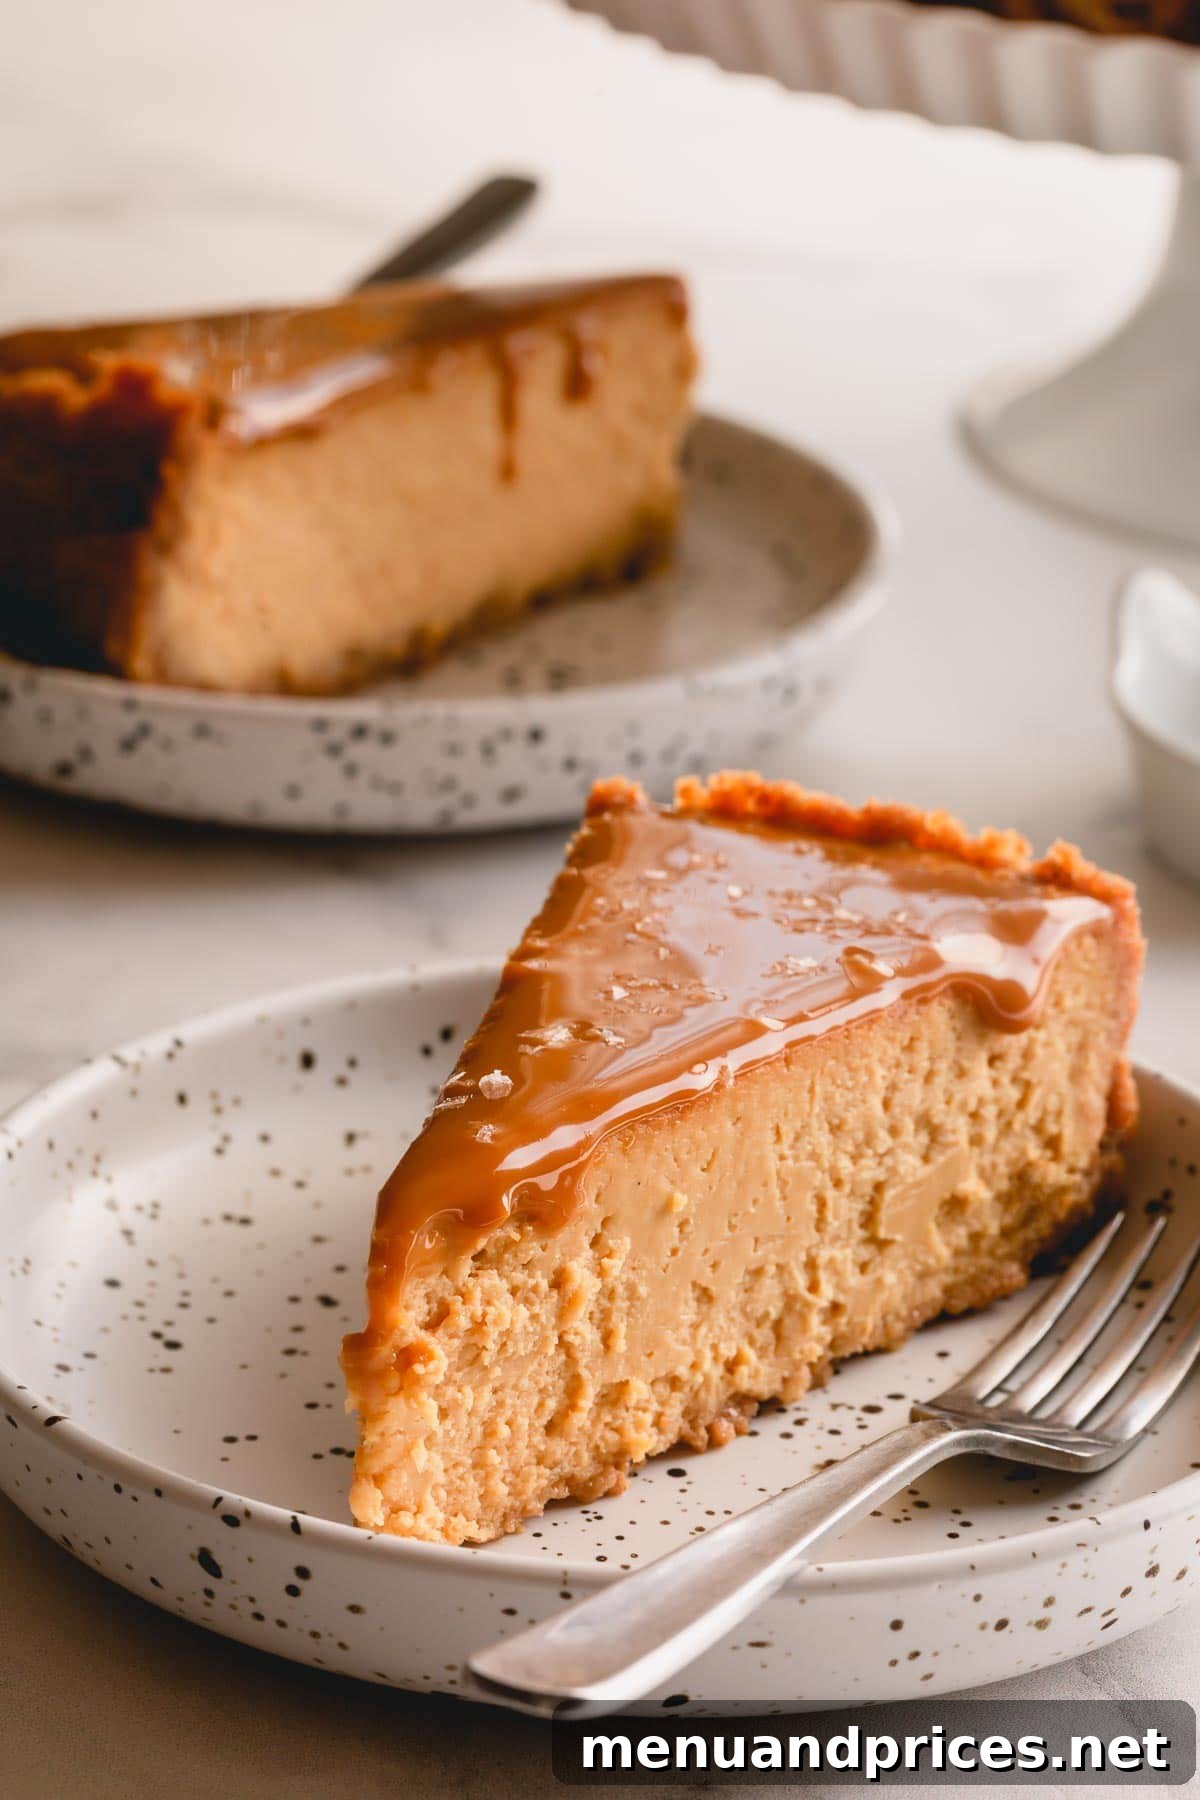
Embark on this delightful baking journey and create a truly memorable Dulce de Leche Cheesecake. Its rich flavors, velvety texture, and stunning appearance are guaranteed to make it a new favorite in your repertoire. We genuinely hope you’ll try this sweet and creamy treat. And if you do, please come back and share your experience and feedback in the comments below. Your star ratings and thoughts are incredibly valuable to us!
Video Tutorial: Watch How to Make It!
Dulce de Leche Cheesecake
Pin Recipe
Comment
Print Recipe
Ingredients
For crust:
- 16 graham crackers Note 1
- ¼ cup (50 g) granulated sugar
- 10 tablespoons (140 g) unsalted butter melted
For cheesecake filling:
- 24 oz (700 g) cream cheese softened Note 2
- 1/3 cup (65 g) granulated sugar
- 1 (14oz) can (400 g) dulce de leche divided
- ½ cup (125 g) sour cream
- 1 tablespoon pure vanilla extract
- ¼ teaspoon kosher salt
- 3 large eggs at room temperature
- Sea salt flakes for dusting optional (I love this Maldon sea salt flakes.)
Instructions
To prepare the pan:
-
Layer 2 large heavy-duty foil and put a 9-inch springform pan in the middle, as pictured. Tightly wrap the pan with foil, being careful not to make a hole.
To make the crust:
-
Crush graham crackers in a food processor until fine crumbs form. And add sugar and then melted butter and pulse until the crumbs are evenly moistened.
-
Transfer the crumbs into a 9-inch springform pan. Press the mixture onto the bottom and up the sides of the pan. Refrigerate while working on filling.
-
Preheat the oven to 350°F (175°C).
To make the filling:
-
In a mixing bowl with paddle attachment, beat cream cheese on medium speed until fluffy, about 2 minutes.
-
Stir in sugar, about ¾ of dulce de leche, sour cream, vanilla extract and salt. Beat the mixture until smooth, about 2 minutes, scraping the sides of the bowl halfway.
-
Add eggs one at a time, mixing well after each addition on medium low speed. Scrape the sides of the bowl again and mix for another 30 seconds.
-
Pour the batter into the prepared crust. Tap it on the counter couple of times to burst any trapped air bubbles.
To bake:
-
Place the cheesecake in a large roasting pan and pour 1 cup of hot water into the roasting pan. (Alternatively, place a baking pan of water on the bottom rack, if you don’t have a large enough roasting pan to fit the cheesecake pan.)
-
Bake the cheesecake for 1 hour, or until the edges of the cheesecake is set, but the center is slightly wobbly.
-
Turn off the oven heat and cool the cheesecake in the oven slowly for 1-2 hours.
-
Remove from the oven and cool completely. Then cover with a plastic wrap and refrigerate it for at least an hour, or preferably overnight.
-
When ready to serve, run an offset spatula (or a butter knife) around the edges, and remove springform sides.
-
Spread the reserved dulce de leche on top and sprinkle flakey sea salt, if desired.
⭐️ Did you make this recipe?
Please leave a review and let us know how you liked it!
Video
Tips & Notes
Note 1: You’ll need 2 sleeves of graham crackers, equivalent to 260g of crackers.
Note 2: Use full fat, brick-style cream cheese. No whipped or reduced fat cream cheese for the best result.
Storing Tips:
– This cheesecake is a perfect make-ahead dessert. Store cooled cheesecake, tightly covered, in the fridge for up to 3 days. Or freeze for up to 1 month.
– Refrigerate leftover cheesecake, in an airtight container, for up to 5 days.
Nutrition

This recipe was originally published on June 9th, 2016.