
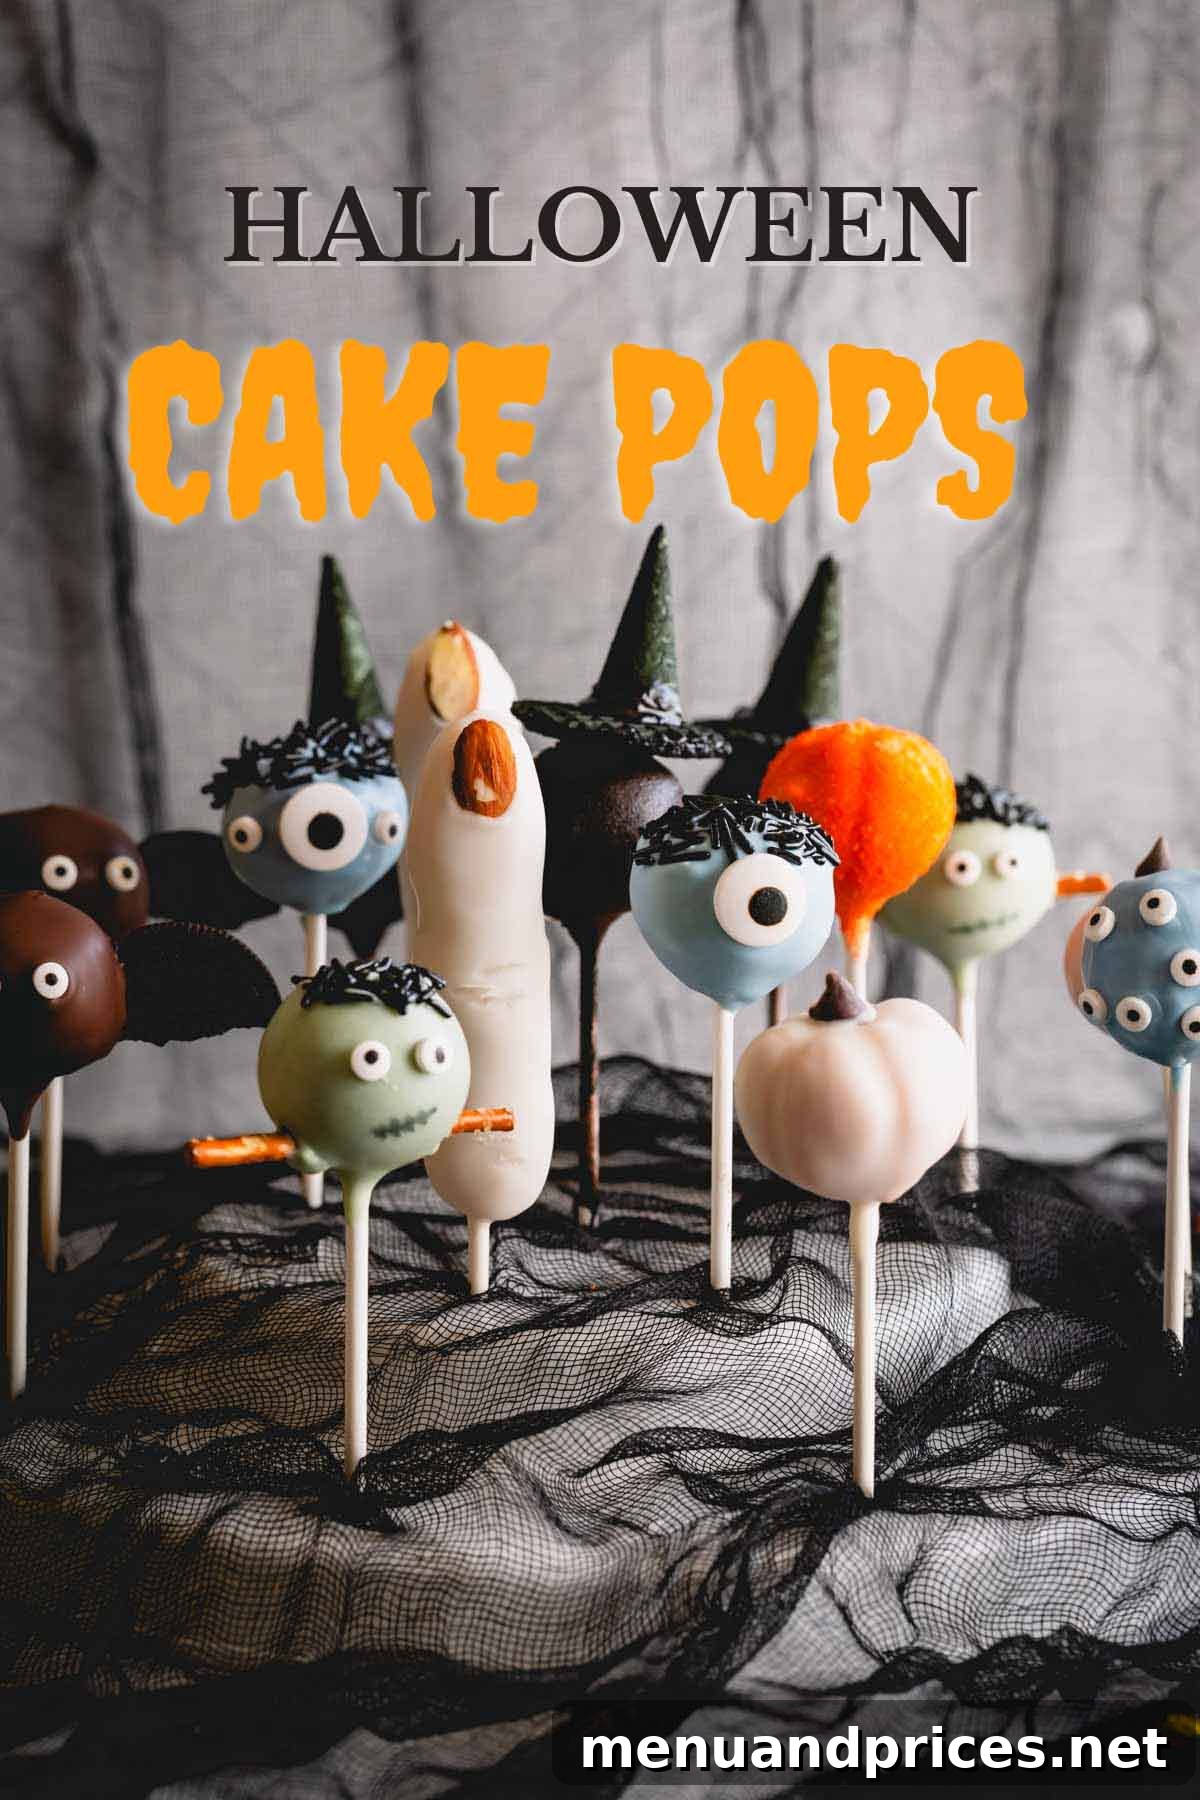
Get ready to conjure up some magic this spooky season with our ultimate guide to creating enchanting **Halloween cake pops**! These delightful, hand-crafted treats are a quintessential part of any frightful celebration, captivating both children and adults with their rich, fudgy texture and whimsical designs. Surprisingly simple to whip up, these portable confections are not just delicious but also incredibly fun to make and customize, transforming ordinary cake into extraordinary Halloween artistry.
Pin this now to find it later
Pin It
Why You’ll Adore This Halloween Cake Pop Recipe
These spooktacular and ghoulish cake pops are not just treats; they’re edible art, perfect for enchanting guests at Halloween parties, school events, or simply enjoying at home. Their bite-sized nature makes them effortlessly enjoyable, while the endless decoration possibilities ensure they’re always eye-catching and utterly irresistible.
- Irresistibly Delicious: Our Halloween cake pops strike the perfect balance between indulgence and sweetness. Each bite offers a rich, moist cake interior enveloped in a crisp candy shell, ensuring you won’t be able to stop at just one. They’re a delightful confection that truly satisfies any sweet craving without being cloyingly sugary.
- Cleverly Time-Saving: We understand that Halloween prep can be a whirlwind! That’s why this cake pop recipe thoughtfully begins with a convenient box cake mix. This smart shortcut significantly cuts down on baking time, allowing you to dedicate more of your precious hours to the most enjoyable part: unleashing your creativity with adorable and spooky decorations.
- Perfect for Beginners: Don’t let intricate designs intimidate you! You absolutely don’t need a professional baker’s certificate to master the art of cake pop decorating. This recipe is designed with simplicity in mind, offering clear, step-by-step instructions accompanied by helpful photos to guide you through every stage, making the process super simple and rewarding for anyone.
For even more decorating inspiration and expert tips, be sure to explore my guides on easy cake pops and discover how to make homemade chocolate cake pops (from scratch)!
Understanding the Magic of a Cake Pop
A cake pop is a delightful confectionery innovation, essentially a small, round sphere of crumbled cake meticulously blended with frosting and then mounted onto a lollipop stick. This unique construction transforms a slice of cake into a portable, mess-free, and individually portioned treat. Once formed, these cake balls are typically dipped into a smooth, melted coating—often chocolate, almond bark, or vibrant candy melts—and then adorned with an array of candies, sprinkles, and edible decorations. The result is a fun, versatile, and visually appealing dessert that’s perfect for parties and celebrations, offering endless creative possibilities for themes and flavors. They combine the rich flavor of cake with the playful presentation of a lollipop, making them a popular choice for events of all kinds.
Essential Ingredients and Spooky Embellishments
Crafting these Halloween delights requires a few key ingredients for the cake base, along with a treasure trove of decorative elements to bring your spooky visions to life. Here’s a detailed list of what you’ll need, focusing on the fun, festive aspects:
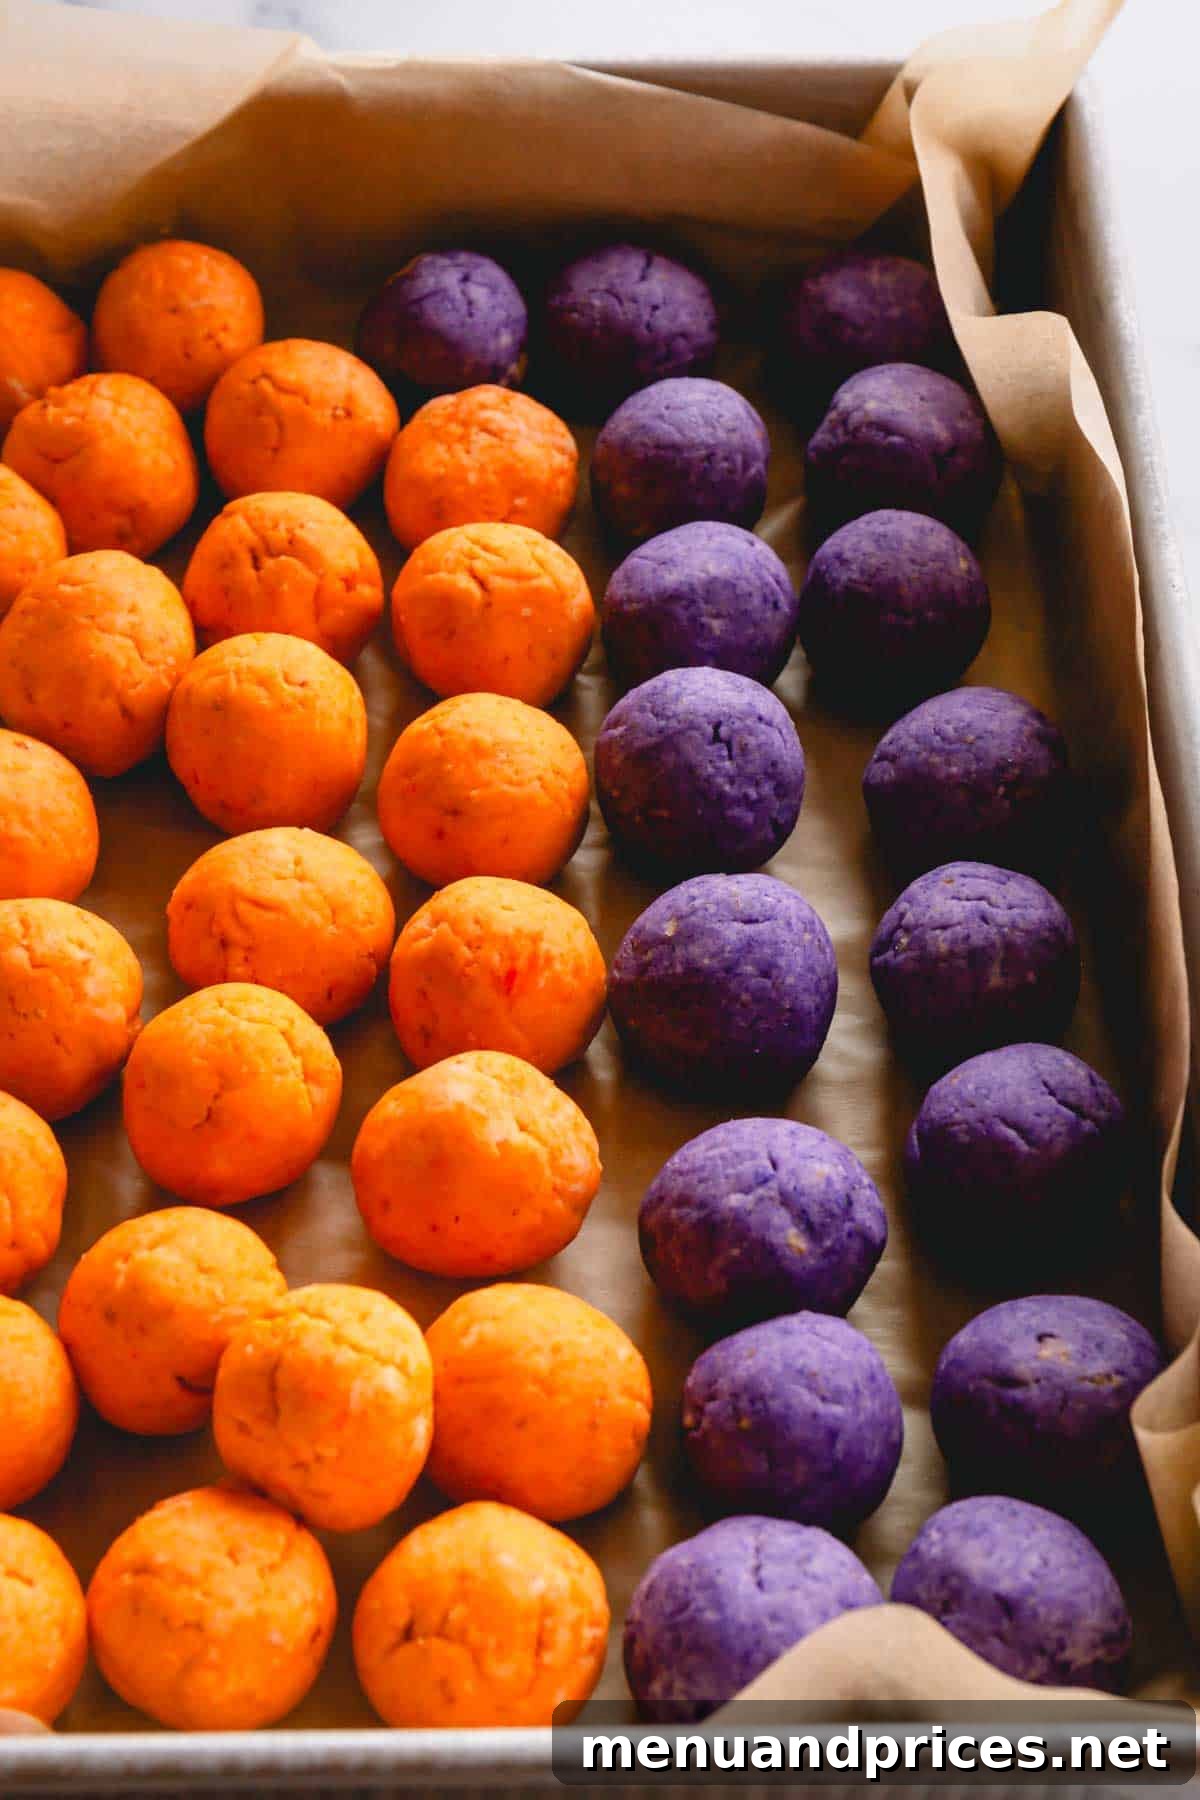
- Food Coloring: To infuse your cake pops with vibrant Halloween hues, you’ll need food coloring. Dye your white or vanilla cake mix with striking orange and purple food coloring. For instance, I adore using orange cake for pumpkin cake pops; the subtle orange peeking through the white coating creates a beautiful, authentically pumpkin-like appearance that truly stands out.
- Almond Bark or Candy Melts: These are crucial for coating your cake pops. For vividly colored cake pops, such as Frankensteins or Monster Heads, I highly recommend using colored candy melts. To achieve a smooth, thin coating, always mix them with shortening. For classic white or rich chocolate coatings, white and chocolate almond bark are excellent choices, offering a consistent melt and set.
- Shortening: This ingredient is absolutely vital, especially when working with candy melts. Shortening helps to thin out the melted candy, resulting in a beautifully smooth, even, and thin coating on your cake pops. Skipping this step, particularly with candy melts, can lead to a thick, clumpy coating, so don’t overlook its importance!
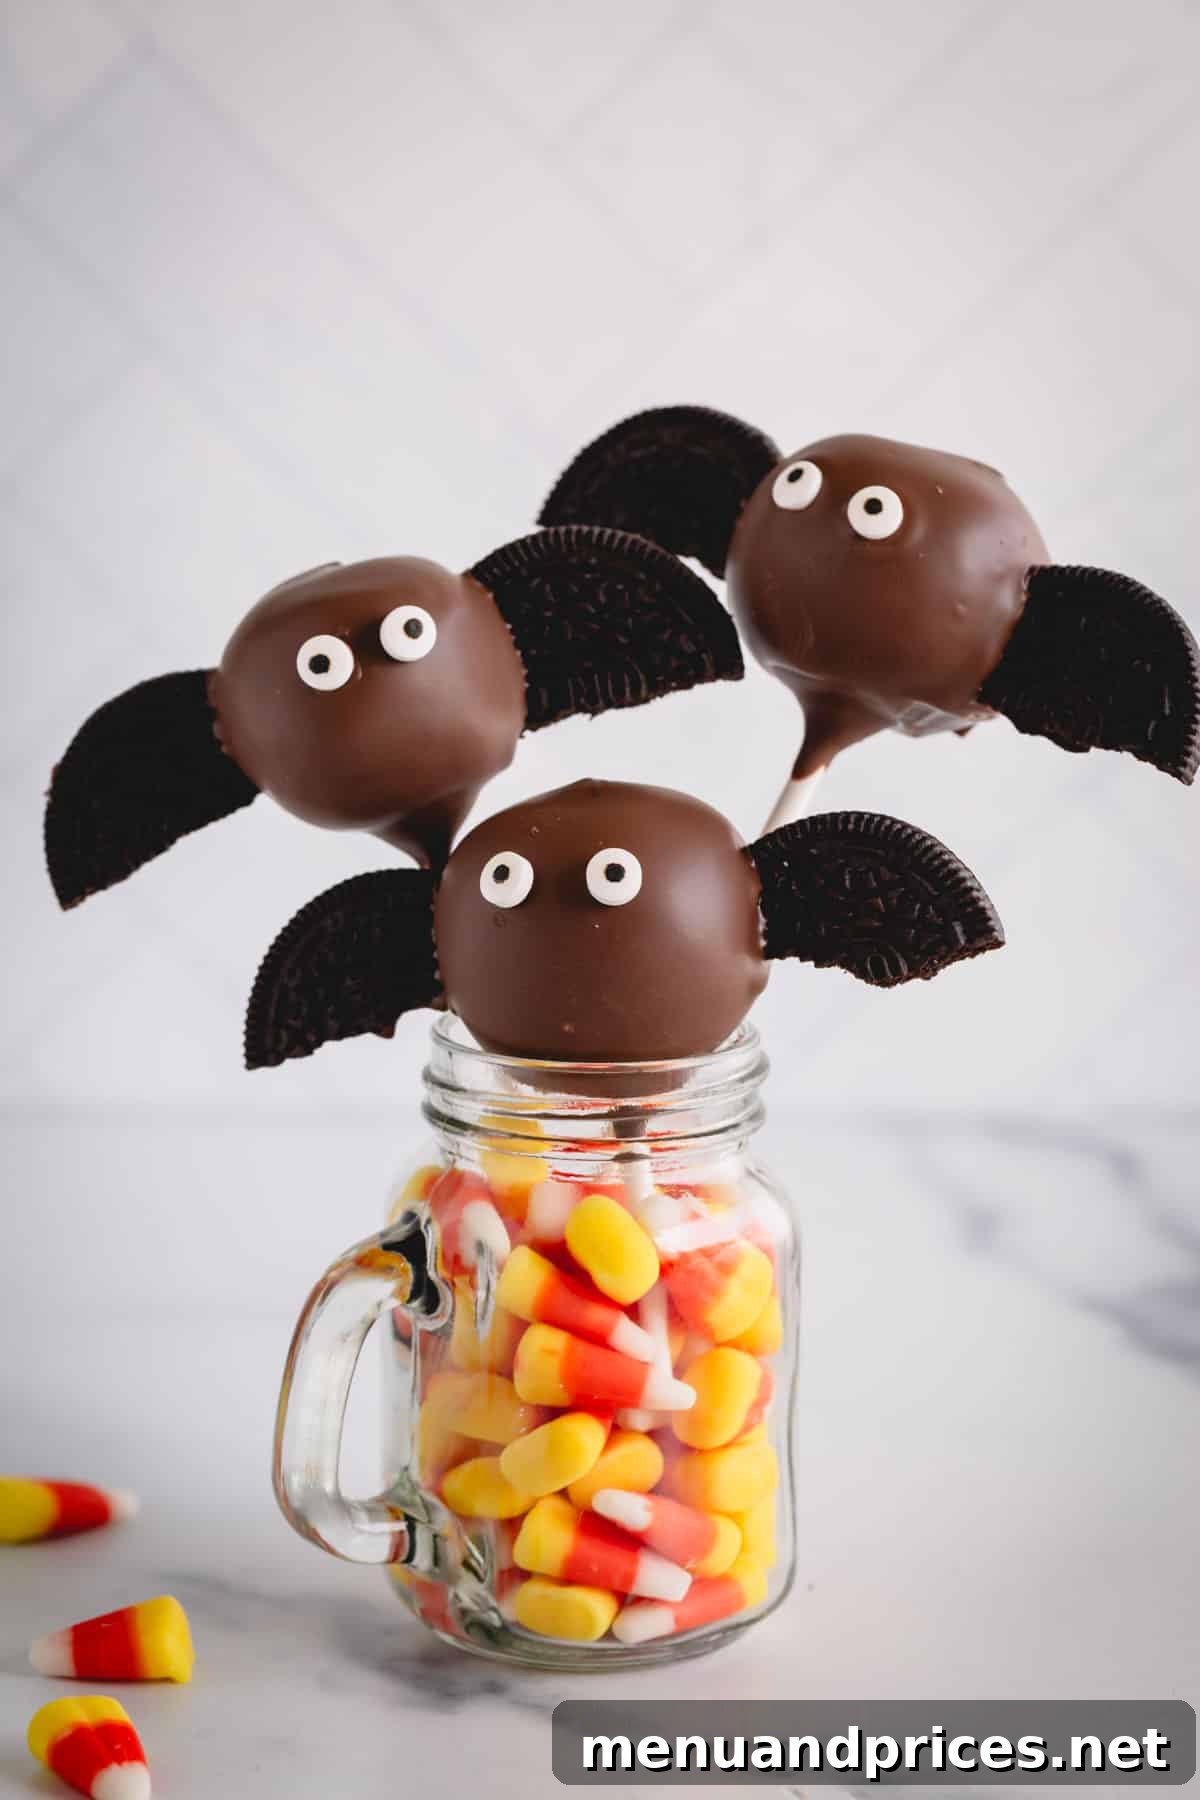
- Chocolate Oreo Cookies: These iconic cookies are ingeniously repurposed to form eerie bat wings. You’ll need to carefully separate the cookies from their creamy filling and then gently break them in half to create the perfect wing shape for your nocturnal creatures.
- Candy Eyes: A Halloween staple! You can truly never have enough of these whimsical edible eyeballs. They instantly add character and a touch of humorous creepiness to any monster, bat, or Frankenstein creation.
- Pretzel Sticks: For Frankenstein’s neck bolts, pretzel sticks are ideal. Break these into roughly 1-inch pieces and insert them into the sides of your green cake pop heads. Ensure you use straight pretzel sticks, as pretzel twists won’t provide the desired effect.
- Edible Marker: A black edible marker is an essential tool for drawing delicate details, such as the mouths and stitches on your Frankenstein cake pops, adding fine finishing touches.
- Mini Chocolate Chips: These tiny morsels make the absolute cutest little pumpkin stems, adding a charming, realistic detail to your pumpkin patch creations.
- Almond Slices: These slender nut slices are pressed onto the top of witch finger cake pops, perfectly mimicking gruesome fingernails for a delightfully eerie effect.
- Mini Stroop Waffles: These delicious, thin waffles are ingeniously used to form the wide, flat brim of a witch’s hat, providing a sturdy and tasty base.
- Mini Waffle Cones: Once assembled, these miniature cones attach directly to the mini Stroop waffles, forming the pointy top of a classic witch’s hat, completing the iconic silhouette.
- Food Coloring Spray: A black food coloring spray is used to transform your assembled mini witch hats into a deep, mysterious black, enhancing their spooky charm.
Almond Bark vs. Candy Melts: A Quick Comparison
When it comes to coating your cake pops, both almond bark and candy melts are popular choices, but they have subtle differences. In my experience, candy melts tend to have a naturally thicker consistency compared to almond bark. This is precisely why I strongly recommend incorporating a small amount of shortening when working with candy melts. The shortening helps to thin out the candy, creating a smoother, more fluid coating that results in a beautiful, thin, and even shell on your cake pops, preventing a thick, sometimes brittle layer.
Essential Equipment for Cake Pop Perfection
Having the right tools can make all the difference in the cake pop-making process. Here’s a rundown of the key equipment you’ll need to ensure your Halloween treats turn out perfectly:
- Half Sheet Pan: Unlike traditional cakes, the cake for cake pops is often baked on a rimmed baking sheet. This method is incredibly efficient, as it allows the cake to bake more quickly and evenly, cutting down your baking time to a mere 15 minutes! Ensure it’s lined with parchment paper for easy removal.
- Large Bowl: Any spacious mixing bowl will suffice for combining your cake crumbles and frosting, providing ample room to mix the ingredients thoroughly and create that perfect cake pop consistency.
- Baking Sheet: A second baking sheet is essential for arranging your formed cake balls. It provides a flat surface for them to chill uniformly in the refrigerator, ensuring they firm up properly before dipping.
- Cake Pop Sticks: These are fundamental! Make sure to select sturdy cake pop sticks that are at least 6 inches long. The extra length provides a good handle for dipping and decorating, and sturdy sticks prevent your precious cake pops from wobbling or breaking.
- Styrofoam or Cake Pop Stand: This is an absolute must-have for cake pop success! After dipping, your cake pops need to stand upright undisturbed while the candy coating hardens. A Styrofoam block or a dedicated cake pop stand provides the perfect support, preventing any flat spots or messy drips.
The Comprehensive Guide to Crafting Perfect Cake Pops
Creating the perfect cake pop is a straightforward process, but it requires attention to detail at each stage. We’ll cover everything from baking the cake to getting those sticks firmly in place, ensuring a solid foundation for all your spooky decorations. While some recipes might refer you elsewhere, we’re detailing every step right here for your convenience.
Bake the Cake Base:
- Preheat Oven and Prepare Pan: Begin by preheating your oven to 350°F (175°C). Line a baker’s half sheet pan with parchment paper or a silicone mat. This will prevent the cake from sticking and make cleanup a breeze.
- Prepare Cake Batter: In a large mixing bowl, prepare your yellow cake mix according to the package directions. This typically involves combining the cake mix with 3 large eggs, ½ cup (120 ml) of vegetable oil, and 1 cup (240 ml) of water or milk. Whisk until the batter is smooth and well combined.
- Spread Batter Evenly: Pour the prepared cake batter onto your lined baking sheet. Using an offset spatula or the back of a spoon, spread the batter evenly across the entire pan, ensuring a consistent thickness for even baking.
- Bake and Cool: Bake the cake for approximately 15 minutes, or until a toothpick inserted into the center comes out clean. Once baked, remove the cake from the oven and allow it to cool completely on a wire rack before proceeding. A fully cooled cake is crucial for the next steps.
Create the Cake Pop Mixture:
- Crumble the Cake: Once the cake is completely cooled, crumble it into fine pieces in your large mixing bowl. You can do this by hand or use a fork to break it down. Ensure there are no large lumps remaining.
- Incorporate Cream Cheese: Add 4 oz (115 g) of softened cream cheese to the crumbled cake. Using clean hands, thoroughly mix the cream cheese into the cake crumbles until a uniform, moist, and pliable dough forms. Continue mixing until there is absolutely no dry cake visible and the mixture holds together when pressed. (Note: Using cream cheese instead of traditional frosting can help balance the sweetness of a box cake mix, creating a more enjoyable flavor profile.)
- Optional Coloring: If you plan to make colored cake balls (like for pumpkins or monster heads), divide the cake pop mixture into separate bowls at this stage. Add your desired food coloring (e.g., orange for pumpkins, purple or blue for monsters) to each portion and mix until the color is evenly distributed before forming the balls.
Form and Chill the Cake Balls:
- Form the Cake Balls: Using a small portion scoop (about 1.5 inches in size) or your hands, roll the cake mixture into uniformly sized balls. For witch finger cake pops, shape the mixture into long, slender fingers instead of balls. Arrange these on a separate baking sheet lined with parchment paper.
- Refrigerate Thoroughly: Place the formed cake balls (or fingers) into the refrigerator to chill for at least 2 hours, or ideally, overnight. Chilling is a critical step, as it firms up the cake mixture, preventing it from crumbling or falling off the sticks during the dipping process.
Prepare for Coating:
- Melt Coating for Sticks: In a microwave-safe cup or bowl, melt a small amount of almond bark or candy melts (about ¼ cup) with a teaspoon of shortening until smooth. This melted coating will act as “glue” for your sticks.
- Insert Sticks: Take out only about 10 chilled cake balls from the refrigerator at a time to keep the rest cold. Dip the tip of a cake pop stick (about ½-inch deep) into the melted coating. Immediately insert the coated end of the stick firmly into the center of a chilled cake ball. The melted coating will help secure the stick as it hardens. Repeat this process for all the cake balls, working efficiently.
- Re-chill: Once all cake balls have sticks, place them back into the refrigerator for another 15-20 minutes to ensure the coating around the stick hardens completely, creating a strong bond. Keeping the cake balls cold is paramount for successful dipping.
Spooktacular Decorating Ideas for Your Halloween Cake Pops
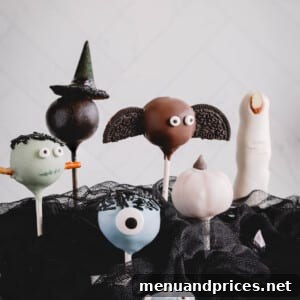
Now for the most exciting part: transforming your basic cake pops into delightful Halloween characters! You can choose to keep it simple by focusing on just one or two designs, or unleash your inner artist and create all six whimsical Halloween cake pops. No matter your choice, these little treats are sure to be a hit with kids and adults alike, bringing a magical touch to your celebration!
1. Crafting Creepy Frankenstein Cake Pops
- Prepare Your Workspace: Have black sprinkles, candy eyes, and 1-inch pieces of pretzel sticks ready. Melt your green candy melts with 1-2 tablespoons of shortening in a 2-cup measuring cup until smooth, following package instructions.
- Dip and Shake: Remove about 10 cake pops from the fridge at a time. Dip each cake ball entirely into the melted green candy coating, ensuring the base is also covered. Gently shake off any excess coating, allowing it to drip back into the cup.
- Add Hair and Set: Working quickly, dunk the very top of the coated cake balls into the bowl of black sprinkles, creating Frankenstein’s hair. Immediately place the cake pops upright into a cake pop stand or Styrofoam block to harden.
- Insert Neck Bolts: While the coating is still slightly tacky, poke the small pretzel sticks into the lower sides of the cake balls to form his iconic neck bolts.
- Attach Eyes: Place the candy eyes onto the pops. If the coating has already dried, simply dab a tiny bit of warm candy melt onto the back of the eyes to “glue” them on.
- Draw Features: Once the green coating is completely dry and set, use a black edible marker to carefully draw a stitched mouth and any other desired facial details onto your Frankenstein monsters.
Pro Tip for Pretzel Sticks:
To make inserting the broken pretzel sticks easier and more symmetrical, try poking them into both sides of the cake pop simultaneously. This helps them align perfectly without distorting the cake ball.
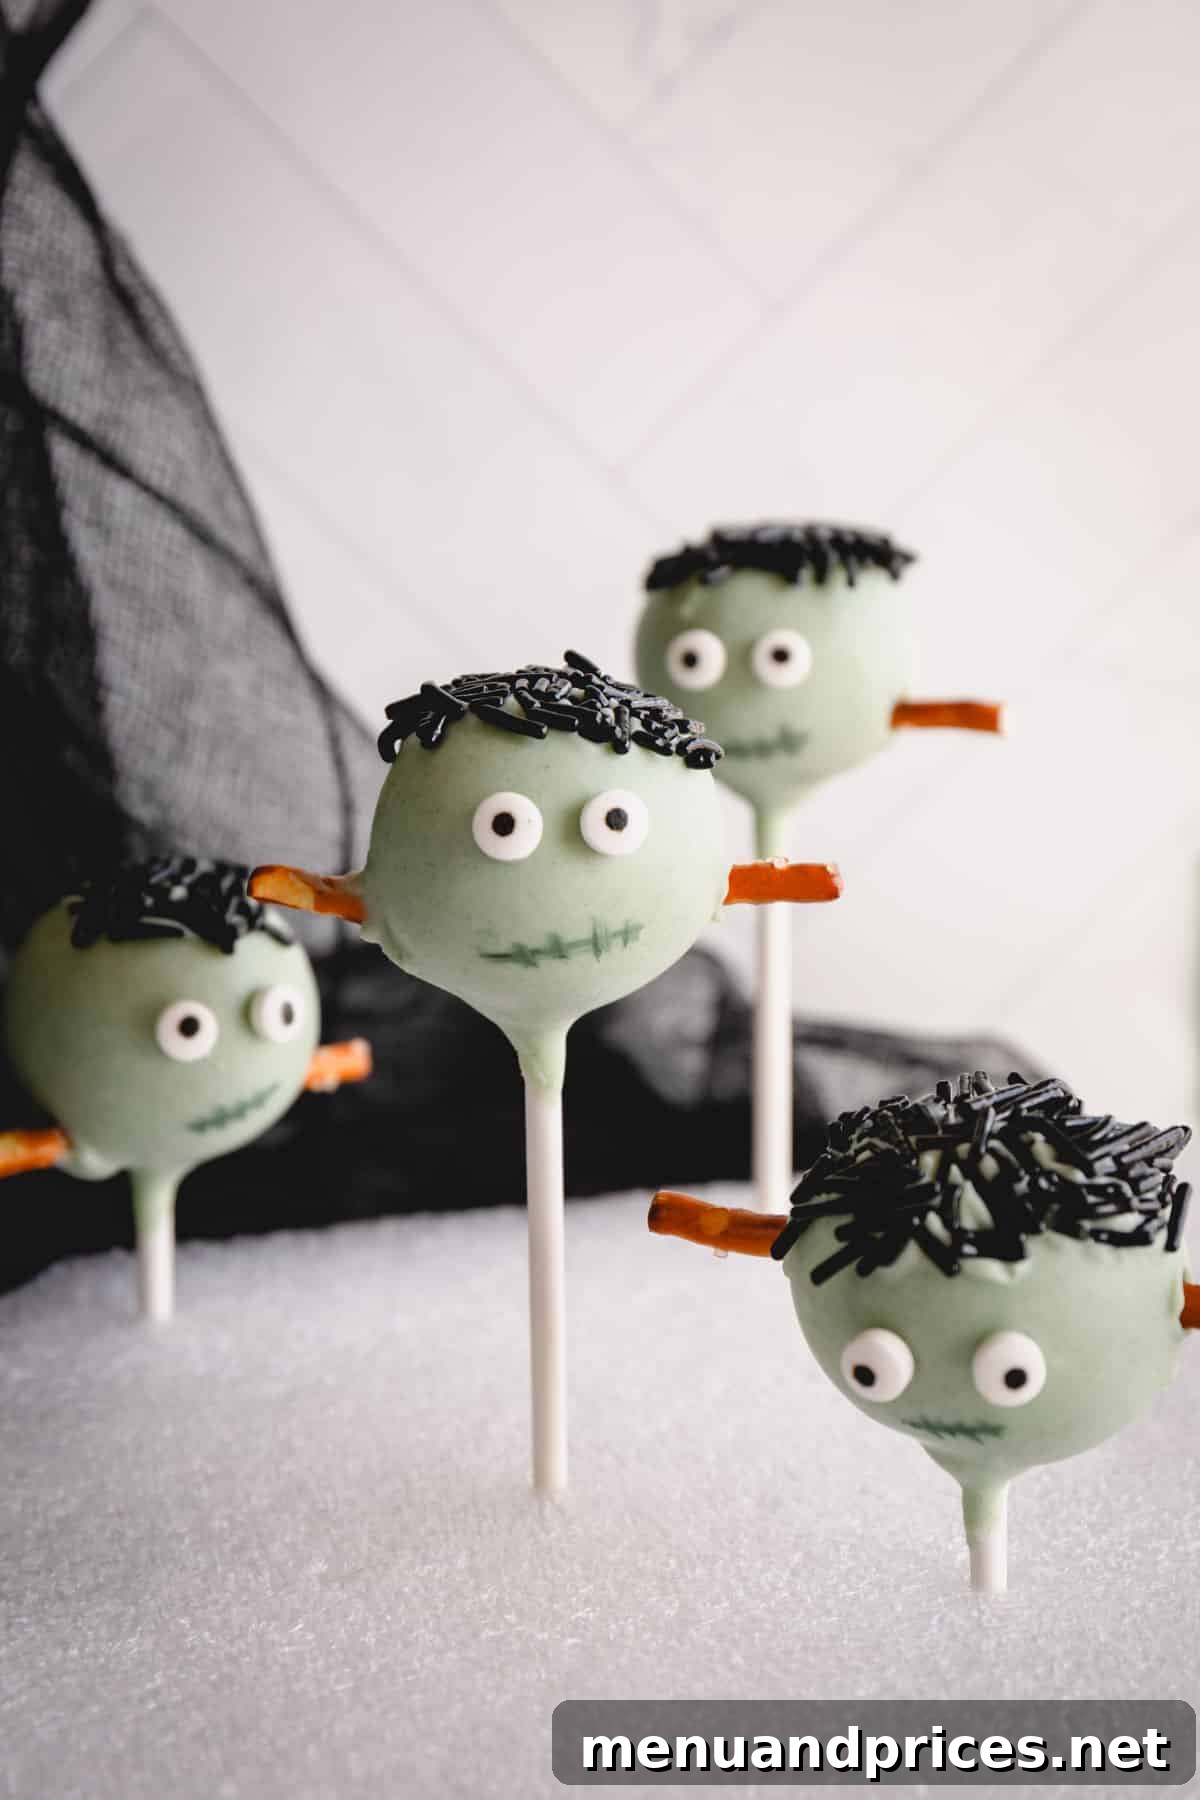
2. Decorating Adorable Pumpkin Cake Pops
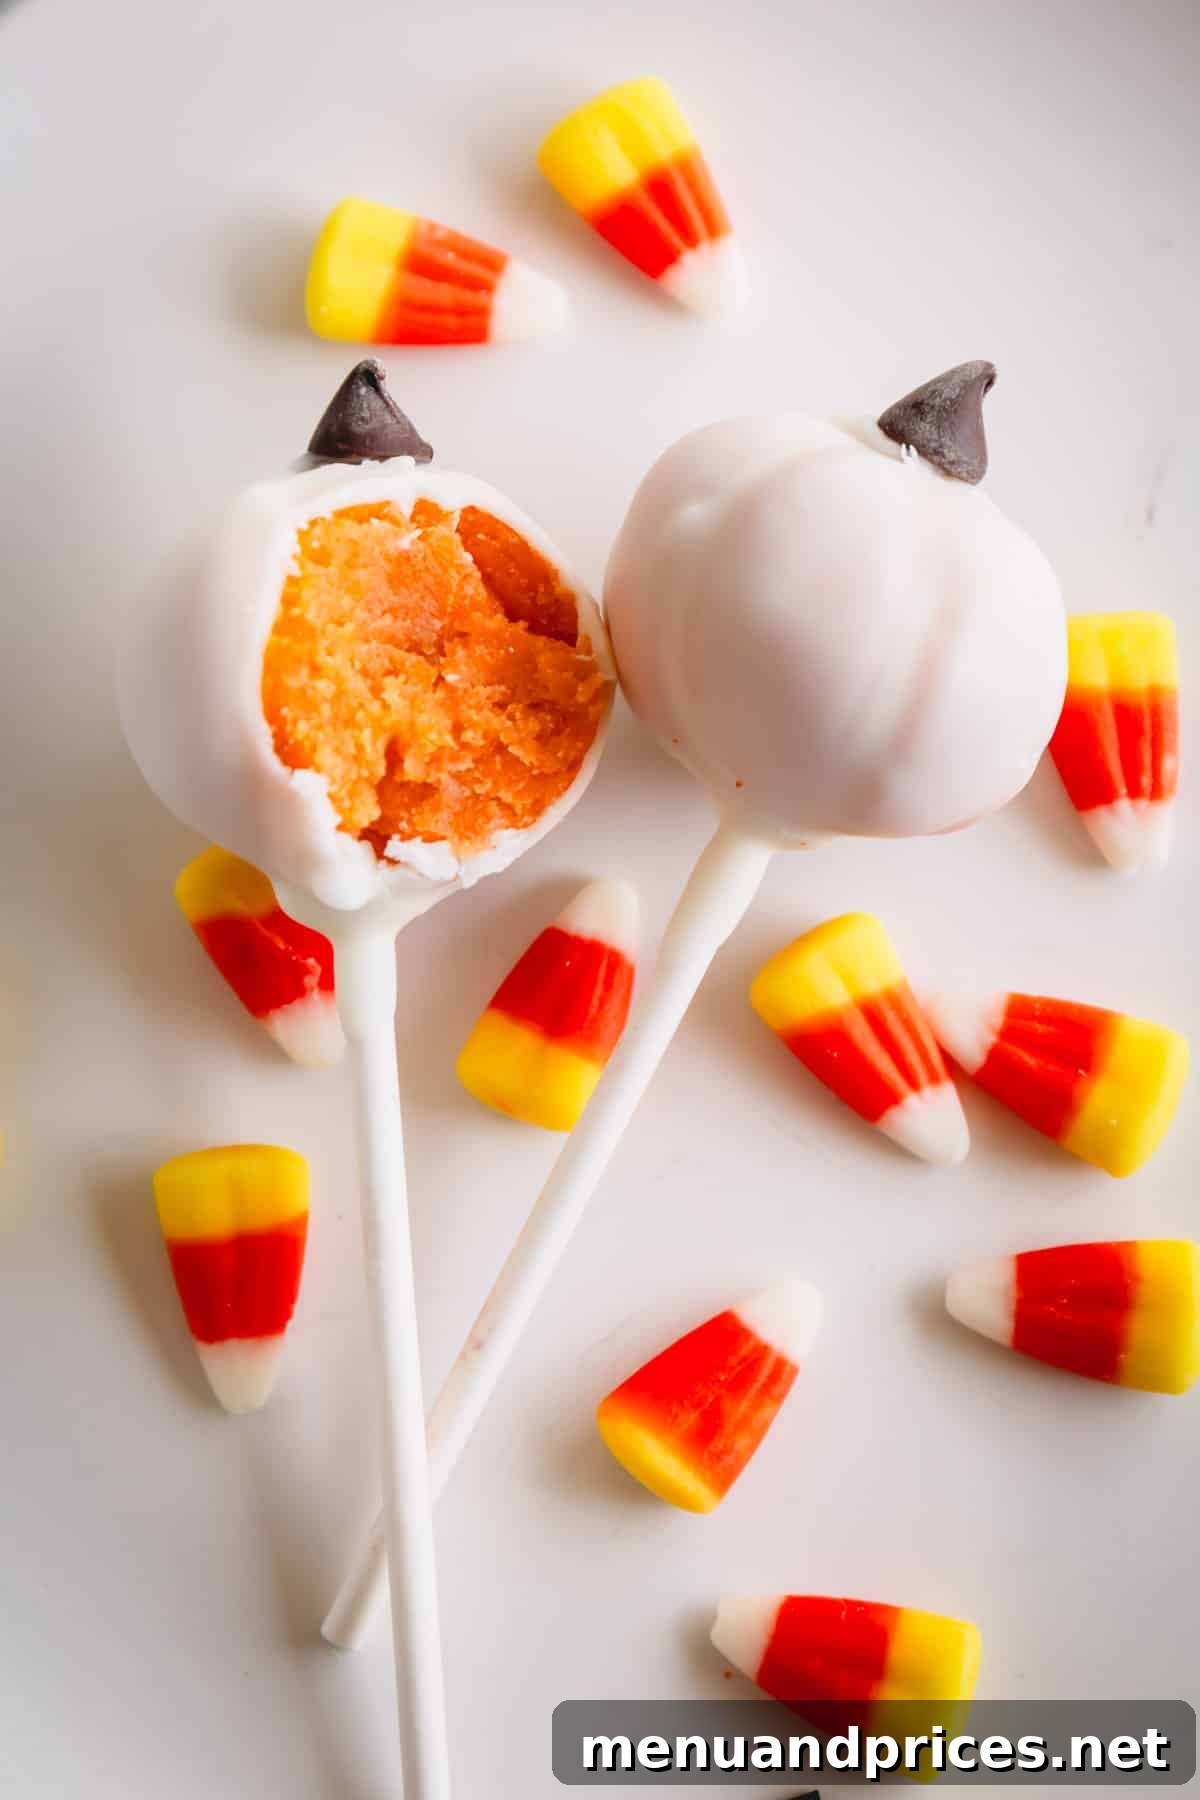
- Prepare the Cake: For the most authentic pumpkin look, I highly recommend using an orange-tinted cake mixture for these. The subtle orange hue will beautifully show through the white coating, enhancing the pumpkin effect.
- Create Pumpkin Grooves: Using a clean cake pop stick or a toothpick, gently indent lines into the chilled cake pops. Draw wide, deep grooves from the very top of the cake pop down to the base, mimicking the natural ridges of a pumpkin. Wider dents tend to show up better after coating. Once grooved, place the cake balls back into the fridge to re-chill and set their shape.
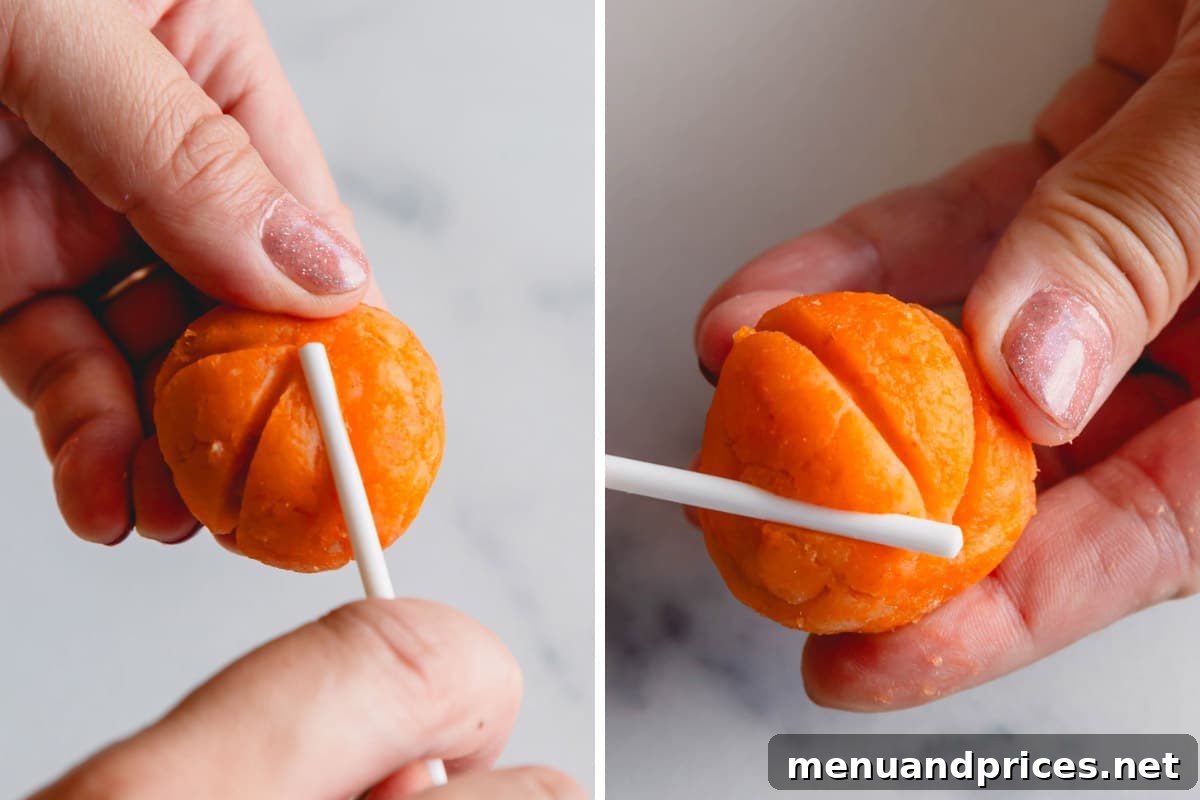
- Melt White Coating: Melt white almond bark or white candy melts with 1-2 tablespoons of shortening in a 2-cup measuring cup until smooth, following package instructions.
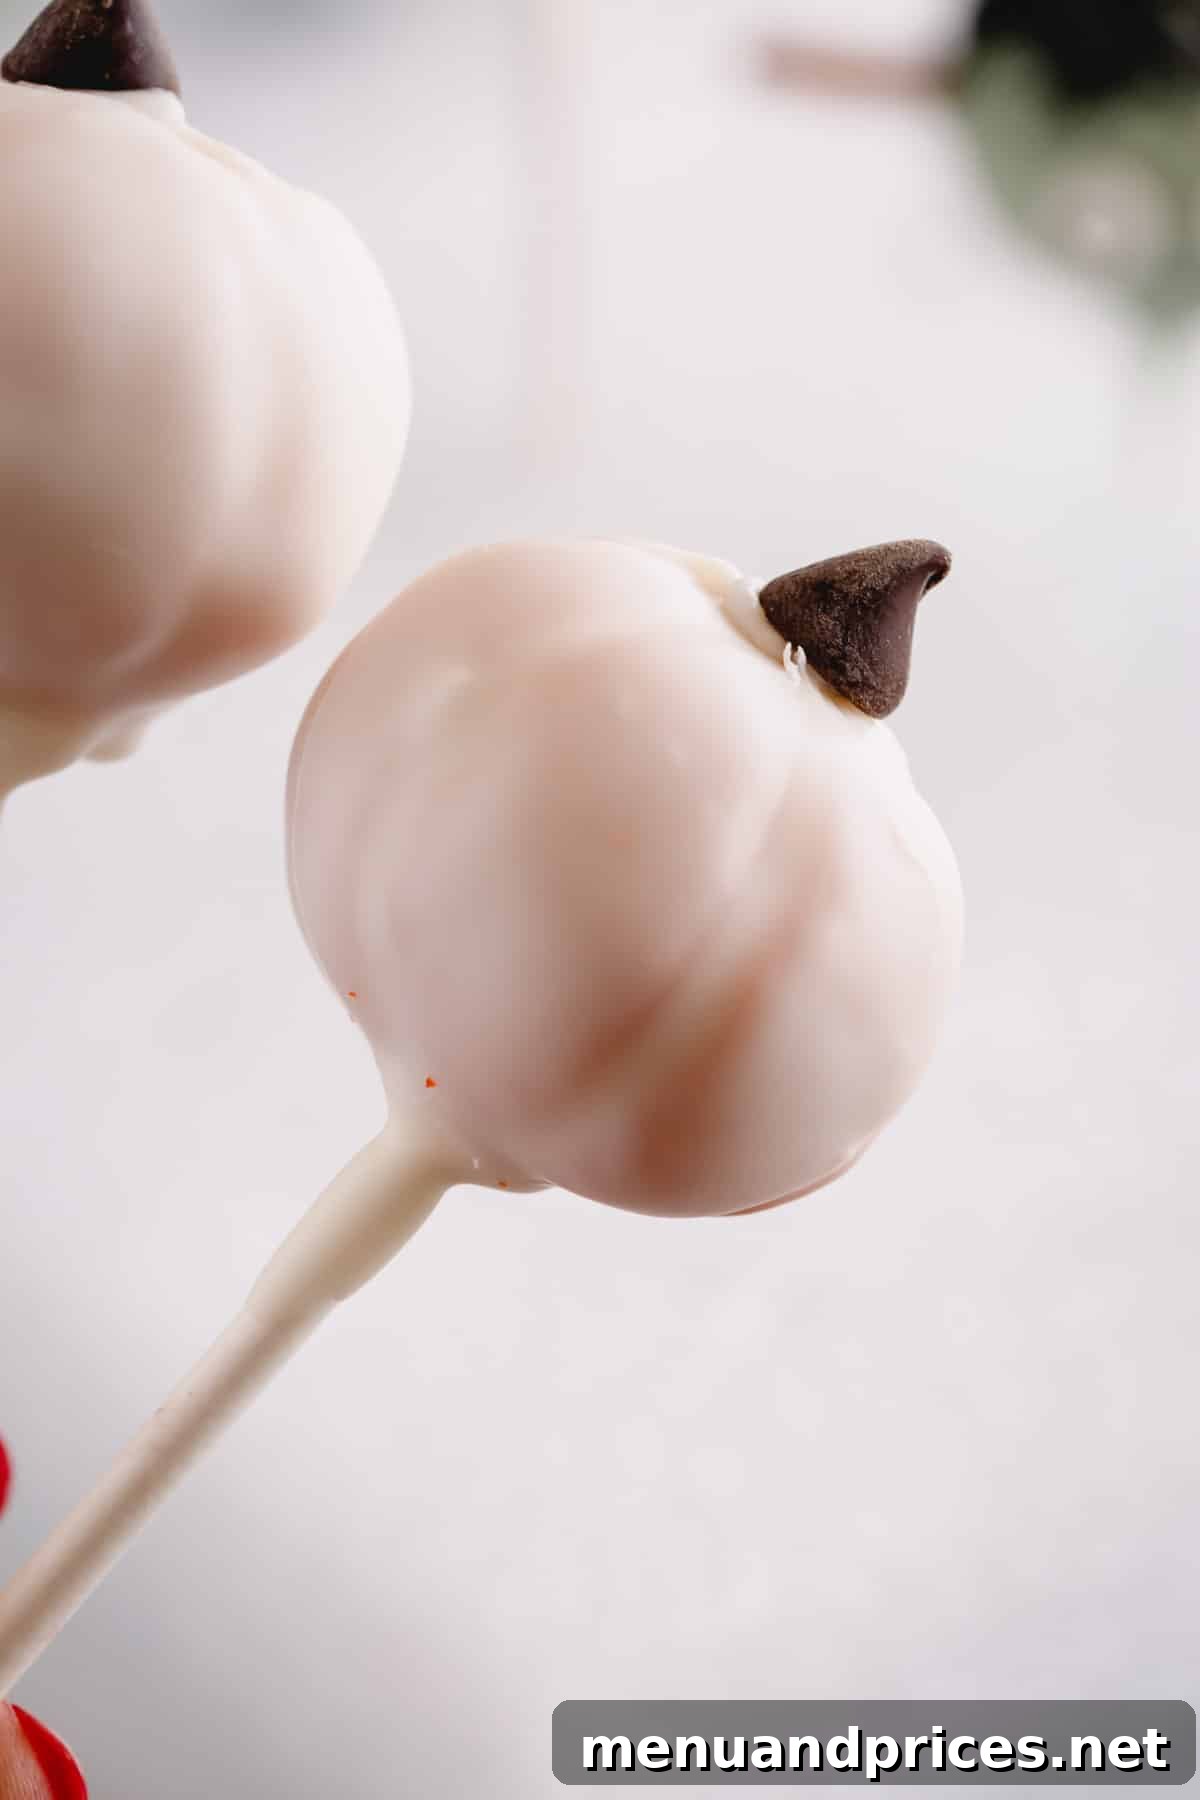
- Dip and Shake: Bring out about 10 grooved cake balls at a time. Dip each cake ball into the melted white coating, ensuring it’s fully covered, including the base. Gently shake to remove any excess coating, allowing the grooves to remain visible.
- Add Stem and Set: Immediately place the cake balls upright into a cake pop stand. While the coating is still wet, top each pumpkin with a mini chocolate chip, pointy side up, to create the perfect little pumpkin stem. Allow them to set completely.
- Optional Sugar: For an extra sparkle, you can sprinkle orange sanding sugar all over the cake pops right after dipping, while the coating is still wet.
3. Spooky Witch Finger Cake Pops
- Form the Fingers: Instead of rolling the cake mixture into balls, shape it into long, gnarled finger-like forms. Make them slightly irregular for a more realistic, creepy effect. Chill these thoroughly in the refrigerator until very firm.
- Melt White Coating: Melt white almond bark or white candy melts with 1-2 tablespoons of shortening in a 2-cup measuring cup until smooth, following package instructions.
- Dip and Shake: Take out about 10 chilled cake fingers at a time. Dip each cake finger into the melted white coating until it’s fully covered, including the base. Gently shake to remove any excess coating.
- Add Fingernails and Set: Immediately place the cake fingers upright into a cake pop stand. While the coating is still wet, press an almond slice onto the tip of each finger to create a realistic, slightly disturbing fingernail. Allow the coating to set.
- Create Wrinkles: Once the coating has mostly set but is not fully hard, use a clean cake pop stick or a toothpick to gently draw a few horizontal lines across the fingers, mimicking the wrinkles and joints of a witch’s gnarly finger.
4. Creating Adorable Bat Cake Pops
- Prepare Bat Wings: Carefully separate chocolate Oreo cookies from their creamy filling. Break the cookie halves in two, creating crescent-shaped “wings.” Have candy eyes ready.
- Melt Chocolate Coating: Melt chocolate almond bark in a 2-cup measuring cup in the microwave until it’s nice and smooth, following package instructions. No shortening is typically needed for almond bark unless it’s too thick.
- Dip and Set: Remove about 10 cake pops from the fridge at a time. Dip each cake ball completely into the melted chocolate almond bark, ensuring it’s fully covered. Gently shake to remove any excess coating. Immediately place each cake pop upright into a cake pop stand or piece of Styrofoam.
- Attach Wings: Working quickly while the chocolate coating is still soft and pliable, poke two Oreo halves into the sides of the cake balls to form the bat wings.
- Add Eyes: Stick the candy eyes onto the bats’ “faces.” If the coating has already begun to set, use a tiny dab of warm almond bark as an adhesive to secure the eyes in place.
Tip for Bat Wings:
Similar to Frankenstein’s pretzels, inserting the Oreo halves is often easier and more symmetrical if you gently poke them into both sides of the cake ball simultaneously.
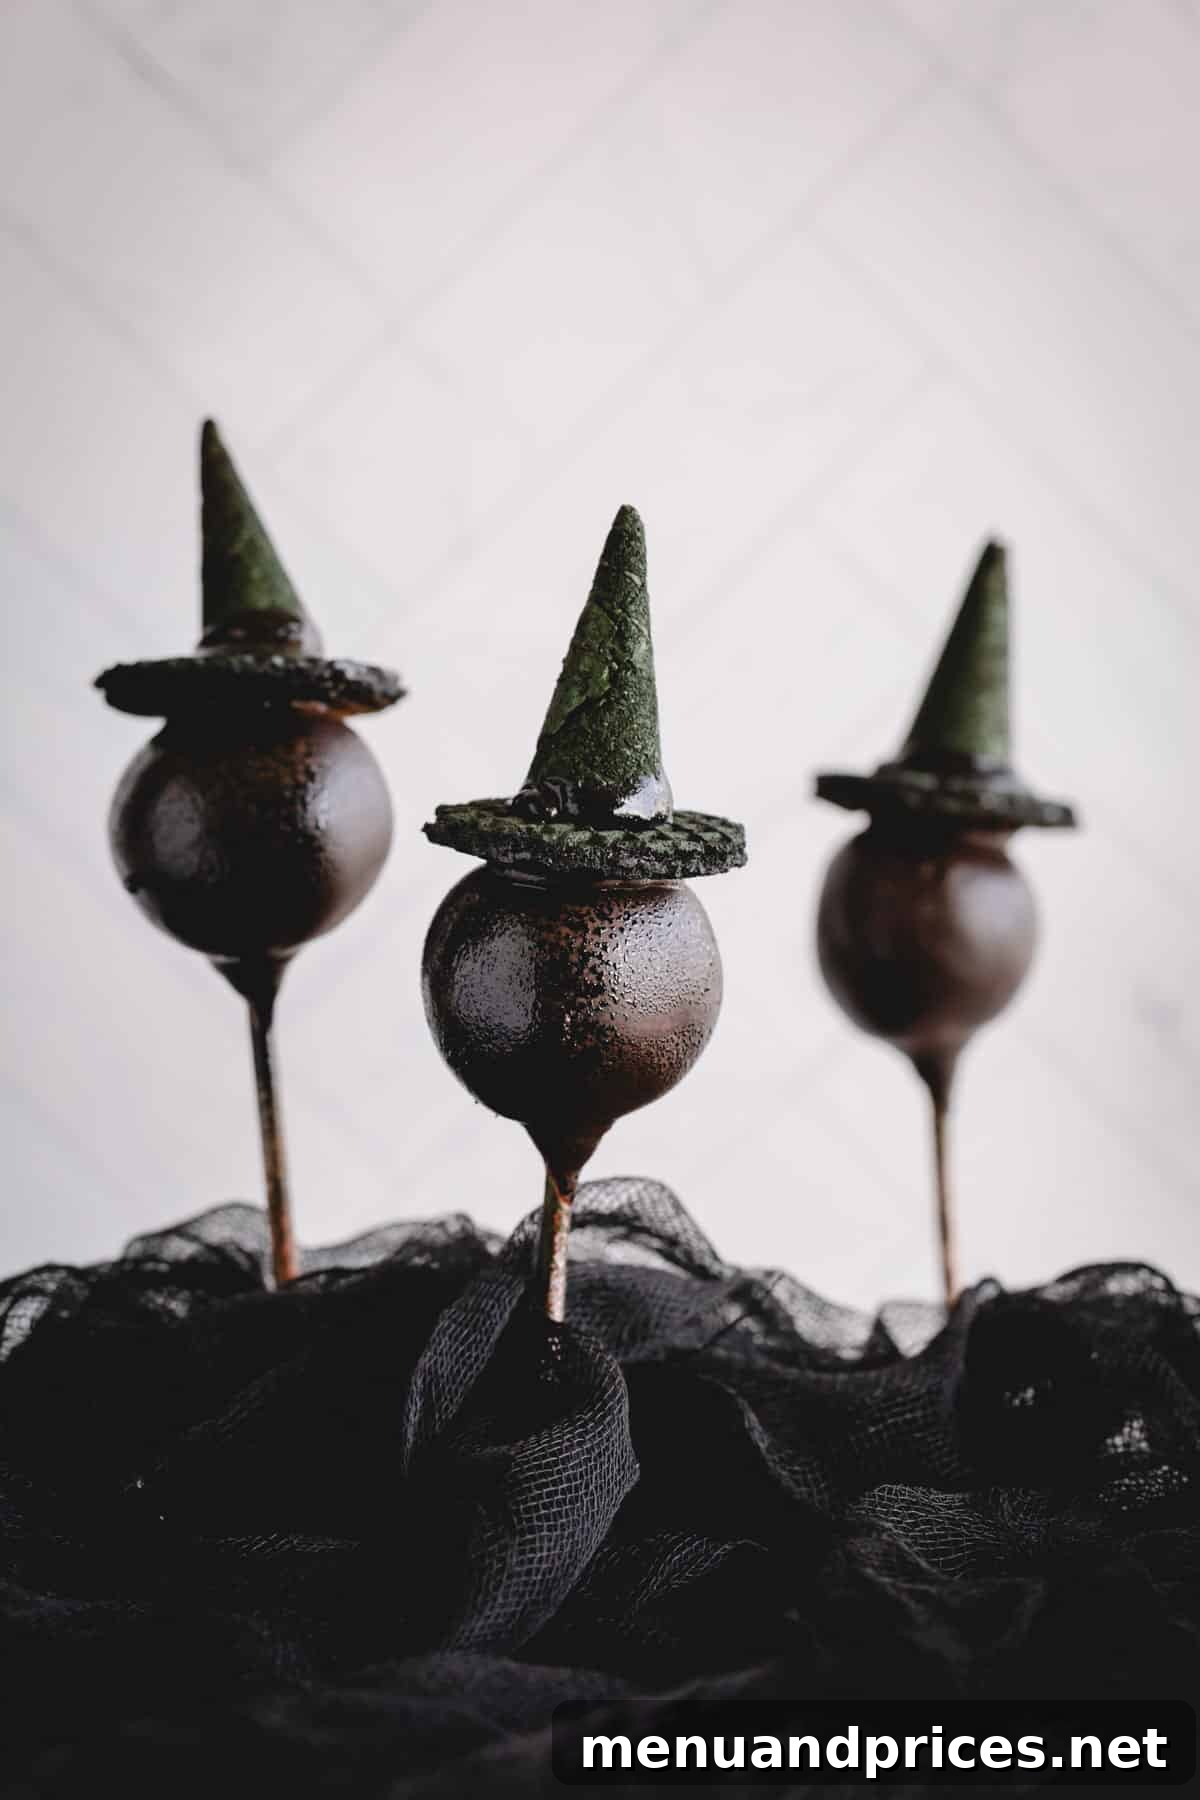
5. Fashioning Enchanting Witch Hat Cake Pops
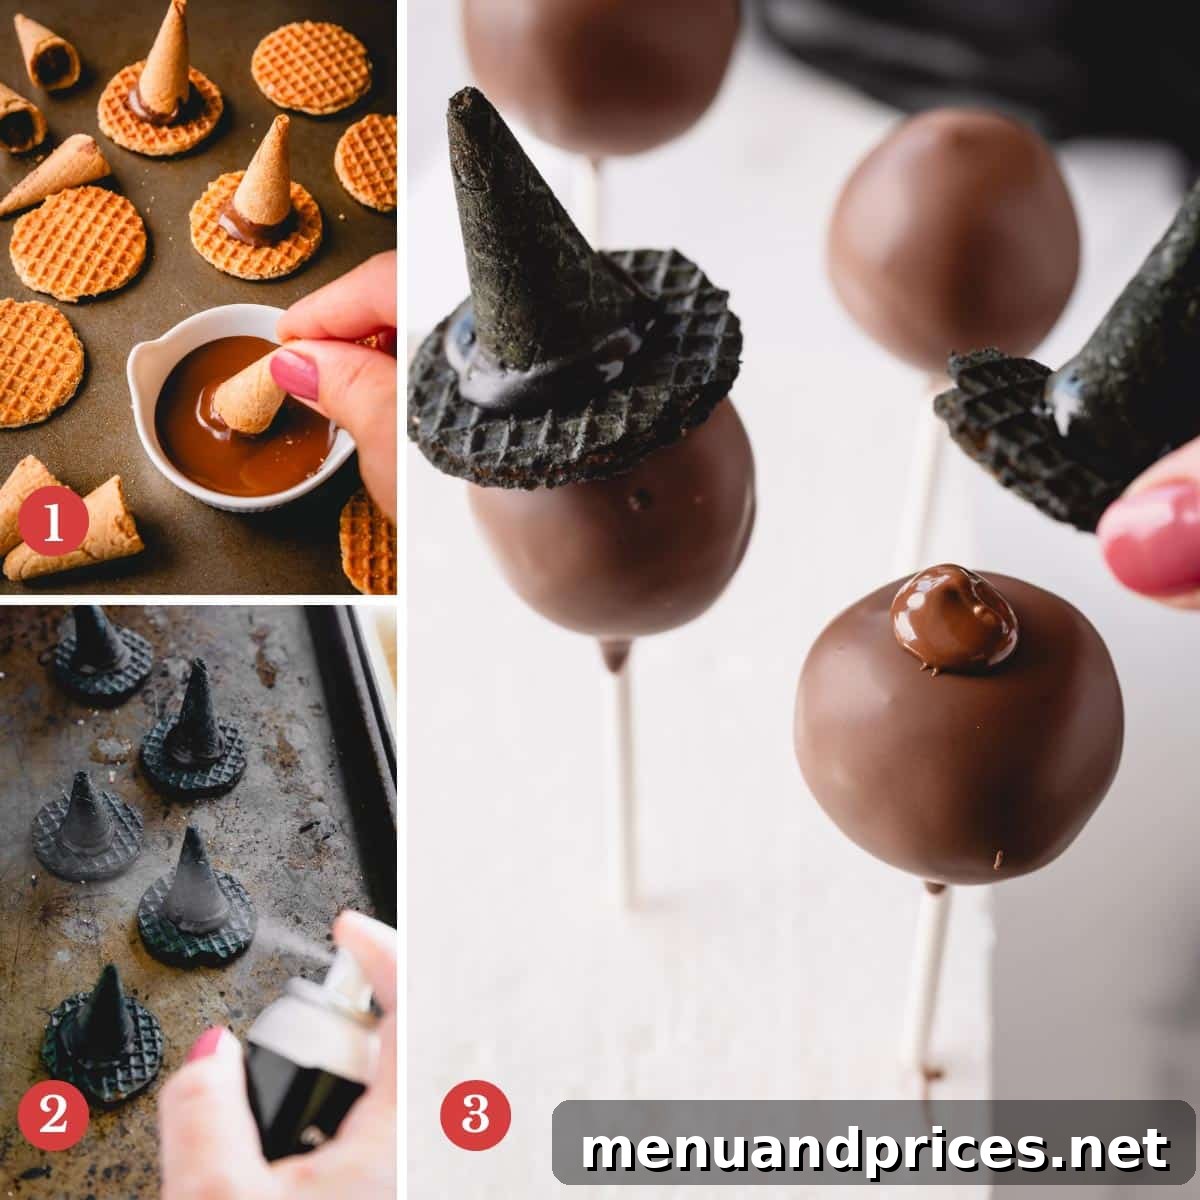
- Assemble Mini Witch Hats: First, melt a small amount of chocolate almond bark. Dip the wide end of a mini waffle cone into the melted chocolate coating, then immediately stick it firmly onto the center of a mini Stroop waffle. Repeat this process to create as many mini witch hats as needed. Allow them to sit and harden completely.
- Color the Hats: Once hardened, transfer the assembled “witch hats” to a baking sheet. Take them to a well-ventilated area (preferably outside or in a garage) and spray them evenly with black food coloring spray. This will give them their signature dark, mysterious look. Allow them to air dry completely.
Crucial Spraying Tip:
To avoid unsightly splatter and potential stains on your kitchen counters, it is highly recommended to spray the witch hats outdoors or in your garage. This prevents any overspray from adhering to surfaces you don’t want discolored.
- Dip Cake Pops: Melt chocolate almond bark in a 2-cup measuring cup until smooth, following package instructions. Dip each cake ball into the melted almond bark until it’s fully covered, including the base. Gently shake to remove any excess coating. Place each cake pop upright into a cake pop stand or piece of Styrofoam.
- Attach Hats: While the chocolate coating on the cake pop is still slightly wet, or by placing a fresh dollop of melted almond bark on top of the cake pop, carefully place one of your prepared black witch hats on top. Hold the hat gently for a few seconds to allow the almond bark to set and secure the hat in place.
6. Designing Whimsical Monster Head Cake Pops
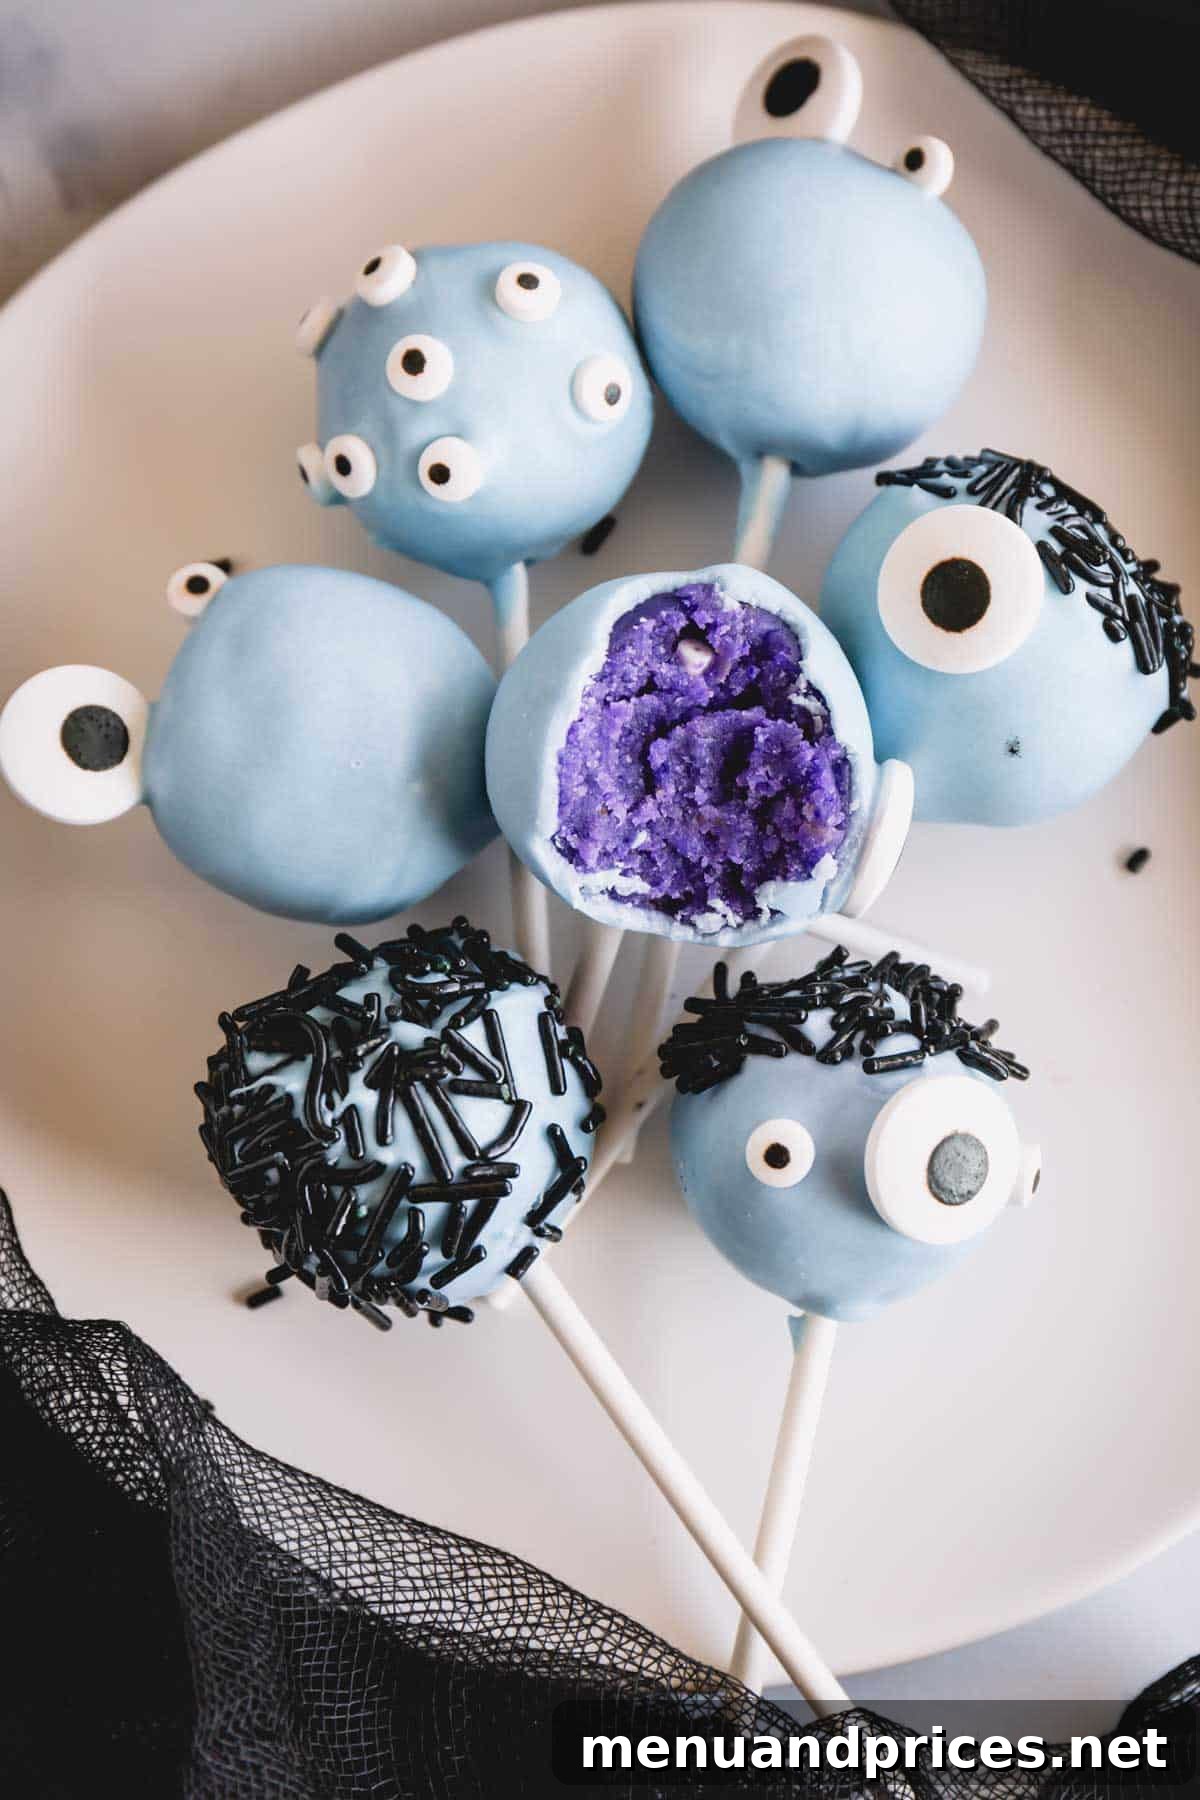
- Prepare Coating and Decorations: Melt purple or blue candy melts with shortening in a 2-cup measuring cup until smooth, according to package instructions. Have a bowl of black sprinkles and a variety of big and small candy eyes ready for immediate use.
- Dip and Shake: Remove about 10 cake balls from the fridge at a time. Dip each cake ball into the melted colored coating until it’s fully covered, including the base. Gently shake off any excess coating.
- Add Hair and Set: Immediately dunk the top of the coated cake pop into the black sprinkles, creating wild, monstrous hair. Place the cake pops upright in a cake pop stand.
- Place Candy Eyes: While the coating is still wet, or using a tiny dab of melted candy as glue, place candy eyes onto the monster heads. Don’t be shy! Experiment with different sizes and arrangements to make them as creepy, silly, or uniquely monstrous as your heart desires!
Essential Tips for Cake Pop Success
Achieving perfectly shaped and beautifully coated cake pops can be an art, but with these expert tips, you’ll master the technique in no time and avoid common pitfalls:
- Achieve Uniformity with a Scoop: For professional-looking cake pops that are consistently sized, always use a small portion scoop. A scoop around 1.5 inches in diameter is ideal for creating perfectly even cake balls, which ensures uniform baking and dipping.
- Work in Small Batches: Cake balls are delicate when they warm up. To prevent them from falling off their sticks, only remove about 10 cake balls from the refrigerator at a time. Keep the rest chilled until you are ready to dip them.
- Avoid Freezing: While chilling is crucial, avoid coating cake balls that are frozen solid. The drastic temperature difference between a frozen cake ball and warm coating will often cause the candy shell to crack as it sets, ruining the smooth finish. Ensure they are well-chilled, but not frozen.
- Shake Off Excess Coating: After dipping each cake pop, gently tap and shake the stick to remove as much excess coating as possible. This step is crucial for preventing thick, unattractive drips and ensuring a beautifully thin, smooth shell that highlights your decorations.
- Prepare Decorations in Advance: Candy coating sets incredibly fast – often within seconds! To avoid scrambling and ensure your decorations adhere properly, have all your sprinkles, candy eyes, edible markers, and other embellishments laid out and ready before you even start dipping your first cake pop.
- Allow Adequate Setting Time: Patience is a virtue when it comes to cake pops! Let the coated and decorated cake pops set completely, ideally for about an hour, before attempting to package them. This ensures the coating is fully hardened and prevents smudges or damage during handling.
Smart Make-Ahead Strategies
To streamline your Halloween preparations and reduce stress on decorating day, consider preparing your cake pops in advance. This allows you to spread out the work and enjoy the decorating process more.
- Prepare Cake Balls in Advance: The cake balls themselves (undipped and undecorated) are very forgiving. You can prepare them up to 3 days in advance. Simply keep them well-chilled in an airtight container in the refrigerator until you are ready for the fun part: dipping and decorating!
Storing Your Halloween Cake Pops
Proper storage ensures your beautiful and delicious Halloween cake pops remain fresh and delightful for as long as possible:
- Refrigerator Storage: Store your finished Halloween cake pops in an airtight container in the refrigerator for up to 1 week. This keeps them fresh and prevents the coating from becoming soft or sticky.
- Freezer Storage: For longer storage, cake pops can be frozen for up to 2 months. Place them in a single layer in an airtight container, separating layers with parchment paper if stacking.
- Thawing Frozen Cake Pops: When ready to enjoy frozen cake pops, transfer them to the refrigerator and allow them to thaw overnight. This gentle thawing process helps maintain their texture and prevents condensation.
Frequently Asked Questions About Halloween Cake Pops
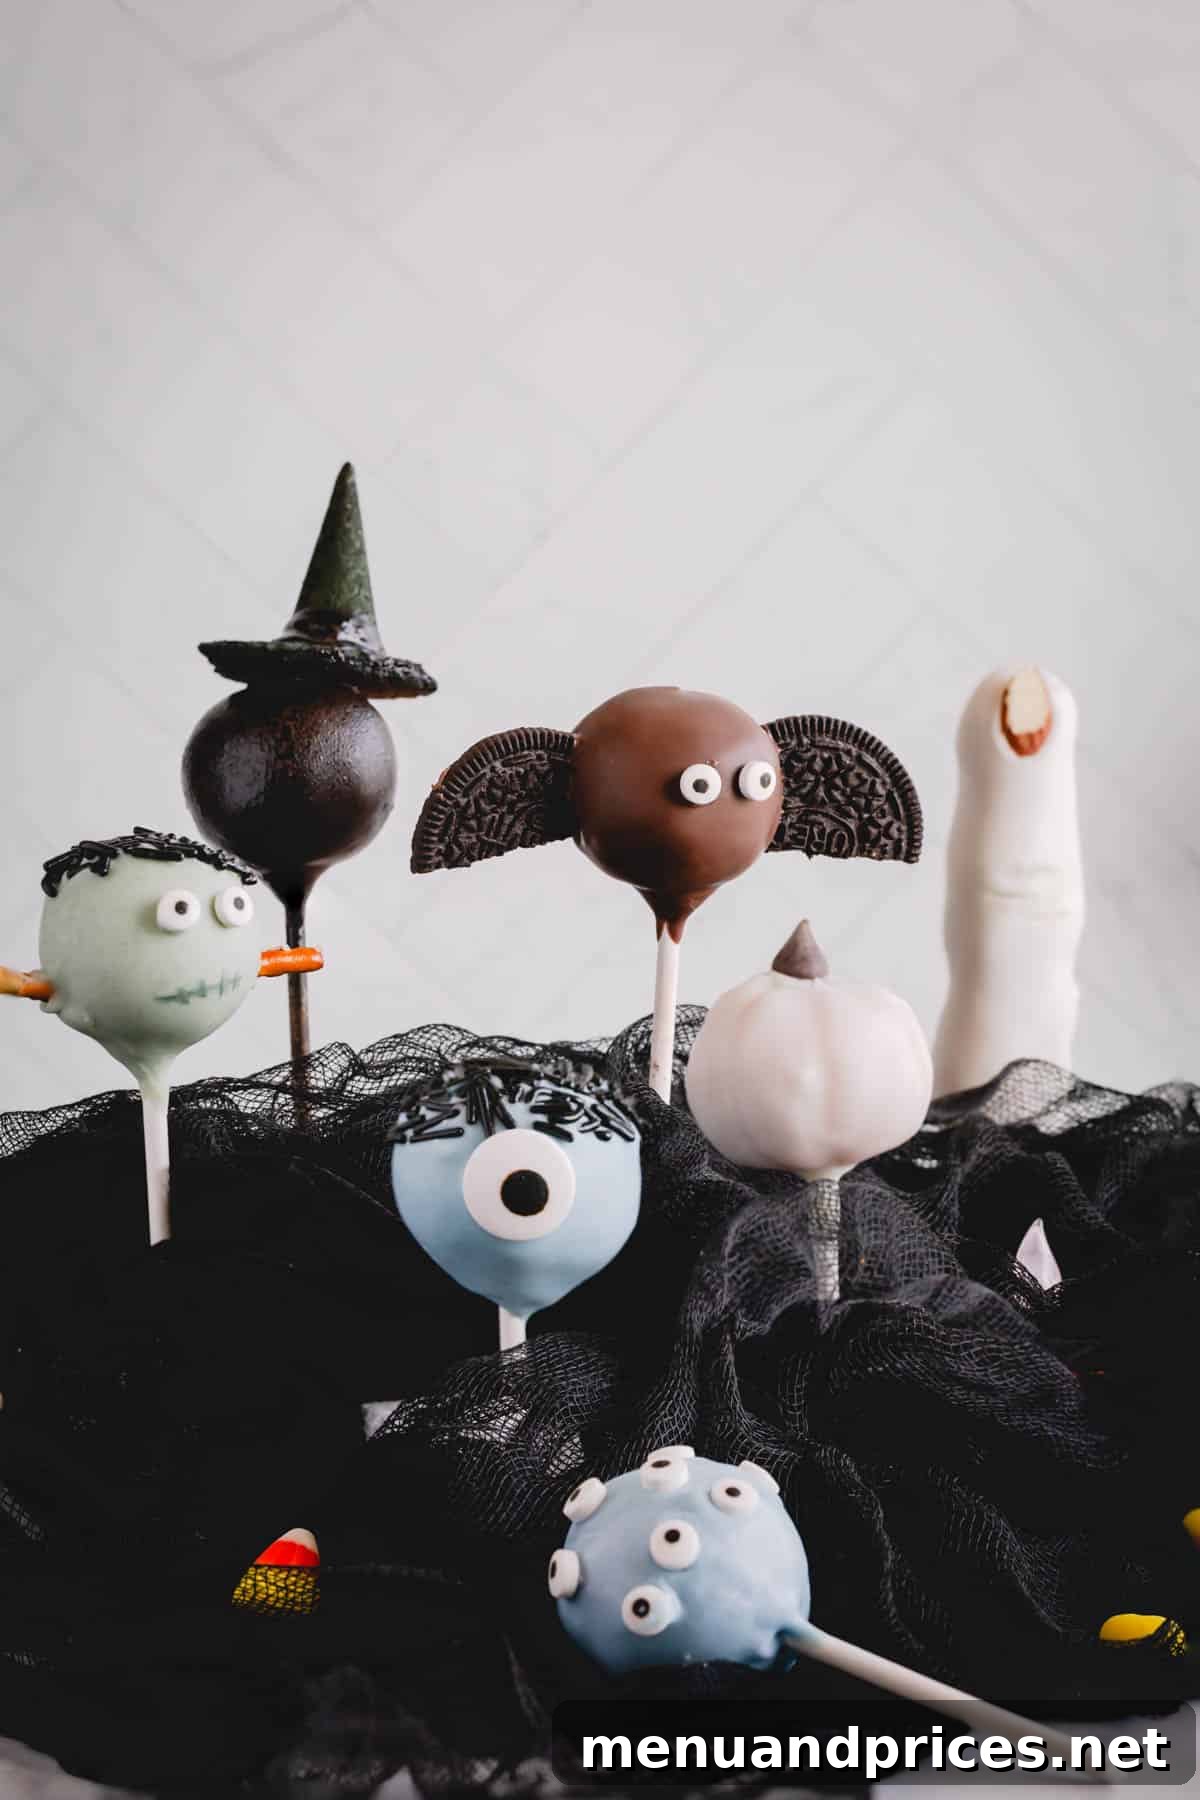
Halloween cake pops are best displayed upright to show off their intricate decorations. You can use a dedicated cake pop stand, a block of Styrofoam (easily covered with festive fabric or paper), or a cardboard box with small holes carefully poked into it. For an extra festive touch, adorn your display with classic Halloween decorations like plastic spiders, scattered candy corn, leftover edible candy eyes, and colorful sprinkles. A themed display truly elevates their visual appeal!
The primary reason cake pops often fall apart is temperature mismanagement. If the cake balls are too warm (i.e., at room temperature or warmer), the cake mixture will soften and crumble, causing the stick to detach. Conversely, if the cake balls are excessively cold or frozen, the sudden temperature change when dipped into warm candy coating can cause the coating to crack as it sets. This is precisely why maintaining a consistent, chilled (but not frozen) temperature in the refrigerator is crucial for cake pop integrity.
Absolutely! Both candy melts and almond bark are excellent choices for coating cake pops. Candy melts, in particular, are favored for their wide array of vibrant colors, which are perfect for festive themes like Halloween. They can be easily melted in the microwave or using a double-boiler method. Candy melts are incredibly versatile, ideal for dipping, drizzling, and creating various decorative elements, offering a smooth, hard shell that beautifully encases your cake pop creations.
Explore More Delicious Cake Recipes:
- Easy Cake Pops
- Homemade Chocolate Cake Pops
- Funfetti Mini Layer Cakes
- Mini Carrot Cakes with Candied Pecans
Halloween Cake Pops
Shinee Davaakhuu
25 minutes
15 minutes
2 hours 40 minutes
25 cake pops
Comment
Print Recipe
Ingredients
For cake pops:
- 1 box yellow cake mix Note 1
- 3 large eggs
- 1 cup (240 ml) water or milk
- ½ cup (120 ml) vegetable oil
- 4 oz (115 g) cream cheese Note 2
- 25 cake pop sticks
- 16 oz (450 g) almond bark, or candy melts Note 3
- 4 tablespoons shortening optional Note 4
For Frankensteins:
- Green candy melts + shortening
- Pretzel sticks
- Black sprinkles
- Candy eyes
- Black edible marker
For pumpkins:
- Orange food coloring
- White almond bark or candy melts
- Mini chocolate chips
For witch fingers:
- White almond bark or candy melts
- Almond slices
For bats:
- Chocolate almond bark
- Chocolate Oreo cookies
- Candy eyes
For witch hat:
- Mini Stroop waffles
- Mini waffle cone snacks
- Black food coloring spray
- Chocolate almond bark
For monster heads:
- Purple or blue candy melts + shortening
- Big and small candy eyes
Equipment
-
half sheet pan
-
large bowl
-
baking sheet
-
cake pop sticks
-
Styrofoam or cake pop stand
Instructions
Bake the cake:
-
Preheat the oven to 350°F (175°C). Line a baker’s half sheet with parchment paper or a silicone mat.
-
Prepare the cake batter according to the box directions, using 1 box yellow cake mix, 3 large eggs, ½ cup (120ml) vegetable oil, and 1 cup (240ml) water or milk.
-
Pour the cake batter into the prepared baking sheet and spread it evenly.
-
Bake for 15 minutes, or until an inserted toothpick comes out clean. Cool the cake completely.
Make the cake pop mixture:
-
Crumble the cooled cake in a large bowl until fine.
-
Add 4 oz (115g) cream cheese and mix it well into the cake with clean hands until no dry cake is visible and the mixture holds together.
-
If desired, divide the cake mixture into 3 parts and color them with purple and orange food coloring.
Form the cake balls:
-
Divide the cake mixture into 1.5-inch balls and arrange them on a lined baking sheet. For witch finger cake pops, form the mixture into long fingers.
-
Refrigerate for 2 hours, or overnight.
Coat the cake balls:
-
Melt a small amount of almond bark (from the 16 oz total) with shortening (from the 4 tablespoons total) in a microwave-safe cup.
-
Dip a cake pop stick about ½-inch deep into the melted mixture, then insert it into a chilled cake ball. Continue this for all cake balls. Place them back into the fridge for 15-20 minutes to set.
For Frankenstein cake pops:
-
Break pretzel sticks into 1-inch pieces. Prepare black sprinkles and candy eyes.
-
Melt green candy melts with 1-2 tablespoons of shortening in a 2-cup measuring cup until smooth, following package instructions.
-
Take out about 10 cake balls at a time. Dip each cake ball into the melted green coating until fully covered, shaking off excess.
-
Quickly dunk the top of the cake balls into black sprinkles and place them upright in a cake pop stand.
-
Poke pretzel sticks into the lower half of the cake balls from both sides simultaneously.
-
Place candy eyes (use warm candy melt as glue if coating is dry).
-
Once dry, draw the mouth with stitches using a black edible marker.
For pumpkin cake pops:
-
Use orange cake mixture for the base.
-
Using a cake pop stick, make wide dented lines from top to base. Refrigerate again.
-
Melt white almond bark or candy melts with 1-2 tablespoons of shortening until smooth.
-
Take out about 10 cake balls at a time. Dip each ball into the melted white coating until fully covered, shaking off excess.
-
Place the cake pops upright into a stand.
-
Immediately place a mini chocolate chip on top for the stem.
-
Optionally, sprinkle with orange sanding sugar while the coating is wet.
For witch finger cake pops:
-
Melt white almond bark or candy melts with 1-2 tablespoons of shortening until smooth.
-
Take out about 10 cake fingers at a time. Dip each finger into the melted white coating until fully covered, shaking off excess.
-
Place the cake pops upright into a stand.
-
Immediately place an almond slice on top for fingernails.
-
Using a spare stick or toothpick, make a few horizontal lines to resemble wrinkles on finger joints.
For bat cake pops:
-
Separate Oreo cookies from filling and break them in half. Have candy eyes ready.
-
Melt chocolate almond bark in a 2-cup measuring cup until smooth.
-
Take out about 10 cake balls at a time. Dip each ball into the melted chocolate almond bark until fully covered, shaking off excess. Place upright in a stand.
-
Working quickly, poke two Oreo halves into the sides of the cake balls simultaneously.
-
Place candy eyes (use warm almond bark as glue if coating is set).
For witch hat cake pops:
-
Melt a small amount of chocolate almond bark.
-
Dip a mini cone into the melted chocolate and immediately place it on top of a mini Stroop waffle. Let them set and harden.
-
Place the “witch hats” on a baking sheet and spray with black food coloring spray outdoors or in a garage. Let air dry completely.
-
Melt chocolate almond bark in a 2-cup measuring cup until smooth.
-
Take out about 10 cake balls at a time. Dip each ball into the melted almond bark until fully covered, shaking off excess. Place upright in a stand.
-
Put a dollop of almond bark on top of the cake pop and place the prepared witch hat. Hold for a few seconds to set.
For monster head cake pops:
-
Melt purple or blue candy melts with shortening in a 2-cup measuring cup until smooth.
-
Prepare black sprinkles in a small bowl and have candy eyes ready.
-
Take out about 10 cake balls at a time. Dip each ball into the melted coating until fully covered, shaking off excess.
-
Immediately dunk the top into the sprinkles and place upright in a stand.
-
Place candy eyes as desired to create creepy and silly monster faces.
Packaging:
-
Let the cake pops set for about an hour before packaging.
⭐️ Did you make this recipe?
Please leave a review and let us know how you liked it!
Tips & Notes
Note 2: I prefer using plain cream cheese to bind the cake pop mixture. Box cake mixes can be quite sweet, and cream cheese offers a balanced, tangy counterpoint that prevents the cake pops from being overly sugary. In blind taste tests, cream cheese consistently won over store-bought frosting or regular buttercream due to its superior flavor balance.
Note 3: Almond bark generally offers the best consistency for coating cake balls, providing a smooth, thin shell. However, for specific colored designs like Frankensteins and purple monsters, colored candy melts are necessary.
Note 4: Shortening is essential for thinning out almond bark and candy melts. A thinner coating is easier to apply evenly and prevents a thick, clumpy layer. This is particularly crucial for pumpkin cake pops, as a thin coating ensures the carved grooves remain clearly visible.
Note 5: The provided nutrition information excludes any additional decorations or candies used.
Storing Tips:
– Store finished cake pops in the refrigerator for up to 1 week in an airtight container.
– For longer preservation, freeze cake pops for up to 2 months in an airtight container. Thaw them overnight in the refrigerator before serving.
General Tips:
– Avoid coating frozen cake balls, as the temperature difference will likely cause the coating to crack upon setting.
– Always work with approximately 10 cake balls at a time, keeping the rest refrigerated. Cake balls can soften and fall off the sticks if they reach room temperature.
– Ensure you shake off as much excess coating as possible after dipping to prevent drips and achieve a clean, smooth finish.
Nutrition
1 cake pop
231kcal
30g
2g
11g
22g
178mg
Dessert
American
Did you make this?Leave a rating and your feedback. Thank you!