

These delightful Easter sugar cookies are a true celebration of spring, featuring a rich, buttery flavor with satisfyingly crisp edges, all elegantly adorned with smooth, puffy royal icing. Perfect for holiday gatherings or a fun baking project, this recipe promises to bring smiles and sweet memories.
BONUS: Dive into expert techniques for creating distinct, multi-layered royal icing designs on your sugar cookies, ensuring no color bleed and stunning visual appeal.

Pin this recipe now to save it for later!
Pin It
Why You’ll Adore These Easter Sugar Cookies
Decorated Easter sugar cookies are more than just a treat; they’re an edible art form that adds charm and joy to your holiday. With this recipe, creating these delightful cookies is truly just a hop, skip, and a jump away! If you’ve been following my baking journey, you know I consider it essential to celebrate every holiday with my tried-and-true classic sugar cookie recipe. Here’s why you’ll fall in love with this particular Easter version:
- Beginner-Friendly Decoration: These cookies are elegantly decorated using my simple, stress-free royal icing recipe, making it achievable for bakers of all skill levels to create stunning designs.
- Flawless Icing Designs: We provide detailed tips and clever tricks to help you create beautifully separated icing designs, ensuring no unsightly color bleed. Your intricate bunny ears and peep eyes will stand out perfectly!
- Irresistible Flavor and Texture: Each cookie boasts a rich, deeply buttery flavor that melts in your mouth. They bake up with crisp, defined edges and perfectly flat tops, creating an ideal canvas for your royal icing masterpieces.
- No Chilling Time Required: Say goodbye to long waiting periods! This recipe is designed for immediate shaping and baking, making it a fantastic option for last-minute holiday preparations or when you just can’t wait to get baking.
These charming sugar cookies are guaranteed to make your Easter celebrations extra special, serving as both a delicious dessert and a beautiful centerpiece!

Essential Ingredients for Perfect Easter Cookies
Creating extraordinary Easter sugar cookies starts with understanding the role of each ingredient. Here’s a closer look at what you’ll need and why each component is crucial for achieving that perfect buttery flavor, tender texture, and vibrant decoration.
For the Buttery Sugar Cookies:
- All-Purpose Flour: This is the backbone of our sugar cookie recipe. Using all-purpose flour ensures the perfect balance of structure and tenderness. For consistently flawless results, I highly recommend weighing your flour with a kitchen scale. If you don’t have one, employ the spoon and level method to avoid over-measuring, which can lead to dry, crumbly cookies.
- Sugars (Granulated and Brown): This recipe utilizes a combination of granulated sugar and brown sugar. Granulated sugar provides crispness and sweetness, while brown sugar adds a lovely depth of flavor, moisture, and a wonderfully soft texture. You can opt for either dark or light brown sugar; just be aware that dark brown sugar will give your cookies a slightly richer, darker hue.
- Cornstarch: A secret weapon for ultra-soft and tender cookies! Cornstarch prevents the cookies from becoming dry or crumbly, contributing to that irresistible melt-in-your-mouth texture.
- Baking Powder: This leavening agent gives the cookies a subtle lift, ensuring they are not too dense, but without causing them to spread excessively or become overly puffy, which is crucial for maintaining sharp, defined cookie cutter shapes.
- Unsalted Butter: The star ingredient for that signature rich, buttery flavor and delicate texture. Unsalted butter allows you to control the salt content in your recipe. It’s vital that your butter is at room temperature before you begin mixing, as this ensures it creams properly with the sugars, creating a light and airy dough.
- Extracts (Vanilla and Almond): Pure vanilla extract provides a warm, classic flavor that is essential in any sugar cookie. Avoid artificial extracts for the best taste; consider making a batch of DIY vanilla extract for a truly exceptional flavor. Almond extract is optional but highly recommended! A mere quarter teaspoon adds a sophisticated, delicate note that truly elevates the cookie’s profile.
- Coarse Kosher Salt: A pinch of salt is crucial for balancing the sweetness and enhancing all the other flavors in the cookie dough. It prevents the cookies from tasting bland and brings out the richness of the butter and extracts.
For Vibrant Royal Icing Decorations:
- Royal Icing: This is the key to creating those beautifully smooth, hard-setting finishes on your decorated Easter sugar cookies. Our recipe provides the perfect consistency for both outlining and flooding, ensuring a flawless professional look.
- Gel Food Coloring: For truly vibrant and stunning colors, gel food coloring is indispensable. Brands like Wilton or Americolor offer concentrated pigments that produce rich hues without altering the consistency of your royal icing. A little goes a long way, so always start with a small amount and add more as needed.
Crafting Your Easter Sugar Cookies: A Step-by-Step Guide
Before embarking on this delightful baking adventure, ensure you have a charming set of Easter cookie cutters on hand. Bunnies, chicks, and Peeps are always adorable choices that perfectly capture the spirit of the holiday!
Step 1: Preparing the Perfect Sugar Cookie Dough
The foundation of any great cookie is a well-prepared dough. Follow these steps carefully to achieve a tender, flavorful base for your Easter masterpieces.
- Combine Dry Ingredients: In the bowl of an electric stand mixer fitted with the paddle attachment, combine the all-purpose flour, granulated sugar, brown sugar, cornstarch, baking powder, and coarse kosher salt. Mix on low speed for about 30 seconds to ensure all dry ingredients are thoroughly combined.
- Incorporate Butter: Add the softened unsalted butter to the dry ingredients. Mix on low speed until the mixture is evenly moistened and takes on the consistency of wet sand. This process should take approximately 1-2 minutes. The butter should be fully incorporated, creating a cohesive, crumbly mixture.
- Add Wet Ingredients: Introduce the large egg, pure vanilla extract, and optional almond extract to the mixture. Continue mixing on low speed until just combined, which typically takes about 30 seconds. Be careful not to overmix at this stage. You’ll know the dough is perfectly combined when it appears crumbly but easily sticks together when you gently squeeze a portion in your hand.
- Divide and Knead: Carefully divide the prepared dough in half. Gently knead each half into a smooth, manageable ball. Avoid over-kneading, as this can develop too much gluten and result in tougher cookies. These dough balls are now ready for shaping or storage.
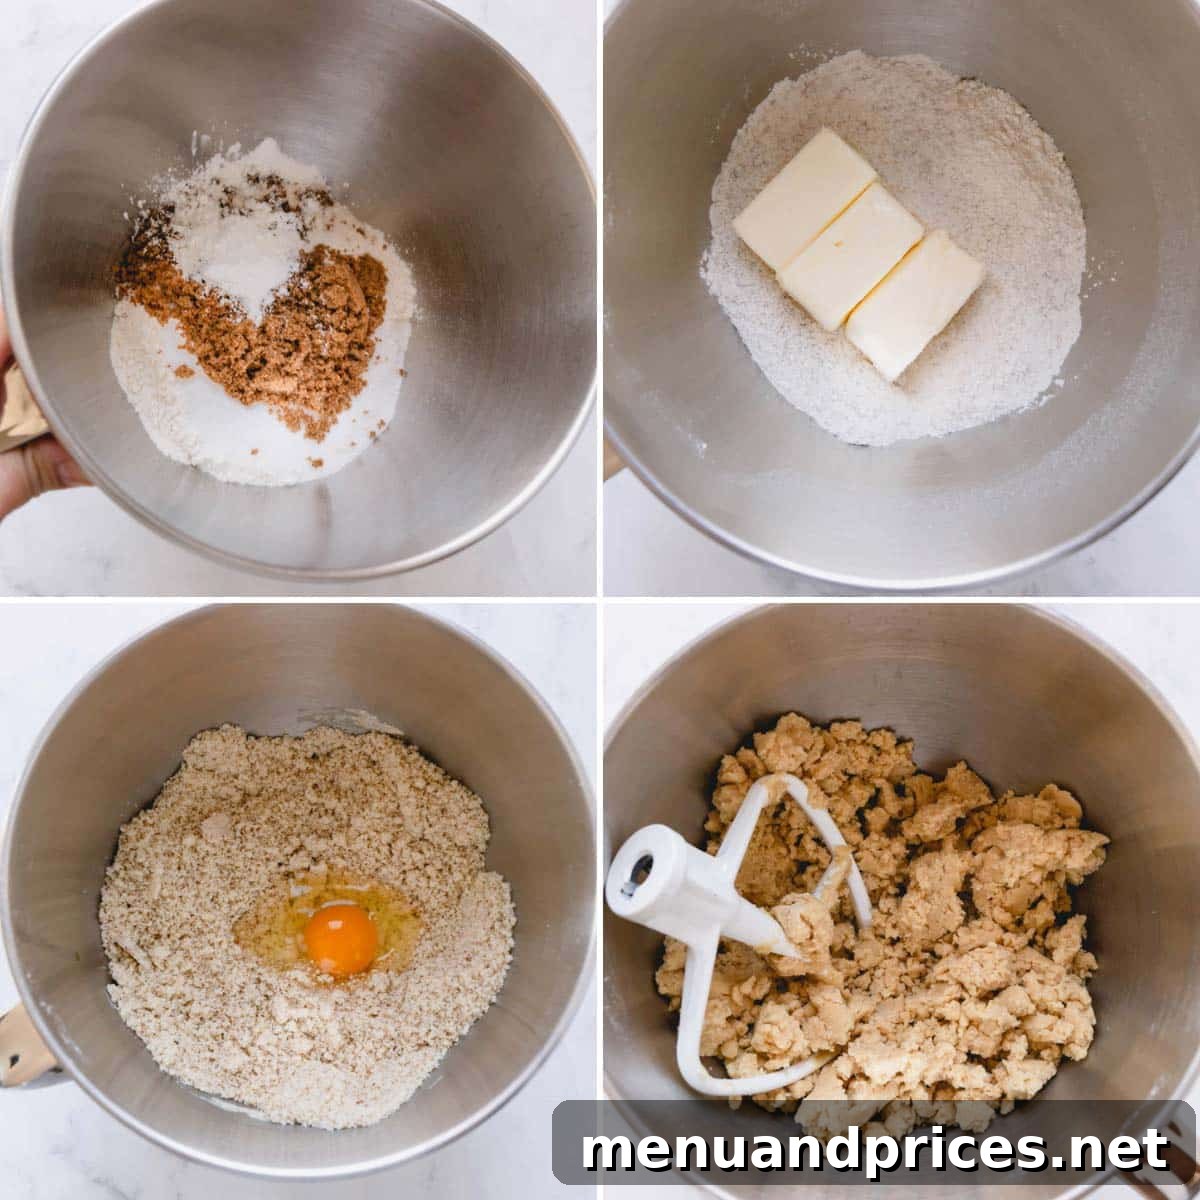
Make-Ahead Tip: Storing Your Cookie Dough
This versatile cookie dough offers excellent make-ahead options! You can either shape and bake your cookies immediately for instant gratification, or prepare the dough in advance for convenience.
- Refrigeration: Place the dough balls into separate plastic bags or wrap them tightly in plastic wrap. Refrigerate for up to 3 days. This is perfect for breaking up your baking process.
- Freezing: For longer storage, freeze the cookie dough for up to 3 months. When ready to use, simply thaw the frozen dough overnight in the refrigerator. Before rolling, let it sit at room temperature for 15-30 minutes to soften slightly.
Step 2: Shaping Your Festive Easter Cookies
Now for the fun part – transforming your dough into charming Easter shapes! Before you begin, preheat your oven to 350°F (175°C) and prepare 2-3 baking sheets by lining them with parchment paper or silicone baking mats. This ensures even baking and easy removal.
- Roll Out the Dough: Take one of your dough balls and place it on a silicone mat or a lightly floured surface. Roll it out evenly to a ¼-inch thickness. My secret weapon for achieving perfectly uniform dough every single time is an adjustable rolling pin. Consistent thickness is crucial for cookies that bake evenly.
- Cut Out Shapes: Using your favorite Easter cookie cutters (bunnies, chicks, eggs, peeps!), press firmly into the rolled dough to cut out your shapes. Carefully lift the cut cookies and place them onto your prepared baking sheets, leaving about 1 inch between each cookie to allow for slight expansion.
- Repeat with Scraps: Gather any dough scraps, gently reform them into a ball, and re-roll. Continue cutting out cookies until all the dough is used. Avoid overworking the dough when re-rolling, as this can make the cookies tough.
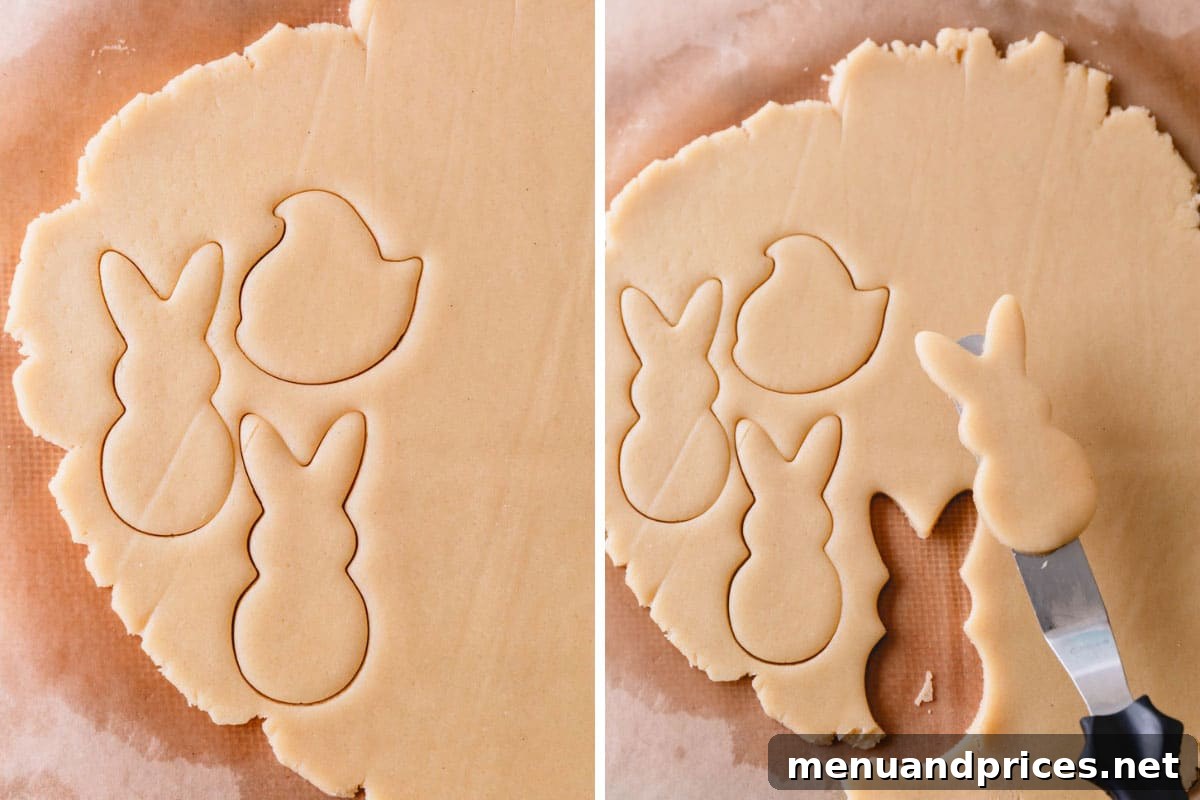
Pro Tip: Preventing Misshapen Cookies
Delicate cookie shapes can sometimes lose their form when transferred. To ensure your beautifully cut cookies maintain their sharp edges and original shape, use a thin offset spatula to carefully lift them from the work surface to the baking sheet.
Step 3: Baking Your Golden Easter Treats
Baking is where the magic happens, transforming raw dough into perfectly golden, fragrant cookies. Keep a close eye on your oven to achieve the ideal texture.
- Bake to Perfection: Place the baking sheets in the preheated oven and bake for 10-13 minutes. The exact baking time may vary depending on your oven and cookie thickness. Look for the edges to turn a very light golden color, indicating they are perfectly done. The centers should still appear pale.
- Cooling Process: Once baked, remove the cookies from the oven and allow them to cool on the baking sheet for approximately 5 minutes. This brief resting period helps them firm up and prevents breakage. After 5 minutes, carefully transfer the cookies to a wire cooling rack to cool completely before decorating. It’s crucial that cookies are entirely cool before applying royal icing to prevent melting or smudging.
Step 4: Preparing Your Vibrant Royal Icing
Royal icing is the key to creating stunning, detailed, and hard-setting decorations. Follow these steps to prepare your palette of colors.
- Prepare Icing Base: First, prepare one full batch of my easy 4-ingredient royal icing according to the recipe instructions. Ensure it reaches a medium consistency suitable for both outlining and flooding.
- Divide and Color: Divide the prepared royal icing into several separate bowls, one for each color you plan to use. Reserve one bowl for white icing, covering it tightly with plastic wrap to prevent it from drying out. For the remaining bowls, add your chosen gel food coloring. Start with a single drop and mix thoroughly. Continue adding tiny amounts of color until you achieve your desired vibrant shade.
- Load Piping Bags: Once colored, transfer each batch of royal icing into tipless piping bags. These bags are fantastic for precise decorating and eliminate the need for separate tips. With your icing ready, you’re all set to begin the exciting decorating phase!

Pro Tip: Achieving Perfect Icing Colors (Avoid Oversaturation)
When coloring royal icing, less is often more. Gel food coloring is significantly more concentrated than liquid food coloring, so a tiny amount goes a long way. Always start with a single drop and gradually add more until you reach your desired vibrancy. This prevents accidental oversaturation and ensures your icing maintains its ideal consistency.
For the most brilliant and vivid icing colors, I highly recommend using Americolor or Wilton gel food colorings. These professional-grade dyes allow you to achieve rich, intense shades without adding excess moisture to your icing, which can compromise its texture and drying time. It’s truly a win-win for stunning cookie decorations!
Mastering Royal Icing Designs: A Guide to Decorating Easter Sugar Cookies
Beyond simply flooding cookies with color, we’ll explore slightly more advanced royal icing decorating techniques to add charming details and dimension. Today, I’ll guide you through creating defined sections and layers on your cookies, such as adding delicate inner ear details to your bunny cookies, without any color bleed.
Method 1: Layered Detail for Defined Features
This method is ideal for creating distinct, raised details that stand out from the main flood color, like the contrasting inner ear of a bunny or small accent shapes.
- Pipe Smaller Details First: Begin by piping the smaller, more intricate design elements, such as the pink inner parts of bunny ears or small white eyes. Use a medium-consistency icing for this.
- Allow to Set: This is a critical step! Once the smaller detail is piped, allow it to set or “crust over” for approximately 10-15 minutes. This creates a slight barrier, preventing colors from mixing.
- Fill in Main Design: After the initial layer has set, proceed to flood the rest of the cookie with your second, main color (e.g., the yellow for the bunny’s body). The slight elevation and setting time of the first layer will ensure a clean separation and a beautiful dimensional effect.
The reason for this layered approach is crucial: piping icing back-to-back without allowing drying time will cause the colors to blend together, resulting in a blurry, undefined design – and we certainly want to avoid that for our beautiful Easter creations!


Method 2: Outlining for Inset Details
This technique is perfect for creating details that appear “set into” the main flood color, offering a different kind of dimension.
- Create an Outline: First, use your royal icing to outline the main shape of your cookie. As you outline, leave a deliberate gap or un-iced space where you intend to add your contrasting detail (e.g., the inner ear section).
- Allow Main Outline to Set: Let this initial outline crust over for 10-15 minutes. This forms a “dam” that will hold the flood icing in place.
- Flood and Fill Gaps: Once the outline has set, flood the main area of the cookie. Then, fill in the reserved gaps with your secondary colored icing. Because the first outline has set, these different colored sections will remain perfectly separate, creating a clean, inset look.
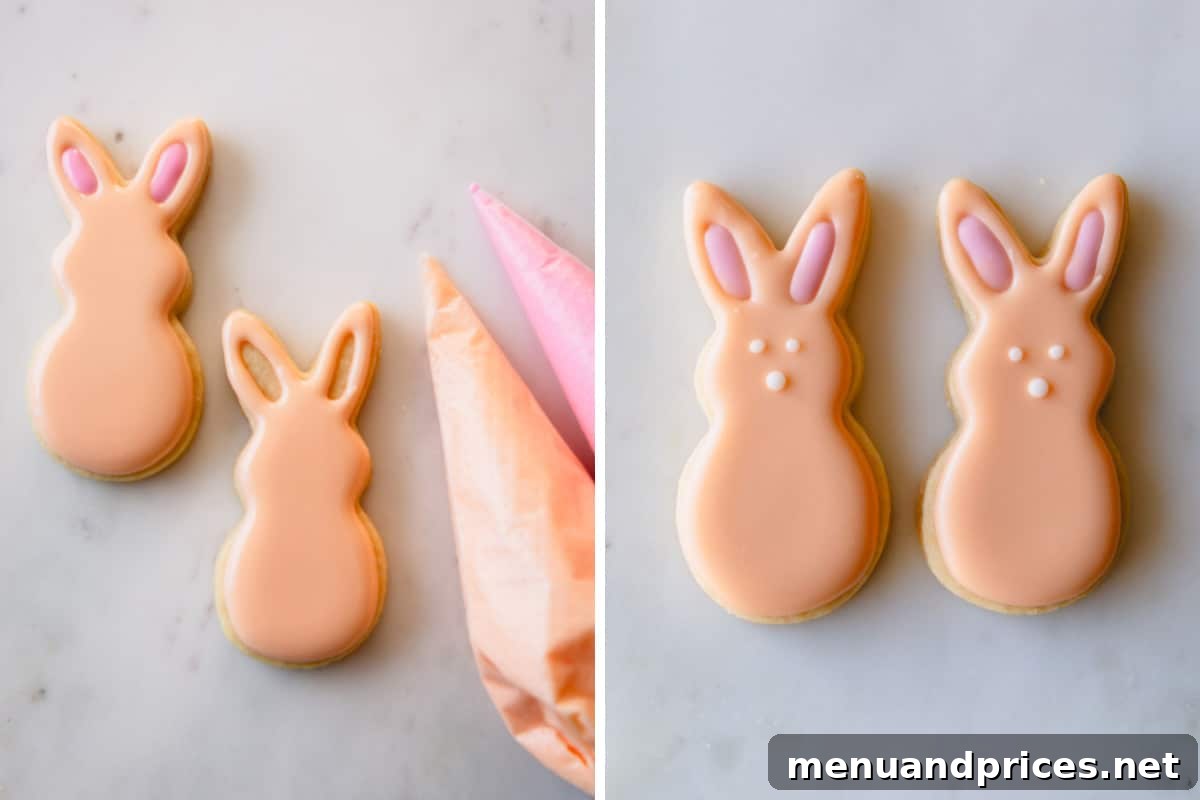
Achieving Dimension with Royal Icing: The Golden Rule
The overarching secret to creating impressive, dimensional royal icing designs that don’t bleed is to adopt a layered approach. The key principle here is allowing each layer of icing to “crust over” or solidify slightly – typically for about 10-15 minutes – before you apply the next section or color. This crucial resting period ensures that each distinct area of your design sets independently, preventing colors from merging and maintaining the crisp, separated look you desire. Patience truly pays off in cookie decorating!
Expert Tips for Sugar Cookie Success: Bake Like a Pro
To ensure your Easter sugar cookies turn out perfectly every single time, keep these invaluable tips in mind. They’ll help you navigate common baking challenges and achieve professional-quality results.
- Precision with Ingredients: Always use a kitchen scale to accurately weigh your flour and sugars. Gram measurements are provided in the recipe for a reason – weighing ingredients is far more precise than using measuring cups, which can lead to variations in consistency and texture. Accuracy is the first step to perfection!
- Even Dough Thickness: When rolling out your cookie dough, strive for a perfectly even ¼-inch thickness. Inconsistent dough thickness will result in some cookies being overcooked and dry, while others remain undercooked in the center. Uniform thickness not only ensures consistent baking times but also contributes significantly to the overall aesthetic appeal of your cookies.
- Don’t Overfill Piping Bags: While it might seem efficient, an overfilled piping bag is much harder to control. This can lead to hand fatigue and a greater risk of icing oozing out from the top, creating a messy situation. Fill your bags only two-thirds full for optimal control and comfort.
- Store Cookies at Room Temperature: It’s a common misconception that cookies should be refrigerated. Undecorated sugar cookies will dry out quickly in the fridge, losing their tender texture. For decorated cookies, refrigeration can cause condensation to form, which can tragically lead to your beautiful royal icing colors bleeding and ruining your hard work. Always store them in an airtight container at room temperature.
- Preventing Dough Stickiness: If your dough becomes too sticky while rolling, lightly dust your work surface and rolling pin with a minimal amount of flour. Avoid excessive flour, as it can dry out your cookies. Alternatively, roll the dough between two sheets of parchment paper for a mess-free experience.
- Achieve Sharp Edges: For crisp, clean cookie cutter shapes, dip your cookie cutters in a little flour between each cut. This prevents sticking and helps you achieve those perfectly defined edges.

Smart Make-Ahead Strategies for Effortless Easter Baking
Planning ahead can significantly reduce stress on busy holidays. Both your cookie dough and royal icing can be prepared in advance, ensuring a smooth and enjoyable baking process.
Preparing Cookie Dough in Advance:
Our versatile cookie dough is perfect for make-ahead planning, allowing you to space out your baking tasks.
- Refrigeration: You can prepare your Easter sugar cookie dough up to 3 days in advance. To store, flatten each dough ball into a disc before wrapping them tightly in plastic wrap. Place the wrapped discs in the refrigerator.
- Freezing: For longer preservation, the cookie dough can be frozen for up to 3 months. Ensure it’s tightly wrapped to prevent freezer burn.
- Thawing Frozen Dough: When you’re ready to bake, thaw frozen dough overnight in the refrigerator. Once thawed, let it sit at room temperature for 15-30 minutes before rolling it out. This slight softening makes it much easier to work with.
Prepping Royal Icing for Future Decorating:
Royal icing is also very forgiving when prepared in advance, saving you time on decorating day.
- Storage: You can make the royal icing up to 2 weeks in advance when stored in an airtight container. It can be kept on the counter at cool room temperature or placed in the fridge.
- Freezing Icing: For even longer storage, royal icing can be frozen for up to 2 months. Store it in an airtight container, ensuring there’s no air gap to prevent drying.
- Thawing and Preparing Frozen Icing: Thaw frozen icing overnight in the refrigerator. Before transferring it into piping bags, allow it to sit at room temperature for about 30 minutes. Give it a gentle stir if needed to restore its smooth consistency.
Optimal Storage for Fresh & Beautiful Easter Sugar Cookies
Proper storage is essential to maintain the freshness, texture, and beautiful appearance of your decorated Easter sugar cookies. Follow these guidelines to keep your creations looking and tasting their best.
- Allow Icing to Fully Set: The royal icing on your decorated cookies needs ample time to fully harden. This can take anywhere from 8 to 24 hours, depending on humidity and icing thickness. I highly recommend allowing them to dry overnight before stacking or transferring them to storage containers. This prevents smudges and sticking.
- Room Temperature is Key: Always store decorated Easter sugar cookies at room temperature. Refrigeration is the enemy of beautifully decorated cookies! It will inevitably dry out your cookies, making them hard and stale, and the condensation that forms can cause your meticulously applied icing colors to bleed, ruining all your hard work and artistic effort.
- Short-Term Storage: Once the icing is completely set, decorated cookies will stay fresh and delicious in an airtight container at room temperature for up to 1 week. For best results, place a piece of parchment paper between layers of cookies to prevent them from sticking or damaging the icing.
- Long-Term Freezing: For extended storage, decorated cookies can be frozen for up to 1 month. Carefully place them in an airtight freezer-safe container, again with parchment paper between layers.
- Thawing Frozen Cookies Correctly: To thaw frozen cookies, remove the container from the freezer and place it on the counter at room temperature for 8-12 hours. It is absolutely crucial to keep the lid sealed and unopened during the entire thawing process. Opening the lid too soon will allow condensation to form on the cold cookies, which can cause the delicate icing colors to bleed and compromise your beautiful designs. Patience here is key to preserving their pristine appearance.

Frequently Asked Questions About Easter Sugar Cookies
Got more questions? Here are answers to some of the most common queries about baking and decorating perfect sugar cookies for Easter.
How long does royal icing take to fully dry?
The drying time for royal icing on decorated Easter sugar cookies can vary, typically requiring anywhere from 8 to 24 hours to fully harden and set. Factors like humidity, icing thickness, and ambient temperature can influence this. For best results and to prevent any smudging or damage, I always recommend letting your cookies dry overnight before stacking or transferring them to a storage container.
Can I make Easter sugar cookies with regular icing?
While you technically *can* use regular buttercream or glaze icing on sugar cookies, I strongly advise against it if you’re aiming for decorated cookies with separated, detailed designs. Royal icing is unique because it hardens completely, allowing you to create intricate patterns and crisp lines that will not blend or smudge. Regular icing, by contrast, remains soft and wet, making it prone to smudging and unable to hold complex designs effectively. For stunning, professional-looking Easter cookies, royal icing is truly the superior choice.
How can I keep my decorated cookies soft?
Keeping sugar cookies soft, even after decorating, is a common goal! My favorite and most effective trick is to use marshmallows. Simply sprinkle a few mini marshmallows on the bottom of an airtight storage container. Then, place a wire cooling rack over the marshmallows, and arrange your cookies on the rack. Cover the container with a tight-fitting lid. The marshmallows release moisture, which is absorbed by the cookies, keeping them wonderfully soft and fresh. This ingenious method works equally well for both decorated and undecorated cookies!
What if my royal icing is too thick or too thin?
Royal icing consistency is key! If your icing is too thick for outlining or flooding, add water a tiny drop at a time, mixing well after each addition, until it reaches the desired flow. If it’s too thin, you can thicken it by adding a small amount of powdered sugar, again, mixing gradually until you achieve the right consistency. Always aim for a consistency that allows for smooth flow without being watery.
Can I use different cookie cutter shapes for this recipe?
Absolutely! While we’ve focused on festive Easter shapes like bunnies and Peeps, this sugar cookie recipe is incredibly versatile. You can use any cookie cutters you desire – from simple circles and squares to intricate seasonal designs. The dough holds its shape beautifully during baking, making it perfect for any occasion. Just ensure your cookie cutters are clean and lightly floured between uses for the best results.
More Delightful Easter Recipes to Explore
Looking for more culinary inspiration to complete your Easter feast or simply enjoy the flavors of spring? Here are some other fantastic recipes from our kitchen that are perfect for the season:
- Mini Carrot Cakes with Candied Pecans: Individual delights packed with spice and crunch.
- Zesty Lemon Sheet Cake: A bright and refreshing dessert, perfect for feeding a crowd.
- Easy Lemon Macarons: Delicate and elegant, these lemon-flavored macarons are a sweet treat.
- My Favorite Classic Layered Carrot Cake: A timeless classic, rich with flavor and topped with luscious cream cheese frosting.
Easter Sugar Cookies Recipe
By Shinee Davaakhuu
Learn how to make festive Easter sugar cookies with a beautifully layered royal icing design that stays perfectly separated without any color bleed!
Prep Time: 20 mins
Cook Time: 13 mins
Total Time: 33 mins
Yields: 36 medium cookies (approx. 3 dozen)
Rating: 5 out of 5 stars (based on 1 vote)
Comment
Print Recipe
Ingredients
For the Sugar Cookies:
- 3 cups (375 g) all-purpose flour
- ½ cup (100 g) granulated sugar
- ¼ cup (50 g) packed light brown sugar (Note 1: Dark brown sugar can be used, but will result in slightly darker cookies)
- 1 tablespoon (8 g) cornstarch
- ½ teaspoon baking powder
- ¼ teaspoon coarse kosher salt
- 1 ½ sticks (170 g) unsalted butter, at room temperature
- 1 large egg, at room temperature
- 2 teaspoons pure vanilla extract
- ¼ teaspoon almond extract (optional, but highly recommended for enhanced flavor)
For Decorating:
- 1 batch of royal icing
- Gel food coloring of your choice (pink, baby blue, green, yellow are perfect for Easter cookies)
Equipment
- Peeps and bunny cookie cutter set
- Electric stand mixer with paddle attachment
- Measuring cups and spoons
- Kitchen scale (optional, for precision)
- Rolling pin (an adjustable rolling pin is recommended)
- Baking sheets
- Parchment paper or silicone baking mats
- Offset spatula
- Wire cooling rack
- Mixing bowls
- Tipless piping bags
Instructions
To Prepare the Dough:
- In a mixing bowl with a paddle attachment, combine the all-purpose flour, granulated sugar, brown sugar, cornstarch, baking powder, and coarse kosher salt. Mix on low speed until combined.
- Add the softened unsalted butter and mix on low speed for 1-2 minutes until the mixture is evenly moistened and resembles wet sand.
- Add the large egg, pure vanilla extract, and optional almond extract. Mix until just combined, about 30 seconds. The dough will appear crumbly but should stick together when squeezed in your hand.
- Divide the dough into 2 equal parts and gently knead each into a smooth ball.
- Make-Ahead Option: You can proceed to shaping and baking immediately. Alternatively, wrap the dough tightly in plastic bags and refrigerate for up to 3 days or freeze for up to 3 months.
To Shape and Bake Cookies:
- Preheat your oven to 350°F (175°C). Line 2-3 baking sheets with parchment paper or silicone mats.
- Place each dough ball on a silicone mat or lightly floured surface and roll it out evenly to a ¼-inch-thick disc. An adjustable rolling pin helps achieve uniform thickness.
- Using Easter cookie cutters, cut out desired shapes and carefully arrange them on the prepared baking sheets, leaving about 1 inch between cookies.
- Gather any dough scraps, gently re-roll, and cut out more cookies until all the dough is used.
- Bake the cookies for 10-13 minutes, or until the edges begin to turn a light golden color.
- Let the cookies cool on the baking sheet for 5 minutes, then carefully transfer them to a wire cooling rack to cool completely before decorating.
To Decorate the Cookies:
- Prepare one batch of royal icing according to its recipe. Divide the icing into several bowls. Keep white icing covered tightly with plastic wrap. Color each remaining bowl of icing with your chosen gel food coloring, mixing until well combined. (Start with a single drop of coloring to prevent oversaturation, as gel colors are highly concentrated).
- Transfer each colored royal icing into tipless piping bags. Now you are ready to decorate your cooled Easter sugar cookies following the methods described above for layered designs.
⭐️ Did you make this recipe?
Please leave a review and let us know how you liked it!
Tips & Notes
Note 1 (Brown Sugar): I appreciate how brown sugar contributes a subtle flavor and enhances the softness of these cookies. I’ve successfully made this recipe using both light and dark brown sugars. While dark brown sugar will yield a slightly darker cookie, I personally prefer light brown sugar for its more delicate color and flavor profile in this recipe.
Make-Ahead Tips:
- Royal Icing: Prepare the royal icing up to 2 weeks in advance and store it in an airtight container at room temperature or in the fridge. For longer storage, it can be frozen for up to 2 months. Thaw frozen icing overnight in the refrigerator, then let it come to room temperature for 30 minutes before use.
- Cookie Dough: Prepare the cookie dough up to 3 days in advance and store it tightly wrapped in plastic in the refrigerator. For freezing, dough can be stored for up to 3 months. Thaw frozen dough overnight in the refrigerator. Before rolling, allow chilled or thawed dough to sit at room temperature for about 30 minutes to soften.
Storing Baked & Decorated Cookies:
- Once the royal icing is completely cooled and hardened (this can take 8-24 hours), leftover decorated cookies can be stored in an airtight container at room temperature for up to 1 week.
- To prevent sticking and damage to the icing, place a piece of parchment paper between each layer of cookies in the storage container.
- Decorated cookies can also be frozen for up to 1 month.
- Thawing Frozen Decorated Cookies: To thaw, place the sealed container of frozen cookies on the counter at room temperature for 8-12 hours. It is crucial NOT to open the lid until the cookies are fully thawed. Opening the lid prematurely can cause condensation to form on the cold cookies, which will lead to the icing colors bleeding and ruining your beautiful designs.
Nutrition Facts (per serving)
Servings: 1 serving (approx. 1 cookie)
- Calories: 144 kcal
- Carbohydrates: 21 g
- Protein: 1 g
- Fat: 6 g
- Sugar: 12 g
- Sodium: 78 mg
(Nutritional information is an estimate and may vary based on specific ingredients and preparation.)
Course: Dessert
Cuisine: American
Did you make this? Leave a rating and your feedback. Thank you!