
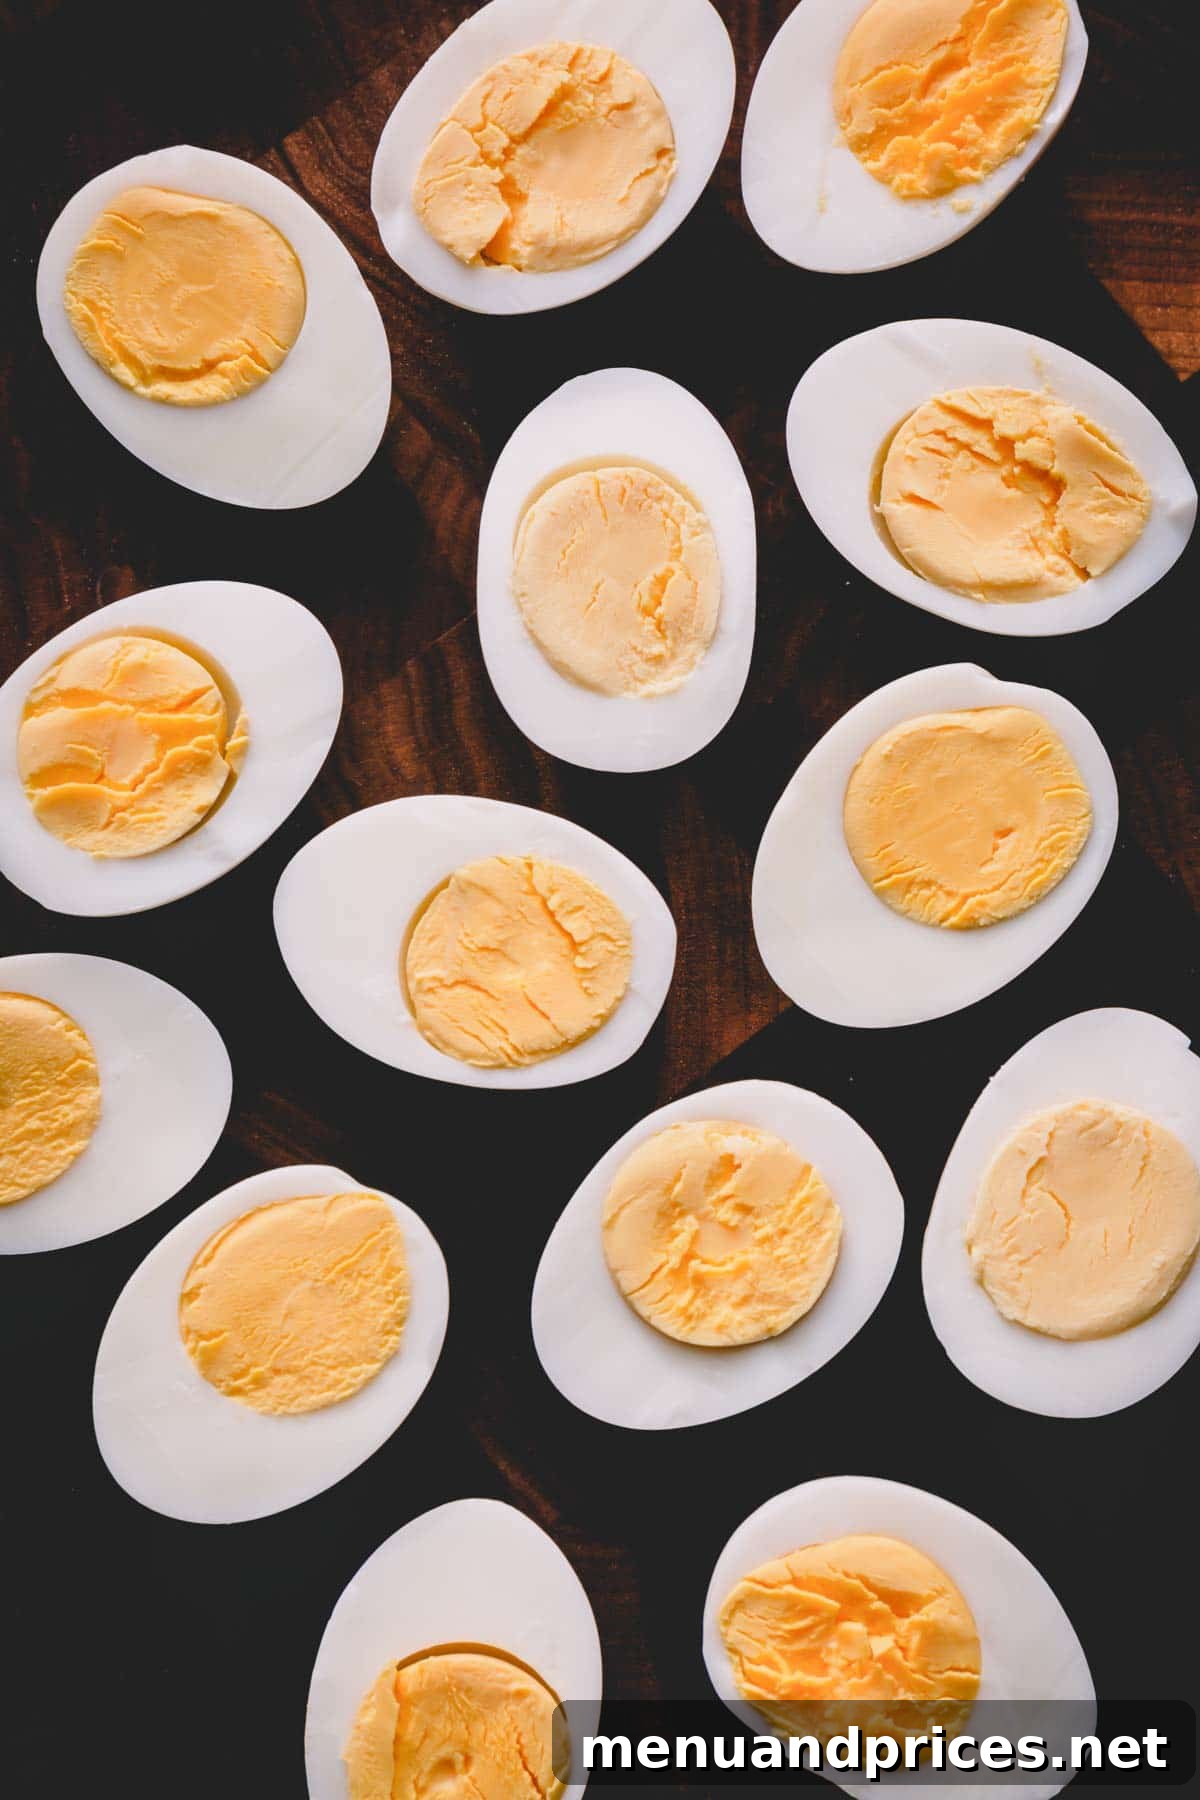
Say goodbye to the frustration of sticky shells and rubbery whites! This comprehensive guide reveals a truly fool-proof method to cook consistently perfect hard-boiled eggs every single time. Whether you’re using store-bought eggs or highly coveted farm-fresh eggs, renowned for being notoriously difficult to peel, this technique guarantees an effortlessly smooth peel and an impeccably cooked egg.
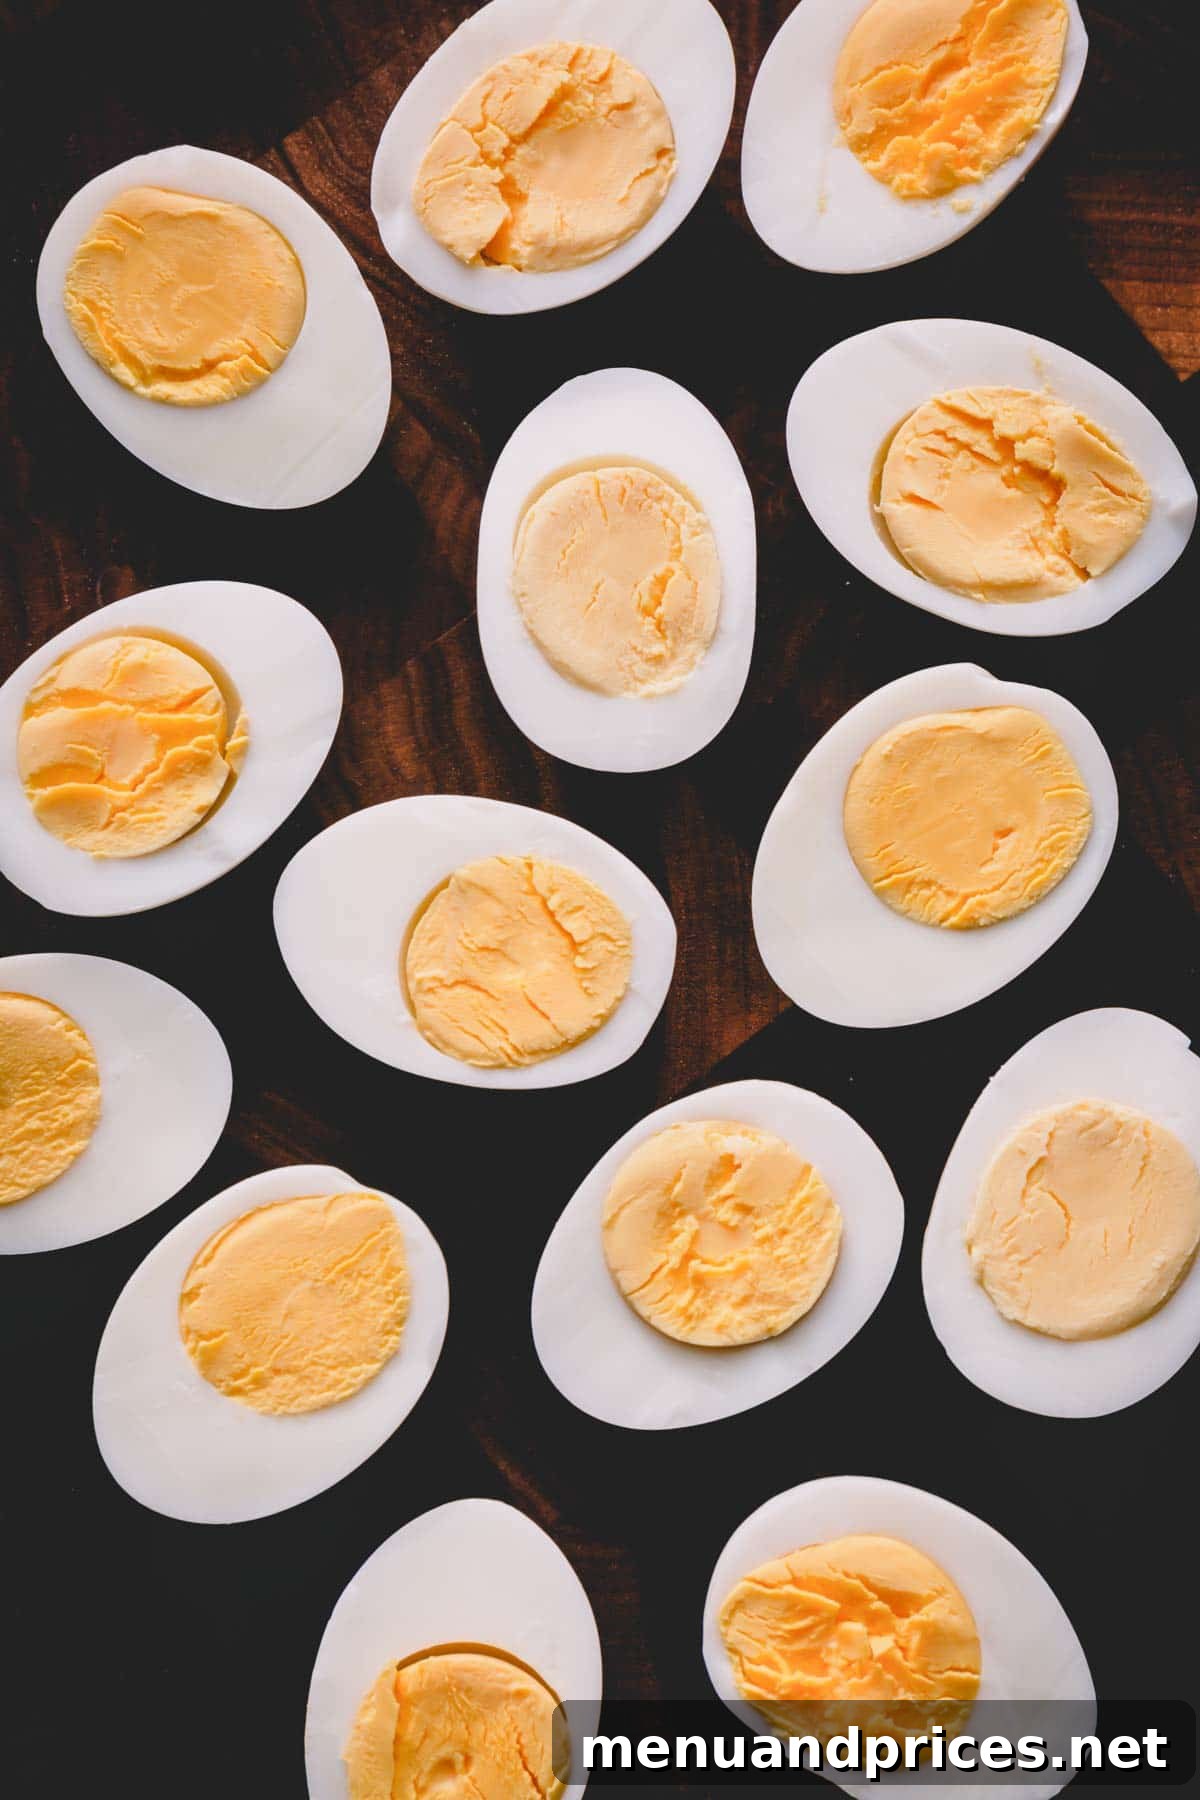
Hard-boiled eggs are a versatile and nutrient-dense staple in any kitchen. They serve as a quick, satisfying snack packed with protein, perfect for any time of day. Most mornings, I enjoy them simply sliced in half, seasoned with a sprinkle of salt and freshly ground black pepper.
However, when the occasion calls for something a little more elegant or celebratory, hard-boiled eggs are the star ingredient in gourmet dishes like classic deviled eggs, transforming a humble egg into a culinary delight.
Why This Steaming Method Is a Game-Changer for Hard-Boiled Eggs
We’ve all been there: biting into a hard-boiled egg only to be met with a rubbery white, a chalky, dry yolk, or worse, that unappealing grayish-green ring around the yolk. These are the hallmarks of a poorly cooked egg, and they can ruin an otherwise simple pleasure. Fortunately, I’m here to share the ultimate technique that will help you avoid these common hard-boiled egg disasters once and for all.
The secret to truly perfect hard-boiled eggs lies in achieving specific characteristics that elevate them from merely cooked to culinary perfection. With this method, your eggs will consistently boast:
- Soft and Silky Smooth Egg Whites: No more tough or bouncy textures; just tender, delicate whites.
- Velvety, Perfectly Cooked Yolks: Whether you prefer a slightly custardy center or a firm, fully set yolk, this method allows for precise doneness.
- No Grayish-Green Ring Around the Yolks: This unsightly discoloration, caused by overcooking and a reaction between sulfur in the egg white and iron in the yolk, becomes a thing of the past.
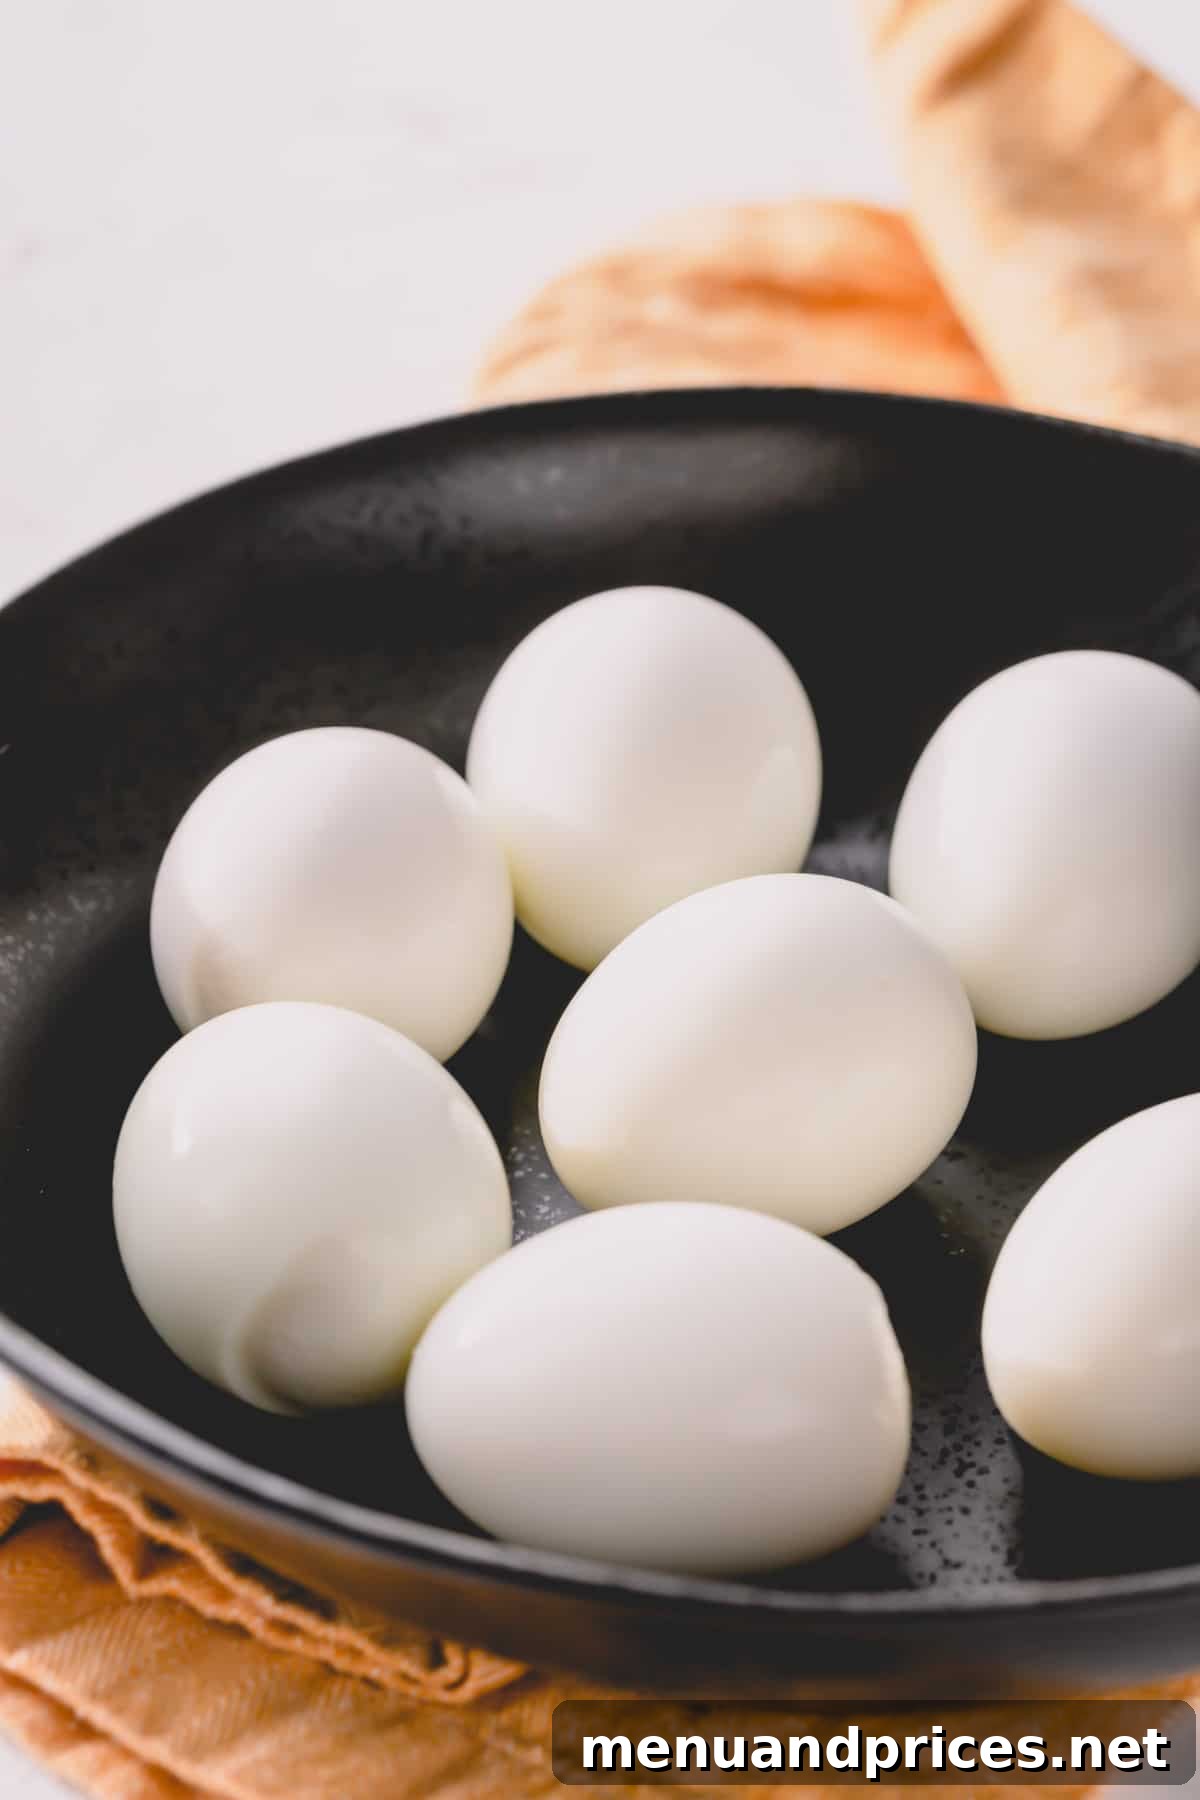
- Effortless Peeling Every Single Time: This is arguably the biggest advantage and the most sought-after quality. Imagine peeling a hard-boiled egg without losing half the white to stubborn shell fragments!
What makes this cooking method truly exceptional is its unparalleled reliability. Regardless of how fresh your eggs are – whether they’re straight from the chicken coop or have been sitting in your fridge for a couple of weeks – you will achieve easy-to-peel hard-boiled eggs without fail! Yes, even those notoriously challenging farm-fresh eggs will surrender their shells with ease.
My mother-in-law, a dedicated chicken keeper, provides us with incredibly fresh eggs weekly. Thanks to this steaming method, I can confidently cook them knowing they will come out perfectly cooked and easy to peel, making breakfast and snack prep a breeze.
The Fool-Proof Steaming Method: Step-by-Step Guide
The highly effective, fool-proof technique I’ve been emphasizing is none other than steaming! This method offers a gentler, more even cooking process compared to direct boiling, which contributes significantly to the ease of peeling and overall egg quality.
You can forget all those conflicting rules about starting with cold water versus boiling water, or using room-temperature eggs versus straight-from-the-fridge eggs. None of those variables impact the success of this steaming method. Simply follow these two straightforward steps for consistently perfect results:
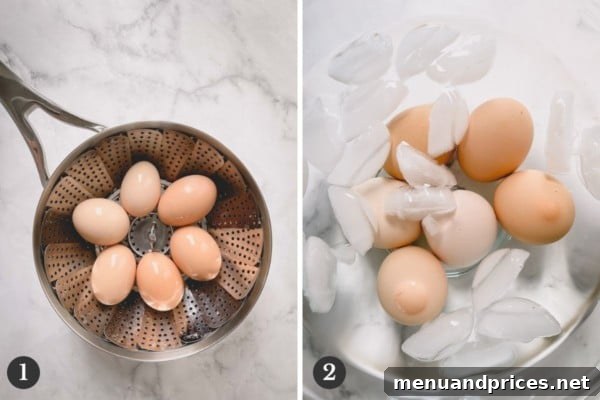
- Prepare and Steam the Eggs: In a saucepan, add approximately one inch of water and bring it to a rolling boil over high heat. Once boiling, carefully place a steamer basket into the saucepan. Arrange your eggs (any number that fits comfortably in a single layer) within the steamer basket. Cover the saucepan tightly with a lid and allow the eggs to steam for the desired duration (refer to our time chart below for specific doneness). For hard-boiled eggs with firm yolks, such as those ideal for deviled eggs, steam for 8-10 minutes, then turn off the heat and let the eggs sit, covered, in the residual steam for an additional 5 minutes. This gentle resting period helps set the yolks without overcooking.
- The Crucial Ice Bath: Immediately after the steaming period (or resting period for firm yolks), use tongs or a slotted spoon to transfer the cooked eggs into a large bowl filled with ice water. This immediate plunge into an ice bath is critical. It rapidly halts the cooking process, preventing any further overcooking that could lead to the dreaded green ring. Allow the eggs to cool completely in the ice bath for 5-10 minutes. This quick chilling also helps the egg whites contract slightly, making the membrane less prone to sticking to the shell.
Hard-Boiled Egg Time Chart for Every Preference
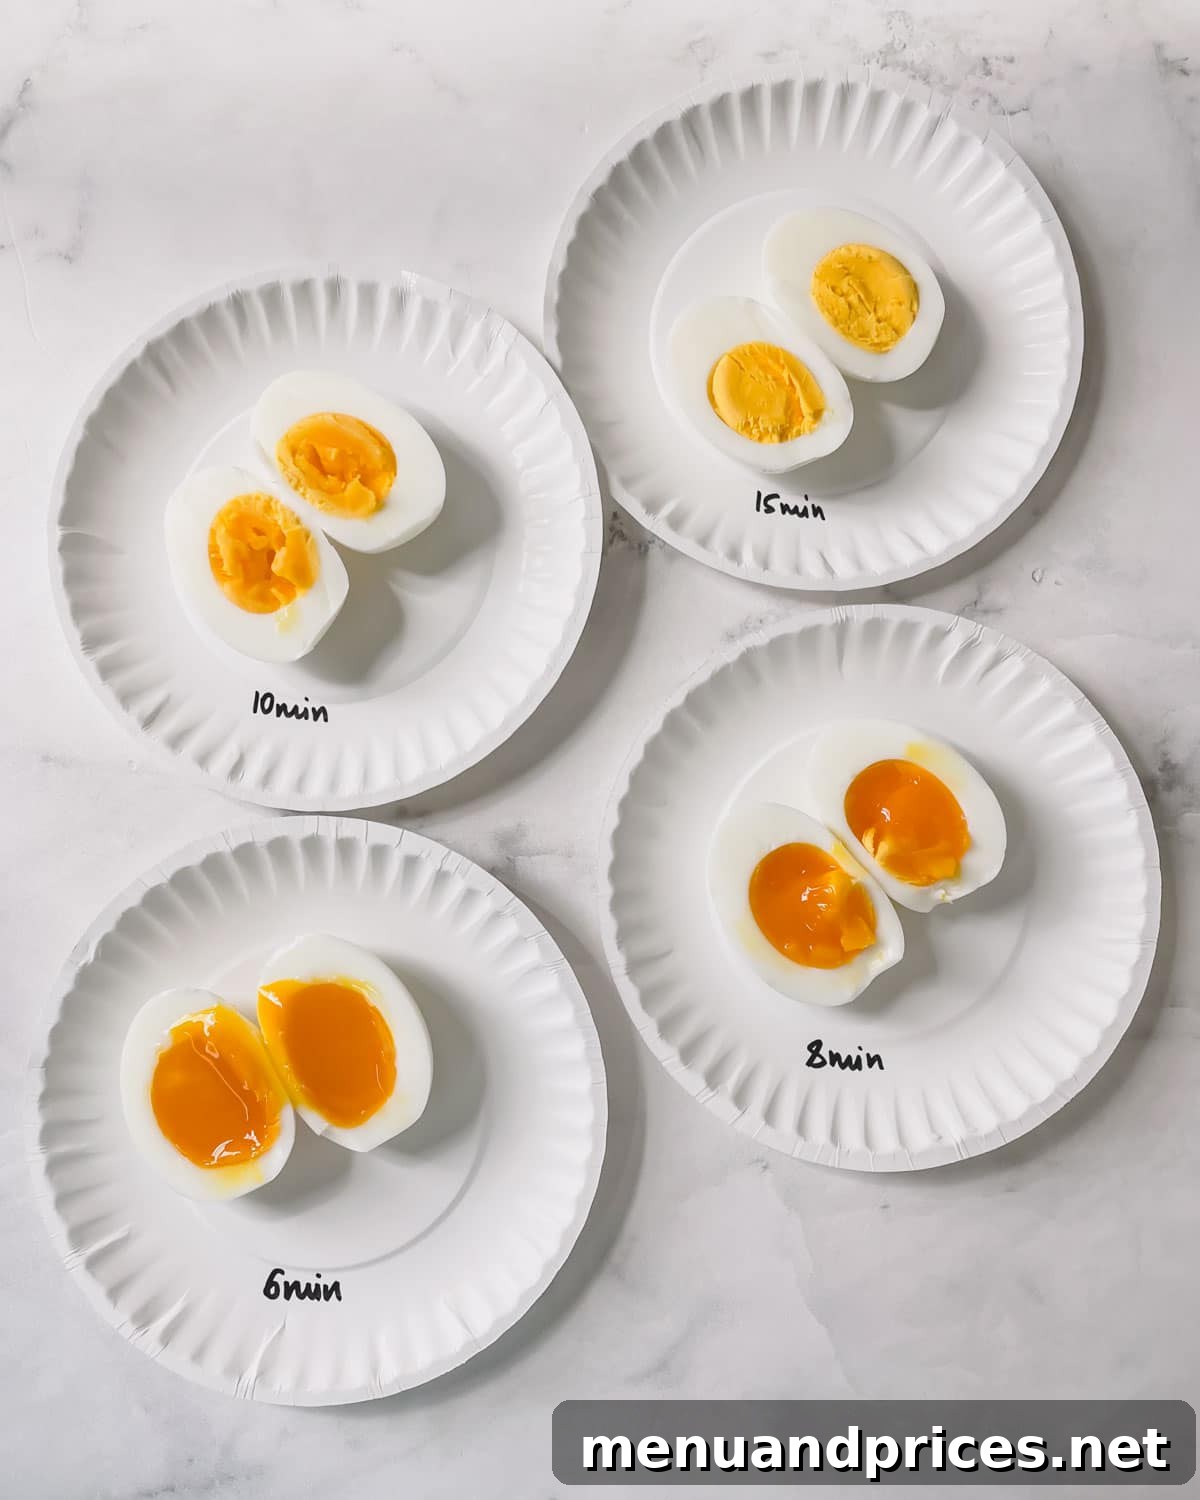
The ideal cooking time for your hard-boiled eggs depends entirely on your preference for yolk consistency and their intended use. This chart provides precise steaming times to achieve your desired doneness, from perfectly runny to firmly set:
- 6 minutes: For a classic soft-boiled egg with a beautifully runny, golden yolk. Ideal for dipping toast soldiers.
- 8 minutes: Achieves a soft-boiled egg with a semi-set yolk – still a bit jammy in the center, offering a creamy texture. Great for salads or open-faced sandwiches.
- 10 minutes: Results in a perfectly hard-boiled egg with a firm yet custardy yolk. This texture is fantastic for general snacking or slicing onto dishes, avoiding any dryness.
- 15 minutes: Delivers a truly firm, fully set yolk, perfect for recipes like deviled eggs or egg salad where a solid consistency is required. (Note: For this doneness, steam for 10 minutes, then turn off the heat and let the eggs sit, covered, for the remaining 5 minutes without direct heat.)
The Ultimate Guide to Effortless Egg Peeling
Once your eggs have had sufficient time to cool completely in the ice bath, they are ready for the final step: peeling. This method makes it incredibly easy, but a few additional tricks can ensure an absolutely flawless result:
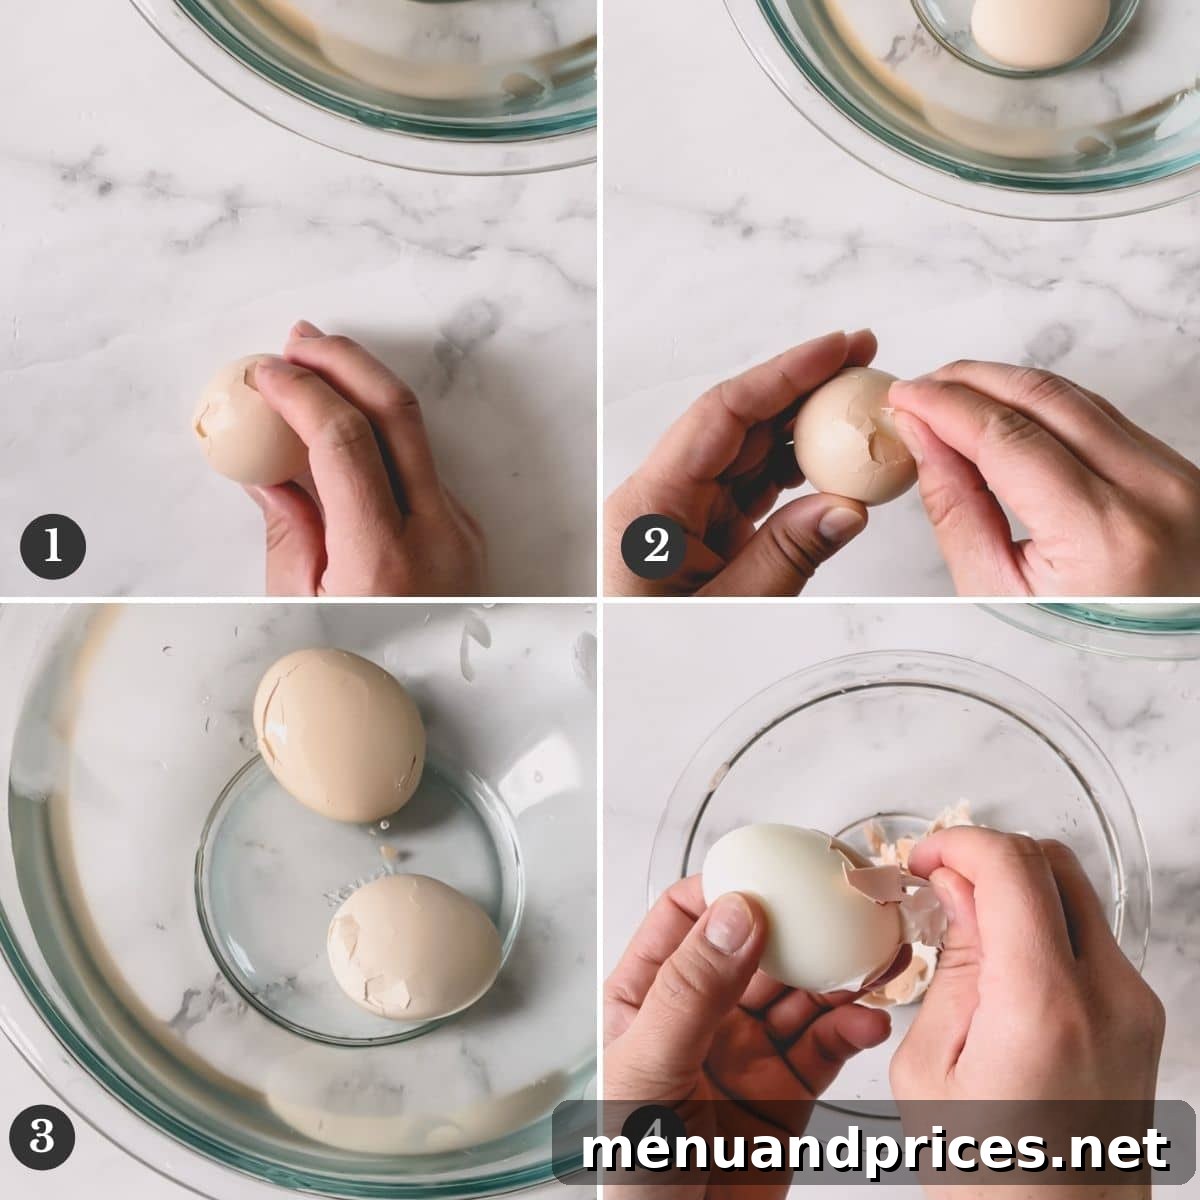
- Gentle Cracking: Remove a cooled egg from the ice bath and gently tap it all over a hard surface, such as your countertop, to create a network of fine cracks across the entire shell. Avoid hitting it too hard, which could damage the egg white underneath.
- Locate the Membrane: If possible, carefully pick at a section of the cracked shell to tear a small hole in the thin, almost invisible membrane that lies just beneath the shell. This membrane is the key to an easy peel.
- Submerge and Soak: Place the cracked egg back into the bowl of water (the same ice bath water is fine, as long as it’s still cool), while you move on to crack the other eggs. The goal here is to allow water to seep in between the cracked shell, the delicate membrane, and the egg white itself. This lubrication drastically reduces friction and makes the shell slide off effortlessly.
- Careful Peeling: After a minute or two of soaking, carefully peel the shells away, starting from where you tore the membrane. You’ll be amazed at how easily the shell and membrane lift off, revealing flawless, smooth hard-boiled eggs. For an even smoother experience, you may find it helpful to peel the eggs under a gentle stream of running tap water. The flowing water further assists in washing away shell fragments and lubricating the process.
Expert Peeling Tip
The simple act of soaking cracked eggs in a bowl of water for a few minutes allows moisture to penetrate between the egg and its membrane, creating a natural lubricant for incredibly easy peeling. Don’t skip this step!
Additional Tips for Hard-Boiled Egg Success
- Immediate Ice Bath is Non-Negotiable: Always remember to transfer the cooked eggs into an ice bath immediately after steaming. This crucial step not only stops the cooking process dead in its tracks but also plays a vital role in preventing the undesirable greenish-gray ring around the yolk and aids in easy peeling.
- Utilize the Water Soak for Easy Peeling: For truly effortless peeling, after cracking the shells, let the eggs sit in a bowl of water for a few minutes. The water seeps under the membrane, making it significantly easier to remove. Alternatively, peeling the egg under a gentle stream of running tap water can also provide the necessary lubrication.
- Peel When Chilled for Best Results: Hard-boiled eggs are easiest to peel right after they have been thoroughly chilled in the ice bath. If you’re preparing eggs for a specific recipe like deviled eggs, plan to cook and peel them right before you intend to use them for optimal freshness and ease.
- Farm-Fresh Eggs Are Welcome: While fresh eggs often have a reputation for being difficult to peel due to a tighter membrane adhesion, the steaming method effectively circumvents this issue. So, feel free to use your delicious farm-fresh eggs without any worry!
Storing Your Perfect Hard-Boiled Eggs
Proper storage ensures your hard-boiled eggs remain fresh and delicious for future enjoyment.
- Peeled Eggs: If you’ve already peeled your eggs, store them in an airtight container in the refrigerator. They will maintain their quality for up to 3 days. It’s often recommended to add a damp paper towel to the container to prevent them from drying out.
- Unpeeled Eggs: Hard-boiled eggs still in their shells can be stored in the refrigerator for up to 1 week. Keeping the shell on provides a natural protective barrier, helping to preserve their freshness and flavor longer.
Frequently Asked Questions About Hard-Boiled Eggs
The grayish-green ring that sometimes forms around a cooked yolk, while harmless, is certainly unappetizing. It’s typically a result of overcooking the eggs or cooking them at too high a temperature, causing a chemical reaction between sulfur in the egg white and iron in the yolk. To prevent this discoloration, use the steaming method outlined above and, most importantly, immediately transfer the cooked eggs into a cold ice bath to stop the cooking process promptly.
Yes, absolutely! We regularly use farm-fresh eggs sourced directly from our family’s chickens, and this steaming technique has consistently proven to be the most reliable and effective method for cooking and peeling them easily, time and time again. You no longer have to worry about the shells sticking, even with the freshest eggs!
Delicious Recipes Using Hard-Boiled Eggs
Beyond simply enjoying them as a high-protein, satisfying snack with just salt and pepper, hard-boiled eggs are incredibly versatile and can be incorporated into a myriad of delicious recipes:
- Deviled Eggs: Get creative with various flavors! Try classic deviled eggs, roasted red pepper, smoked salmon, lobster, chicken liver pâté, or curry deviled eggs. The possibilities are endless!
- Scotch Eggs: A hearty and satisfying dish featuring a hard-boiled egg wrapped in sausage meat and breadcrumbs, then fried or baked.
- Russian Potato Salad or Amish Potato Salad: Eggs add rich flavor and texture to these beloved creamy potato salads.
- Spring Cobb Salad: A colorful and filling salad, where sliced hard-boiled eggs are a traditional and essential component.
- Instant Pot Egg Salad: The easiest way to make a creamy, delicious egg salad, perfect for sandwiches or as a dip.
For something a little different, have you ever tried soft-boiled quail eggs? They make for exquisite, bite-sized gourmet snacks!
Easy Peel Hard Boiled Eggs
Comment
Print Recipe
Ingredients
- 6 large eggs
Instructions
-
In a saucepan, bring about an inch of water to a boil.
-
Place a steamer basket in the saucepan and add the eggs. Cover with a lid and let the eggs steam for 8-10 minutes (refer to the time chart for desired doneness).
-
For hard-boiled eggs with truly firm yolks (e.g., for deviled eggs), turn off the heat after 10 minutes of steaming and let them sit, covered, for an additional 5 minutes.
-
Immediately transfer the cooked eggs into a bowl of ice water and allow them to cool completely for 5-10 minutes.
To peel the eggs:
-
Gently tap the cooled eggs on a hard surface to crack the shell all over. If possible, tear a small hole in the thin membrane under the shell.
-
Place the cracked egg back into the bowl of cool water while you crack other eggs. This allows water to seep between the egg and the membrane, facilitating easier peeling.
-
Carefully peel the shells to reveal flawless hard-boiled eggs. (TIP: Peeling the eggs under running water can also be very helpful.)
⭐️ Did you make this recipe?
Please leave a review and let us know how you liked it!
Tips & Notes
– 6 minutes for soft-boiled egg with 100% runny yolk
– 8 minutes for soft-boiled egg with semi-set yolk
– 10 minutes for hard-boiled egg with firm, but custardy yolk
– 15 minutes for hard-boiled egg with firm yolk (Note: The last 5 minutes are cooked with no heat.)
Storing Tips:
Store hard-boiled eggs in the fridge.
– Keep peeled eggs in an airtight container for up to 3 days.
– Unpeeled eggs are good for up to 1 week.
Nutrition

Did you make this?Leave a rating and your feedback. Thank you!
By following this detailed steaming method, you’ll consistently achieve perfect, easy-to-peel hard-boiled eggs every single time. This technique eliminates the guesswork and frustration often associated with cooking eggs, allowing you to enjoy this versatile ingredient in all its glory, whether as a simple snack or a gourmet addition to your favorite recipes. Happy cooking!
This post was originally published on March 22, 2016, and updated with enhanced tips and details on April 11, 2022.