
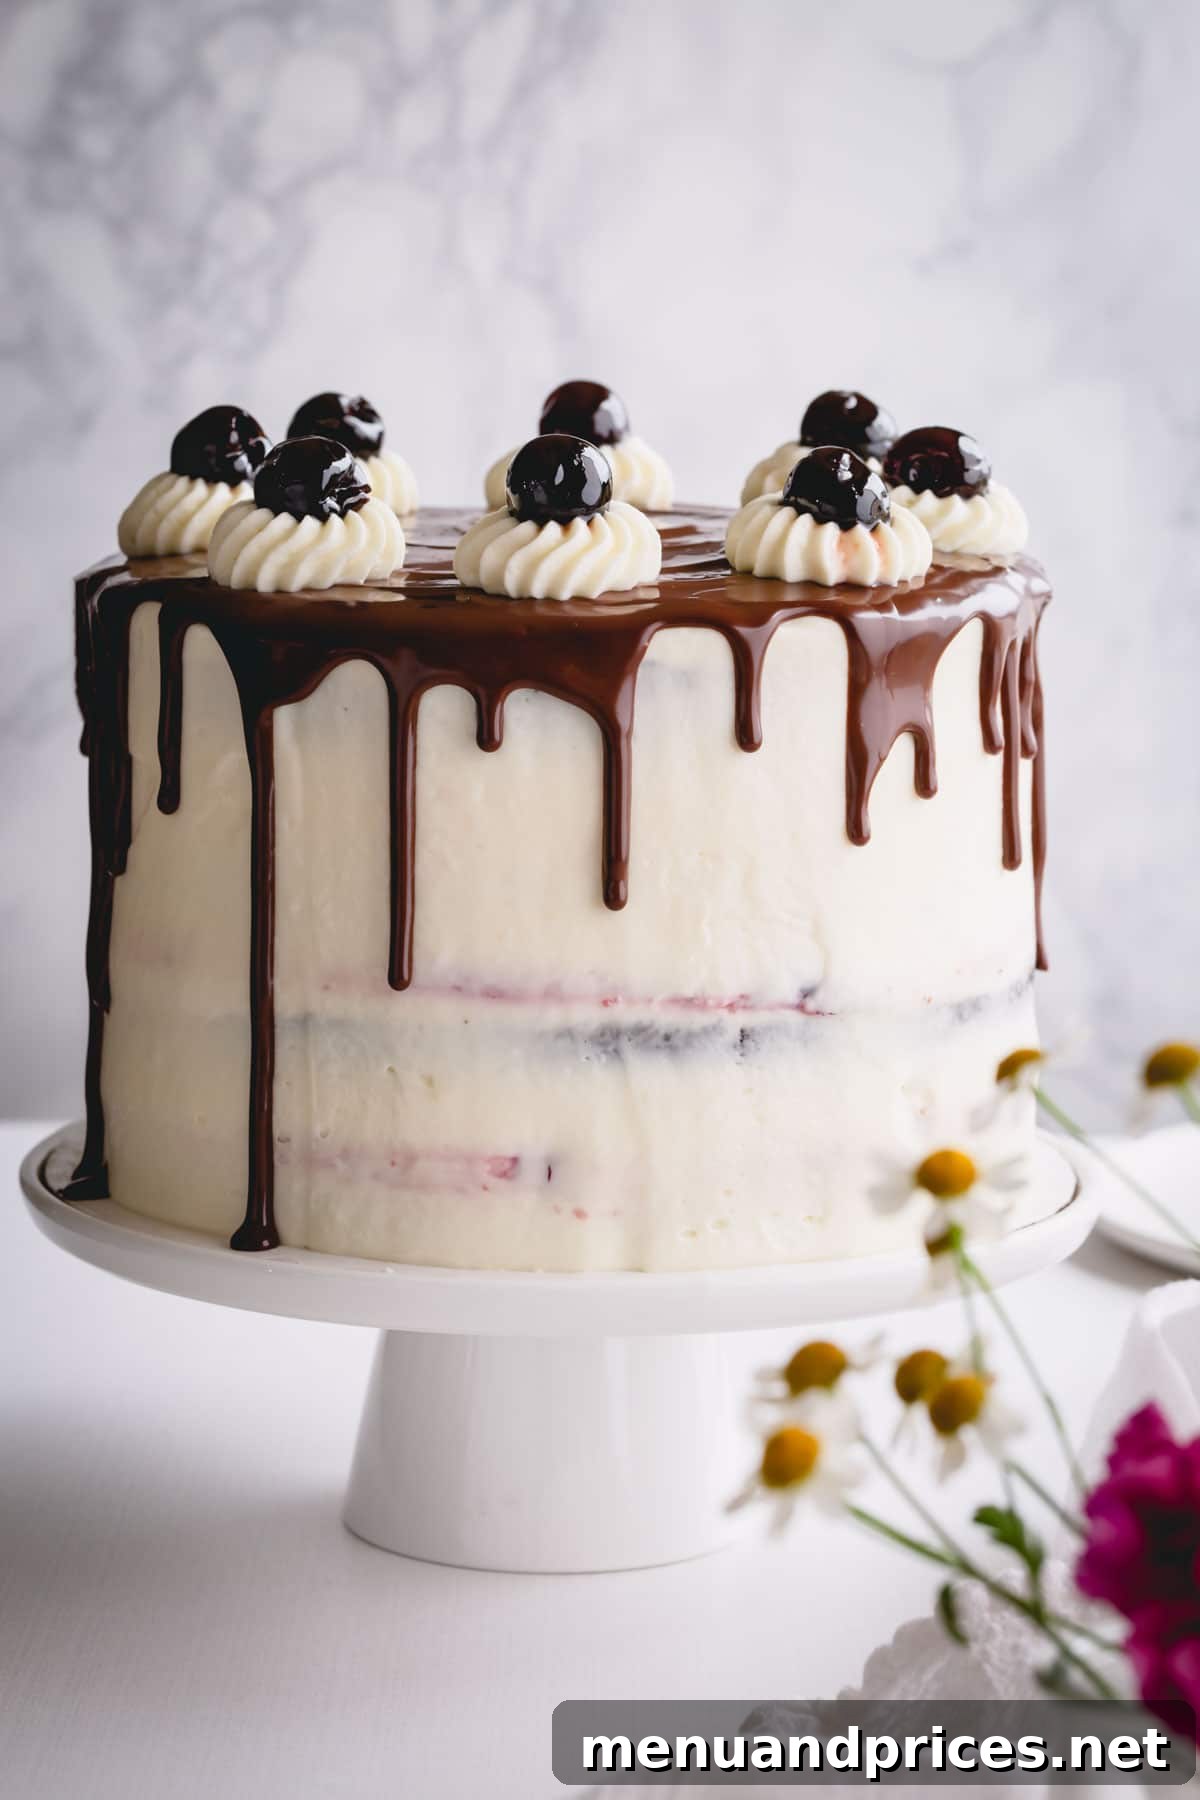
Prepare to elevate your dessert game with our exquisite Black Forest Cake recipe! This stunning creation takes the beloved German classic, Schwarzwälder Kirschtorte, to new heights with impeccably moist chocolate cake layers, a luscious homemade sweet cherry sauce, and a remarkably light white chocolate mousse frosting. Forget heavy, overly sweet versions; this showstopping cake is perfectly balanced, intensely flavorful, and elegantly decadent, promising to be the star of any gathering. Its harmonious blend of rich chocolate, tart cherries, and ethereal mousse creates an unforgettable culinary experience.
What is Black Forest Cake? A Timeless German Tradition
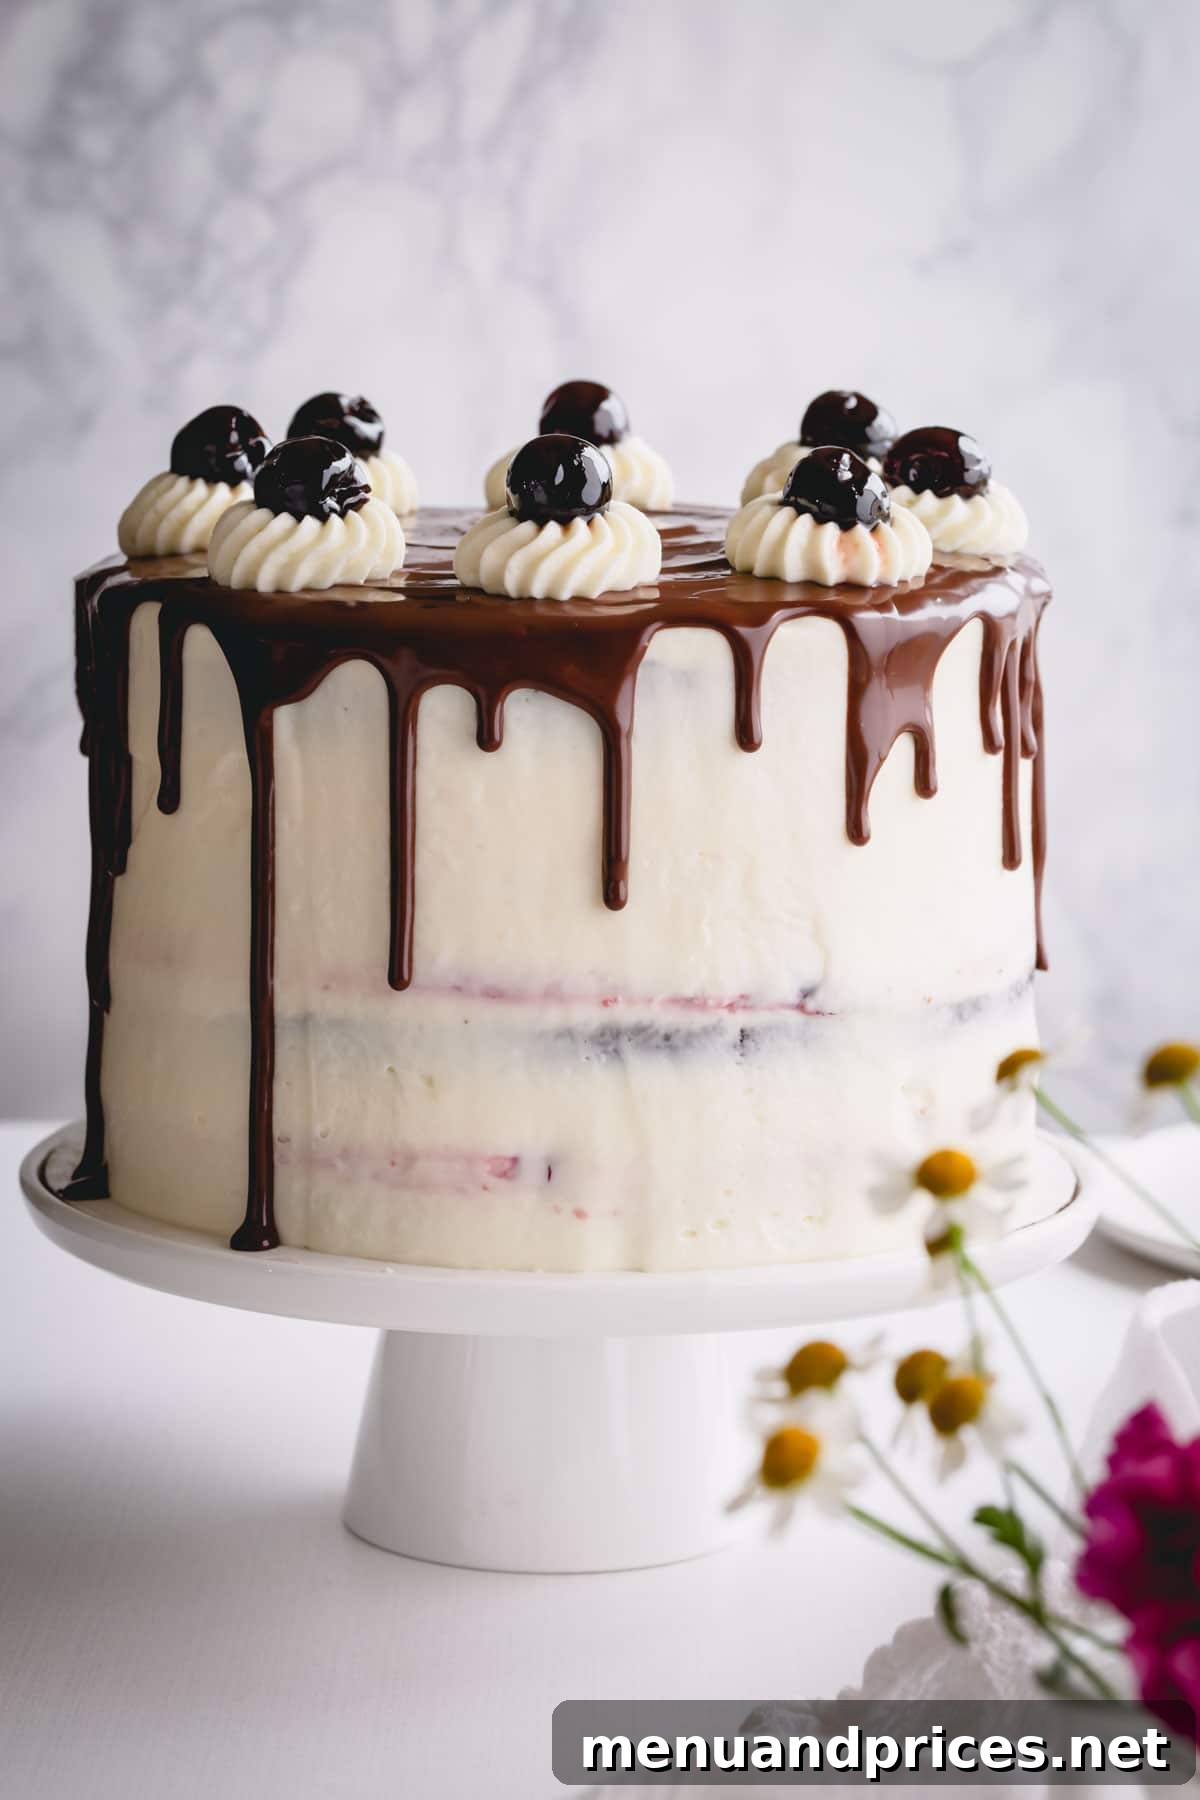
At its heart, Black Forest Cake, or Schwarzwälder Kirschtorte as it’s known in Germany, is a truly iconic dessert that originated from the Black Forest region (Schwarzwald) in southwestern Germany. Traditionally, this celebratory cake features layers of rich chocolate sponge cake, generously soaked with Kirschwasser (a clear, unsweetened cherry brandy), sweet cherry filling, and plenty of whipped cream, often adorned with chocolate shavings and fresh cherries. Our recipe honors this heritage while introducing an innovative twist: a stable and utterly divine white chocolate mousse frosting that offers a more refined texture and flavor profile than traditional whipped cream, ensuring your cake stands tall and proud without drooping.
Why You’ll Adore This Elevated Black Forest Cake Recipe:
This upgraded rendition of the classic Black Forest Gateau is designed to impress and delight, offering a culinary experience that surpasses any store-bought cake. Here’s why this recipe will become your new favorite:
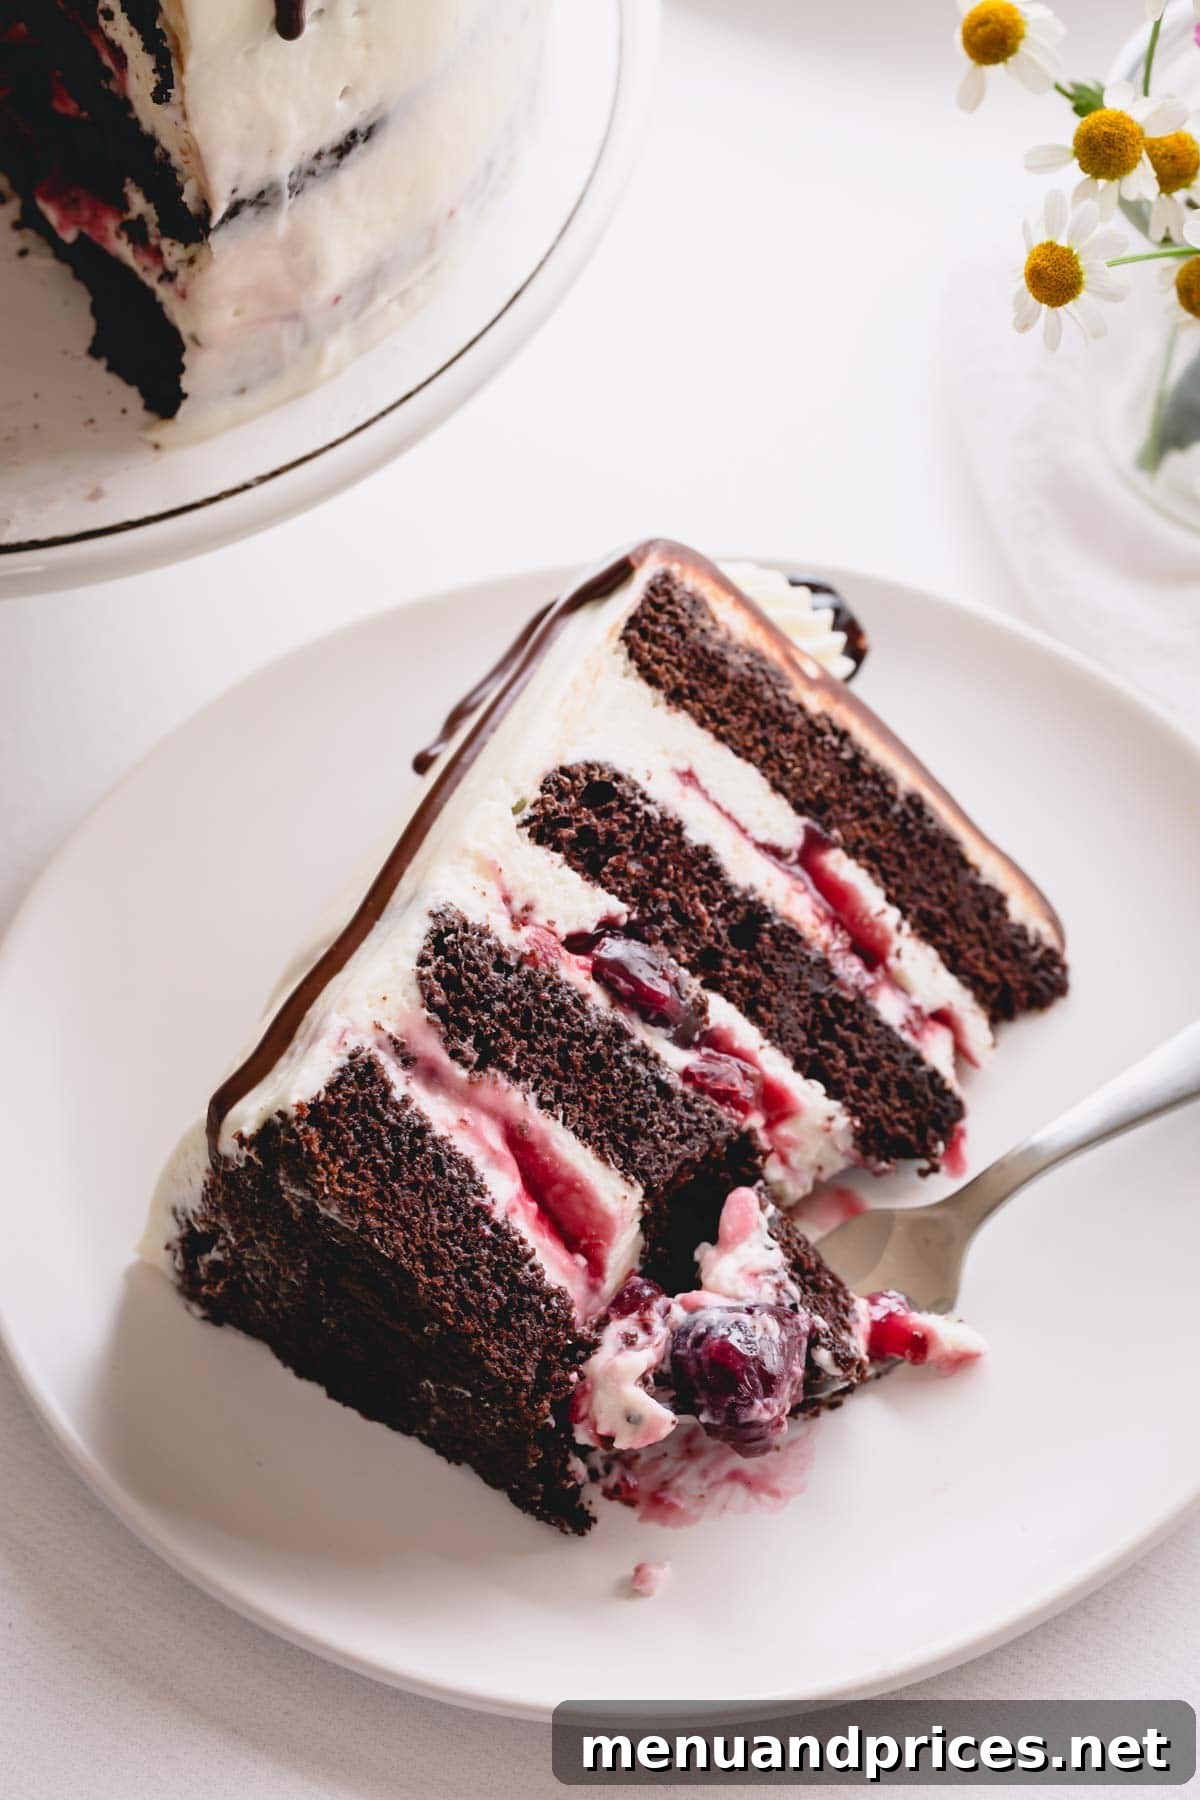
- Stunning Beauty & Elegance: With its perfectly layered structure, glossy chocolate ganache drip, and vibrant cherry garnish, this cake is a feast for the eyes. It’s truly a showstopper that will earn gasps of admiration at any event, from birthdays to holiday celebrations.
- Incredibly Moist Chocolate Cake Layers: Our carefully crafted chocolate cake recipe yields layers that are not just soft and tender, but also sturdy enough to hold the generous fillings. Each bite is rich with deep cocoa flavor, providing the ideal foundation for the lighter components.
- Ethereal Light and Airy Mousse Frosting: Unlike standard whipped cream that can deflate or “weep” over time, our white chocolate mousse frosting is wonderfully stable, offering a luxurious, cloud-like texture and a delicate sweetness that perfectly complements the chocolate and cherries. It’s a sophisticated upgrade that ensures your cake remains pristine and delicious.
- Bursting with Sweet Cherry Filling: The homemade cherry filling is the heart of this cake, delivering a vibrant burst of sweet and tangy flavor. Made with fresh or frozen sweet cherries, it provides a bright contrast to the rich chocolate and creamy mousse, tying all the flavors together beautifully.
Honestly, once you taste this towering beauty, with its perfect balance of sweetness, lightness, and decadence, you’ll find that all other Black Forest cakes pale in comparison. It’s a dessert that disappears all too quickly, leaving everyone craving another slice!
The Essential Components of This Black Forest Masterpiece:
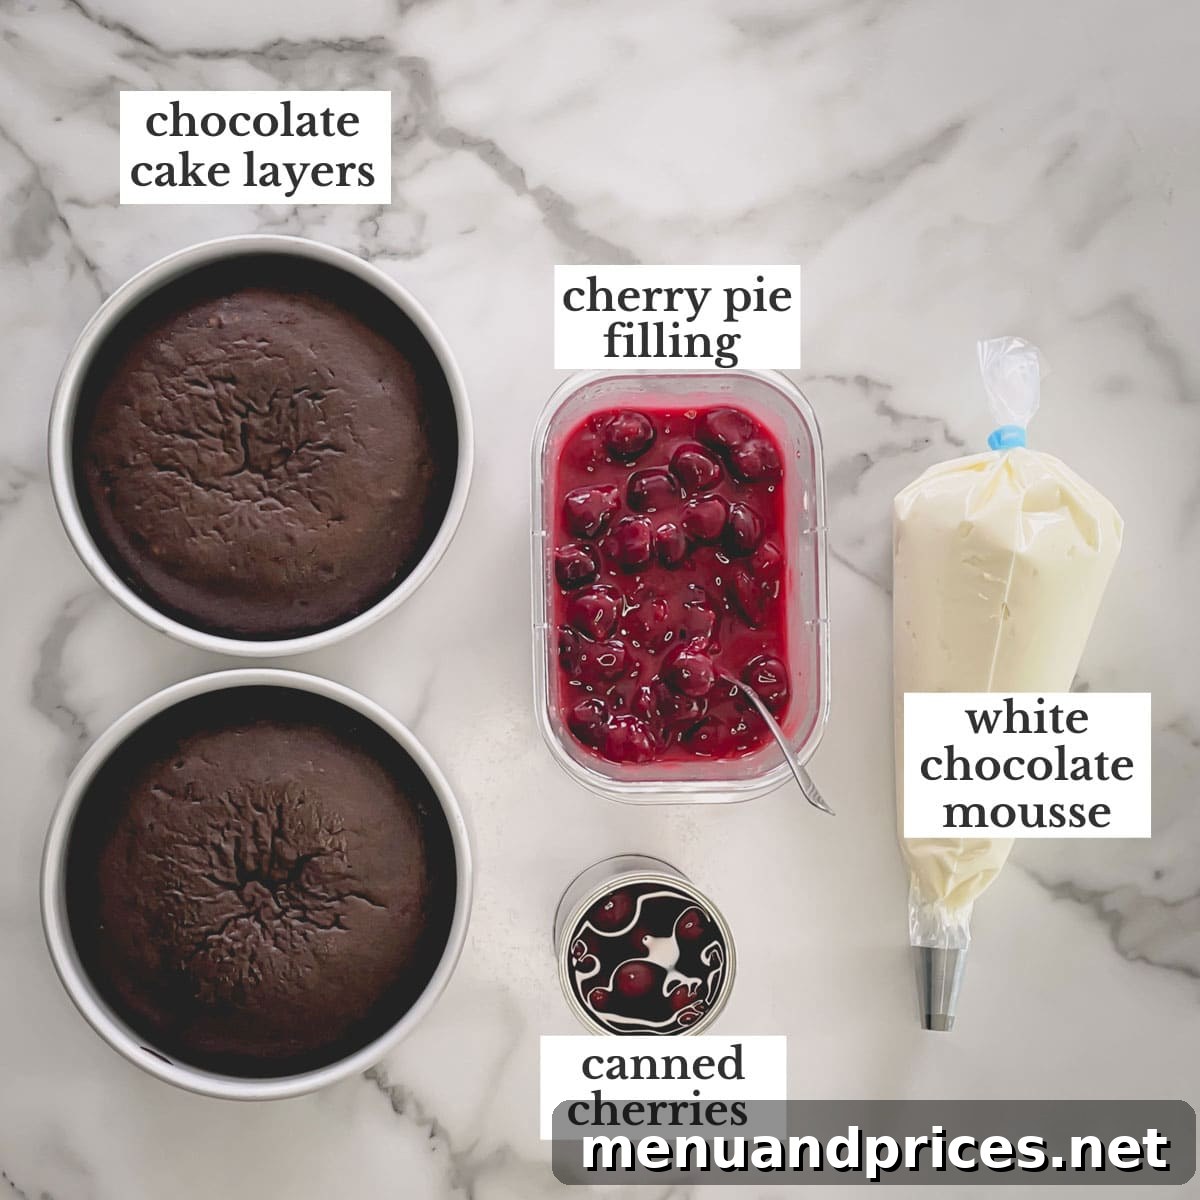
Crafting this magnificent Black Forest Cake involves four primary elements, each contributing to its overall perfection. Understanding and mastering each component will ensure a truly spectacular result:
- Chocolate Cake: Our recipe features a moist, tender, yet incredibly sturdy chocolate cake layer. This is crucial for supporting the fillings and frosting without crumbling. The good news is these cake layers can be prepared well in advance, making your baking day much less stressful.
- Sweet Cherry Filling: While a store-bought cherry pie filling can work in a pinch, we wholeheartedly recommend the homemade version. It offers a depth of flavor and freshness that is simply incomparable. This filling can also be made ahead of time, allowing flavors to meld beautifully.
- White Chocolate Mousse Frosting: This is where our recipe truly shines. Light, fluffy, and wonderfully stable, this simplified white chocolate mousse frosting provides an exquisite creamy texture and a delicate sweetness that is utterly divine. It holds its shape beautifully, unlike traditional whipped cream.
- Chocolate Ganache: While primarily for decorative purposes, the glossy chocolate ganache drizzle adds a touch of elegance and an extra layer of rich chocolate flavor, enhancing the cake’s visual appeal and overall decadence. A little extra chocolate never hurts!
- Canned Cherries (for garnish and syrup): Beyond just being a beautiful garnish, the syrup from canned dark sweet cherries is reserved for brushing onto the chocolate cake layers. This infuses the cake with even more cherry flavor and ensures ultimate moistness. The cherries themselves are perfect for decoration.
Step-by-Step Guide: How to Make This Irresistible Black Forest Cake:
1. Bake the Perfect Chocolate Cake Layers:
For the best results and ease of assembly, we highly recommend baking your chocolate cake layers in advance. This allows the cakes to cool completely and firm up, making them much easier to handle and slice. Once baked and cooled, wrap each cake layer tightly in plastic wrap and refrigerate for up to 2 days, or freeze them for up to 3 months. For a comprehensive guide with detailed step-by-step photos and a wealth of expert tips, you can refer to our dedicated recipe post for the best simple chocolate cake.
Essential Tip: Patience is Key!
Never attempt to slice or frost a warm cake! A warm cake is delicate and prone to crumbling, and the heat will cause your beautiful frosting to melt instantly, turning into a runny mess. Ensure your cake layers are completely chilled before proceeding to assembly.
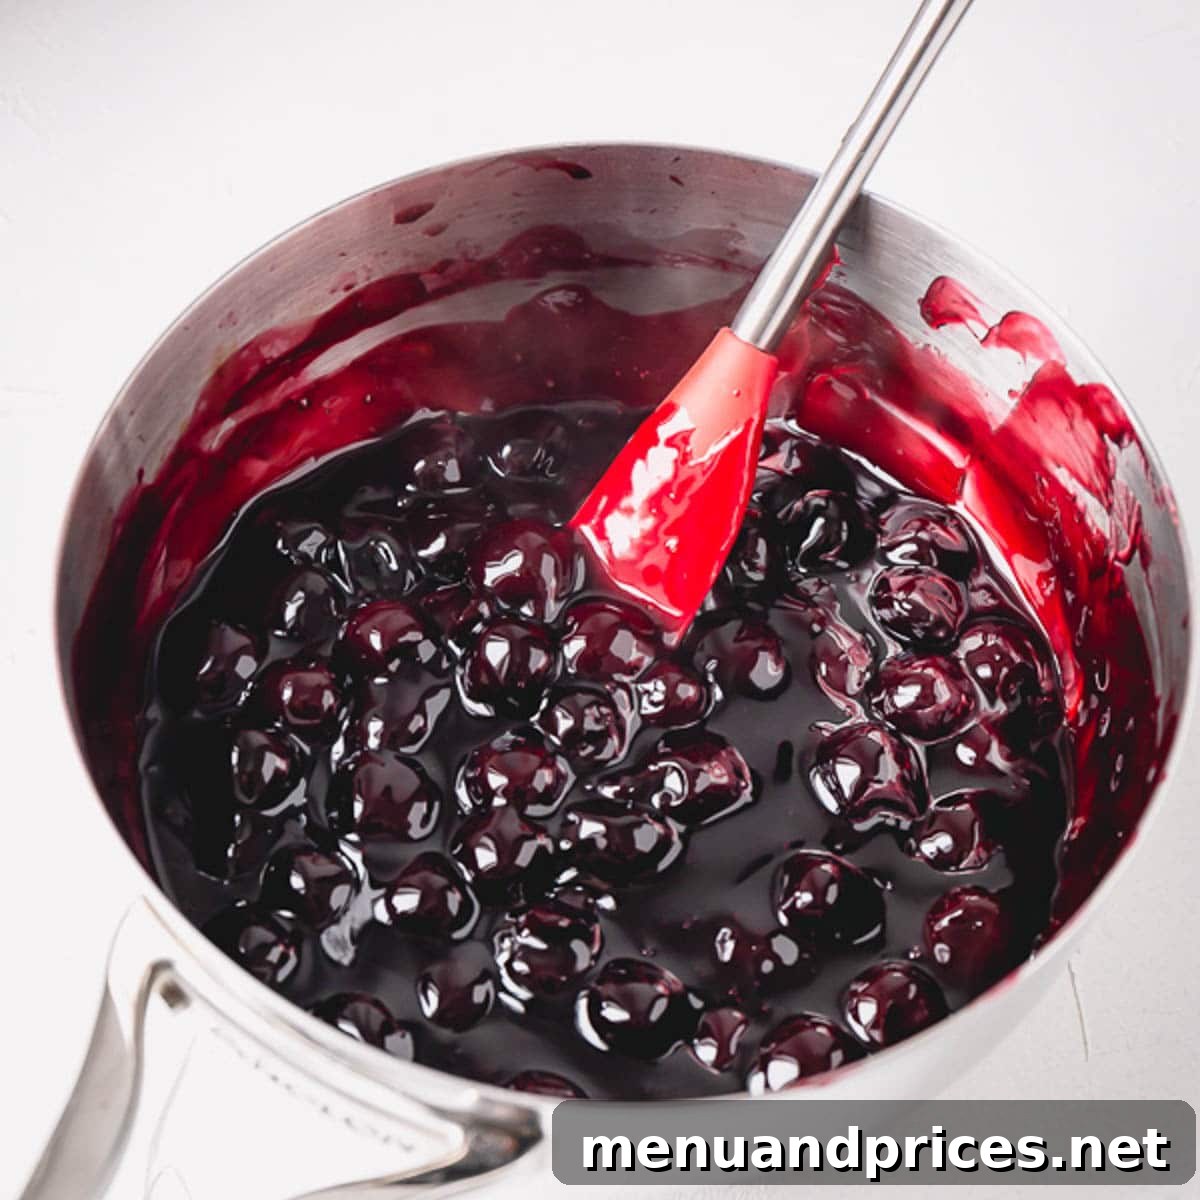
2. Prepare the Luscious Cherry Sauce:
Similar to the chocolate cake layers, preparing the homemade cherry sauce at least a day in advance is highly recommended. This allows the sauce to thoroughly chill and thicken to the ideal consistency, which is crucial for a stable and delicious cake filling. Place the cooled sauce in an airtight container and refrigerate until needed. Should you be short on time, a high-quality (21oz) can of store-bought cherry pie filling can serve as a convenient alternative.
3. Craft the Silky White Chocolate Mousse Frosting:
In contrast to the cake and cherry sauce, the white chocolate mousse frosting is not an ideal make-ahead component. For the best texture and stability, it should be prepared just before you are ready to assemble the cake. The gelatin in the mousse will set in the refrigerator, making it difficult to pipe and spread if made too far in advance. Timing is everything for this light and airy frosting!
Pro Tip: Cold Cream is Crucial!
Ensure your heavy cream is thoroughly chilled before you begin whipping. Warm cream will not whip properly, leading to a runny and unstable mousse. A cold bowl and whisk attachments (chilled in the freezer for 10-15 minutes) can also aid in achieving perfectly firm peaks.
4. Master the Art of Cake Assembly:
Before you begin layering, ensure all your cake components are prepped and ready. This organized approach makes the assembly process smooth and enjoyable:
- Carefully slice each chocolate cake horizontally into two even layers using a long serrated knife or a cake leveler. Precision here ensures a beautiful, stable cake.
- Transfer the prepared white chocolate mousse frosting into two large piping bags, ideally fitted with a plain round tip. If you don’t have tips, simply snip off the ends of the bags for easy piping.
- Drain the canned dark sweet cherries, carefully reserving the flavorful cherry syrup in a small bowl. This syrup will be used to moisten the cake layers.
To Assemble the Layers with Precision:
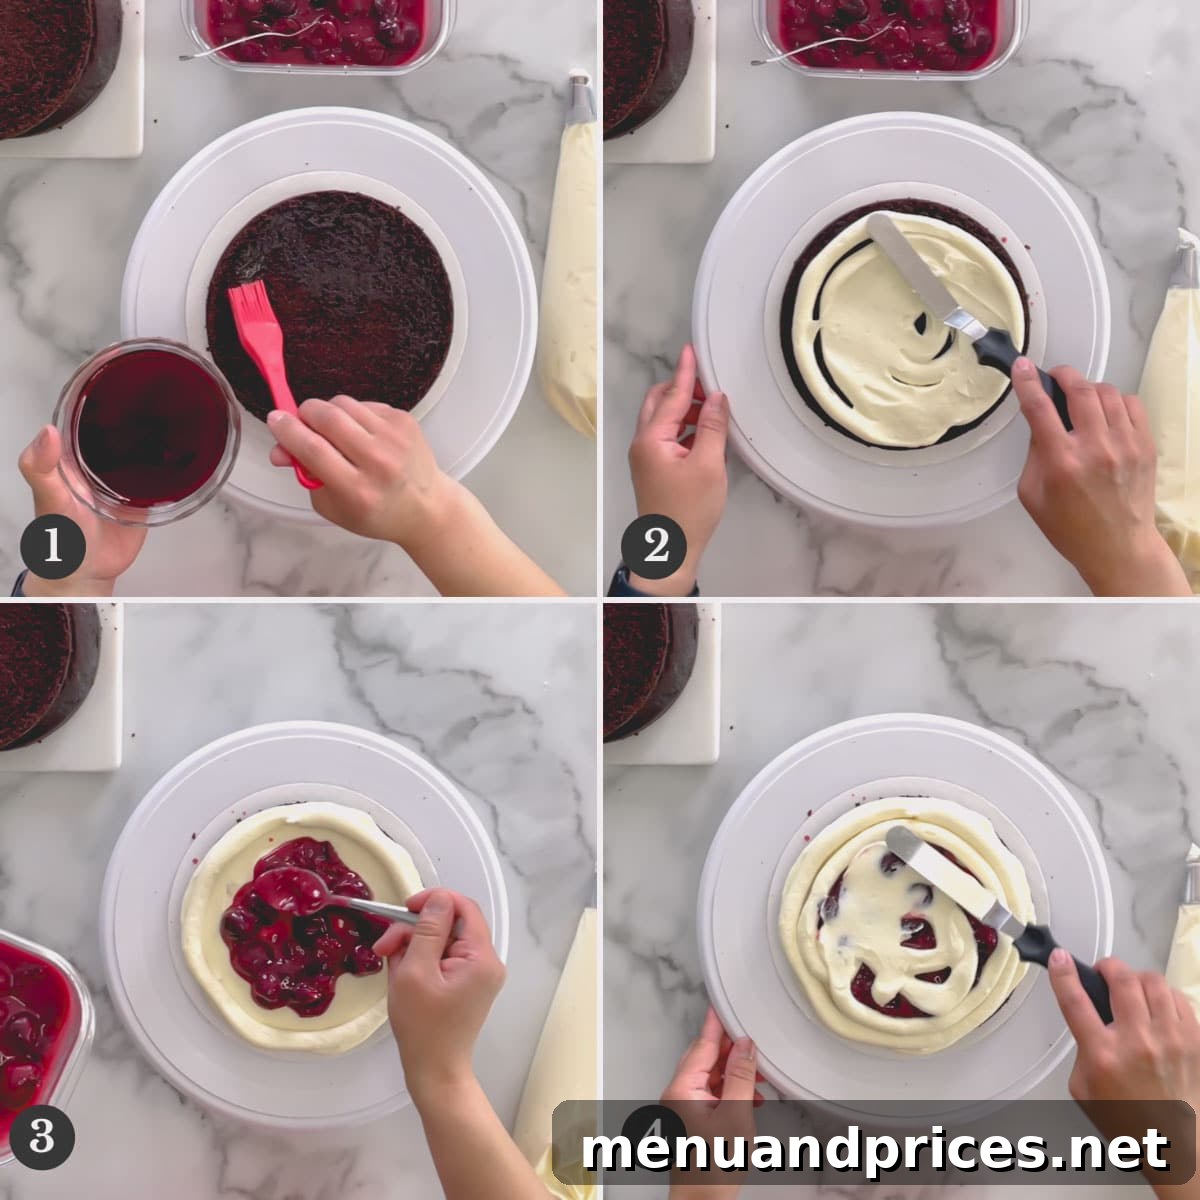
- Begin by placing your first cake layer onto a cake board or serving platter. Gently brush a generous amount of the reserved cherry syrup evenly all over the cake layer. This adds moisture and enhances the cherry flavor.
- Next, pipe a layer of the white chocolate mousse filling over the cake layer. Use an offset spatula to gently spread it evenly across the surface. Then, pipe a sturdy border of mousse around the very edge of the layer; this acts as a dam to contain the cherry filling.
- Carefully spoon approximately one-third of your homemade sweet cherry sauce into the middle of the mousse border. If needed, add a very thin layer of mousse over the cherry sauce to create an even surface for the next cake layer.
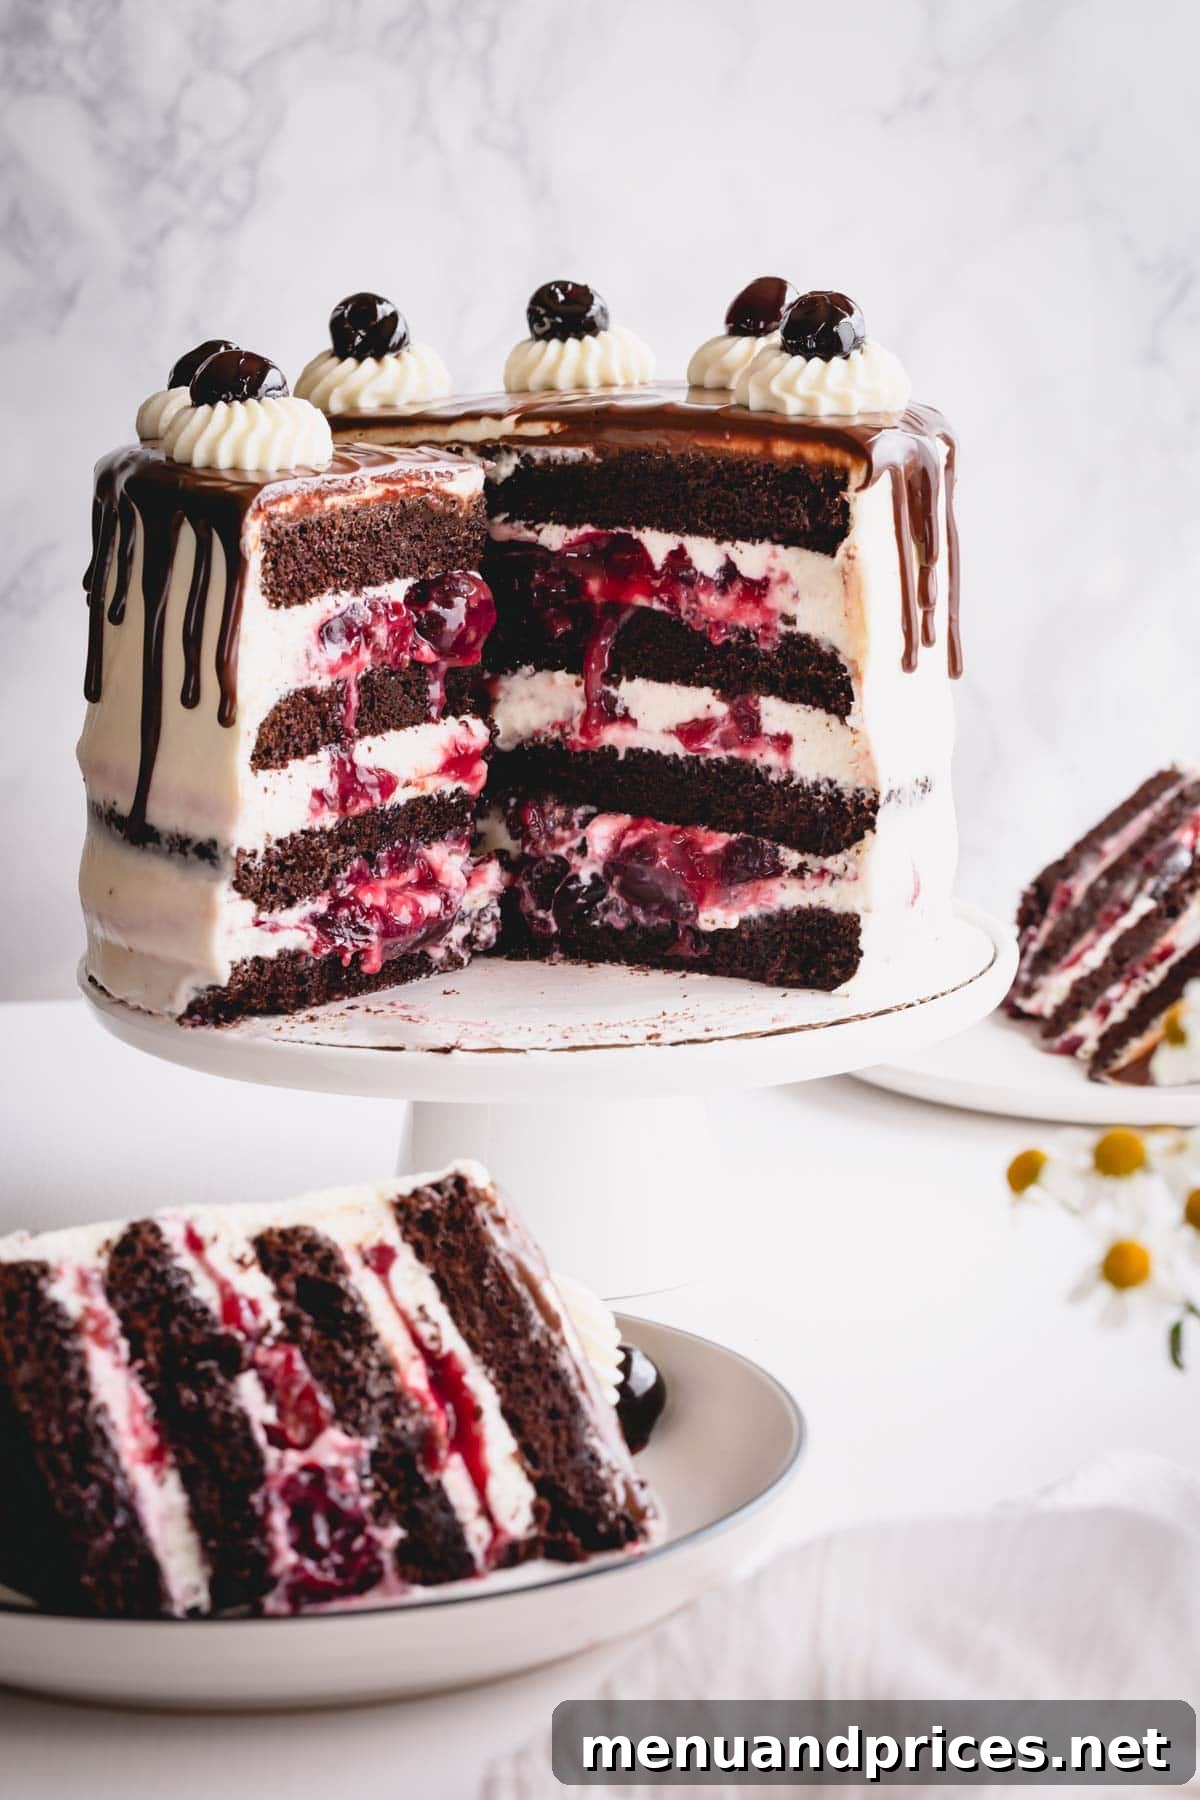
- Gently place the next cake layer on top and repeat the brushing, piping, and filling process. Continue until all cake layers are stacked and filled.
Smart Assembly Hack:
To prevent your cake from sliding around during assembly and frosting, place a small dollop of frosting in the center of your cake board or serving stand before placing the first cake layer. This acts like edible “glue,” securely holding your cake in place as you work.
To Achieve a Flawless Finish with Frosting:
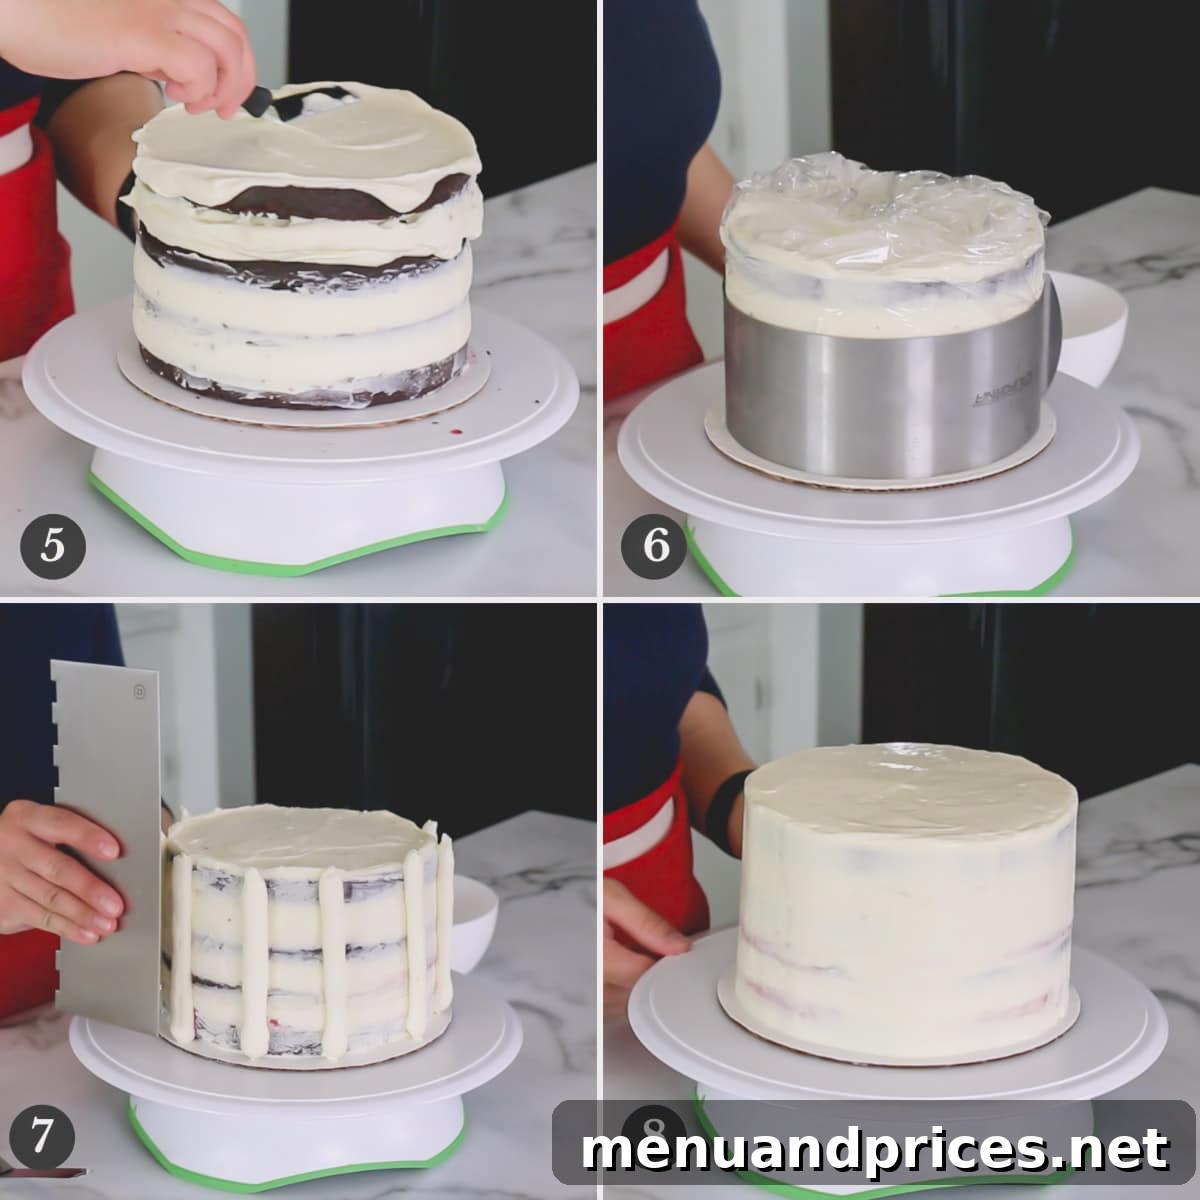
- Begin by applying a very thin, even layer of the white chocolate mousse frosting all over the outside of the assembled cake. This is known as a “crumb coat,” and its purpose is to trap any loose cake crumbs, preventing them from mixing into your final frosting layer.
- Once the crumb coat is applied, wrap the cake loosely in plastic wrap and, if you have one, place a metal cake collar around its base. Refrigerate the cake for at least an hour. This crucial chilling step allows the crumb coat to firm up, stabilize the cake, and helps it maintain a perfectly straight structure for the final frosting application.
- After chilling, carefully remove the plastic wrap and cake collar (if used). Now, apply a generous second layer of the white chocolate mousse frosting to the entire exterior of the cake.
- Using an offset spatula or a bench scraper, meticulously smooth out the frosting until you achieve a beautifully even and polished finish around the sides and top of the cake.
5. Embellish and Decorate for a Professional Touch:
The final decorations transform your delicious cake into an edible work of art. Take your time with these finishing touches for a truly impressive presentation:
- Prepare your dark chocolate ganache and transfer it into a squirt bottle or a small piping bag with a very small opening. Ensure the ganache is flowing smoothly but is not hot to the touch. It should be warm enough to drip, but cool enough not to melt the frosting.
- Scoop a small amount of your white chocolate mousse frosting into a piping bag fitted with a large star tip. This will be used for decorative dollops.
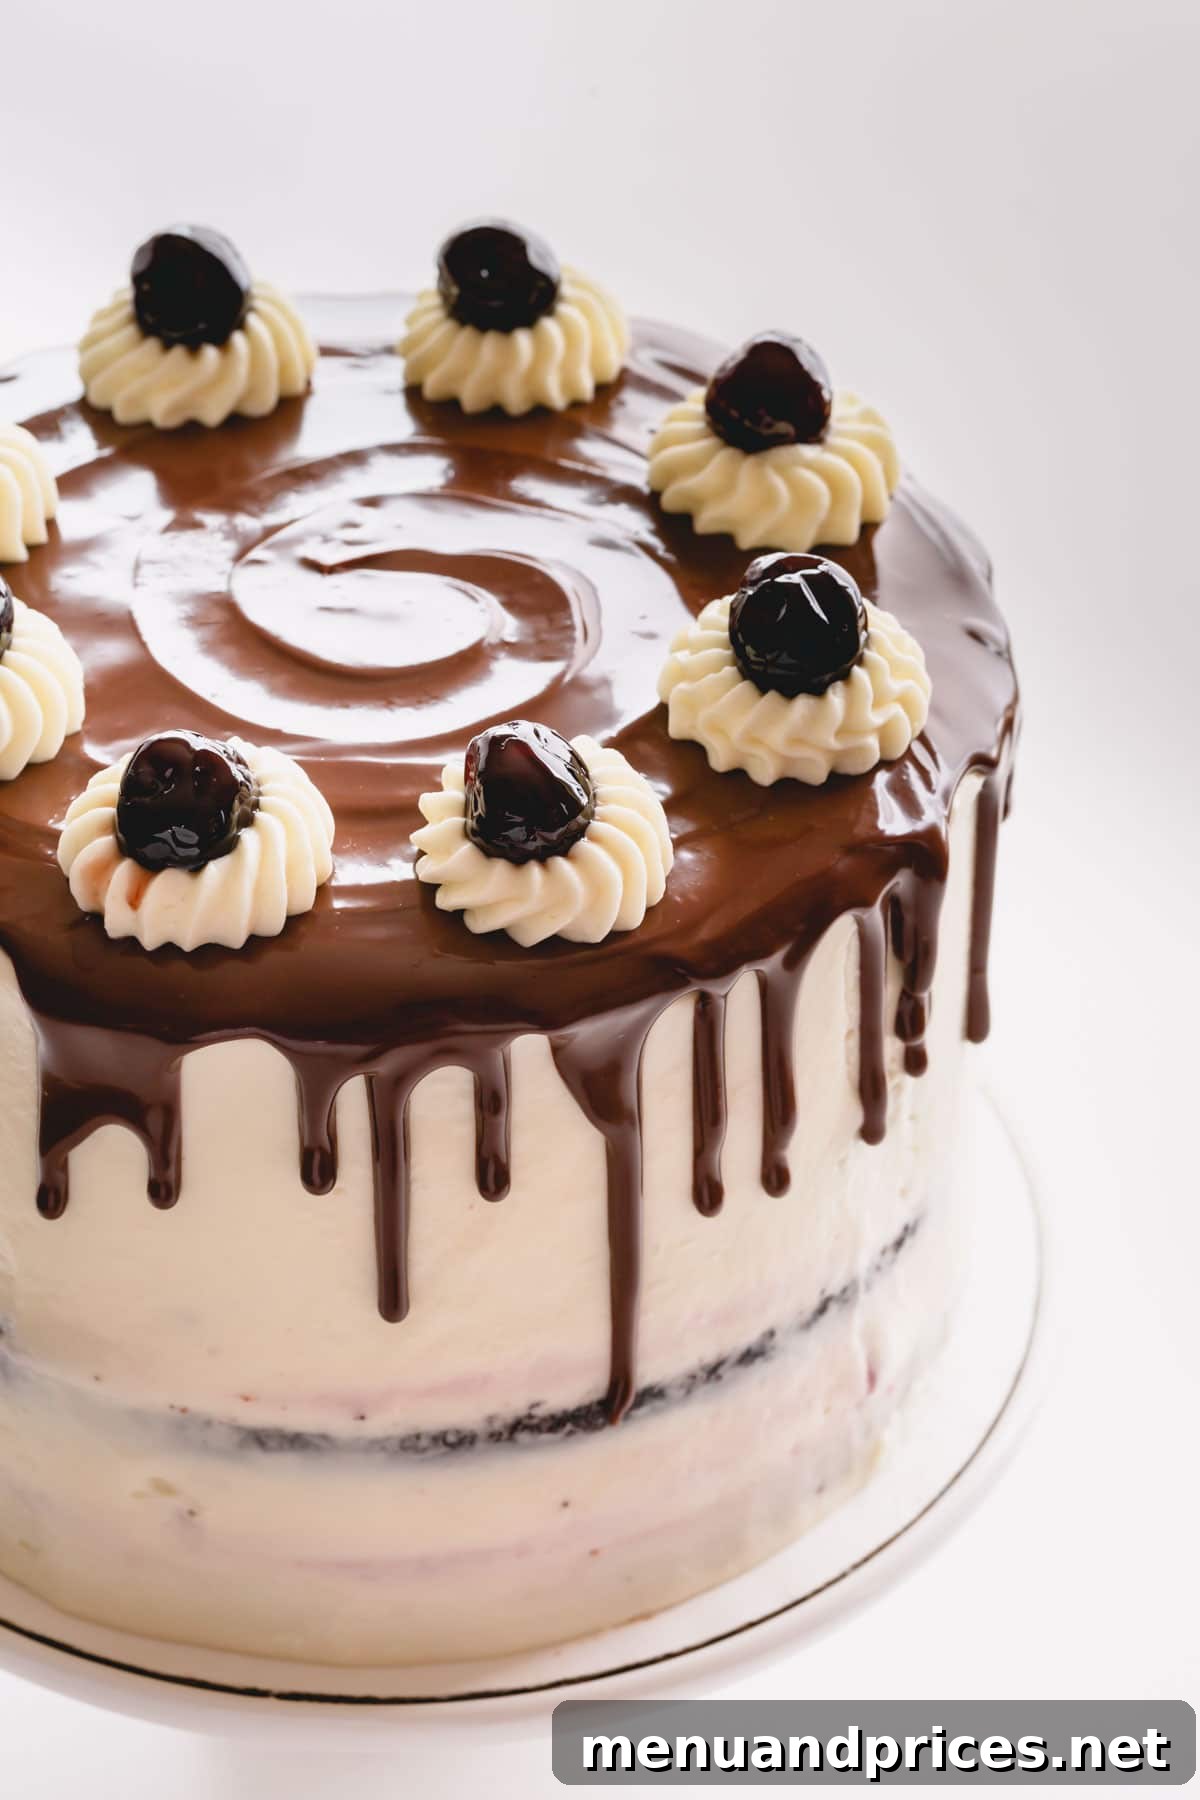
- Carefully drip the chocolate ganache around the edges of the chilled, frosted cake, allowing it to create elegant “drips” down the sides. Then, generously cover the entire top surface of the cake with the remaining ganache, spreading it evenly.
- Using the piping bag with the star tip, pipe 8 evenly spaced dollops of white chocolate mousse frosting around the outer edge of the ganache-covered top. Finally, crown each dollop with a beautiful canned (or fresh) cherry, adding a vibrant pop of color and classic Black Forest flair.
Ganache Temperature Control:
The secret to perfect ganache drips is temperature. Your chocolate ganache should be thick enough to hold its shape when dripped but still flow freely. If it’s too hot and runny, it will melt your carefully frosted cake; if it’s too thick, it won’t drip nicely. Let it cool slightly, stirring occasionally, until it reaches the ideal consistency.
Essential Tips for Black Forest Cake Success:
Achieving a truly spectacular Black Forest Cake is within your reach with these expert tips and tricks:
- Always Use Chilled Heavy Cream: This is non-negotiable for perfectly whipped cream or mousse. Cold cream whips faster and achieves much firmer, more stable peaks due to its fat globules being more structured at lower temperatures.
- Measure Flour Accurately: For light and fluffy cake layers, precision is key. Use the “spoon and level” method (spoon flour into a measuring cup, then level off with a knife) or, even better, weigh your flour with a kitchen scale for the most accurate results. Too much flour can lead to a dense, dry cake.
- Avoid Overmixing the Cake Batter: Overmixing develops gluten, which can result in a tough, dense, and gummy cake. Mix the batter just until the ingredients are combined and smooth, then stop.
- Cool White Chocolate Mixture Completely: When folding the melted white chocolate into the whipped cream for the mousse, ensure the chocolate mixture is at room temperature or slightly cooler. If it’s warm, it will melt your beautifully whipped cream, turning your mousse into soup.
- Never Frost a Warm Cake: As mentioned, a warm cake will not only melt your frosting but can also be crumbly and difficult to handle. Always work with completely cooled and preferably chilled cake layers.
- Chilled Cakes are Easier to Slice: Refrigerated cake layers are firmer and less prone to tearing or crumbling, allowing you to slice them into even, clean layers with ease.
- Troubleshooting White Chocolate Melting: If your white chocolate mixture doesn’t fully melt after mixing with the warm cream, microwave it in short 10 to 15-second bursts, stirring well after each interval, until it becomes completely smooth and lump-free.
- Add a Boozy Kick with Kirsch: For a truly authentic German Black Forest Cake experience, add a tablespoon or two of Kirschwasser (a clear cherry brandy) or cherry liqueur to the reserved cherry syrup before brushing it onto the cake layers. This traditional addition enhances the cherry flavor with a sophisticated, subtle alcoholic note.
Smart Make-Ahead Strategies for Effortless Baking:
Preparing components in advance is a fantastic way to spread out the work and make assembling this impressive cake a breeze. Here’s what you can do ahead of time:
- Chocolate Cake Layers: These are perfect for making ahead! Once completely cooled, wrap each cake layer tightly in plastic wrap. They can be refrigerated for up to 2 days or frozen for up to 3 months. Chilled cake layers are actually sturdier and much easier to slice and handle.
- Homemade Cherry Sauce: Prepare the cherry sauce up to 2 days in advance. Once it has cooled, transfer it to an airtight container and store it in the refrigerator. This allows the flavors to deepen and the sauce to thicken perfectly.
- White Chocolate Mousse Frosting: This is the one component that should NOT be made in advance. The gelatin in the mousse will set in the refrigerator, making it difficult to pipe and spread. For the best light and airy texture, prepare the mousse frosting just before you are ready to assemble the cake.
Storing Your Black Forest Cake to Maintain Freshness:
To keep your Black Forest Cherry Cake fresh and delicious, store it in the refrigerator. Gently wrap the finished cake with plastic wrap to prevent it from drying out or absorbing other odors from the fridge. Stored properly, the cake will remain fresh and delightful for up to 3 days.
Frequently Asked Questions About Black Forest Cake:
While both feature chocolate, a Black Forest Cake is a distinct traditional German dessert with specific characteristics that differentiate it from a general chocolate cake. A true Black Forest Cake traditionally consists of several layers of chocolate sponge cake, which are typically brushed with Kirschwasser (cherry brandy). It is then filled with sweet cherry compote or fresh cherries and frosted with generous amounts of whipped cream, often garnished with chocolate shavings and whole maraschino or fresh cherries. A regular chocolate cake, on the other hand, can have various fillings, frostings (buttercream, ganache, etc.), and flavor profiles without these specific cherry and Kirsch elements.
The traditional alcohol used in Black Forest Cake is Kirschwasser, often shortened to Kirsch. It’s a clear, colorless fruit brandy distilled from the fermented juice of morello cherries. Unlike other cherry liqueurs that can be very sweet, Kirschwasser is dry and offers a pure, intense cherry flavor without added sugar. It’s used to moisten the chocolate cake layers, imparting a unique, sophisticated depth of cherry flavor that is characteristic of an authentic Schwarzwälder Kirschtorte. For those who prefer a non-alcoholic version, the cake layers can be brushed with extra cherry syrup or simple syrup, or a cherry extract can be added to the syrup.
Explore More Beautiful Layer Cake Creations:
- Super Tall Red Velvet Layer Cake
- Zesty Lemon Layer Cake with Lemon Curd
- Irresistible Tiramisu Layer Cake
- Tropical Pineapple Layer Cake
- Delightful Raspberry Layer Cake with Cream Cheese Frosting
Watch Our Step-by-Step Video Tutorial:
Black Forest Cake
Shinee Davaakhuu
14
slices
Comment
Print Recipe
Ingredients
For chocolate cake:
- 2 cups (250g) all-purpose flour
- 1 ½ cups (300g) granulated sugar
- ½ cup (60g) unsweetened cocoa powder Note 1
- 1 teaspoon baking soda
- 1 teaspoon instant espresso powder Note 2
- ½ teaspoon salt
- 1 cup + 2 tablespoons (280ml) milk at room temperature, Note 3
- 2 large eggs at room temperature
- ¼ cup (60ml) vegetable oil
- 4 tablespoons (56g) unsalted butter melted
- 1 teaspoon white vinegar or apple cider vinegar
For cherry sauce:
- 4 cups pitted sweet cherries fresh or frozen
- ½ cup sugar
- 4 tablespoons cornstarch
- ⅛ teaspoon salt
- ½ teaspoon pure vanilla extract
- 1 tablespoon fresh lemon juice
For white chocolate mousse:
- 1 ½ teaspoons (6g) powdered gelatin
- 2 tablespoons water
- 18 ounces (500g) white chocolate chips
- 3 cups (720 ml) heavy whipping cream
For assembly:
- 1 can (15oz) dark sweet cherries in heavy syrup
For the chocolate ganache:
- ¼ cup (2oz/60ml) heavy cream
- 2 ounces bittersweet chocolate chopped
Equipment
-
2 7-inch cake pans
-
Stand mixer with the paddle & whisk attachment
-
Wire rack
-
Saucepan
-
Bowls
-
Measuring cups & spoons
-
Piping bags with round and star tip
-
Pastry brush
-
Offset spatula or bench scraper
Instructions
To make the chocolate cake:
-
Line two 7-inch cake pans with parchment paper and spray with cooking spray.
-
Preheat the oven to 350°F (175°C).
-
In a mixing bowl with paddle attachment, combine flour, sugar, cocoa powder, baking soda and salt. Mix on low speed for 30 seconds, or until everything is well combined.
-
Add milk, eggs, oil and butter. Mix the batter just until smooth, about 15 seconds.
-
Stir in vinegar and mix for another 10 seconds.
-
Divide the batter into the prepared baking pans. Bake for 35 minutes, or until inserted toothpick comes out clean.
-
Let cakes cool completely in the pans set on wire rack. Then carefully run a knife around the edges and invert.
-
Wrap each cake in a plastic wrap and refrigerate until ready to use, preferably overnight and up to 2 days. Chilled cakes are sturdier and slice much easier, but you can definitely frost the cake as soon as they have cooled completely.
To make cherry sauce:
-
In a medium saucepan, bring the cherries to boil over medium-high heat.
-
In a small bowl, whisk together sugar, cornstarch and salt. Add this to the boiling cherries along with vanilla extract and lemon juice. Reduce the heat to medium-low and continue to cook the mixture, stirring constantly with a wooden spoon, for about 5 minutes, or until the sauce thickens. Remove from heat and cool completely.
-
Pour half of the cherry sauce over the bottom layer with white chocolate mousse, then place the top layer of the cake with white chocolate mousse and pour the remaining cherry sauce. You may serve right away.
To make the white chocolate mousse filling:
-
In a small cup sprinkle the gelatin over cold water. Let it stand for 5 minutes.
-
In a small saucepan, pour 1 cup of heavy cream and bring it to simmer over low heat. Don’t boil. Remove from heat and add the gelatin mixture. Stir until gelatin is fully dissolved.
-
In medium bowl, pour the warm mixture over white chocolate and using a silicone spatula mix until the chocolate is completely melted. Let it cool to room temperature.
-
In a large mixing bowl with a whisk attachment, whip the remaining 2 cups of heavy cream until hard peaks form.
-
Add white chocolate ganache into the whipped cream and gently fold until well combined. (TIP: Make sure white chocolate ganache is not hot, or it’ll melt the whipped cream and you’ll end up with soup.)
To assemble the cake:
-
When the cake is cooled completely, slice each cake horizontally into two equal layers.
-
Place the mousse filling into 2 large piping bags fitted with plain round tips, or simply cut the ends off.
-
Strain the canned cherries and reserve the cherry sauce in a small bowl.
-
Place a cake board on a turntable and smear a small amount of frosting in the middle.
-
Put the first layer of the cake and evenly brush on the reserved cherry sauce over the cake.
-
Pipe the mousse filling all over the cake and then spread it evenly with a small offset spatula. Then pipe frosting around the edges to create a border.
-
Spread 1/3 of cherry sauce in the middle and top it with a little more frosting on top to even out the layer.
-
Place the next layer of cake and repeat steps 5-8 until all the layers are assembled.
-
To crumb coat the cake, frost the entire cake with a thin layer of frosting and smooth it out as best as you can. Wrap the cake with a plastic wrap and place a metal cake collar around the base, if you have it. This will help the cake stay nice and straight. Refrigerate the cake for 30-60 minutes to stabilize.
To make chocolate ganache:
-
Heat heavy cream in microwave for 45 seconds, or until hot. Place the chopped chocolate in a bowl and pour hot cream over chocolate. Let it sit for 2 minutes, and then stir until smooth.
-
If the chocolate isn’t melted completely, microwave the mixture for 15 seconds and stir, continue until ganache is smooth and runny. (TIP: Make the ganache right before assembling the cake.)
To decorate the cake:
-
Apply another layer of frosting and smooth it out nicely with an offset spatula, or a bench scraper.
-
Put the ganache in a squirt bottle. Make sure the ganache is not too hot before decorating the cake, but runny enough for dripping. (The ganache gets thicker as it cools.)
-
Transfer a small amount of frosting into a piping bag, fitted with a star tip.
-
Drip chocolate ganache around the edges of the cake, then cover the entire top of the cake with more ganache.
-
Pipe 8 dollops of mousse with star tip on top and garnish with canned cherries.
⭐️ Did you make this recipe?
Please leave a review and let us know how you liked it!
Video
Tips & Notes
Note 1: You can use either unsweetened natural or dutch-processed cocoa powder in this chocolate cake recipe.
Note 2: Espresso powder doesn’t add coffee flavor and you won’t even taste it. It only enhances chocolate flavor. But if you don’t have it, you can omit it.
Note 3: I highly recommend using whole milk for richer flavor, but 2% , skim or even almond milk would work too.
Note 4: You may use store-bought cherry pie filling instead of homemade cherry sauce. You’ll need one (21oz) can of cherry pie filling.
Nutrition
709
kcal
79
g
9
g
42
g
59
g
249
mg
Dessert
American, German
Did you make this?
Leave a rating and your feedback. Thank you!