

Indulge in the pure bliss of these homemade chocolate cake pops, crafted completely from scratch to deliver an intense chocolate flavor and an irresistibly fudge-like texture. Far superior to any store-bought alternative, these delightful treats are incredibly versatile and can be elegantly dressed up for any occasion, from vibrant birthday parties and heartwarming baby showers to sophisticated bridal events and casual gatherings. Prepare to impress your guests and delight your taste buds with every bite!

Why You’ll Adore This Homemade Chocolate Cake Pop Recipe
Cake pops are more than just a dessert; they are miniature works of art that bring a touch of whimsy and elegance to any celebration. Their individual portions make them perfect for parties, ensuring hygienic and easy enjoyment for all guests. This particular chocolate cake pop recipe stands out for several reasons, making it a favorite among home bakers and dessert enthusiasts alike:
- Effortlessly Simple to Create: Don’t be intimidated by the impressive appearance of cake pops. This recipe guides you through each step with clarity, ensuring a smooth and enjoyable baking experience even for beginners. With straightforward instructions, you’ll be creating professional-looking treats in no time.
- Luxuriously Decadent Flavor: Prepared from scratch, these cake pops boast a deep, rich chocolate flavor that’s both comforting and sophisticated. The combination of moist cake and creamy frosting creates a uniquely delightful texture that melts in your mouth, making them truly irresistible.
- Budget-Friendly Indulgence: Making cake pops at home is a wonderfully economical way to produce a large batch of stunning desserts. Using common pantry staples, you can create a show-stopping treat that costs significantly less than gourmet bakery items, without compromising on quality or taste.
- A Fun Family Project: Baking these cake pops offers a fantastic opportunity for family bonding. Kids love to help in the kitchen, and this recipe provides engaging tasks for all ages. Older children can assist with the careful dipping process, while younger ones can joyfully add sprinkles and other fun decorations, fostering creativity and shared memories.
Indeed, with their delightful taste and charming presentation, no one can resist the allure of a perfectly crafted chocolate cake pop!

Essential Ingredients for Perfect Chocolate Cake Pops
Crafting exceptional chocolate cake pops begins with understanding the role of each ingredient. Here’s a detailed look at what you’ll need and why it matters:
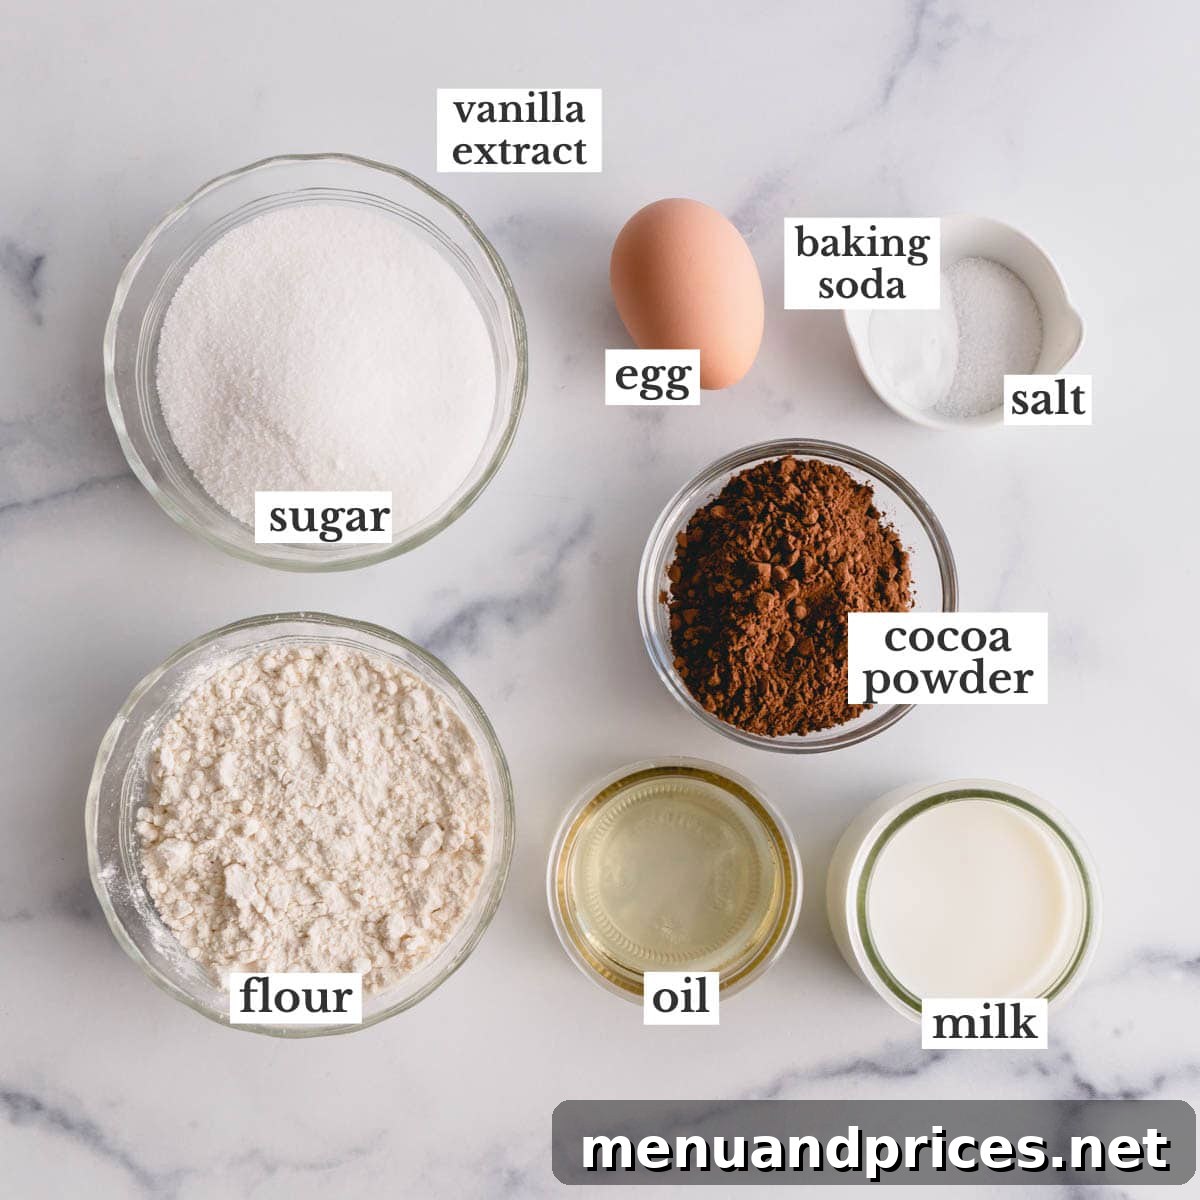
1. For the Ultra-Moist Chocolate Cake:
- All-Purpose Flour: The foundation of our cake. For accurate measurements and consistent results, a kitchen scale is highly recommended. If you don’t have one, employ the ‘spoon and level’ method: gently spoon flour into your measuring cup until it overflows, then level it off with the flat edge of a butter knife. This prevents over-packing the flour, which can lead to a dense, dry cake.
- Unsweetened Cocoa Powder: This is where the intense chocolate flavor truly comes alive. You have the choice between natural or Dutch-processed cocoa powder. Natural cocoa powder is acidic and reacts with baking soda to create lift, offering a rich, classic chocolate taste. Dutch-processed cocoa powder, on the other hand, has been treated to reduce its acidity, resulting in a darker color and a smoother, less bitter chocolate flavor. Both work beautifully in this recipe; choose based on your desired depth of chocolate and color.
- Milk or Coffee: Both liquids add moisture, but they each contribute uniquely to the flavor profile. Milk provides a classic richness and tenderness to the cake. Coffee, however, is a secret weapon in chocolate baking; it doesn’t make the cake taste like coffee, but rather deepens and intensifies the chocolate notes, making them more pronounced and complex. Feel free to use whichever you prefer or have on hand.
- Vegetable Oil: Essential for a tender, exceptionally moist cake. Unlike butter, which contains water and milk solids, oil is 100% fat, contributing to a consistently moist crumb that stays fresh longer, a crucial factor for cake pops.
2. For the Rich Frosting & Smooth Coating:
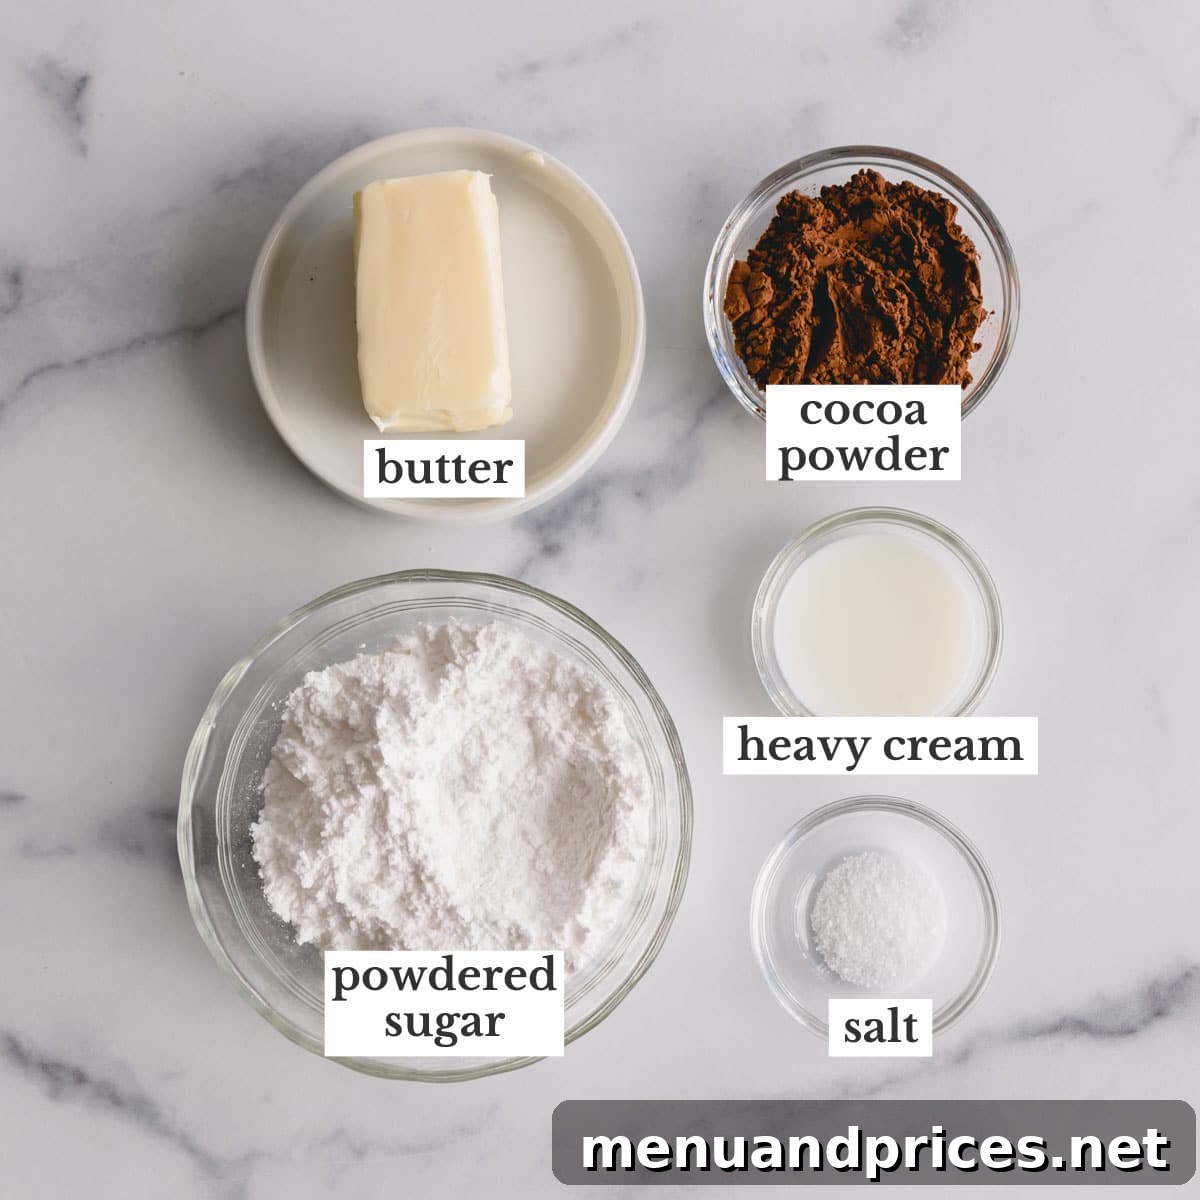
- Butter: For the frosting, always opt for real unsalted butter at room temperature. Homemade buttercream with quality butter offers an unparalleled richness and creamy texture that simply cannot be matched by store-bought frostings. It’s key to achieving that delightful fudge-like consistency when mixed with the cake crumbs.
- Powdered Sugar (Confectioners’ Sugar): This fine sugar is crucial for achieving a smooth, silky buttercream frosting that incorporates seamlessly into the cake crumbs, creating the perfect pliable mixture for forming cake balls.
- Heavy Cream: Using heavy cream instead of milk in your frosting yields a significantly creamier, more luxurious consistency. The higher fat content of heavy cream results in a richer, more stable frosting, though whole milk can be used as a suitable alternative if heavy cream isn’t available.
- Almond Bark (or Candy Melts): When it comes to coating cake pops, almond bark is a highly recommended choice. Its unique composition provides the ideal consistency for easy dipping and a smooth, quick-setting finish without the fuss of tempering. Melting wafers are another excellent option, offering a similar user-friendly experience. While real chocolate (like chocolate chips or bars) can be used, it typically requires tempering to achieve a glossy, stable coating that doesn’t melt easily at room temperature. For beginners, almond bark or candy melts simplify the process significantly, ensuring professional-looking results.
Step-by-Step Guide: How to Make Decadent Chocolate Cake Pops
Creating these delightful chocolate cake pops is a rewarding process. Follow these detailed steps for guaranteed success:
1. Bake the Perfect Chocolate Cake:
- Begin by preheating your oven to 350°F (175°C). Prepare a 9-inch round cake pan by lining its bottom with parchment paper. This step prevents sticking and ensures easy removal of the baked cake.
- In the bowl of a stand mixer fitted with the paddle attachment, combine all the dry ingredients for the cake: all-purpose flour, granulated sugar, unsweetened cocoa powder, baking soda, and salt. Mix on low speed for about 30 seconds until they are thoroughly combined and no lumps remain.
- Next, add the wet ingredients to the dry mixture: milk (or coffee), large egg, and vegetable oil. Mix on low speed just until the batter comes together and is smooth, typically about 15 seconds. Be careful not to overmix, as this can develop the gluten in the flour, leading to a tough cake.
- Pour the smooth cake batter evenly into your prepared 9-inch cake pan.
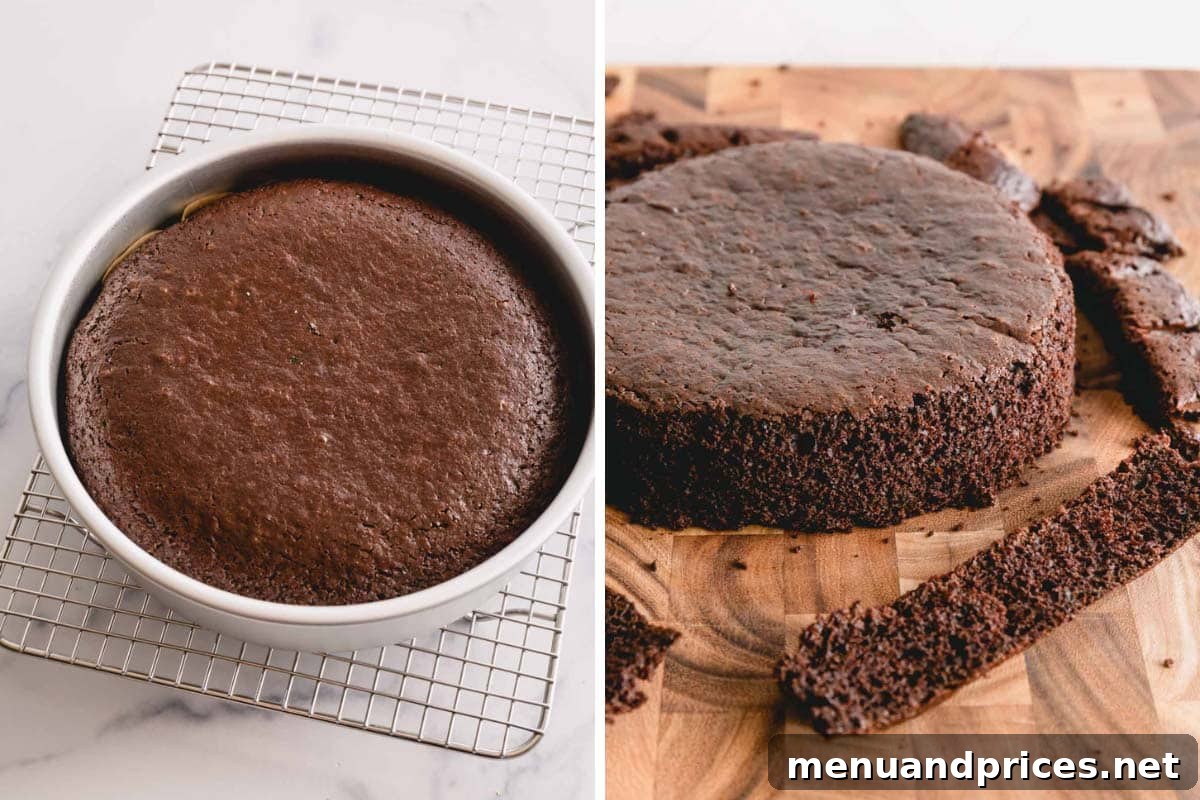
- Bake for approximately 20-25 minutes, or until a toothpick inserted into the center of the cake comes out clean. This indicates it’s fully cooked.
- Once baked, allow the cake to cool completely in the pan on a wire rack. Cooling is crucial for easy handling. Once cool, invert the cake onto a cutting board. For the most tender cake pops, carefully slice off and discard the slightly firmer outer edges of the cake. This ensures every cake pop has that desirable soft, melt-in-your-mouth texture.
2. Prepare the Silky Chocolate Buttercream:
- In the bowl of a stand mixer equipped with the whisk attachment, or using a hand mixer and a large bowl, whip the room temperature unsalted butter until it’s light, fluffy, and pale in color. This usually takes 2-3 minutes. Room temperature butter is essential for a smooth, emulsified frosting.
- Gradually add the powdered sugar and cocoa powder to the whipped butter. Start mixing on a very low speed to prevent the powdered ingredients from puffing out of the bowl. Once incorporated, increase the speed to medium-high and beat for about 1 minute until well combined and smooth.
- Finally, stir in the heavy cream and a pinch of salt. Mix for another 30 seconds until the frosting reaches a creamy, spreadable consistency. The salt helps to balance the sweetness and enhance the chocolate flavor.
3. Form the Decadent Chocolate Cake Balls:
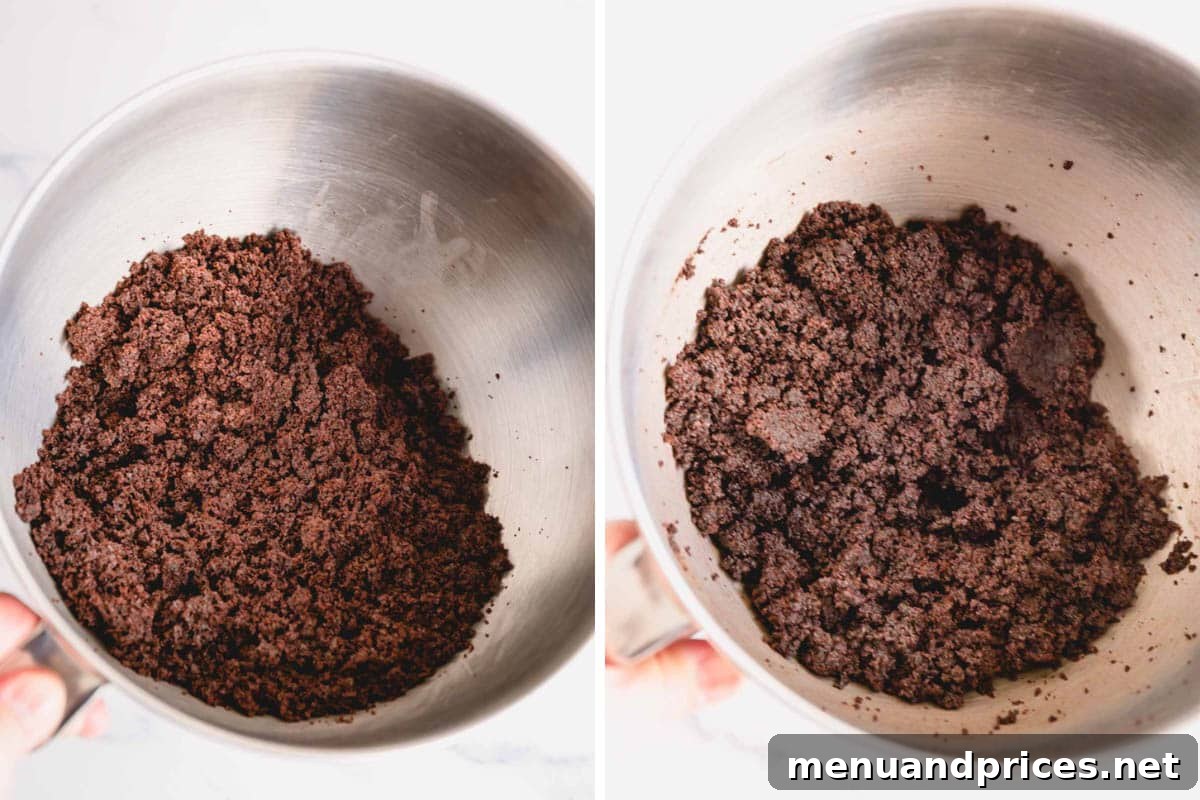
- Once the chocolate cake is completely cooled and its edges trimmed, place the cake into a large mixing bowl. If using a stand mixer, attach the paddle attachment. Crumble the cake into very fine, even pieces. This ensures a consistent texture throughout your cake pops.
- Add the freshly made chocolate frosting to the crumbled cake. Mix on medium-low speed until the frosting is completely incorporated into the cake crumbs. Continue mixing until there is no dry cake visible and the mixture comes together to form a moist, pliable dough-like consistency that holds its shape when pressed. This is your cake pop “dough.”
- Using a small cookie scoop (about 1.5-inch diameter), portion out the cake mixture and roll each portion into a smooth, round ball. Uniform sizing is key for consistent cooking and presentation. Arrange these cake balls neatly on a baking sheet lined with parchment paper. It’s crucial not to make the cake balls too large, as oversized pops are prone to falling off the sticks once dipped.
- Once all cake balls are formed, refrigerate them for at least 2 hours, or ideally, overnight. This chilling period is absolutely vital; cold, firm cake balls are much easier to dip and less likely to crumble or fall apart during the coating process. Skipping this step often results in a messy, frustrating experience.
4. Expertly Dip and Coat Your Cake Pops:
- In a small, microwave-safe bowl or cup, melt a small amount (about 1/4 cup) of your chocolate almond bark or candy melts according to package directions. Heat in 30-second intervals, stirring thoroughly after each, until smooth.
- Take one cake pop stick and dip one end about 1/2-inch deep into the melted bark. Immediately insert the bark-coated end of the stick into the center of a chilled cake ball. The melted bark acts as a “glue” to secure the stick. Repeat this process for all cake balls, then return them to the refrigerator for another 15-20 minutes to allow the “glue” to set completely. This prevents the cake balls from sliding off their sticks during dipping.
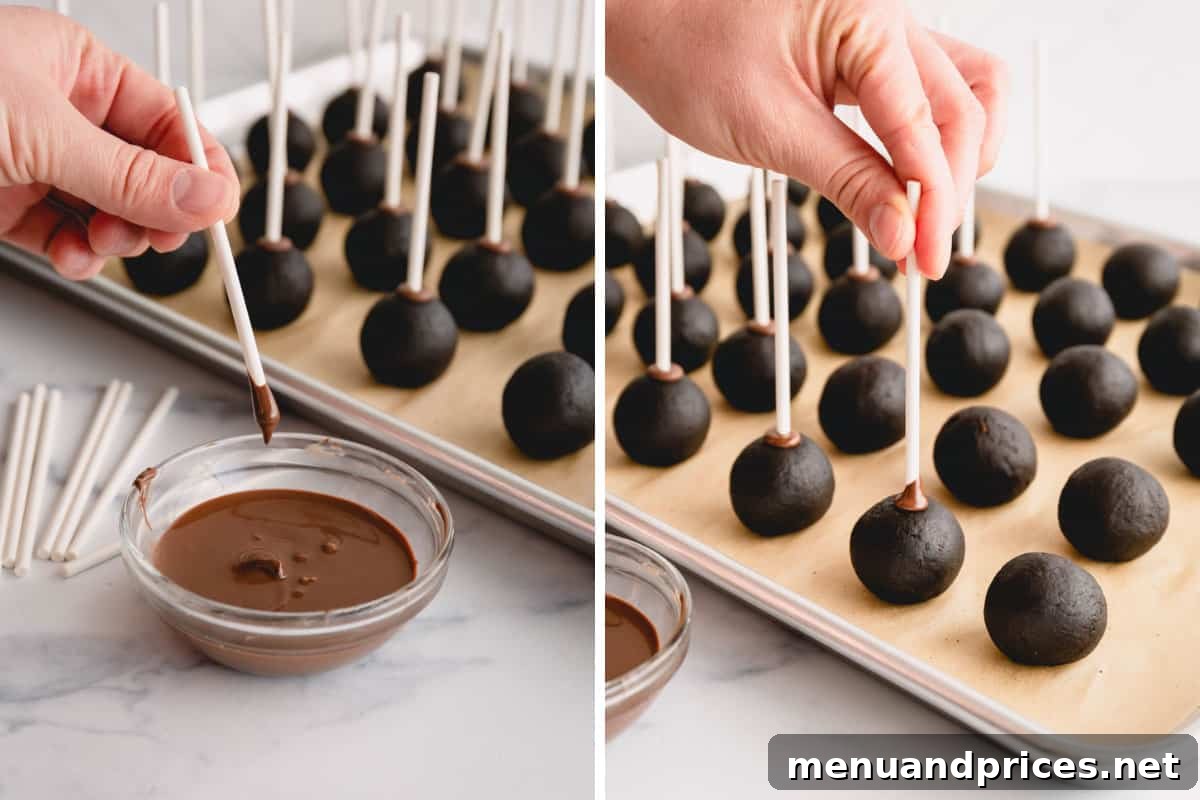
- While the sticks are setting, melt the remaining chocolate almond bark (or candy melts) in a 2-cup measuring cup or a deep, narrow microwave-safe container until smooth and silky. A deep container allows for full submersion of the cake pops.
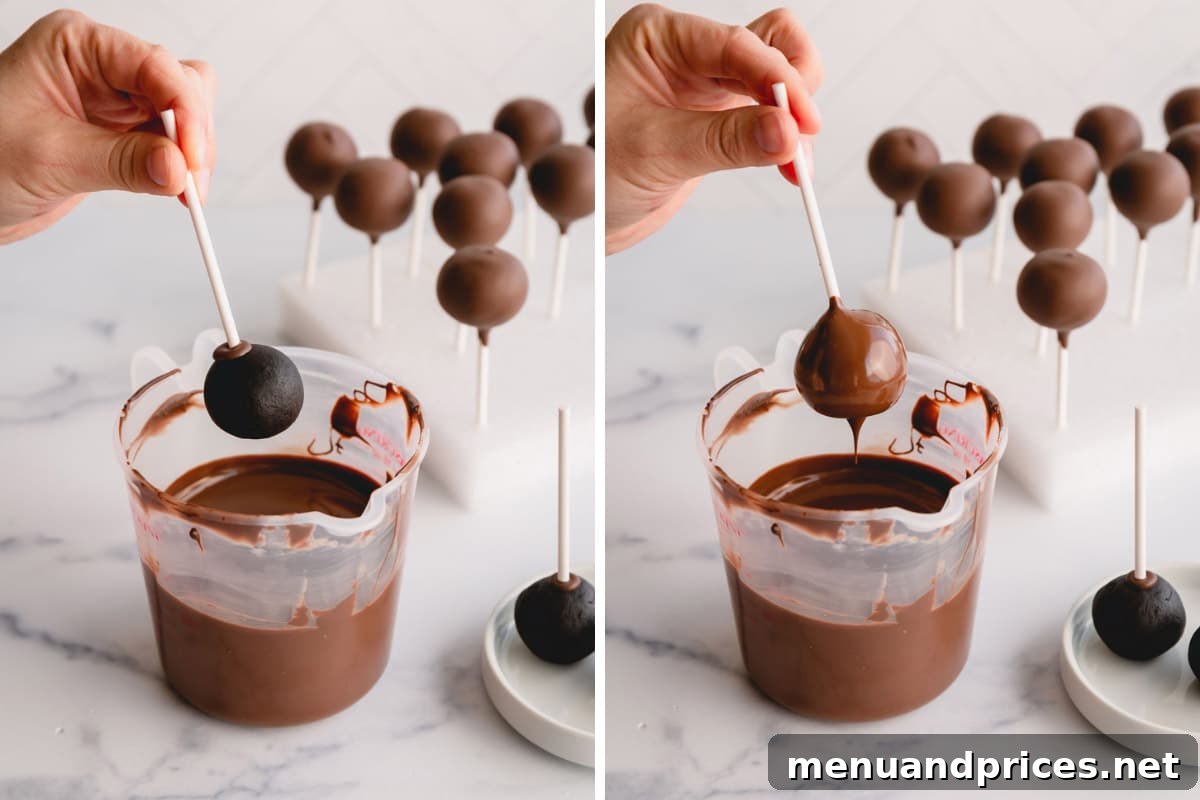
- Remove about ten cake balls from the fridge at a time. Working in small batches is important to keep the cake balls cold and firm. Dip each cake ball into the melted chocolate, ensuring it’s fully coated. Gently tap the stick against the side of the cup to allow any excess chocolate to drip off. This creates a smooth, even, and not-too-thick coating.
- Immediately after dipping and allowing excess to drip, place the dipped cake pops upright into a cake pop stand, a piece of Styrofoam block, or even a cardboard box with small holes poked in it. This allows the coating to set without creating a flat bottom.
- Repeat this process with the remaining cake balls, bringing out small batches from the refrigerator as needed. It’s crucial that the cake balls stay cold; if they warm up to room temperature, they are more likely to crack or fall off the sticks.
5. Decorate and Personalize Your Cake Pops:
- For decorations like sprinkles, jimmies, or sugar pearls, apply them immediately after dipping each cake pop, while the chocolate coating is still wet. This ensures they adhere firmly to the surface.
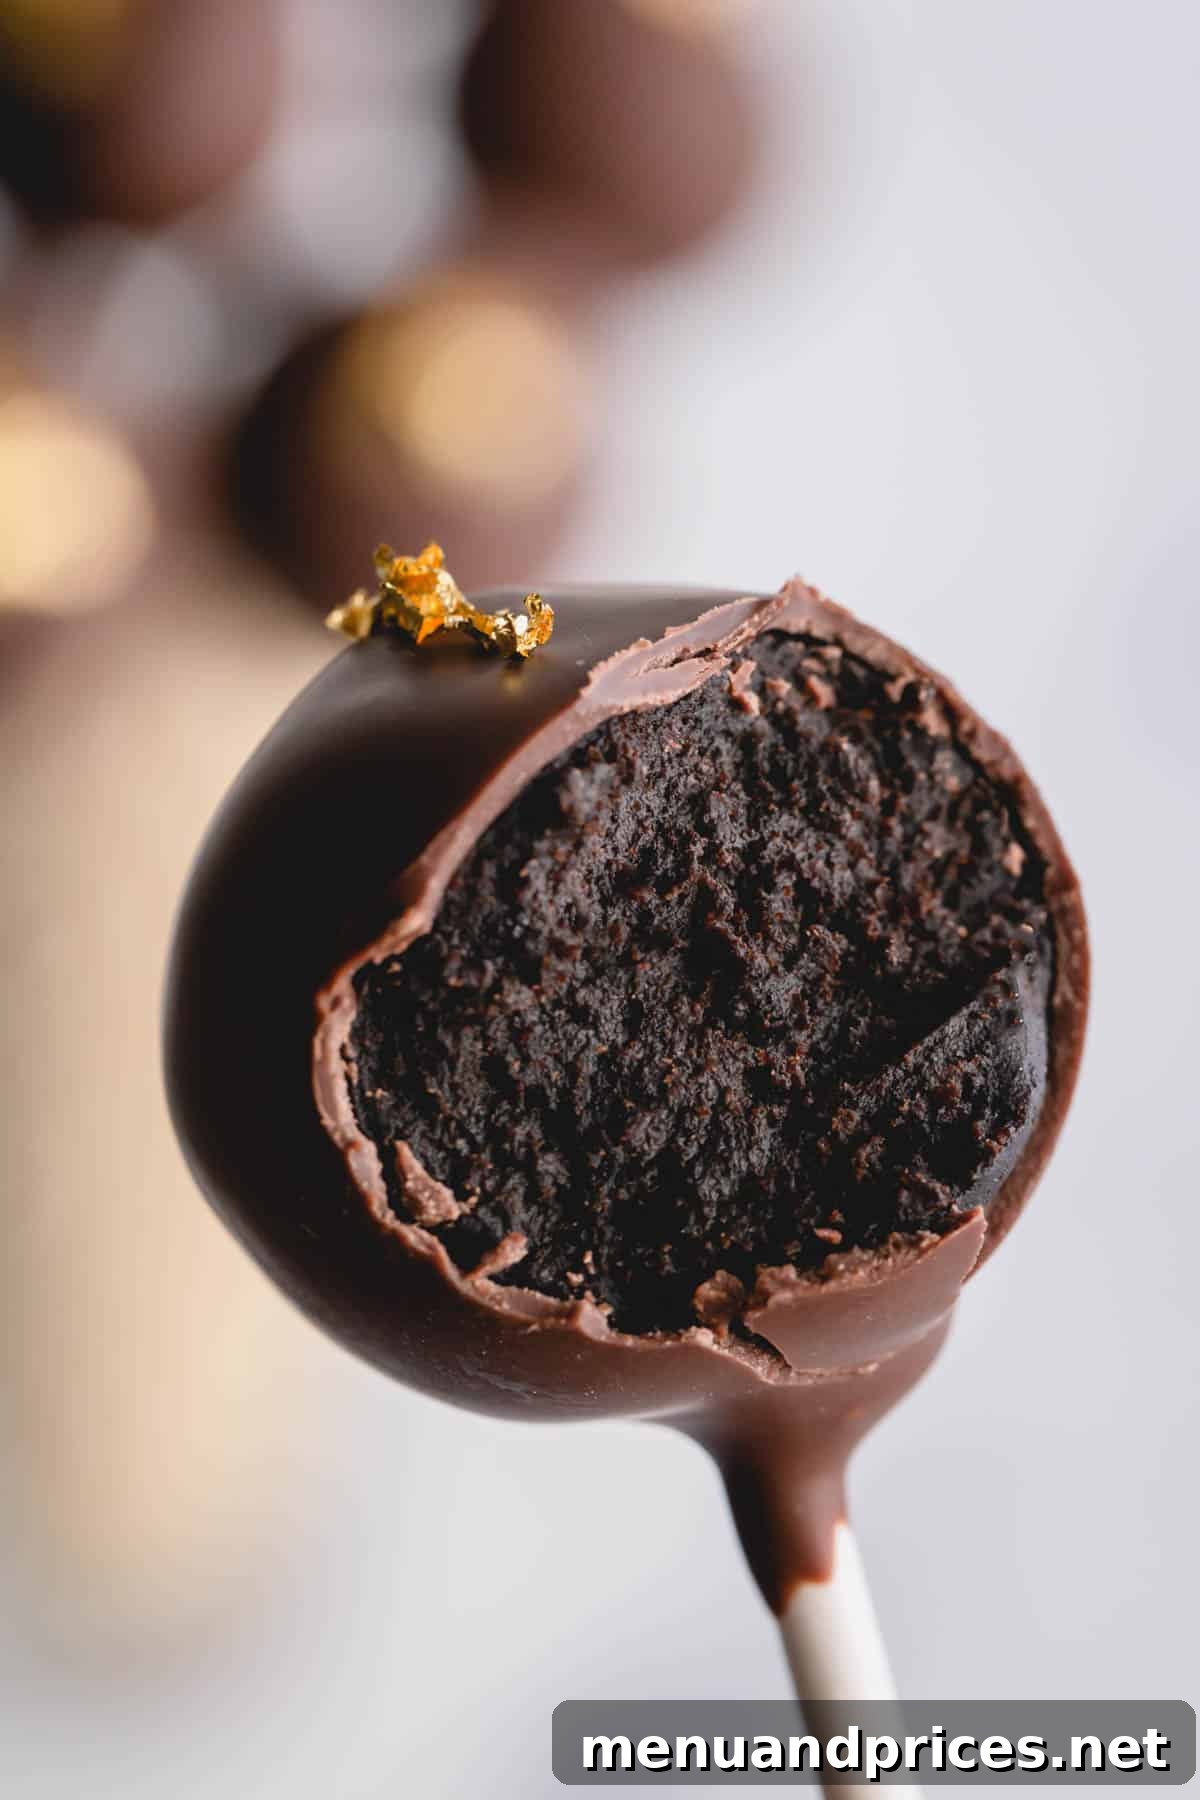
- If you plan to decorate with delicate edible gold leaf, wait until the chocolate coating has completely dried and set. Then, carefully apply pieces of gold leaf using a toothpick or small brush for a luxurious touch.
- Allow the decorated cake pops to dry and set for at least an hour at room temperature (or in the fridge to speed up setting) before handling or packaging. This prevents smudges and ensures the coating is firm.

Expert Tips for Cake Pop Perfection
Achieving flawless cake pops every time requires attention to a few key details:
- Temperature is Your Best Friend: The temperature of your cake balls is absolutely crucial for easy and successful dipping. Warm cake balls are soft and prone to falling apart or crumbling into your melted coating. Conversely, frozen cake balls are too rigid and tend to crack the chocolate coating as they warm up. Aim for cake balls that are well-chilled and firm (refrigerated for at least 2 hours or overnight) but not frozen. This optimal temperature ensures a smooth dipping process and prevents cracks.
- Drip Off Excess Coating: After dipping each cake pop, gently tap the stick against the rim of your melting cup. Allow all excess melted chocolate bark to drip off completely. This step is vital to prevent a thick, stodgy coating that can crack, and to avoid unsightly drips running down the sides of your finished cake pops. A thin, even coating not only looks better but also tastes more balanced.
- Uniformity for Stability: For consistently sized and professional-looking cake pops, always use a small portion scoop (like a 1.5-inch cookie scoop) to form your cake balls. Avoid making them too large; larger cake balls are heavier and significantly more likely to fall off their sticks during dipping or handling. Stick to the recommended size for optimal stability.
- Coloring Your Coating: If you wish to create brightly colored cake pops, start with vanilla-flavored almond bark or white candy melts. When adding color, always use oil-based food coloring. Water-based food coloring will cause the melted bark or candy melts to seize and clump instantly, rendering it unusable.
- Patience is a Virtue: The chilling steps are non-negotiable. Rushing the process will lead to frustration and flawed cake pops. Allow ample time for the cake balls to chill and for the coating to set.
- Keep Your Melted Coating Warm: If your melted almond bark starts to thicken during dipping, return it to the microwave for 10-15 seconds at a time, stirring until it regains its smooth, dippable consistency.
Smart Make-Ahead Strategies for Cake Pops
Cake pops are an ideal dessert for preparing in advance, making party planning much easier:
- Plan Ahead for Ease: The most important rule for stress-free cake pop making is to think ahead! Since the cake balls require significant chilling time to become firm enough for easy dipping, you can prepare them days in advance. This breaks down the process, making it more enjoyable and less rushed.
- Storage of Undipped Cake Balls: Undipped cake balls can be stored in an airtight container in the refrigerator for up to 3 days. This gives you ample flexibility to prepare them well before your event.
- Storage of Dipped Cake Pops: Once dipped and decorated, your beautiful cake pops will last for an entire week when stored in an airtight container in the refrigerator. This extended shelf life means you can make them several days before a party or celebration, allowing you to focus on other preparations on the day of the event.
Creative Decorations & Topping Ideas for Your Cake Pops
Unleash your creativity and personalize your chocolate cake pops with an array of stunning decorations:
- Vibrant Colors: For brightly colored cake pops, use white candy melts or vanilla almond bark as your base coating. These come in virtually every color imaginable! If the consistency seems a bit thick, stir in a half teaspoon of vegetable oil or paramount crystals to thin it out for a smoother dip. White chocolate also works perfectly as a canvas for color.
- Fun Toppings: While the chocolate coating is still wet, sprinkle your cake pops with an assortment of fun toppings! Consider classic jimmies, elegant sugar pearls, sparkling sanding sugar, finely crushed candies (like peppermints or Oreos), whimsical candy eyes for themed parties, or festively shaped sprinkles. Don’t forget to check your local craft or baking supply store for miniature royal icing decorations that can add incredible detail.
- Alternative Sticks: Once you’ve mastered the basic cake pop technique, experiment with different stick options. Colorful paper straws can replace traditional cake pop sticks for a charming, rustic, or themed look. Wooden skewers can also work for a more natural aesthetic.
- Edible Markers: For intricate designs and personalized messages, edible food markers are a fantastic tool. They work best on a light-colored or white coating, allowing you to draw cute faces, add delicate patterns, or write celebratory messages directly onto your dried cake pops.
- Creative Holders: The presentation of your cake pops is just as important as the taste. Get creative with your display stand! You can use tall glass jars filled with colorful candies, sugar pearls, or even coffee beans to hold your pops upright. Alternatively, craft your own custom stand from a block of Styrofoam covered with decorative paper or fabric.
- Marbled Effects: Achieve a stunning marbled look by lightly swirling a contrasting color of melted candy melts into your primary coating just before dipping. Dip quickly for beautiful, unique patterns.
Smart Storage Solutions for Fresh Cake Pops
Proper storage ensures your homemade chocolate cake pops remain fresh and delicious for as long as possible:
- Refrigerator Storage: Once your cake pops are dipped and completely dried, store them in an airtight container in the refrigerator. This method will keep them fresh and delicious for up to one week. Ensure the container is truly airtight to prevent them from absorbing refrigerator odors or drying out.
- Freezer-Friendly Option: Chocolate cake pops are wonderfully freezer-friendly! After they have completely dried and set, carefully transfer them to a single layer in a Ziplock freezer bag or a freezer-safe airtight container. You can layer them with parchment paper in between to prevent sticking. When properly stored, they can be thawed and enjoyed within 2 months.
- Thawing Frozen Cake Pops: To prevent any cracking of the delicate chocolate coating, it’s best to thaw frozen cake pops slowly. Transfer them from the freezer to the refrigerator overnight. Allow them to come to room temperature on the counter for about 15-30 minutes before serving for the best texture and flavor. Handle them very carefully when thawing!
Frequently Asked Questions About Chocolate Cake Pops
My absolute favorite coating for cake pops is chocolate almond bark or high-quality candy melts. These options are specifically designed to melt smoothly and offer a thin consistency that’s easy to dip with. They also set quickly and firmly without requiring any special tempering techniques, making them ideal for home bakers. While regular chocolate can be used, it needs to be tempered correctly to achieve a stable, shiny, and non-melting coating.
Absolutely, yes! This step is paramount for successful cake pop making. It is critical that the cake balls are thoroughly chilled and firm before you attempt to dip them. If they are at room temperature or too soft, they will likely crumble, fall apart, or create an uneven coating. Aim to chill your cake balls for at least 2 hours in the refrigerator, or even better, overnight.
Yes, you can certainly use chopped chocolate or chocolate chips to dip cake pops. However, it’s important to understand that regular chocolate (especially semi-sweet or milk chocolate chips) contains cocoa butter that needs to be properly tempered. Tempering is a process of heating and cooling chocolate to specific temperatures to stabilize the cocoa butter crystals, resulting in a firm, glossy, and snap-able coating that doesn’t melt easily at room temperature. Untempered chocolate, while it will melt, often sets up with a dull finish, can be soft, or may develop “bloom” (white streaks), and melts too quickly on touch, which isn’t ideal for cake pops. For an easier process, especially for beginners, almond bark or candy melts are highly recommended.
Explore More Decadent Chocolate Cake Recipes:
- The Best Simple Chocolate Cake
- Ina’s Chocolate Cake with Mocha Frosting
- Supreme Chocolate Cake
- Death by Chocolate Roll Cake

Homemade Chocolate Cake Pops
By Shinee Davaakhuu
These homemade chocolate cake pops are crafted entirely from scratch, offering an intense chocolate flavor and a delightfully fudge-like texture. They are perfect for birthdays, baby showers, and any special occasion.
Prep Time: 45 mins | Cook Time: 10 mins | Chill Time: 2 hrs | Total Time: 2 hrs 55 mins
Yields: 25 cake pops
Ingredients
Chocolate Cake:
- 1 cup (125 g) all-purpose flour
- ¾ cup (150 g) granulated sugar
- ¼ cup (30 g) unsweetened cocoa powder (Note 1)
- ½ teaspoon baking soda
- ½ teaspoon coarse kosher salt
- ½ cup (120 ml) milk or coffee (Note 2)
- 1 large egg
- ¼ cup (60 ml) vegetable oil
Frosting:
- 6 tablespoons (85 g) unsalted butter, at room temperature
- 1 cup (120 g) powdered sugar
- 2 tablespoons (15 g) unsweetened cocoa powder
- 2 teaspoons heavy whipping cream
- ¼ teaspoon coarse kosher salt
For Coating:
- 25 cake pop sticks
- 16 ounces chocolate almond bark (Note 3)
Equipment
- 9-inch round cake pan
- Stand mixer with paddle and whisk attachments (or hand mixer and large bowls)
- Baking sheet
- Small cookie scoop (1.5-inch diameter)
- Cake pop stand or Styrofoam block for drying
Instructions
To make the chocolate cake:
- Preheat the oven to 350°F (175°C). Line a 9-inch round cake pan with parchment paper.
- In a mixing bowl, combine flour, sugar, cocoa powder, baking soda, and salt. Mix on low speed for 30 seconds, or until well combined.
- Add milk, egg, and oil. Mix the batter just until smooth, about 15 seconds, being careful not to overmix.
- Pour the batter into the prepared cake pan. Bake for about 20-25 minutes, or until an inserted toothpick comes out clean.
- Let the cake cool completely in the pan on a wire rack. Then, invert the cake onto a cutting board and slice off the thin, slightly firmer outer edges of the cake.
To make the chocolate frosting:
- In a large mixing bowl with the whisk attachment, whip the room temperature butter until light and fluffy.
- Add powdered sugar and cocoa powder. Beat for about 1 minute until well combined, starting on low speed and gradually increasing to medium-high.
- Stir in heavy cream and salt and mix for another 30 seconds until creamy.
To make cake pop mixture:
- In a large mixing bowl with a paddle attachment, crumble the cooled cake into fine pieces.
- Add the prepared chocolate frosting and mix it well into the cake crumbs on medium-low speed until completely incorporated and no dry cake is visible. The mixture should be pliable like dough.
To form cake balls:
- Using a small cookie scoop, divide the cake mixture into 1.5-inch balls and roll them smooth. Arrange them on a lined baking sheet.
- Refrigerate the cake balls for at least 2 hours, or preferably overnight, until firm. This is critical for successful dipping.
To coat the cake balls:
- Melt a small amount of chocolate almond bark in a microwave-safe bowl according to package directions.
- Dip each cake pop stick about ½-inch deep into the melted bark, then immediately insert it into a chilled cake ball. The melted bark acts as glue. Repeat for all cake balls, then return them to the fridge for 15-20 minutes to set the sticks.
- Melt the remaining chocolate almond bark in a 2-cup measuring cup or a deep, narrow container until smooth and silky.
- Remove approximately 10 cake balls from the refrigerator at a time. Dip each cake ball into the melted almond bark until fully covered, ensuring the base is coated. Gently tap the stick to allow excess coating to drip off.
- Place the dipped cake pops upright into a Styrofoam block, a box with holes, or a special cake pop stand to dry.
- Repeat with the remaining cake balls, working in small batches to keep them chilled. If cake balls warm up, they are more likely to fall off the sticks.
- Decorate immediately with sprinkles or other toppings while the coating is still wet. For other decorations like gold leaf, wait until the coating is completely dry.
- Let the cake pops set completely for about an hour before packaging or serving.
Tips & Notes
Note 1: You can use either unsweetened natural or Dutch-processed cocoa powder in this chocolate cake recipe. Natural cocoa is acidic and reacts with baking soda, while Dutch-processed is less acidic and provides a darker color and smoother flavor.
Note 2: Milk adds richness to the cake, whereas coffee enhances the chocolate flavor without making the cake taste like coffee. You can use either one based on your preference.
Note 3: Almond bark is highly recommended for coating cake balls due to its ideal consistency and ease of use compared to traditional chocolate. If using candy melts, you may add ½ teaspoon of vegetable oil or paramount crystals to thin it out if needed. If opting for white, semi-sweet, or milk chocolate, you’ll need to properly temper the chocolate for it to set firm with a nice sheen.
Storing Tips:
- Store dipped cake pops in the refrigerator in an airtight container for up to one week.
- Chocolate cake pops are freezer-friendly! Wait until they’ve dried completely, then transfer them to a Ziplock bag or freezer-safe container. Thaw and enjoy within 2 months.
- Thaw frozen cake pops in the refrigerator overnight to prevent cracking. Handle them very carefully!
Nutrition
- Servings: 1 cake pop
- Calories: 217 kcal
- Carbohydrates: 29 g
- Protein: 1 g
- Fat: 11 g
- Sugar: 24 g
- Sodium: 102 mg
Course: Dessert | Cuisine: American

⭐️ Did you make this recipe? Leave a rating and your feedback. Thank you!