

Prepare to delight your taste buds and impress your guests with the ultimate in simplicity and flavor: an incredibly easy, 3-ingredient bean dip. This crowd-pleasing appetizer delivers a rich, cheesy, and creamy experience that’s perfect for scooping with your favorite chips or complementing a spread of Mexican-inspired dishes. In less than 30 minutes, you can transform a handful of pantry staples into a hot, bubbly, and utterly irresistible dip that requires minimal effort for maximum deliciousness. Whether you’re hosting a game day, a casual get-together, or simply craving a satisfying snack, this homemade bean dip is guaranteed to be a hit.

Why This Easy Bean Dip Will Become Your Go-To Appetizer
Once you try this recipe, you’ll understand why it’s a staple for so many home cooks. Who could possibly resist a warm, classic bean dip, generously topped with an abundant layer of gloriously melted cheese? This irresistible dip isn’t just a treat for the palate; it’s a triumph of convenience and versatility. Here’s why you’ll fall in love with it:
- Unbelievably Simple: With just three core ingredients, your shopping list is minimal, and the preparation couldn’t be easier. You’ll spend mere minutes getting this dip ready for the oven, leaving you more time to enjoy your event or relax.
- A Flavorful Mexican Cuisine Companion: This bean dip is a fantastic addition to virtually any Mexican-themed meal. It pairs beautifully with classic tacos, enriches burritos, elevates enchiladas, and serves as an excellent base for more elaborate layered dips. Its robust flavor profile perfectly complements the vibrant spices of Latin American cooking.
- Effortlessly Budget-Friendly: Hosting a crowd can often be expensive, but this recipe offers a delicious and satisfying solution without breaking the bank. Refried beans and cheese are economical staples, making this dip an ideal choice for feeding a large number of guests on a modest budget.
- Versatile Serving Options: While it’s famously perfect with crunchy tortilla chips, don’t limit yourself! This hot and bubbly dip is also delightful with crispy nachos, various crackers, or even healthier options like fresh sliced bell peppers, cucumber sticks, or pita bread.
Imagine serving this golden, bubbly dip at your next gathering. Its comforting aroma will draw everyone in, and its rich texture will have them coming back for more. It’s the kind of dish that disappears quickly, always leaving a lasting impression of deliciousness and ease.
Mastering Your Dip: Essential Ingredient Notes
The beauty of this easy bean dip lies in its simplicity, relying on just three core ingredients. Because each plays such a crucial role, choosing quality components will significantly elevate your final product. Let’s dive into the specifics:
- Refried Beans: The Heart of Your Dip
Since refried beans form the very foundation of this recipe, their quality and flavor are paramount. Opt for a brand you trust and enjoy. Look for varieties with a good balance of seasoning – not too bland, not overly salty. Many brands offer different styles, from smooth and creamy to more textured with whole pinto bean pieces. Experiment to find your preference. For consistently excellent results, popular choices like Rosarita and Gebhardt are often recommended by home cooks for their reliable flavor and consistency. These brands tend to have a smooth, rich texture that blends wonderfully and holds up well when baked, ensuring your dip isn’t too runny or too stiff. - Salsa: The Flavor Driver
The salsa you choose will define a significant portion of your dip’s character. The most important tip here is to ensure your salsa is on the thicker side. A watery or very thin salsa will lead to a runny dip, which nobody wants! Look for chunky salsas or those with less liquid. You have the freedom to select your preferred heat level – mild for a family-friendly option, medium for a gentle kick, or hot for those who love a fiery experience. Consider also the flavor profile: a classic tomato and onion salsa will provide a traditional taste, while one with roasted corn or black beans can add an extra layer of complexity. If you’re using a store-bought brand, remember that its flavor intensity will transfer directly to your dip, so choose wisely! I personally love mine with a spicy kick, making sure to pick a salsa that delivers on that front. - Cheese: The Melty, Golden Crown
The cheese is what brings this bean dip to life with its gooey, golden charm. While you can certainly use whatever shredded cheese you have available, a strategic blend can create a more dynamic flavor and superior melt. My personal favorite combination often includes sharp cheddar cheese for its robust flavor, mozzarella for its incredible stretch and mild creaminess, and Monterey Jack for its excellent melting properties and buttery taste. However, feel free to experiment: Pepper Jack will add a subtle heat, Colby Jack offers a milder, approachable profile, and a Mexican blend can provide convenience and a balanced flavor. For the best melt and flavor, consider grating your own block of cheese rather than using pre-shredded varieties, which sometimes contain anti-caking agents that can slightly alter the melt.
By paying attention to these key ingredients, you’re setting yourself up for a perfectly balanced and incredibly satisfying bean dip every single time.
Step-by-Step Guide: Crafting Your Perfect Bean Dip
Creating this delicious 3-ingredient bean dip is surprisingly straightforward, making it an ideal recipe for beginner cooks and busy hosts alike. Follow these simple steps for a hot, bubbly, and incredibly flavorful result:
- Prepare Your Oven and Dish: Begin by preheating your oven to 350°F (175°C). Ensuring the oven is at the correct temperature before the dip goes in is crucial for even cooking and achieving that perfect bubbly, golden-brown cheese crust. While the oven heats, lightly spray your chosen baking dish with a nonstick cooking spray. An 8×8-inch (20x20cm) square dish is ideal, but any similar-sized oven-safe dish will work. The nonstick spray helps prevent the dip from sticking, making serving and cleanup much easier.
- Layer the Foundation: Once your dish is prepped, it’s time to assemble your dip. Start by spreading the refried beans evenly across the bottom of the baking dish. Aim for a relatively consistent layer. Next, spoon the salsa over the refried beans, gently spreading it out to cover the bean layer. Be mindful not to mix the layers too much at this stage; keeping them distinct allows for a beautiful visual and textural contrast once baked.
- Add the Cheesy Crown: Now for the most exciting part – the cheese! Evenly sprinkle your generous helping of shredded cheese over the salsa layer. Ensure a good, uniform coating from edge to edge. This creates that iconic, irresistible blanket of melted cheese that truly defines a great bean dip. Don’t be shy here; more cheese often equals more happiness!
- Bake to Perfection: Transfer your assembled dip to the preheated oven. Bake for approximately 25 minutes, or until the cheeses are hot, gloriously bubbly, and have achieved a light golden-brown hue on top. The bubbling indicates that everything underneath is heated through and the flavors are melding beautifully. Keep an eye on it during the last few minutes to prevent over-browning.
- Garnish and Serve Hot: Once baked, carefully remove the dish from the oven. If desired, sprinkle a generous amount of fresh chopped cilantro over the top for a burst of vibrant color and fresh, herbaceous flavor. Cilantro not only adds to the visual appeal but also provides a refreshing counterpoint to the richness of the dip. Serve your warm, gooey bean dip immediately with a plentiful supply of sturdy tortilla chips, allowing everyone to scoop up the cheesy goodness.
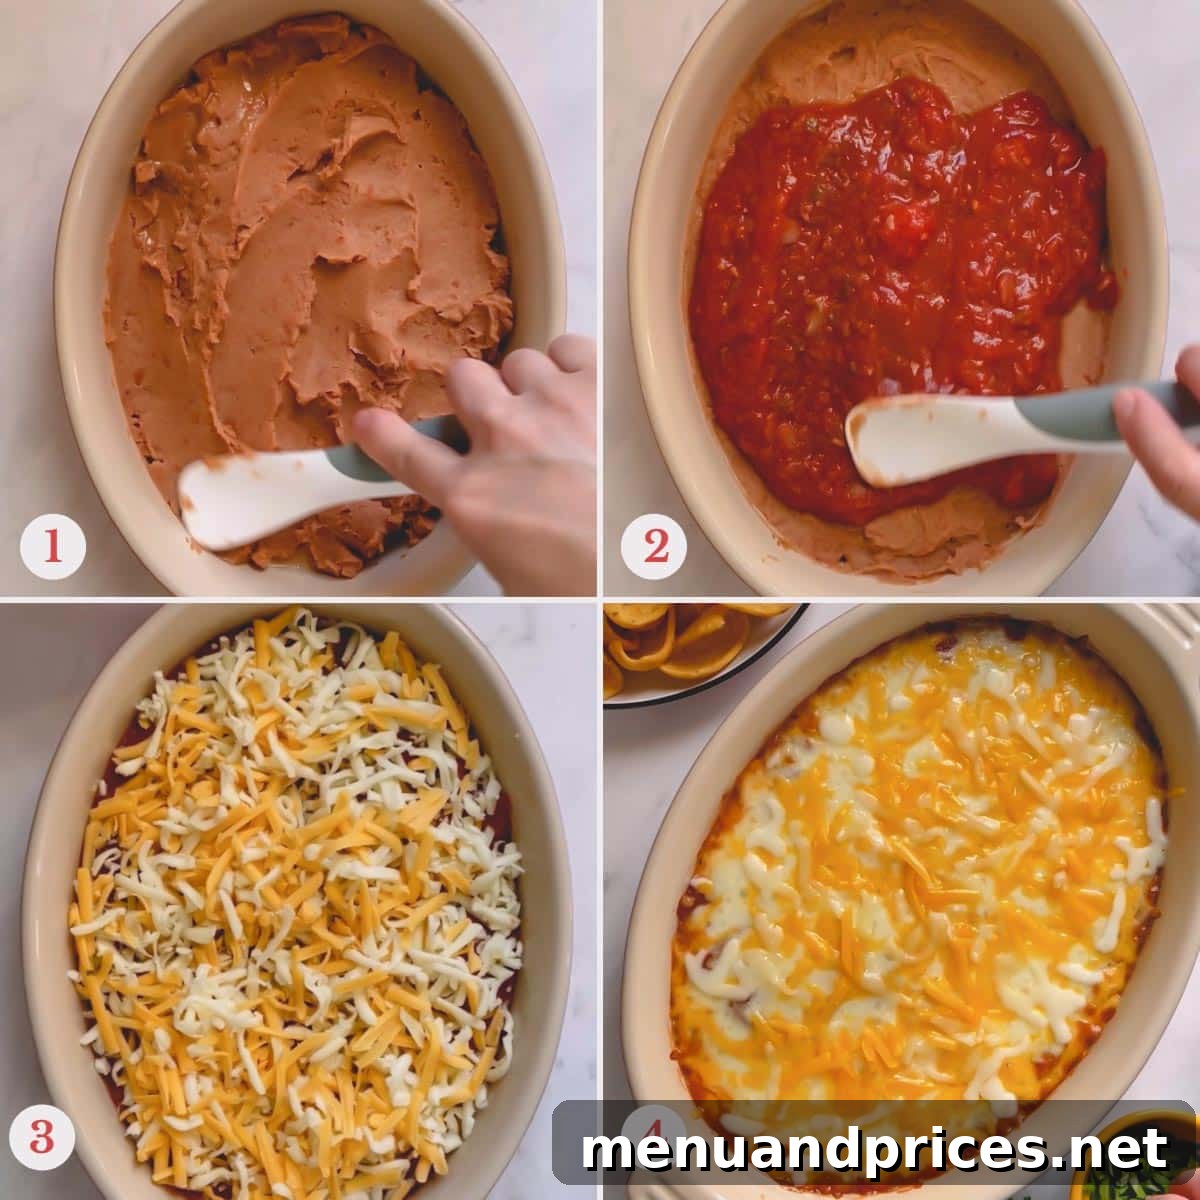
And just like that, you’ve created a mouth-watering bean dip that’s ready to be devoured!
Exciting Variations to Customize Your Bean Dip
While the classic 3-ingredient bean dip is perfect in its simplicity, it’s also a fantastic canvas for culinary creativity. Don’t hesitate to experiment with these variations to tailor the dip to your personal taste, mood, or the occasion:
- Alternate Bean Bases:
If you’re looking for a slightly different flavor or texture, you can easily swap out the traditional refried pinto beans for refried black beans. Refried black beans offer a slightly earthier, often sweeter, and deeper flavor profile. They also tend to be a bit chunkier, adding more textural interest to your dip. For a truly homemade touch, you could even mash your own cooked pinto or black beans, seasoned with a little garlic and cumin, to create your unique bean base. - Endless Topping Possibilities:
Toppings aren’t strictly necessary for a delicious dip, but they are undoubtedly a fantastic way to add freshness, texture, and an extra layer of flavor. Think of them as the perfect finishing flourish.- Fresh & Zesty: A sprinkle of freshly chopped green onions (scallions), diced red onion for a sharper bite, or a vibrant mix of cherry tomato halves and finely chopped bell peppers will add a burst of color and a refreshing crunch.
- Creamy & Cool: A dollop of cool sour cream or plain Greek yogurt offers a wonderful contrast to the warm dip. Sliced avocado or a scoop of homemade guacamole adds richness and a smooth texture.
- Spicy Kicks: Pickled jalapeños offer a tangy heat, while fresh sliced jalapeños deliver a brighter, more intense spice. A drizzle of your favorite hot sauce can also be a quick way to amp up the heat.
- Herbs: Beyond cilantro, consider fresh parsley or even a sprinkle of oregano for a different aromatic note.
Mix and match these to create your perfect topping medley!
- Boost the Heat:
For those who crave a little extra warmth and spice, it’s incredibly easy to build more heat into your dip. Before layering, simply stir a small can of diced green chiles (mild or hot, depending on preference) directly into the refried beans. This infuses the entire dip with a pleasant, background heat. For an even more fiery kick, finely chop some fresh jalapeños or serrano peppers and mix them in, or add a pinch of cayenne pepper to the bean mixture. - Enhance the Flavor Profile:
If you want to deepen the savory, Tex-Mex flavor of your dip, a simple addition of taco seasoning can work wonders. Just stir 1-2 tablespoons of your favorite taco seasoning blend into the refried beans before layering them into the dish. This adds a complex mix of spices like cumin, chili powder, garlic, and onion, creating a more robust and authentic Mexican-inspired taste. Alternatively, you could add a pinch of smoked paprika or chipotle powder for a smoky depth.
These variations allow you to transform a simple appetizer into something truly extraordinary, catering to diverse preferences and adding excitement to every serving.

Smart Make-Ahead Strategies for Stress-Free Entertaining
One of the many appealing aspects of this refried bean dip is its incredible ease, which often means you can whip it up on the fly. However, for those occasions when you’re planning a party or simply want to lighten your workload on a busy day, preparing this dip ahead of time is a brilliant strategy. While the assembly is quick, having it ready to bake can save valuable time and reduce last-minute stress.
To prepare your homemade bean dip in advance, simply follow the “How to Make Bean Dip” instructions up to the point of baking. Once you’ve layered the beans, salsa, and cheese in your baking dish, cover the dish tightly with plastic wrap. Ensure the wrap is pressed down to minimize air exposure, which helps maintain freshness. Once covered, refrigerate the unbaked dip. It can be stored in the refrigerator for up to 24 hours before you’re ready to bake it. When it’s time to serve, simply remove it from the fridge, allow it to sit at room temperature for about 15-20 minutes while your oven preheats, and then bake as directed. You might need to add an extra 5-10 minutes to the baking time if the dip is still quite cold, to ensure it heats through evenly and the cheese gets perfectly bubbly.
This make-ahead option ensures you can focus on other aspects of your meal preparation or simply enjoy your guests, knowing a delicious, hot appetizer is just minutes away from the oven.
Maximizing Freshness: Storage and Reheating Guidelines
This bean dip is so delicious, leftovers might be a rarity! However, if you do find yourself with some extra, proper storage and reheating techniques are key to enjoying it for days to come. Here’s how to keep your dip fresh and delicious:
- Refrigerating Leftovers:
Once the dip has cooled completely to room temperature, transfer it to an airtight container. This prevents it from absorbing odors from other foods in your refrigerator and keeps it fresh. Store it in the refrigerator for up to 4 days. Beyond this, the quality may start to diminish, although it could still be safe to eat for another day or two if stored correctly. - Reheating for Best Results:
For optimal texture and flavor, reheating the bean dip in the oven is highly recommended. Preheat your oven to 350°F (175°C). Transfer the desired portion of dip to an oven-safe dish and cover it loosely with foil to prevent drying out. Bake for about 15-20 minutes, or until it’s heated through and bubbly. If you’re short on time, the microwave works too. Place a portion in a microwave-safe dish and heat in 30-60 second intervals, stirring in between, until hot. Be careful not to overheat, as this can make the cheese rubbery. - Freezing for Long-Term Storage:
Yes, you can freeze bean dip! This is a fantastic option if you’ve made a large batch or want to save some for a future craving. To freeze, ensure the dip has cooled completely. Scoop it into a sealed, freezer-safe container or a heavy-duty freezer bag, removing as much air as possible. Label the container with the date. For the best quality and texture, aim to use the frozen bean dip within 2 months. While it will likely remain safe to eat longer, its texture may degrade over time. - Defrosting and Reheating Frozen Dip:
When you’re ready to enjoy your frozen dip, transfer it from the freezer to the refrigerator and let it defrost overnight. Once thawed, you can reheat it using the oven method described above. The texture might be slightly different after freezing and thawing, possibly a bit softer, but the flavors will still be wonderfully intact.
These tips ensure that every last bit of your homemade bean dip can be savored, whether it’s days or even weeks after you first made it.
Transforming Leftovers: Creative Culinary Adventures
Having leftover bean dip is a blessing in disguise! Its rich, savory flavor and creamy texture make it an incredibly versatile ingredient, perfect for transforming into exciting new meals. Don’t let a single scoop go to waste – get creative with these delicious ideas:
- Speedy Tostadas for a Quick Meal:
Turn your leftover bean dip into a satisfying lunch or dinner with minimal effort. Simply bake or fry corn tortillas until crispy. Spread a generous layer of warm bean dip over each tostada shell. For added protein, top with cooked ground beef, shredded chicken, or seasoned black beans. Finish with your favorite tostada toppings like shredded lettuce, diced tomatoes, a dollop of sour cream, crumbled cojita cheese, or a drizzle of hot sauce. It’s a fantastic way to enjoy a full Mexican-inspired meal in minutes. - Easy, Flavorful Quesadillas:
Elevate your quesadilla game using this versatile dip. Spread a thin, even layer of leftover bean dip onto one half of a flour tortilla. Sprinkle generously with extra shredded cheese (Monterey Jack or a Mexican blend works wonderfully) over the dip. Fold the other half of the tortilla over to create a crescent shape. Grill it in a hot skillet or on a griddle until both sides are golden brown and the cheese is beautifully melted and gooey. Serve with a side of guacamole, extra salsa, or a squeeze of fresh lime juice for a quick and incredibly flavorful quesadilla. - Kid-Friendly Nacho Extravaganza:
This dip is the perfect foundation for building kid-friendly (and adult-approved!) nachos. Arrange a single layer of tortilla chips on a baking sheet. Spoon dollops of the leftover dip over the chips, ensuring each chip gets some cheesy bean goodness. Sprinkle with an additional layer of shredded cheese. Bake in a preheated oven (around 375°F/190°C) until the cheese is melted and bubbly. Once out of the oven, let the kids go wild with their favorite toppings: shredded lettuce, diced tomatoes, a mild salsa, a swirl of sour cream, or even some black olives. It’s a fun, interactive, and delicious way to use up those leftovers!
With these ideas, your delicious 3-ingredient bean dip can continue to bring joy and flavor to your table long after the initial party is over.

Explore More Amazing Cheesy Dips for Your Next Gathering
If you’ve fallen in love with the comforting, cheesy goodness of this bean dip, then you’re in for a treat! There’s a whole world of incredible dips waiting to be discovered. Expand your appetizer repertoire with these equally delicious and crowd-pleasing cheesy dip recipes:
- Classic Reuben Dip: A unique twist on the classic sandwich, packed with savory flavors.
- Simply Irresistible Jalapeño Popper Dip: All the flavors of a jalapeño popper in a scoopable, creamy dip.
- Beer Cheese Dip: A robust and tangy dip, perfect for pretzels and hearty breads.
- Spicy Cheddar Cheese Dip: For those who love a bit more heat and intense cheddar flavor.
- Creamy Hot Cheese Dip: A versatile, decadent cheese dip that’s always a winner.
Each of these dips offers a distinct flavor experience, guaranteed to satisfy your craving for something warm, cheesy, and utterly delicious.
This fantastic bean dip recipe was originally discovered in the pages of “The Mystery Writers of America Cookbook,” a delightful collection edited by the renowned suspense novel writer and former editor-in-chief of Cosmopolitan, Kate White. It’s a testament to how simple, well-crafted recipes can be found in the most unexpected and charming places.
Now that you’re equipped with all the knowledge to create, customize, and enjoy this incredible 3-ingredient bean dip, there’s nothing left to do but make it! Add this foolproof recipe to your next game day menu, party spread, or simply whip it up for a cozy night in. Your taste buds (and your guests) will thank you for this wonderfully cheesy, creamy, and endlessly dippable delight. Enjoy every warm, flavorful bite!

3-Ingredient Bean Dip
Ingredients
- 1 (16oz/450gr) can refried beans
- 16 oz (450g) salsa
- 12 oz (350g) grated cheese
For serving:
- Fresh cilantro, chopped, for garnish (optional)
- Tortilla chips
Instructions
- Preheat the oven to 350°F (175°C). Lightly spray an 8×8-inch (20x20cm) baking pan with cooking spray.
- Layer the refried beans and salsa evenly in the prepared baking dish. Spread the shredded cheeses evenly on top.
- Bake for about 25 minutes, or until the cheese is hot, bubbly, and slightly browned around the edges.
- Top with fresh cilantro, if desired, and serve warm with plenty of tortilla chips.
⭐️ Did you make this recipe?
Please leave a review and let us know how you liked it!
Tips & Notes
Refried Beans: For the best flavor and texture, choose a quality brand like Rosarita or Gebhardt for your refried beans.
Salsa Selection: Avoid runny salsas to ensure your dip has the perfect consistency. A thicker salsa will prevent the dip from becoming watery. Adjust the heat level (mild, medium, or hot) according to your preference.
Cheese Choices: This dip is forgiving, so use your favorite melting cheeses. A combination of cheddar and mozzarella, or Monterey Jack and mozzarella, provides a great balance of flavor and gooey texture. Experiment with what you have on hand!
Storing & Reheating:
- Store any leftover bean dip in an airtight container in the refrigerator for up to 4 days.
- Reheat in the oven at 350°F (175°C) for best results, or quickly in the microwave if time is short.
- To freeze, transfer cooled dip to a freezer-safe container and use within 2 months. Thaw in the refrigerator before reheating.
Nutrition

Leave a rating and your feedback. Thank you!
This recipe was originally published on September 28th, 2015, and has since been updated and enhanced for even greater enjoyment.