

Prepare to amaze your taste buds and impress your guests with these effortlessly delicious 3-ingredient Oreo balls! Also known as Oreo truffles, these no-bake delights are a staple for holidays, parties, or simply satisfying that sweet craving. What makes them truly special is their incredible simplicity, requiring just three core ingredients, yet offering endless possibilities for customization and flavor variations.
Whether you prefer the classic cream cheese version or are looking for a dairy-free alternative, this comprehensive guide has you covered. We’ll walk you through everything from basic preparation to expert tips, ensuring your homemade Oreo truffles are perfectly smooth, rich, and utterly irresistible.

Why You’ll Absolutely Love These Oreo Truffles
These delightful Oreo truffles have earned a permanent spot in my annual holiday treat box, and they never fail to garner rave reviews. Their widespread appeal isn’t just because they’re incredibly tasty; it’s also due to their unparalleled ease and versatility. Here’s why these no-bake wonders will become your new favorite dessert:
- Unbelievably Easy to Make: With just a few simple steps and minimal ingredients, even novice bakers can create these professional-looking treats. No complicated techniques or extensive kitchen skills required!
- Perfect for Making Ahead: These Oreo balls are ideal for meal prep. You can prepare them days, or even weeks, in advance, freeing up your time when you need it most. They store beautifully in the refrigerator or freezer, maintaining their fresh taste and perfect texture.
- Endlessly Customizable Flavors: While the classic version is fantastic, the true magic lies in the ability to infuse them with a variety of flavors. From seasonal cookie varieties to different binding agents and coatings, the creative possibilities are limitless. (Keep reading for an exciting array of flavor ideas!)
- Effortlessly Impressive: Despite their simple preparation, these chocolate-dipped delights look incredibly sophisticated and gourmet. Arrange them on a platter, package them in gift boxes, or serve them as elegant dessert bites—they’re guaranteed to impress.
- Only 3 Core Ingredients: Yes, you read that right! The base recipe for these decadent truffles calls for just three accessible ingredients, making them a budget-friendly and convenient option for any occasion.

Essential Ingredients for Your Oreo Truffles
The beauty of classic Oreo balls lies in their simplicity, relying on just three key components. However, this recipe also opens the door to dairy-free and other delicious variations. Let’s explore the core ingredients and their roles in creating the perfect truffle.
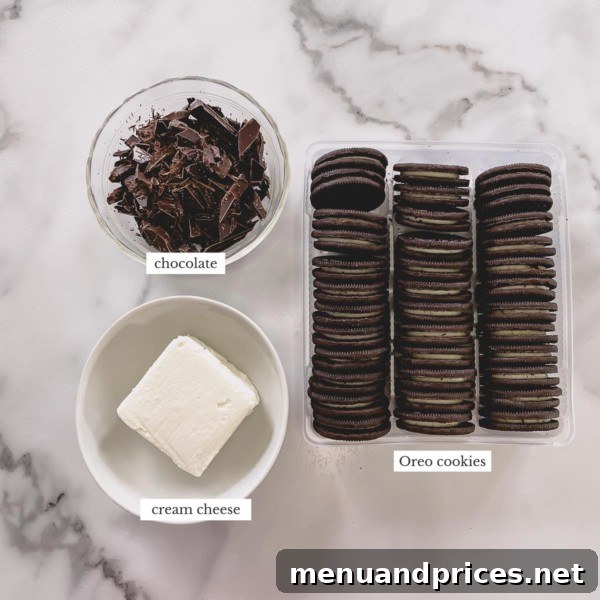
- Oreo Cookies: The star of the show! You can use any type of Oreo cookies you prefer. The classic chocolate-and-cream combination is always a hit, but don’t hesitate to experiment with limited-edition holiday flavors like Gingerbread, Peppermint, or Lemon. These specialty flavors can add an exciting twist and elevate your truffles to a new level of deliciousness. Ensure you use the standard filling Oreos, not double-stuffed, for the best consistency.
- Cream Cheese: For the traditional version, softened cream cheese acts as the perfect binding agent. Its tangy creaminess beautifully complements the sweet Oreo crumbs, creating a rich, dense, and perfectly balanced truffle. The classic cream cheese base is incredibly versatile, pairing wonderfully with virtually any flavor profile you choose to explore.
- Chocolate: The final touch that coats and seals in all that goodness. While chocolate chips can be used in a pinch, I highly recommend opting for a good quality chocolate bar (like semi-sweet, dark, or white chocolate baking bars). Chocolate bars are formulated to melt smoothly and provide a superior, glossy coating for dipping, unlike chocolate chips which often contain stabilizers that prevent them from melting as fluidly.
Creative Substitutions: Making Oreo Truffles Your Way
One of the most exciting aspects of this recipe is its adaptability. You can absolutely make delectable Oreo truffles without cream cheese, catering to different dietary needs or simply exploring new flavor and texture combinations. Here are some fantastic substitutes for cream cheese, along with alternatives for the chocolate coating:
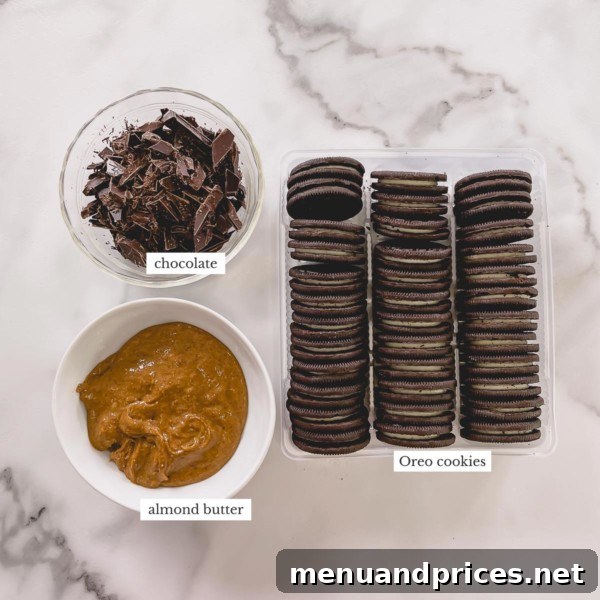
Consider these ingredients to bind your Oreo crumbs instead of cream cheese:
- Almond Butter: A fantastic dairy-free option that adds a nutty depth of flavor. Choose a creamy, unsweetened almond butter for the best results and a smooth texture.
- Peanut Butter: For a beloved flavor pairing, peanut butter works wonders. Use creamy peanut butter for a consistent texture. This is a surefire hit for peanut butter enthusiasts!
- Melted Butter: A simple and effective binder that contributes a rich, buttery note. Ensure it’s unsalted for better control over the sweetness.
- Mascarpone Cheese: A softer, sweeter, and richer Italian cream cheese. While it produces a wonderfully luxurious truffle, remember that it’s softer than traditional cream cheese, so you might need to adjust the quantity slightly or ensure extra chilling time.
A note on sweetness: While some recipes suggest sweetened condensed milk as a binder, I find it often makes the Oreo balls excessively sweet, bordering on cloying. For a more balanced and enjoyable flavor, I highly recommend sticking with neutral, non-sweet binding ingredients like those listed above. This allows the delicious flavor of the Oreos and chocolate to shine through without being overpowered.
For your coating: If you’re looking to simplify the dipping process and avoid the intricacies of tempering chocolate, melted candy melts (also known as confectioner’s coating or almond bark) are an excellent alternative. They melt smoothly and set quickly without requiring special techniques, coming in a rainbow of colors for fun customization.

Step-by-Step Guide: Crafting Your Easy Oreo Truffles
As previously mentioned, these Oreo truffles are one of the easiest and most rewarding treats you can make. Follow these simple steps for perfect results every time.
1. Prepare the Batter
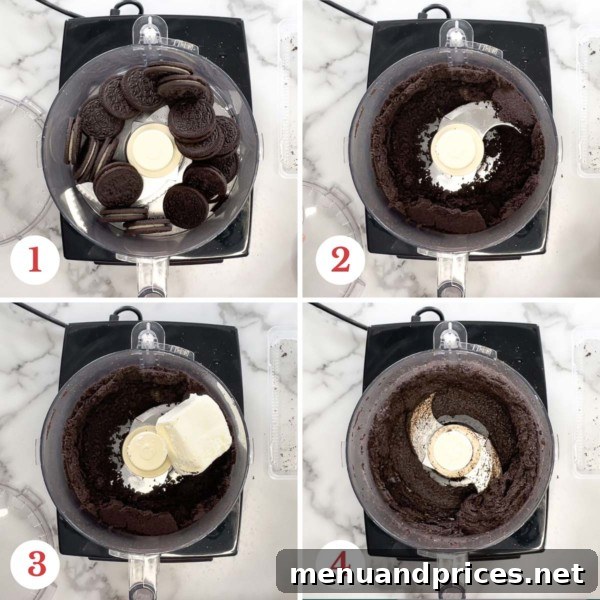
- Crush the Oreo Cookies: The first crucial step is to finely crush your Oreo cookies. For the quickest and most consistent results, use a food processor. Process the entire package of Oreos (including the cream filling) until they resemble fine, even crumbs, almost like sand. This fine texture is essential for creating smooth, uniform balls. No food processor? No problem! Place the cookies in a sturdy plastic freezer bag, seal it, and use a rolling pin or the bottom of a heavy pan to crush them into fine crumbs. Ensure there are no large chunks remaining.
- Combine with Binder: Add your softened cream cheese (or chosen substitute like peanut butter or mascarpone cheese) to the food processor with the Oreo crumbs. Process until the mixture is thoroughly combined and forms a thick, uniform dough. It should be pliable and hold together when pressed. If you’re hand-mixing, transfer the crumbs to a large bowl, add the softened cream cheese, and use an electric hand mixer or a stand mixer with a paddle attachment to blend until smooth.
2. Shape and Chill the Truffles
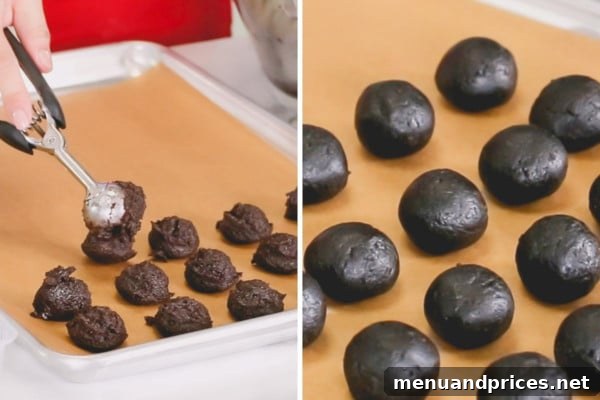
- Form the Balls: Using a small cookie scoop (approximately 1-inch in diameter) helps ensure uniform sizes, which is important for even dipping and presentation. Scoop out portions of the Oreo mixture and arrange them on a baking sheet lined with parchment paper or a silicone mat. This prevents sticking and makes handling easier.
- Initial Chill: Once all the balls are scooped, transfer the baking sheet to the refrigerator (or freezer for quicker results) for about 30 minutes. This chilling period is crucial as it allows the mixture to firm up, making the next step much easier and preventing the balls from falling apart during dipping.
- Smooth Rolling: After the initial chill, retrieve the balls. Gently roll each ball between your palms to smooth out any rough edges and create perfectly round truffles. This also helps compact the mixture, resulting in a denser, more professional-looking finished product. Return them to the fridge if they become too soft while working.
3. Dip and Set
- Melt the Chocolate: Gently melt your chosen chocolate in a microwave-safe bowl. Heat in short bursts (30 seconds at a time), stirring well after each interval, until smooth and fully melted. Be careful not to overheat, as this can cause the chocolate to seize or burn. For best results and easy dipping, use a silicone cup or a deep, narrow bowl to create a deep pool of melted chocolate.
- Dip the Truffles: Working with one chilled Oreo ball at a time, fully immerse it in the melted chocolate. Use a fork or a specialized dipping tool to lift the truffle out. Gently tap the fork against the side of the bowl to shake off any excess chocolate, ensuring a thin, even coating.
- Allow to Set: Carefully transfer the dipped truffle back onto the parchment-lined baking sheet. Repeat with the remaining truffles. Once all truffles are dipped, allow the chocolate coating to set completely at room temperature for at least 30 minutes. Alternatively, you can refrigerate them for quicker setting, especially if your room is warm. Once set, you can get creative with decorations like chocolate drizzles, sprinkles, or crushed cookies before packaging and refrigerating.
Expert Dipping Tip
For an exceptionally quick and easy dipping process, consider investing in specialized candy dipping tools. These tools are designed to hold truffles securely and allow excess chocolate to drip off efficiently. However, a simple fork and a toothpick can also work wonders! Watch a video demonstration to perfect your technique.
Mastering the Dip: Two Popular Methods for Coating Oreo Truffles
Achieving a smooth, even chocolate coating is key to visually appealing Oreo truffles. Here are two effective methods to help you get professional-looking results:
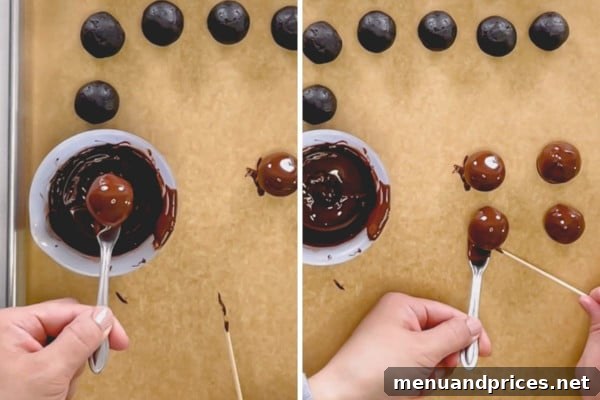
Method 1: The Fork and Toothpick Technique
This method is a classic and requires no special equipment beyond what you likely already have in your kitchen. It offers excellent control and allows for a clean finish.
- Gently place a chilled Oreo truffle onto the tines of a fork.
- Carefully lower the truffle into your melted chocolate, ensuring it’s fully submerged.
- Lift the fork, letting the excess chocolate drip back into the bowl. Tap the fork gently against the rim of the bowl to encourage dripping and remove any remaining drips.
- Using a toothpick, carefully slide the chocolate-coated truffle off the fork onto your parchment-lined baking sheet. Use the toothpick to nudge it into place and smooth any small imperfections where the fork was.
Method 2: Utilizing a Candy Dipping Tool
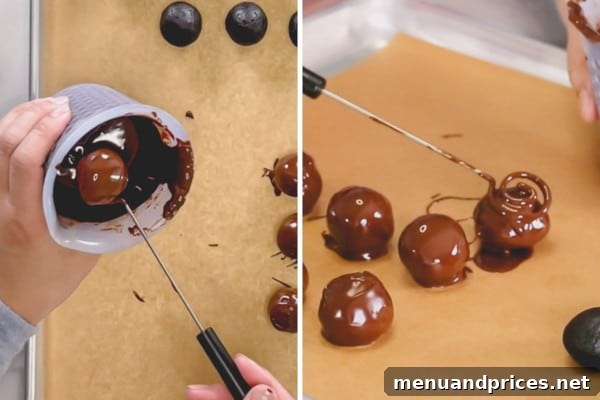
For those who frequently make dipped treats or want to streamline the process, a specialized candy dipping tool is a game-changer. These tools are designed for efficiency and ease.
- Place a chilled truffle onto the loops or tines of the dipping tool.
- Submerge the truffle in the melted chocolate. The design of the tool allows for easy coating.
- Lift the tool, and gently shake off excess chocolate over the bowl. The open design allows chocolate to drain quickly.
- Transfer the coated truffle directly onto your prepared baking sheet. The tool’s design makes it easy to release the truffle with minimal fuss, often leaving a cleaner bottom.
Pro Tips for Perfect Oreo Truffles Every Time
While making Oreo truffles is incredibly straightforward, a few key tips can elevate your results from good to absolutely perfect. Keep these pointers in mind for a truly flawless batch:
- Ensure Finely Crushed Cookies: This cannot be stressed enough! Any coarse or chunky cookie pieces will make it difficult to form smooth, cohesive balls. Take the time to process your Oreos until they are fine crumbs. If using a rolling pin, double-check for any larger pieces before mixing.
- Mixing Your Dough: If you’re crushing cookies manually or using a small food processor that struggles with mixing, transfer the crumbs to a large bowl. Then, add your softened cream cheese (or chosen binder) and use an electric hand mixer or a stand mixer with a paddle attachment. This ensures the ingredients are thoroughly combined into a smooth, pliable dough.
- Don’t Fear a Sticky Mixture: If your mixture feels too soft and sticky, especially when using mascarpone cheese (which has a higher fat content than cream cheese), don’t be alarmed. This is perfectly normal. Simply freeze the unrolled balls for an extended period (up to an hour) before rolling them smooth and dipping. A firmer base is easier to work with.
- The Art of Chocolate Coating:
- Temper Your Chocolate (for shine and snap): For a truly professional finish—a glossy sheen, a satisfying snap when bitten, and no fingerprints—it’s best to temper your chocolate. If you’re new to tempering, it involves carefully heating and cooling chocolate to stabilize its crystals. There are various methods, but patience is key.
- Melting Chocolate Without Breaking Temper: If you’re not tempering from scratch, you can often gently melt good quality chocolate chips or chopped chocolate bars in the microwave without “breaking its temper” if they were already tempered. Use low power and short bursts, stirring frequently.
- Easy Alternatives: To bypass tempering entirely, opt for almond bark or candy melts. These products are designed to melt smoothly and set quickly without any special treatment, making them perfect for beginners or when you’re short on time.
- Choose the Right Melting Container: A 1-cup silicone cup or a deep, narrow mug is excellent for melting chocolate or candy melts. It creates a deep pool, making it easier to fully immerse your truffles without needing excessive amounts of chocolate.
- Optimize Your Dipping Tools: As mentioned, specialized dipping tools can significantly speed up the process. If you’re using a fork and toothpick, remember the technique: dip with the fork, tap off excess, and use the toothpick to gently slide the truffle off the fork onto the baking sheet.
- Allow Chocolate to Set Fully: Always allow the chocolate coating to set completely before moving, stacking, or refrigerating your Oreo balls. This prevents smudges and ensures a neat finish. Setting them at room temperature is ideal for tempered chocolate, but refrigerating for a short period can speed up the process for candy melts or untempered chocolate.

Unlock Endless Creativity: Delicious Flavor Variations
The beauty of these 3-ingredient Oreo truffles lies in their adaptability. Once you master the basic recipe, you can unleash your creativity and craft an endless array of flavor combinations. Here are some inspiring ideas to get you started:
- Oreo Peanut Butter Truffles: A fan-favorite! Simply substitute the cream cheese with creamy peanut butter. Dip them in milk or dark chocolate and consider a sprinkle of chopped peanuts or a peanut butter drizzle for extra indulgence.
- Almond Oreo Balls: Replace cream cheese with almond butter for a sophisticated, nutty flavor. These pair wonderfully with white chocolate coating. Garnish with a few slivered almonds or a dusting of cocoa powder.
- Funfetti Truffles: For a festive and vibrant treat, use Golden Oreo cookies and mascarpone cheese (or cream cheese). Mix in about 1/2 cup of colorful sprinkles into the dough before forming the balls. Dip in white chocolate and immediately add more sprinkles before the chocolate sets for a truly celebratory look.
- Lemon Oreo Truffles: Start with Lemon Oreo cookies. For an extra burst of citrus, add 1 tablespoon of fresh lemon juice and 1 tablespoon of lemon zest to your cream cheese mixture. Dip in white chocolate and garnish with a delicate lemon zest curl.
- Mint Oreo Truffles: Utilize Mint Oreo cookies for a refreshing twist. Enhance the minty flavor by adding 1/4 teaspoon of peppermint extract to the cream cheese mixture. These are fantastic dipped in dark chocolate, perhaps with a subtle green drizzle or a crushed candy cane sprinkle.
- Holiday Spice Truffles: During the festive season, try using Gingerbread Oreos with cream cheese, and a pinch of cinnamon or nutmeg in the mixture. Coat with white chocolate and a light dusting of gingerbread spice.
- Coffee Lover’s Truffles: Add a teaspoon of instant espresso powder (dissolved in a tiny bit of hot water) to your cream cheese and classic Oreo mixture for a rich mocha flavor. Dip in dark chocolate.

Smart Storage Solutions: Keeping Your Oreo Truffles Fresh
One of the many advantages of these Oreo truffles is their excellent shelf life, making them perfect make-ahead treats for any event. Proper storage ensures they remain delicious and maintain their delightful texture.
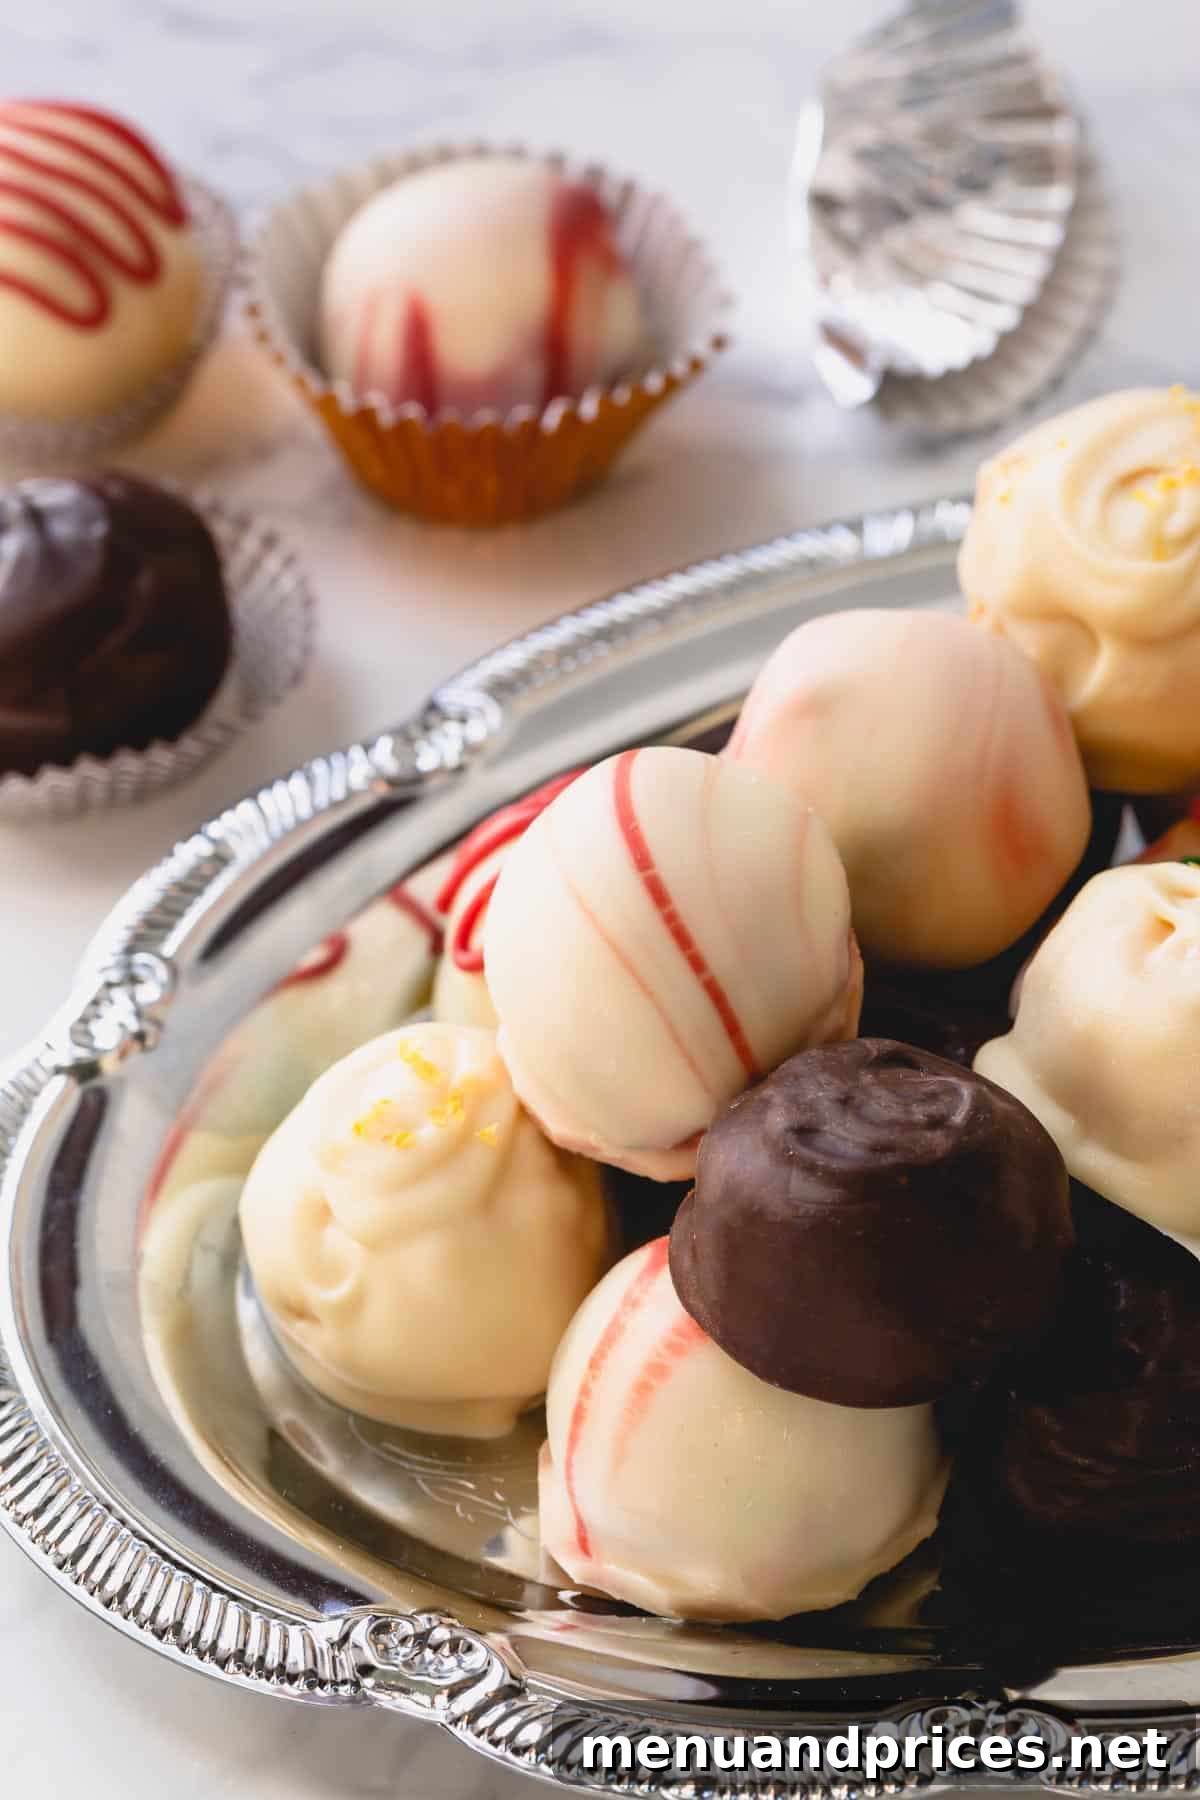
For easy handling and an attractive presentation, I like to place the finished truffles in mini cupcake liners once their chocolate coating has fully set. This not only prevents sticking but also makes them simple to pick up and serve.
- Refrigeration: Once the chocolate coating on your Oreo balls is completely set (this is crucial!), transfer them to an airtight container. They will stay fresh and delicious in the refrigerator for up to 1 week. Layer them with parchment paper if stacking to prevent sticking.
- Freezing: For longer storage, Oreo truffles freeze beautifully. Place them in an airtight, freezer-safe container, again using parchment paper between layers if necessary. They can be stored in the freezer for up to 1 month.
Important Thawing Tip
When thawing frozen Oreo balls, always transfer them from the freezer to the refrigerator to thaw slowly overnight. Bringing them directly to room temperature from a frozen state can cause condensation to form on the chocolate coating, leading to a less appealing appearance and potentially affecting the texture.

Easy 3-Ingredient Oreo Balls
Shinee Davaakhuu
30 mins
2 hrs
50 Oreo balls
Ingredients
Classic Version:
- 1 package (14oz/400g) Oreo cookies (Note 1)
- 8 oz (225g) cream cheese, softened
- 8 oz (225g) semi-sweet chocolate (Note 2)
Peanut Butter Version:
- 1 package (14oz/400g) Oreo cookies
- 10 oz peanut butter (Note 3)
- 8 oz (225g) semi-sweet chocolate
Funfetti Mascarpone Version:
- 1 package (14oz/400g) Golden Oreo cookies
- 5 oz Mascarpone cheese (Note 4)
- 1/2 cup (80g) sprinkles
- 8 oz (225g) white chocolate
Instructions
- Crush Oreo cookies in a food processor until fine crumbs. (No food processor? Place the cookies in a plastic bag and crush with a rolling pin.)
- Add softened cream cheese (or peanut butter, or mascarpone cheese) and process until well combined into a thick dough.
- Using a small cookie scoop, form 1-inch balls and arrange them on a baking sheet, lined with parchment paper or a silicone mat.
- Refrigerate (or freeze) for about 30 minutes to firm up.
- Then, roll each ball between your hands to smooth them out.
- Gently melt chocolate in a microwave, stirring frequently to avoid overheating. (TIP: Use a silicone cup for easy dipping!)
- Working with one ball at a time, dip the truffles in melted chocolate, shake off excess chocolate, and transfer back onto the baking sheet.
- Let the chocolate set for at least 30 minutes at room temperature (or refrigerate for faster setting), then package them up and refrigerate.
- To decorate, feel free to drizzle some contrasting chocolate on top, sprinkle some crushed cookies, sprinkles, or lemon zest, if desired, while the chocolate is still wet.
⭐️ Did you make this recipe?
Please leave a review and let us know how you liked it!
Video
Tips & Notes
Note 2: Chocolate bars work better than chocolate chips for smooth melting and dipping. Feel free to substitute almond bark or candy melts for chocolate to simplify the process.
Note 3: I prefer creamy peanut butter over chunky for a smooth truffle texture. You can also use almond butter!
Note 4: Mascarpone cheese is softer than cream cheese. For a similar consistency, decrease the mascarpone cheese amount slightly compared to cream cheese (e.g., 5 oz mascarpone instead of 8 oz cream cheese for a 14oz package of Oreos).
Flavor Variations:
- For lemon Oreo truffles: add 1 tablespoon lemon juice and 1 tablespoon lemon zest to the classic version with lemon Oreo cookies.
- For mint Oreo truffles: add 1/4 teaspoon peppermint extract to the classic version with mint Oreo cookies.
Storing Instructions:
- Refrigerate: Once the chocolate coating is fully set, store Oreo balls in an airtight container for up to 1 week.
- Freeze: Freeze Oreo truffles in an airtight container for up to 1 month. To thaw, transfer them to the refrigerator overnight to prevent condensation.
Nutrition
1 classic Oreo ball
79kcal
8g
1g
5g
5g
52mg
Dessert
American
This beloved recipe was originally published on December 26th, 2012, and has been updated for clarity and expanded tips.