

Homemade Croissants: Mastering the Art of Flaky Perfection
Imagine biting into a croissant so light, so airy, it practically melts in your mouth. Envision layers upon layers of ultra-buttery crust, yielding to a cotton-soft interior, all wrapped in a beautiful golden hue. This isn’t just a dream – it’s the reality of a homemade croissant, and the immense satisfaction of creating such a masterpiece with your own hands is truly unparalleled.

My Personal Croissant Odyssey: From Craving to Crafting
For years, croissants were my ultimate weakness. Yet, I faced a culinary conundrum: a distinct lack of bakeries capable of delivering that truly transcendent croissant experience in my vicinity. In fact, there wasn’t a single bakery in town. Period! This geographical disadvantage meant that the only way to indulge in authentic, melt-in-your-mouth croissants was either through extensive travel or by embarking on a personal baking quest.
My journey truly began back in October 2013 during a work trip to San Antonio, Texas. While savoring a truly delicious croissant at a hotel restaurant breakfast, I made a solemn promise to myself: I would never buy another croissant until I had mastered the art of making them from scratch. While I confess to a momentary lapse (a truly irresistible croissant from my favorite Minneapolis bakery proved too much to resist!), that promise fueled my determination. And indeed, shortly thereafter, I did learn to craft some truly fabulous homemade croissants. It was a victory!

Demystifying Croissants: The Truth About Their Difficulty
Let’s be upfront: baking croissants is not a “piece of cake.” It demands patience and attention to detail, but it’s far from impossible. The ingredients themselves are remarkably simple, and the fundamental techniques are straightforward. The real secret lies in managing your time and respecting the process, which unfolds over three distinct days. This isn’t about complex maneuvers; it’s about giving the dough and butter the time they need to develop their iconic structure.
My first batch of homemade croissants came to life on April 20th, 2014. Within a month, I was so enamored with the process and the results that I made three more batches. Each attempt deepened my understanding and refined my technique. And, naturally, having an abundance of freshly baked, buttery croissants to enjoy was certainly not something to complain about!

We can all agree that anything made from scratch, with care and attention, inherently tastes better, right? These homemade croissants are the epitome of this principle. The satisfaction of pulling them from the oven, their aroma filling your home, is an experience that store-bought versions simply cannot replicate. The extra buttery, exquisitely flaky crust, the delicate, cotton-soft interior, the beautiful golden color, and that unmistakable buttery scent of fresh croissants… nothing truly beats the feeling of achievement as you admire your picture-perfect creations, crafted by your own hands.
The Three-Day Croissant Journey: A Blueprint for Success
Now, you too can achieve this baking triumph. While the idea of a three-day recipe might initially seem daunting, let me assure you that the hands-on time each day is surprisingly minimal, making it perfectly manageable even for busy schedules. This structured approach allows the dough to develop its flavor and texture properly, which is essential for those signature flaky layers. Here’s a quick overview:
- Day 1: The Foundation (Less than 30 minutes active time)
This day is all about preparing your basic dough and shaping your butter block. It’s mostly hands-off time as the dough rests and chills.
- Day 2: The Lamination Magic (The most active day, with breaks)
This is where the magic happens! You’ll be rolling and folding your dough with the butter a few times, with crucial chilling breaks in between each turn. This builds those incredible layers.
- Day 3: Shaping and Baking Your Masterpiece (The grand finale)
On the final day, you’ll perform one last roll, then cut and shape your beautiful croissants. Soon after, you’ll be enjoying the warm, buttery goodness straight from your oven.

Day 1: Preparing Your Dough and Butter Block
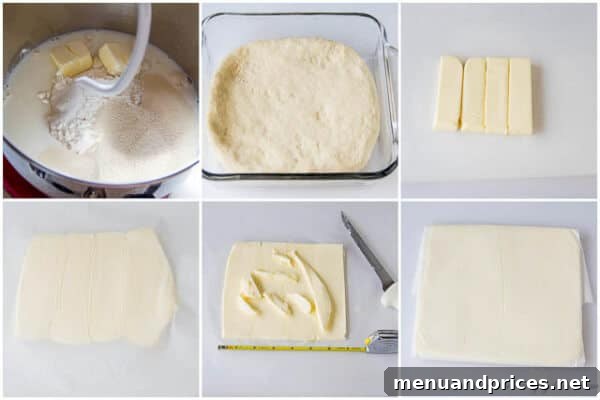
Day one is arguably the easiest and most forgiving. Your main tasks are to prepare the croissant dough and sculpt the butter block. For the dough, simply combine all the ingredients and knead until it’s smooth and elastic. A stand mixer with a dough hook makes this effortless, but it’s entirely achievable by hand as well. Once kneaded, the dough needs a substantial rest in the refrigerator – at least 6 hours, though overnight is ideal. I often choose to prepare the dough on a Friday evening after dinner, allowing it to chill throughout the night, setting the stage for fresh croissants on Sunday morning.
Crucially, on this first day, you should also prepare your butter block. Shaping it into a flat square immediately after making the dough saves you time and effort the next day. A common mistake is attempting to speed up the butter chilling process by freezing it. Resist this temptation! Frozen butter won’t soften evenly during the lamination process, leading to tears in the dough and immense frustration. Instead, simply refrigerate the shaped butter for at least 30 minutes, or overnight, to achieve the perfect pliable yet firm consistency.
Day 2: The Art of Lamination – Crafting Those Flaky Layers
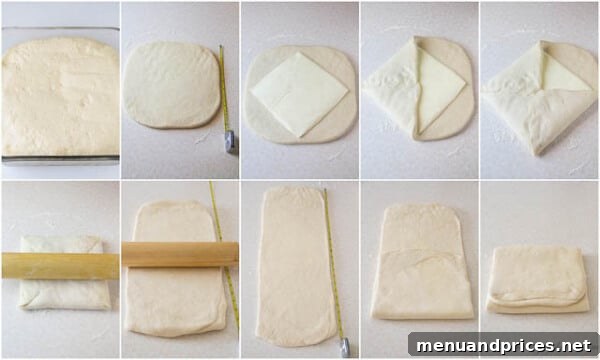
Day two is where the magic of lamination truly unfolds. This process, which creates the iconic flaky layers of a croissant, might sound intimidating, but it’s actually much simpler than you might think. You’ll enclose the chilled butter block within your dough, creating a “butter envelope.” The key then is to repeatedly roll this dough and butter package into a long rectangle, and then fold it into thirds, much like folding a letter. This sequence, known as a “turn,” is repeated three times, with a vital 30-minute chilling break after each fold. These chilling periods are non-negotiable; they allow the gluten in the dough to relax and the butter to firm up, preventing it from melting into the dough and ensuring distinct, separate layers.
Day 3: Shaping, Proofing, and Baking Your Croissant Masterpiece
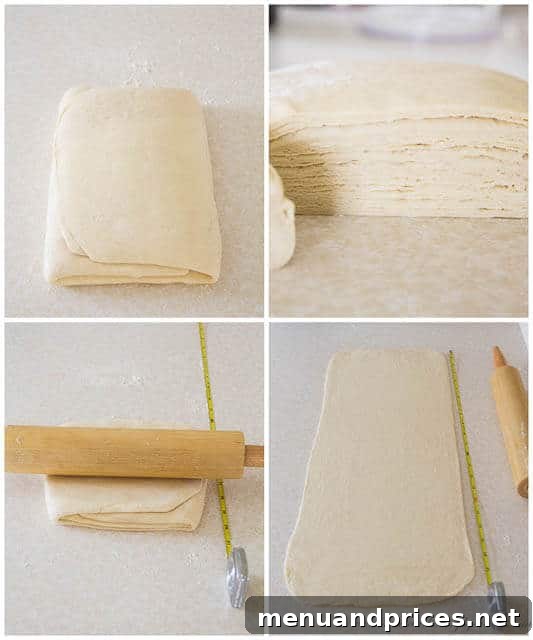
The final day culminates in the breathtaking transformation of your layered dough into recognizable croissants. You’ll begin by rolling the dough one last time. If your countertop space is limited, like mine, cutting the dough into two equal parts makes it far more manageable to achieve the required dimensions. As you roll, you’ll clearly see the numerous layers you meticulously created on Day 2 – these are the very layers that will puff up and separate in the oven, giving your baked croissants their characteristic flakiness!
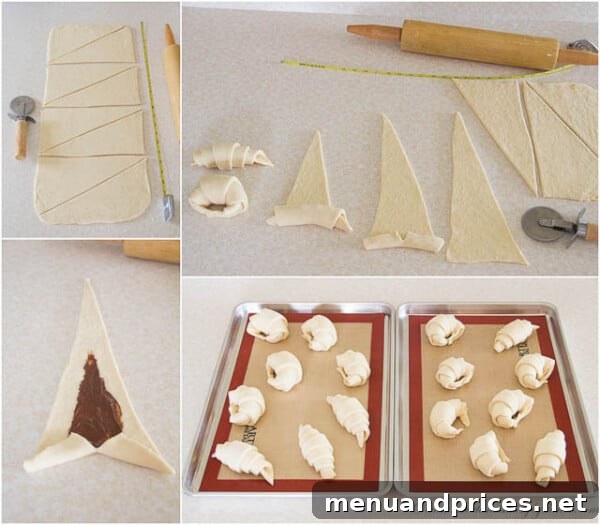
Once rolled, the dough is cut into triangles, which are then skillfully rolled into the classic crescent shape. This recipe typically yields 16 generously sized croissants. For an extra treat, you can easily transform these into chocolate croissants by placing a few squares of your favorite chocolate or a dollop of Nutella at the wide end of each triangle before rolling. After shaping, the croissants undergo a crucial proofing period, where they rest in a warm environment, allowing the yeast to work its magic and the pastries to double in size and become airy. This step is vital for a light, fluffy interior.
One common intention when making a large batch of croissants is to freeze some for later enjoyment. However, in my experience, this rarely happens! Everyone at home loves these homemade pastries so much that they vanish quickly. Nonetheless, for testing purposes, I have successfully frozen a couple of croissants, and they freeze exceptionally well. This means you can enjoy freshly baked croissants anytime by simply planning ahead with frozen dough. (See the detailed freezing instructions in the recipe section below).

Baking homemade croissants is an incredibly rewarding culinary experience. It teaches patience, precision, and the sheer joy of creating something truly exquisite from basic ingredients. The aroma that fills your kitchen, the satisfying crunch of the first bite, and the proud feeling of sharing your handiwork with loved ones are all part of the magical process. Don’t be deterred by the multi-day commitment; the active time is minimal, and the results are profoundly worth every minute. I truly hope this guide inspires you to embark on your own croissant-making adventure. Happy baking!
Ultimate Homemade Croissant Recipe

Homemade Croissants
By Shinee Davaakhuu
These buttery homemade croissants might seem challenging, but with our detailed guide, you’ll achieve light, airy, and incredibly flaky results that are truly worth the effort.
- Prep Time: 3 Days
- Total Time: 3 Days
- Yields: 16 Croissants
Ingredients
For the Dough:
- 4 cups (500g) all-purpose flour
- 1 ¼ cup (300ml) milk, at room temperature
- ¼ cup (50g) sugar
- 2 tablespoons unsalted butter, softened
- 1 tablespoon instant yeast
- 1 ½ teaspoons salt
For Laminating:
- 1 cup (225g) unsalted butter, for butter block
For Egg Wash:
- 1 egg
- 1 tablespoon water
Instructions
Day 1: Dough Preparation & Butter Block
- In a large mixing bowl (using a dough hook attachment if available, or knead by hand), combine all the ingredients for the dough. Mix until the dough comes together and is smooth and elastic, approximately 5 minutes.
- Transfer the dough to a lightly floured surface, knead briefly for about a minute, then flatten it into a disk. Place in a floured dish, cover with plastic wrap, and refrigerate for at least 6 hours, or ideally overnight.
- While the dough chills, prepare the butter block. Cut 1 cup (225g) of unsalted butter in half lengthwise. Place these halves on a large piece of parchment paper. Cover with another piece of parchment and roll the butter into a 7×7 inch square. Trim any uneven edges and place the trimmings back on the butter, then roll again to ensure a uniform, flat butter square. Refrigerate this butter block for at least 30 minutes, or overnight. Do NOT freeze the butter, as it needs to be pliable for lamination.
Day 2: Lamination – The Folding Process
- On a lightly floured surface, roll the chilled dough into a 10×10 inch square.
- Place the 7×7 inch butter square diagonally in the center of the dough. Fold the corners of the dough over the butter, meeting in the middle like an envelope. Pinch the seams securely to fully enclose the butter.
- Gently and evenly roll the butter-enclosed dough into an 8×24 inch rectangle. Focus on maintaining an even thickness to ensure consistent layers.
- Fold the rectangle into thirds (a “letter fold”). Cover the folded dough with plastic wrap and refrigerate for 30 minutes. This completes your first “turn.”
- Repeat steps 6 and 7 two more times, for a total of three turns. If at any point the dough becomes too resistant or elastic, return it to the refrigerator for 10-15 minutes to relax before continuing. After the third turn, cover the dough securely with plastic wrap and refrigerate it overnight.
Day 3: Shaping, Proofing, and Baking
- On a lightly floured surface, roll out the dough into a large rectangle. If your countertop is not long enough (for an 8×44 inch rectangle), cut the dough into two equal parts and roll each part into an 8×22 inch rectangle. As you roll, occasionally lift the dough to prevent it from sticking and to allow it to relax, as it tends to shrink back slightly.
- Once the dough is rolled to the desired dimensions, mark the top and bottom edges every 5.5 inches. Using a pizza cutter or a sharp knife, cut the dough into smaller rectangles, then cut each rectangle diagonally from corner to corner to form triangles. You should yield a total of 16 triangles.
- To shape the croissants, gently stretch the wide base of each triangle slightly. Make a small slit (about ½ inch) in the center of the base. Roll the triangle from the base towards the point, gently stretching and curving it to form the classic crescent shape. If making chocolate croissants, place a few chocolate squares or a teaspoon of Nutella at the base before rolling.
- Place the shaped croissants on baking sheets lined with parchment paper or a silicone mat. Ensure ample space between them. Let them proof in a warm, draft-free place for about 1 hour, or until they have visibly puffed up and increased in size. They should feel light and jiggle slightly when gently shaken.
- While the croissants are proofing, preheat your oven to 425°F (220°C).
- In a small bowl, whisk one egg with a tablespoon of water to create an egg wash. Gently brush this egg wash over the proofed croissants before baking.
- Bake the croissants for 20-25 minutes, or until they are deeply golden brown and beautifully flaky. Serve warm for the ultimate experience.
Tips & Notes
- Storage: Store baked croissants in an airtight container at room temperature for up to 2 days to maintain freshness.
- Freezing Instructions (Unbaked): To freeze croissants for later, follow all shaping instructions (Step 11), but do NOT proof them. Instead, place the shaped unbaked croissants on a baking sheet and freeze for at least 3 hours, or until completely solid. Once frozen, transfer them to a freezer-safe ziplock bag or airtight container. They can be stored in the freezer for up to one month.
- To Bake Frozen Croissants: Remove the frozen, unbaked croissants from the freezer and arrange them on a parchment-lined baking sheet. Cover them loosely with a kitchen towel and allow them to thaw and proof overnight on your counter (typically 8-10 hours). In the morning, they should be visibly puffed and ready to proceed with Step 13 (preheating the oven) and subsequent baking instructions.
Nutrition Information (Approximate, Per Croissant)
- Servings: 1 croissant (estimated)
- Calories: 256 kcal
- Carbohydrates: 28g
- Protein: 4g
- Fat: 14g
- Sugar: 4g
- Sodium: 233mg
Course & Cuisine
- Course: Appetizer, Breakfast, Snack
- Cuisine: French
We trust that this comprehensive guide will empower you to create these beautiful, golden croissants in your own kitchen. There’s immense satisfaction in learning a new skill and indulging in the fruits of your labor. Thank you for reading, and happy baking!

This recipe was originally published on May 26th, 2014.