
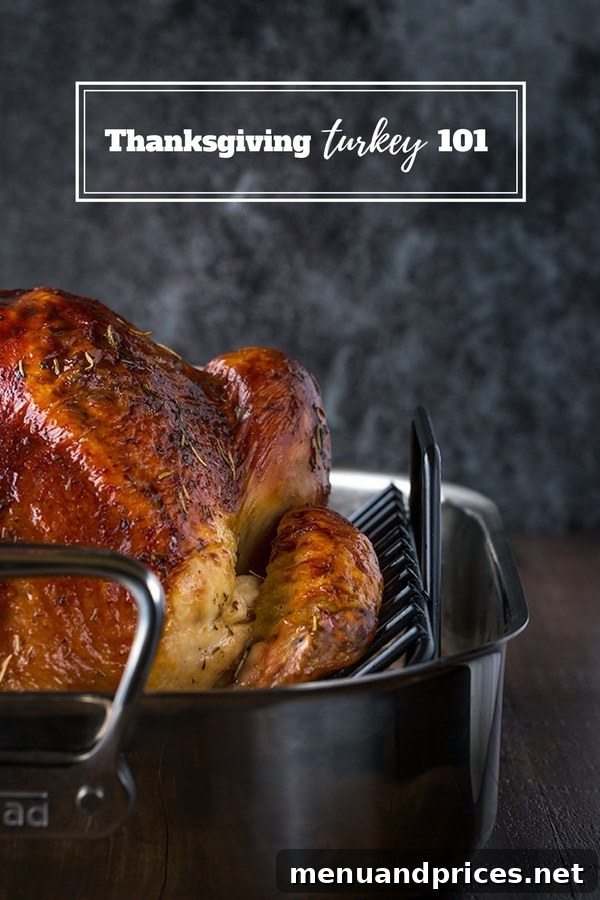
The centerpiece of any magnificent Thanksgiving dinner is undoubtedly the golden-brown, perfectly roasted turkey. It’s a dish that embodies the spirit of the holiday – warmth, generosity, and gathering. However, preparing a show-stopping turkey can often feel like a daunting task, filled with questions ranging from choosing the right bird to mastering the carving technique. This comprehensive guide is designed to empower you with all the knowledge and tips you need to confidently tackle your Thanksgiving turkey, ensuring it’s not just a meal, but a memorable culinary triumph. Forget the stress and embrace the joy of creating a truly fabulous centerpiece that will leave your guests impressed and craving more.
How Much Turkey Do You Need? Planning Your Perfect Portion Sizes
One of the first and most critical decisions for your Thanksgiving feast is determining the ideal size of your turkey. Getting this right ensures everyone gets enough to eat without an overwhelming amount of waste, unless, of course, you’re planning for those glorious leftovers!
As a general starting point, the **rule of thumb is to plan for 1 pound of turkey per person.** This measurement accounts for the bone weight and provides a reasonable serving size for most appetites. However, this is just a baseline, and several factors can influence your final decision:
- For Moderate Appetites and Fewer Leftovers: If your guests are light eaters or you prefer not to have too many leftovers, sticking closer to 1 pound per person is perfectly acceptable.
- For Hearty Eaters and Ample Leftovers: If your family and friends are known for their robust appetites, or if you simply adore the idea of post-Thanksgiving turkey sandwiches, soups, and casseroles, then aim for 1.5 to 2 pounds per person. This extra buffer ensures everyone can enjoy second helpings and you’ll have plenty to savor in the days following the holiday.
- Consider Other Dishes: Remember that turkey is just one component of a lavish Thanksgiving spread. If you’re serving a multitude of rich side dishes, your guests might consume slightly less turkey. Conversely, if turkey is the undisputed star with fewer accompanying dishes, you might lean towards the higher end of the spectrum.
- Kids vs. Adults: When counting guests, you might adjust portions for younger children, but it’s often simpler and safer to just include everyone in the general calculation to avoid running short.
When in doubt, it’s always better to err on the side of buying a slightly larger bird. A little extra turkey means more opportunities for delicious leftover meals, which many argue is one of the best parts of Thanksgiving!
How Long to Thaw the Turkey? Safe and Speedy Methods
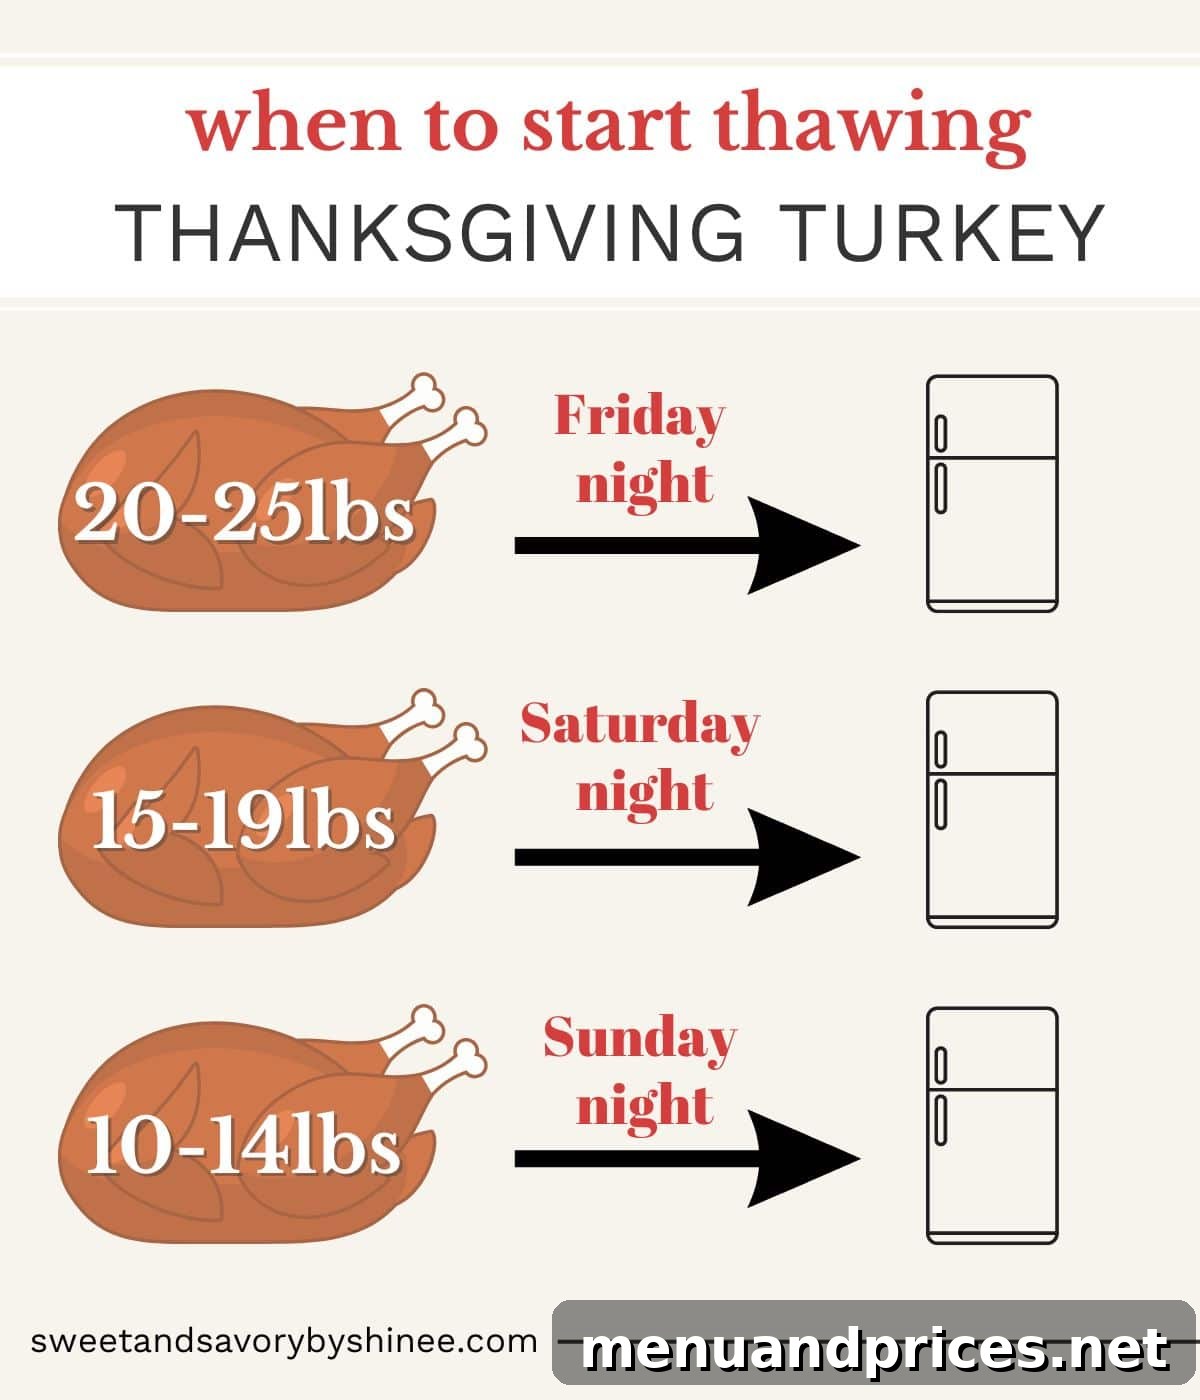
Properly thawing your frozen turkey is a crucial step for both food safety and ensuring an evenly cooked, delicious bird. Rushing this process or doing it incorrectly can lead to bacterial growth or an unevenly cooked turkey. Plan ahead to ensure your turkey is fully thawed before it’s time to brine or roast.
- Refrigerator Thawing (The Safest Method): This is the recommended method for thawing a turkey, as it allows for a slow, controlled thaw in a consistently cold environment, minimizing bacterial risk.
- Timeframe: Generally, allow approximately **24 hours of thawing time for every 5 pounds of turkey.**
- Preparation: Place your frozen turkey, still in its original packaging, on a rimmed baking sheet or in a large roasting pan. This is essential to catch any drips and prevent cross-contamination with other foods in your refrigerator.
- Temperature: Ensure your refrigerator is set to 38°F (3°C) or below.
- Example Thawing Schedule:
- 8-12 lb turkey: 2-3 days
- 12-16 lb turkey: 3-4 days
- 16-20 lb turkey: 4-5 days
- 20-24 lb turkey: 5-6 days
- Check for Thaw: Once the estimated time has passed, feel inside the body cavity for any ice crystals. The turkey should be pliable and free of hard ice.
- Cold Water Thawing (The Quicker, Still Safe Method): If you’re short on time or forgot to move your turkey to the fridge, the cold water method offers a safe way to speed things up.
- Timeframe: This method is much faster, requiring about **30 minutes of thawing time per pound of turkey.**
- Preparation: First, ensure your turkey is in a leak-proof plastic bag. This prevents water from getting into the turkey (which can affect flavor and safety) and prevents bacteria from the turkey contaminating your sink or cooler.
- Procedure: Submerge the wrapped turkey completely in a sink or large cooler filled with cold tap water (no warmer than 70°F or 21°C).
- Water Changes: It is absolutely critical to change the cold water every 30 minutes. This prevents the surface of the turkey from rising to an unsafe temperature that could encourage bacterial growth.
- Example Thawing Schedule:
- 8-12 lb turkey: 4-6 hours
- 12-16 lb turkey: 6-8 hours
- 16-20 lb turkey: 8-10 hours
- 20-24 lb turkey: 10-12 hours
- Immediate Cooking: A turkey thawed using the cold water method must be cooked immediately after thawing is complete. It cannot be refrozen or stored in the refrigerator for later use.
Emergency Thawing: When You’re Really in a Pinch
Life happens, and sometimes you realize Thanksgiving is tomorrow, and your turkey is still a solid block of ice. While not ideal, a partially frozen turkey can technically be roasted, though it will take significantly longer to cook and may not cook as evenly. If you find yourself in this situation, continue thawing as much as possible using the cold water method, then plan for extra roasting time and rely heavily on a meat thermometer to ensure safe internal temperatures throughout the bird.
Brine or No Brine? Unlocking the Juiciest Turkey
The quest for a truly juicy and flavorful turkey often leads to the question of brining. For many home cooks, it’s the secret weapon against dry, bland poultry. But what exactly is brining, and when is it necessary?
What is Brining and Why Do It?
Brining is a process where the turkey is submerged in a saltwater solution (wet brine) or coated with a salt mixture (dry brine) for an extended period. The salt helps the meat absorb moisture and enhances its natural flavors. Through osmosis, the salt penetrates the muscle fibers, causing them to unravel and tenderize. This allows the turkey to retain more moisture during the high heat of roasting, resulting in a significantly juicier and more tender final product.
When to Skip Brining:
You can skip brining if you’ve purchased a kosher turkey or one that has been “enhanced” or “self-basting” – meaning it’s already been injected with a sodium solution. Adding more salt through brining could make the turkey overly salty.
Wet Brining vs. Dry Brining:
- Wet Brining: This involves submerging the turkey in a large container filled with a saltwater solution, often infused with aromatics like herbs, spices, and citrus. While effective, it requires significant refrigerator space and can be messy to manage a large bird in liquid.
- Dry Brining: My personal preference and a method I highly recommend is dry brining a turkey. This simpler technique involves rubbing the turkey with a salt and spice mixture and letting it rest in the refrigerator. The salt draws out moisture from the turkey, which then reabsorbs, creating a self-basting effect. Dry brining results in incredibly juicy meat and, a major bonus, wonderfully crispy skin. It’s less cumbersome than wet brining and delivers fantastic results.
The “No Brine, Still Juicy” Alternative:
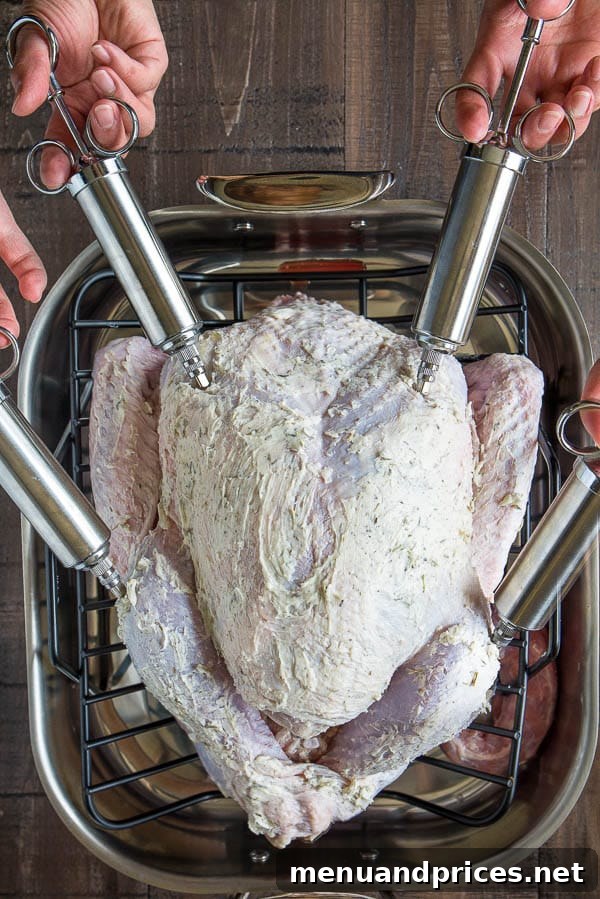
Forgot to brine or simply don’t have the time or space? Don’t despair! You can still achieve a remarkably moist and flavorful turkey without brining. The key lies in injecting flavor and moisture directly into the meat. By injecting melted butter, broth, or a seasoned marinade into the breast and thigh meat before roasting, you infuse the turkey with richness and moisture from the inside out. This method can yield meat that is just as tender and juicy as a brined bird, with minimal hassle. Explore my juicy no-brine turkey recipe for step-by-step instructions and more details on this fantastic technique.
Ultimately, the choice to brine depends on your preference, time, and the type of turkey you’re starting with. Whichever method you choose, the goal is always a succulent, flavor-packed turkey that’s the star of your holiday table.
Preparing Your Turkey for Roasting: The Final Touches Before the Oven
Once your turkey is thawed and potentially brined, a few final preparation steps will set the stage for a perfect roast. These steps are crucial for even cooking, maximum flavor, and that coveted golden-brown skin.
- Remove Giblets and Neck: Don’t forget to reach into both cavities of the turkey and remove the giblet bag (which often contains the liver, gizzard, heart) and the neck. These can be saved to make a flavorful gravy or stock, or discarded.
- Pat Dry, Pat Dry, Pat Dry: This step cannot be overstated! Using paper towels, thoroughly pat the entire surface of the turkey, inside and out, until it is as dry as possible. Excess moisture on the skin will steam rather than crisp, preventing that beautiful, crackling golden crust we all desire.
- Season Generously: This is where you infuse flavor. Rub the turkey generously with butter or olive oil, then season it liberally with salt, freshly ground black pepper, and your favorite herbs and spices. Don’t forget to season the cavity as well. Popular choices include rosemary, thyme, sage, and garlic powder. You can also place aromatics like quartered onions, lemon halves, garlic cloves, and herb sprigs inside the cavity for added fragrance and flavor, though avoid over-stuffing if you plan to cook stuffing separately.
- Trussing (Optional but Recommended): Trussing involves tying the turkey’s legs together and tucking the wings under its body. This isn’t just for aesthetics; it helps the turkey cook more evenly by keeping the delicate breast meat protected and preventing the wing tips from burning. It also creates a more compact shape, promoting consistent heat distribution.
- Place in Roasting Pan: Position the turkey on a sturdy roasting rack within a shallow roasting pan. The rack ensures air circulates around the entire bird, contributing to even cooking and crispy skin. If you don’t have a rack, you can create a makeshift one with thick slices of onion, carrots, and celery at the bottom of the pan.
With these steps complete, your turkey is now primed and ready for its journey to a golden, succulent perfection in the oven.
How Long to Roast the Turkey? Achieving Perfect Doneness
Roasting the turkey is the heart of Thanksgiving cooking, and getting the timing and temperature right is essential for a moist, flavorful bird. While many traditional recipes recommend roasting at 325°F (160°C), there’s room for personal preference and a little rebellion in the kitchen!
- Temperature Talk: Most guidelines suggest 325°F (160°C). However, I often opt for 350°F (175°C) myself. In my experience, this slightly higher temperature doesn’t drastically alter the outcome but can sometimes result in a slightly quicker cooking time and contributes to a beautiful, crispier skin. The key is monitoring, not just blindly following a clock.
- The Essential Tool: A Meat Thermometer: This is your best friend for roasting turkey. The only truly reliable way to know if your turkey is cooked through is by checking its internal temperature. Insert the thermometer into the thickest part of the thigh, without touching the bone. The turkey is safely cooked when it reaches 165°F (74°C). You should also check the thickest part of the breast.
- Unstuffed vs. Stuffed Turkey:
- Unstuffed Turkey: This is generally recommended for safer and more even cooking. An unstuffed turkey will typically take anywhere between 2.5 to 5 hours, depending on its weight.
- Stuffed Turkey: If you prefer to cook your stuffing inside the bird, remember that this will significantly increase the roasting time. You’ll need an additional 15-30 minutes, or even more, as the stuffing needs to reach an internal temperature of 165°F (74°C) as well. It’s crucial to ensure both the turkey meat and the stuffing are at safe temperatures. For best food safety practices, many chefs recommend cooking stuffing separately.
- Basting: To Baste or Not to Baste? Basting the turkey periodically with pan juices or broth is a classic tradition. While it can help promote a beautifully golden-brown skin, many experts argue it doesn’t actually contribute to the turkey’s juiciness. Opening the oven frequently to baste can cause the oven temperature to drop, extending the cooking time. If you desire crisp skin, limit basting or apply butter/oil generously at the beginning.
- Resting is Crucial: Once your turkey reaches the target internal temperature, remove it from the oven, tent it loosely with foil, and let it rest for at least 20-30 minutes (for smaller birds) up to an hour (for larger birds). This vital step allows the juices to redistribute throughout the meat, ensuring a truly moist and tender turkey. If you cut into it too soon, those delicious juices will simply run out onto your carving board.
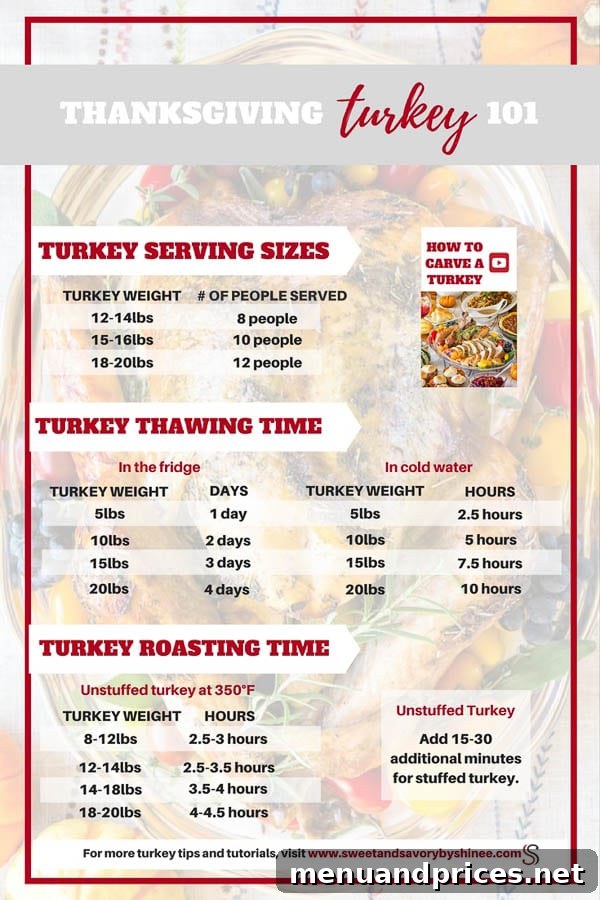
Below, you’ll find a handy cheatsheet with specific guidelines, broken down by weight, to help you plan your roasting time more precisely. Remember, these are estimates; your oven, the initial temperature of your turkey, and whether it’s stuffed will all affect the actual cooking duration.
How to Carve a Turkey? Presenting Your Masterpiece
After all the effort you’ve put into selecting, preparing, and roasting your turkey, the final presentation often comes down to carving. Carving a turkey doesn’t have to be intimidating; with a sharp knife and a bit of practice, you can elegantly transform your roasted bird into perfectly portioned slices. Remember, patience is key – ensure the turkey has rested adequately before you begin.
- The Essential Resting Period: Begin carving only after the turkey has rested for at least 30 minutes, or even up to an hour for larger birds. As mentioned, this allows the juices to redistribute, ensuring every slice is as moist and flavorful as possible. Don’t skip this step!
- Gather Your Tools: You’ll need a very sharp carving knife (an electric knife can also be useful), a sturdy carving fork to hold the turkey steady, and a large cutting board, preferably one with a well to catch any juices.
- Step-by-Step Carving Guide:
- Remove the Legs and Thighs:
- Place the turkey on your cutting board. Locate where the thigh connects to the breast.
- Using your sharp knife, carefully cut through the skin between the leg and the breast. Push the leg down and away from the body towards the counter. You’ll feel and possibly hear a “pop” as the hip joint separates.
- Once separated, simply cut through the remaining connective tissue to detach the entire leg-thigh quarter from the body. Repeat on the other side.
- To separate the drumstick from the thigh, locate the joint connecting them. Carefully cut through the skin and then gently push the drumstick away from the thigh. You’ll again hear a “pop” as the joint gives way. Cut through the joint.
- To debone the thigh (optional, for easier eating), make a cut along one side of the thigh bone, then another cut along the other side, following the bone’s curve, to remove it cleanly. Slice the thigh meat against the grain.
- Remove the Wings:
- Locate the wing joint where it attaches to the breast. Cut through the joint to remove the entire wing. You can then separate the drumette and flat sections if desired.
- Carve the Breast Meat:
- Once the legs, thighs, and wings are removed, you have clear access to the breast meat.
- Make a long, deep cut parallel to the breastbone (sternum), starting at the top and going all the way down to the bottom.
- Then, starting from the outside edge of the breast, make horizontal slices, following the natural curve of the rib cage. As you slice, gently pull the meat away from the bone with your carving fork or free hand. Continue slicing until all the breast meat is removed from one side. Repeat on the other side.
- Remove the Legs and Thighs:
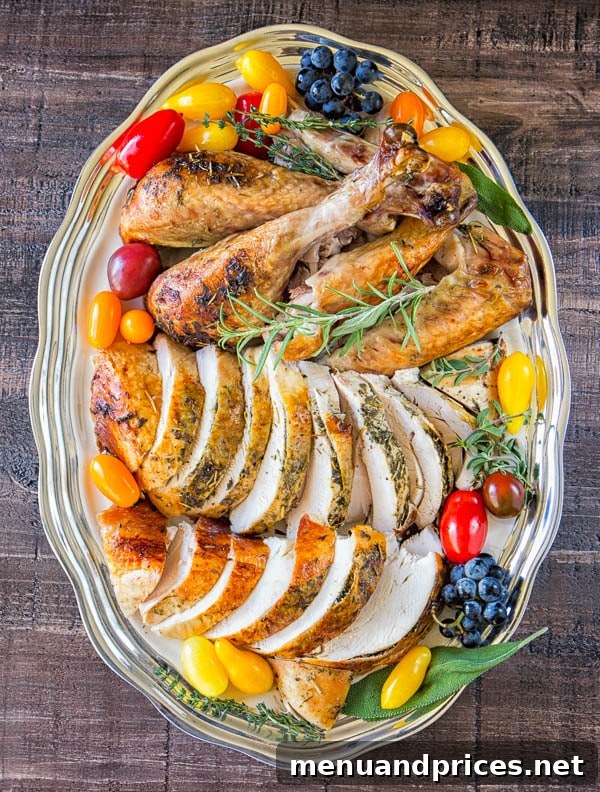
- Arranging and Serving: Arrange the beautifully carved slices of breast meat, drumsticks, and deboned thigh pieces on a warm platter. Garnish with fresh herbs, like rosemary or thyme, for an inviting presentation. Don’t forget to spoon any accumulated pan juices or gravy over the meat to keep it moist and add extra flavor.
With these techniques, you’ll be able to serve your turkey with confidence and flair, impressing your guests with both your culinary skills and your carving prowess.
Making the Most of Leftovers: The Gift That Keeps on Giving
One of the best traditions of Thanksgiving is the abundance of delicious leftovers. Don’t let a single savory morsel go to waste! Proper storage and creative culinary ideas will ensure you enjoy the fruits of your labor long after the holiday meal has ended.
- Proper Storage is Key:
- Cool your turkey and any accompanying dishes as quickly as possible (within two hours of serving).
- Carve any remaining meat off the bones and store it in airtight containers in the refrigerator.
- For maximum freshness, consume refrigerated leftovers within 3-4 days.
- Consider freezing portions of turkey meat or broth for longer storage (up to several months).
- Creative Leftover Ideas:
- Turkey Sandwiches: The quintessential leftover meal! Layer slices of turkey with cranberry sauce, stuffing, and gravy between bread.
- Turkey Soup: Don’t discard the carcass! Simmer it with vegetables and herbs to make a rich turkey broth, then add leftover turkey meat and vegetables for a comforting soup.
- Turkey Pot Pie: Combine diced turkey with leftover vegetables and gravy under a flaky pastry crust for a hearty meal.
- Turkey Hash: Sauté chopped turkey with potatoes, onions, and bell peppers for a delicious breakfast or brunch.
- Turkey Tacos or Enchiladas: Shredded turkey works wonderfully as a filling for Mexican-inspired dishes.
Embrace the versatility of your Thanksgiving turkey by transforming it into new and exciting meals, extending the holiday cheer and reducing food waste.
And finally, to help you keep all these essential tips at your fingertips, here’s a quick cheatsheet for you to reference back on details. This comprehensive guide covers everything from turkey size to roasting times and thawing specifics. Or you can download it right here for easy access: Turkey 101 Cheatsheet.
We hope this in-depth guide provides you with the confidence and knowledge to prepare a truly spectacular Thanksgiving turkey this year. May your holiday feast be filled with joy, delicious food, and cherished memories. If you have any further turkey questions, expert tips of your own, or need specific advice, please don’t hesitate to share them in the comments below. Happy Thanksgiving and happy cooking!