
For any avid baker or home cook, mastering the art of egg separation is a fundamental skill. Whether you’re aiming for sky-high meringues, velvety custards, or light-as-air soufflés, the ability to cleanly separate egg whites from yolks is paramount. While countless gadgets promise an easy solution, I’m here to share my tried-and-true method for separating eggs without any specialized tools, alongside invaluable tips to ensure a clean, efficient, and successful process every single time. Get ready to elevate your baking!
If you’ve followed my culinary journey for a while, you’ve likely noticed my deep appreciation for meringue-based desserts. From the airy elegance of an Angel food cake to the delicate crispness of French macarons and the classic charm of Pavlovas – these creations often demand impeccably separated egg whites. With a decade of dedicated baking under my belt, I’ve honed my skills in this seemingly simple yet crucial technique.
While the market offers a myriad of tools designed specifically for egg separation, I’ve always gravitated towards the most basic, yet highly effective, methods. My philosophy in the kitchen is simple: if a tool isn’t versatile or frequently used, it’s often more clutter than a convenience. This is why I rely on a technique that uses nothing more than the eggshell itself, proving that sometimes, the simplest approach is truly the best.
Why Egg Separation is Essential in Baking
Understanding the fundamental differences between egg whites and yolks is key to appreciating why separation is so important in many recipes. Egg whites are primarily composed of protein and water, making them ideal for whipping into stable foams that provide structure and lightness to dishes like meringues and soufflés. The proteins in egg whites denature and coagulate when whipped, trapping air to create volume and a delicate texture.
Egg yolks, on the other hand, are rich in fats, cholesterol, and lecithin – a powerful natural emulsifier. While essential for richness, flavor, and binding in custards, sauces like mayonnaise, and pasta dough, the fat content in yolks is the sworn enemy of whipped egg whites. Even a minuscule amount of yolk can prevent egg whites from achieving their desired volume and stability, making clean separation a non-negotiable step for many delicate recipes.
The Foolproof Shell-to-Shell Method
Among the most efficient and widely favored techniques for separating egg yolks and whites is the classic shell-to-shell method. This approach leverages the natural structure of the eggshell and a steady hand to meticulously separate the two components. It requires no special equipment, just a bit of practice and patience. Here’s a detailed, step-by-step guide to mastering this traditional technique:
- Prepare Your Workspace with Three Bowls: Before you even touch an egg, set yourself up for success. You will need one small, individual bowl specifically for cracking each egg and initial separation. Alongside this, prepare two larger, impeccably clean bowls: one designated for collecting all your egg whites and the other for your egg yolks. This “three-bowl system” is a crucial precautionary measure. Should a yolk accidentally break during separation, only the egg in the small bowl is compromised, preventing contamination of an entire batch of whites.
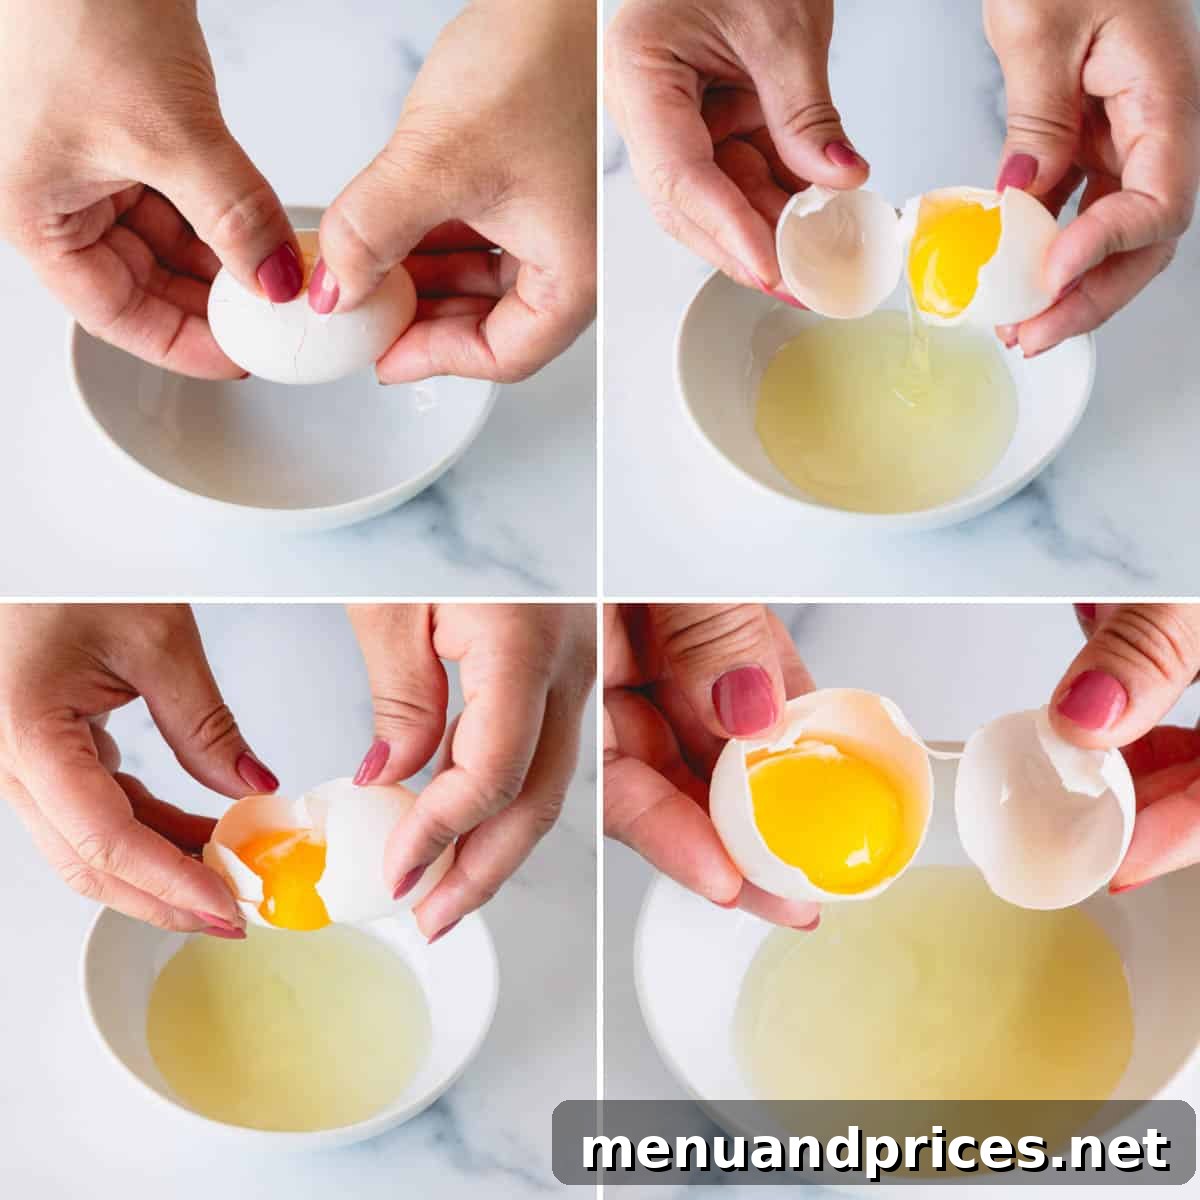
- Crack the Egg with Precision: Begin by cracking the egg on a flat, even surface, such as your countertop. Avoid cracking it on the edge of a bowl or counter, as this can push shell fragments inwards, making them more difficult to remove. Aim for a clean, swift crack across the middle of the egg. Maintaining a steady hand is crucial here to prevent any shell fragments from falling into the egg’s contents, and to ensure the yolk remains intact.
- Gently Open and Drain Over the Small Bowl: Holding the cracked egg halves over your small, individual bowl, carefully open them apart. Allow the egg white to begin flowing out of the shell, naturally clinging to the yolk in one of the shell halves. The majority of the albumen (egg white) will drip away quickly at this stage, while the yolk remains cradled within the shell.
- Transfer the Yolk Between Shell Halves: Once the initial rush of egg white has drained, gently transfer the yolk back and forth between the two shell halves. Each transfer allows more of the egg white, which tends to adhere to the yolk, to drip into the bowl below. Perform this gentle transfer a few times. You’ll notice the egg white becoming thinner and separating more easily with each pass. Continue until you are confident that virtually all the egg white has been separated from the yolk.
- Deposit into Designated Bowls: Once thoroughly separated, carefully tip the clean egg white into your collective egg white bowl and the intact yolk into your collective egg yolk bowl. Repeat this entire process for each egg you need to separate, using the small individual bowl for each new egg to maintain maximum cleanliness and prevent cross-contamination.
Does a Drop of Egg Yolk Truly Ruin a Meringue? Understanding the Science
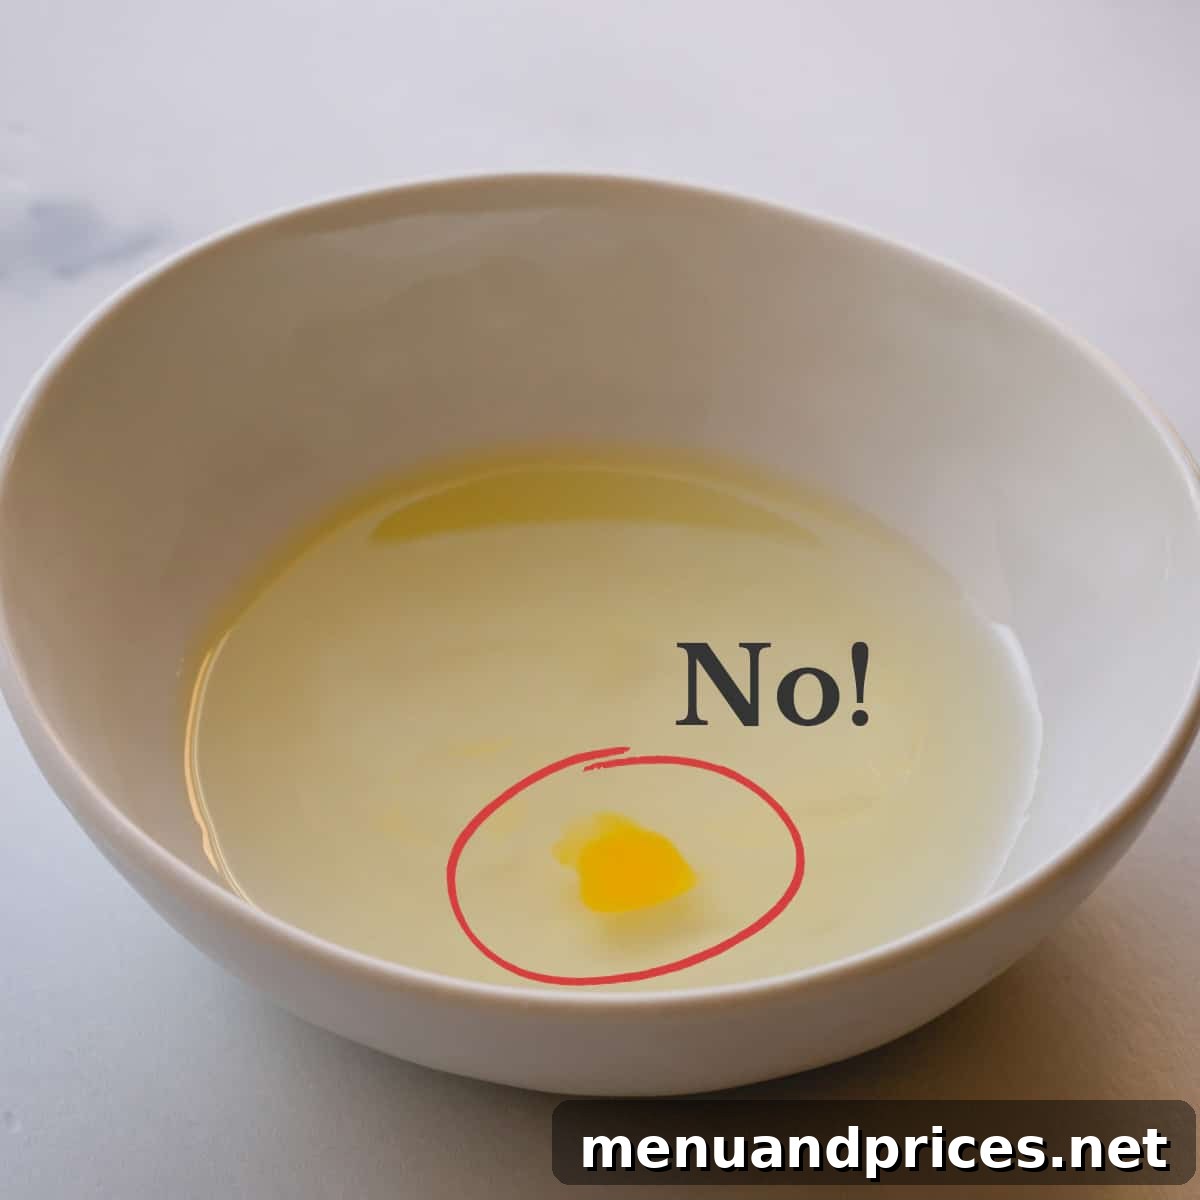
The culinary lore surrounding egg yolk contamination in egg whites, particularly when making meringues, often sounds like an absolute decree: “One drop and it’s ruined!” While it’s true that egg yolks contain fat, and fat is detrimental to the whipping process of egg whites, the reality is a bit more nuanced and often depends on the specific application and the ratio of whites to the contaminating fat.
Here’s the science: Egg whites are primarily proteins and water. When whipped, these proteins unfold and create a network that traps air, forming a stable foam. Fats, however, interfere with this protein network formation. They coat the proteins, preventing them from interacting with each other and stabilizing the air bubbles. This inhibition results in whites that won’t whip to stiff peaks, leading to a loose, unstable, and ultimately failed meringue.
While I always advocate for the utmost care to avoid any contamination, the impact of a tiny amount of yolk is truly about the ratio. Consider a delicate macaron recipe that calls for just two egg whites. In such a small batch, even a single, minute drop of egg yolk can significantly impede the whites from achieving the precise stiff peaks required for the macaronage technique. The margin for error is extremely slim.
However, if you’re preparing a grand Angel Food Cake that requires a dozen or more egg whites, a truly tiny, pinprick-sized drop of egg yolk may not have a catastrophic impact. The sheer volume of uncontaminated egg white can often overpower and dilute the small amount of fat, allowing the proteins to still form a stable foam, albeit perhaps with slightly less volume or a longer whipping time. I’ll admit, in moments of slight imperfection, I’ve meticulously scooped out a tiny drop of yolk from a large batch of whites and still achieved a perfectly respectable meringue. Nevertheless, when in doubt, it’s always safer to err on the side of caution. If significant contamination occurs, it’s best to discard the whites and start fresh, especially for critical recipes.
Essential Tips for Flawless Egg Separation Every Time
Beyond the technique itself, there are several crucial practices that can significantly enhance your success rate when separating eggs. Incorporating these tips into your routine will make the process smoother, cleaner, and virtually foolproof.
- Separate Cold Eggs for Optimal Results: This is a golden rule for easy separation. Egg yolks are much firmer and less prone to breaking when they are cold, straight from the refrigerator. Their membranes are stronger, making them less likely to rupture during the cracking and transferring process. While it’s best to separate cold eggs, remember that egg whites whip best at room temperature. So, separate your eggs when cold, then cover the whites and let them sit on the counter for 20-30 minutes before whipping to achieve maximum volume.
- Always Use the Three-Bowl System: Your Insurance Policy: As mentioned in the step-by-step guide, this is a non-negotiable for separating multiple eggs. Have one small, dedicated bowl for the initial crack and separation of each individual egg. Then, two larger, separate bowls for collecting the uncontaminated egg whites and yolks. This precautionary measure is invaluable: if a yolk accidentally breaks during separation, only that single egg in the small bowl is compromised, and it won’t contaminate all the precious egg whites you’ve already collected. This saves time, ingredients, and frustration.
- Crack the Egg on a Flat Surface, Not an Edge: This might seem like a minor detail, but it makes a significant difference. Cracking an egg on a flat countertop creates a cleaner break, reducing the chances of tiny, sharp shell fragments getting pushed into the egg’s interior. When you crack an egg on the edge of a bowl or counter, the shell can shatter unevenly, creating jagged edges that are more likely to break the yolk or fall into the whites. If a small fragment does get in, use another clean piece of shell or a damp finger to gently scoop it out – it often attracts to the shell.
- Ensure Spotlessly Clean Bowls and Utensils for Egg Whites: This tip is absolutely critical for successful meringue and anything requiring whipped whites. Any residual grease or oil, even from previous use or faint fingerprints, can completely destabilize egg whites and prevent them from whipping up properly. Glass or stainless steel bowls are the best choices for collecting and whipping egg whites. I strongly recommend staying away from plastic containers for storing or whipping egg whites because plastic is porous. It can retain invisible layers of residual grease and oil within its microscopic cuts and scratches, which can then leach into your egg whites and ruin their ability to foam. Always wash your bowls and beaters thoroughly with hot, soapy water, rinse them well, and wipe them with a paper towel dampened with a bit of vinegar or lemon juice to ensure they are absolutely pristine.
- Clean Hands are Essential: If you’re using your hands at any point (even for removing a shell fragment), ensure they are thoroughly washed with soap and water. Any oils or residues on your skin can also interfere with the egg whites.
Exploring Other Egg Separation Methods
While the shell-to-shell technique is my preferred method for its simplicity and effectiveness, it’s worth noting other approaches for completeness. Each has its pros and cons, and personal preference often plays a role.
The Hand Method: Simple but Messy
Another very basic way to separate egg whites from yolks involves cracking an egg directly into your clean hand and letting the egg whites drip between your fingers into a bowl below. The yolk is then left intact in your palm. While incredibly simple and requiring no tools, this process can be quite messy, and some people are uncomfortable with direct hand contact with raw eggs. It also carries a higher risk of transferring oils from your skin to the whites if your hands aren’t immaculately clean.
The Water Bottle Method: A Clever Gadget Alternative
This somewhat viral kitchen hack involves cracking an egg into a bowl, then gently squeezing an empty, clean plastic water bottle, placing its opening over the yolk, and releasing the squeeze. The suction created by the bottle effectively draws the yolk up into the bottle, leaving the whites behind. This method can be fun and keeps your hands clean, but it can be a bit finicky to master. It might also struggle with very large or very small yolks, and it still requires clean bowls for collection.
Specialized Egg Separators: Single-Use Convenience
Many gadgets on the market are designed solely for egg separation. These range from simple slotted spoons that allow whites to drain, to more elaborate plastic or metal devices with built-in cradles for yolks. While they can be effective, they are often single-use tools that take up drawer space. My philosophy leans towards minimal kitchen clutter, favoring techniques that utilize existing tools or no tools at all, especially when the basic methods are so reliable.
Storing Separated Eggs and Making the Most of Leftovers
Once you’ve successfully separated your eggs, proper storage is key to maintaining their freshness and ensuring they’re ready for their next culinary role. Don’t let those valuable components go to waste!
Storing Raw Egg Whites
Raw egg whites can be stored in an airtight container in the refrigerator for up to 3 days. Ensure the container is impeccably clean, as any residual fat can degrade their quality. For longer storage, raw egg whites freeze exceptionally well. Simply transfer them to an airtight, freezer-safe container or freezer bags, labeling with the date and the number of whites. They can be frozen for up to 3 months. Thaw them overnight in the refrigerator before use; they might be slightly thinner but will still whip beautifully for most applications.
Storing Raw Egg Yolks
Raw egg yolks are a bit more delicate due to their fat content. Store them in an airtight container in the refrigerator for up to 2 days. To prevent them from drying out or forming a film on top, you can cover them with a tiny amount of water (about 1/2 teaspoon per yolk) or a light layer of plastic wrap pressed directly onto their surface. Drain off any water before use. Freezing yolks is possible, but they benefit from a small amount of salt or sugar (1/8 teaspoon per 4 yolks, depending on whether they’re for savory or sweet dishes) to prevent them from becoming gelatinous upon thawing.
Creative Uses for Leftover Egg Yolks
Never discard leftover yolks! They are incredibly versatile:
- Custards & Crème Brûlée: The richness of yolks is essential for these creamy desserts.
- Lemon Curd: A vibrant and tangy spread that relies heavily on egg yolks for its luscious texture.
- Hollandaise or Béarnaise Sauce: Classic emulsified sauces that are yolk-based.
- Pasta Dough: Incorporating yolks into fresh pasta dough enriches its flavor and color.
- Enriching Soups & Sauces: Whisk a yolk with a bit of cream and temper it into hot soups or sauces for a velvety finish.
Creative Uses for Leftover Egg Whites
Leftover whites are perfect for numerous light and airy creations:
- Meringues: From delicate cookies to pie toppings and Pavlova bases.
- Angel Food Cake: A classic that uses a large quantity of egg whites for its signature airy texture.
- Macarons: These delicate French cookies are famously made with almond flour and egg whites.
- Financiers: Small French almond cakes that use browned butter and egg whites.
- Royal Icing: Perfect for decorating cookies and cakes.
- Cocktails: Add a foamy, silky texture to drinks like a Whiskey Sour or Pisco Sour.
- Egg White Omelets/Scrambles: A lighter, protein-packed breakfast option.
Frequently Asked Questions About Egg Separation
Yes, absolutely! It is significantly easier to separate eggs when they are cold, directly from the refrigerator. The yolk membrane is firmer and less elastic when chilled, making the yolk less likely to break during the cracking and transferring process. Once separated, if your recipe calls for room temperature egg whites (as most meringue-based recipes do), simply let them sit on the counter in a clean bowl for 20-30 minutes to warm up before whipping.
The “slotted spoon egg hack” involves cracking an egg directly over a slotted spoon, allowing the thinner egg white to drip through the holes while the yolk remains cradled in the spoon. While this method can be effective, it might become quite time-consuming, especially if you’re working with a large number of eggs. Egg whites, particularly the thicker albumen, are not always as liquid as water and may not drip through the holes as easily or quickly as one might expect, often requiring a bit of shaking or wiggling.
The finger method, also known as the hand method, involves cracking an egg into your clean, cupped hand and letting the egg whites naturally slip and drip between your fingers into a bowl below. The intact yolk remains in your palm. While effective and requiring no special tools, many find this process quite messy and prefer to avoid direct contact with raw egg, especially due to potential for bacterial contamination or transferring oils from skin. Always ensure your hands are scrupulously clean if you use this method.
Yes, an egg with a blood spot is perfectly safe to eat. A blood spot, often a small red or brown speck on the yolk, is simply a ruptured blood vessel that occurred during the egg’s formation. It’s a natural occurrence and poses no health risk. As someone who frequently uses farm eggs, I encounter blood spots quite often. If you find one, simply remove it with the tip of a paring knife or a spoon if desired, and proceed with your recipe. It has no impact on the egg’s flavor or nutritional value. You can learn more about this from reliable sources like Nellie’s Free Range.
If you only have two bowls, you can still manage, but with extra caution. Use one bowl to crack and separate each egg, then carefully pour the clean white into the second, larger bowl (your collective whites bowl). For the yolk, you would need to quickly transfer it to a small plate or another temporary clean surface before cracking the next egg into the first bowl. This is less ideal than the three-bowl system, as it increases the risk of yolk breaking and contaminating your collected whites, but it’s a workable solution in a pinch.
Mastering egg separation is a foundational skill that unlocks a world of delicate and delicious culinary possibilities. By understanding the simple shell-to-shell technique and incorporating the essential tips for success – such as working with cold eggs, using the three-bowl system, and ensuring spotless equipment – you can achieve perfectly separated whites and yolks every time, without relying on single-use gadgets. Embrace this fundamental technique, and watch as your meringues reach new heights and your custards achieve unparalleled richness. Happy baking!