
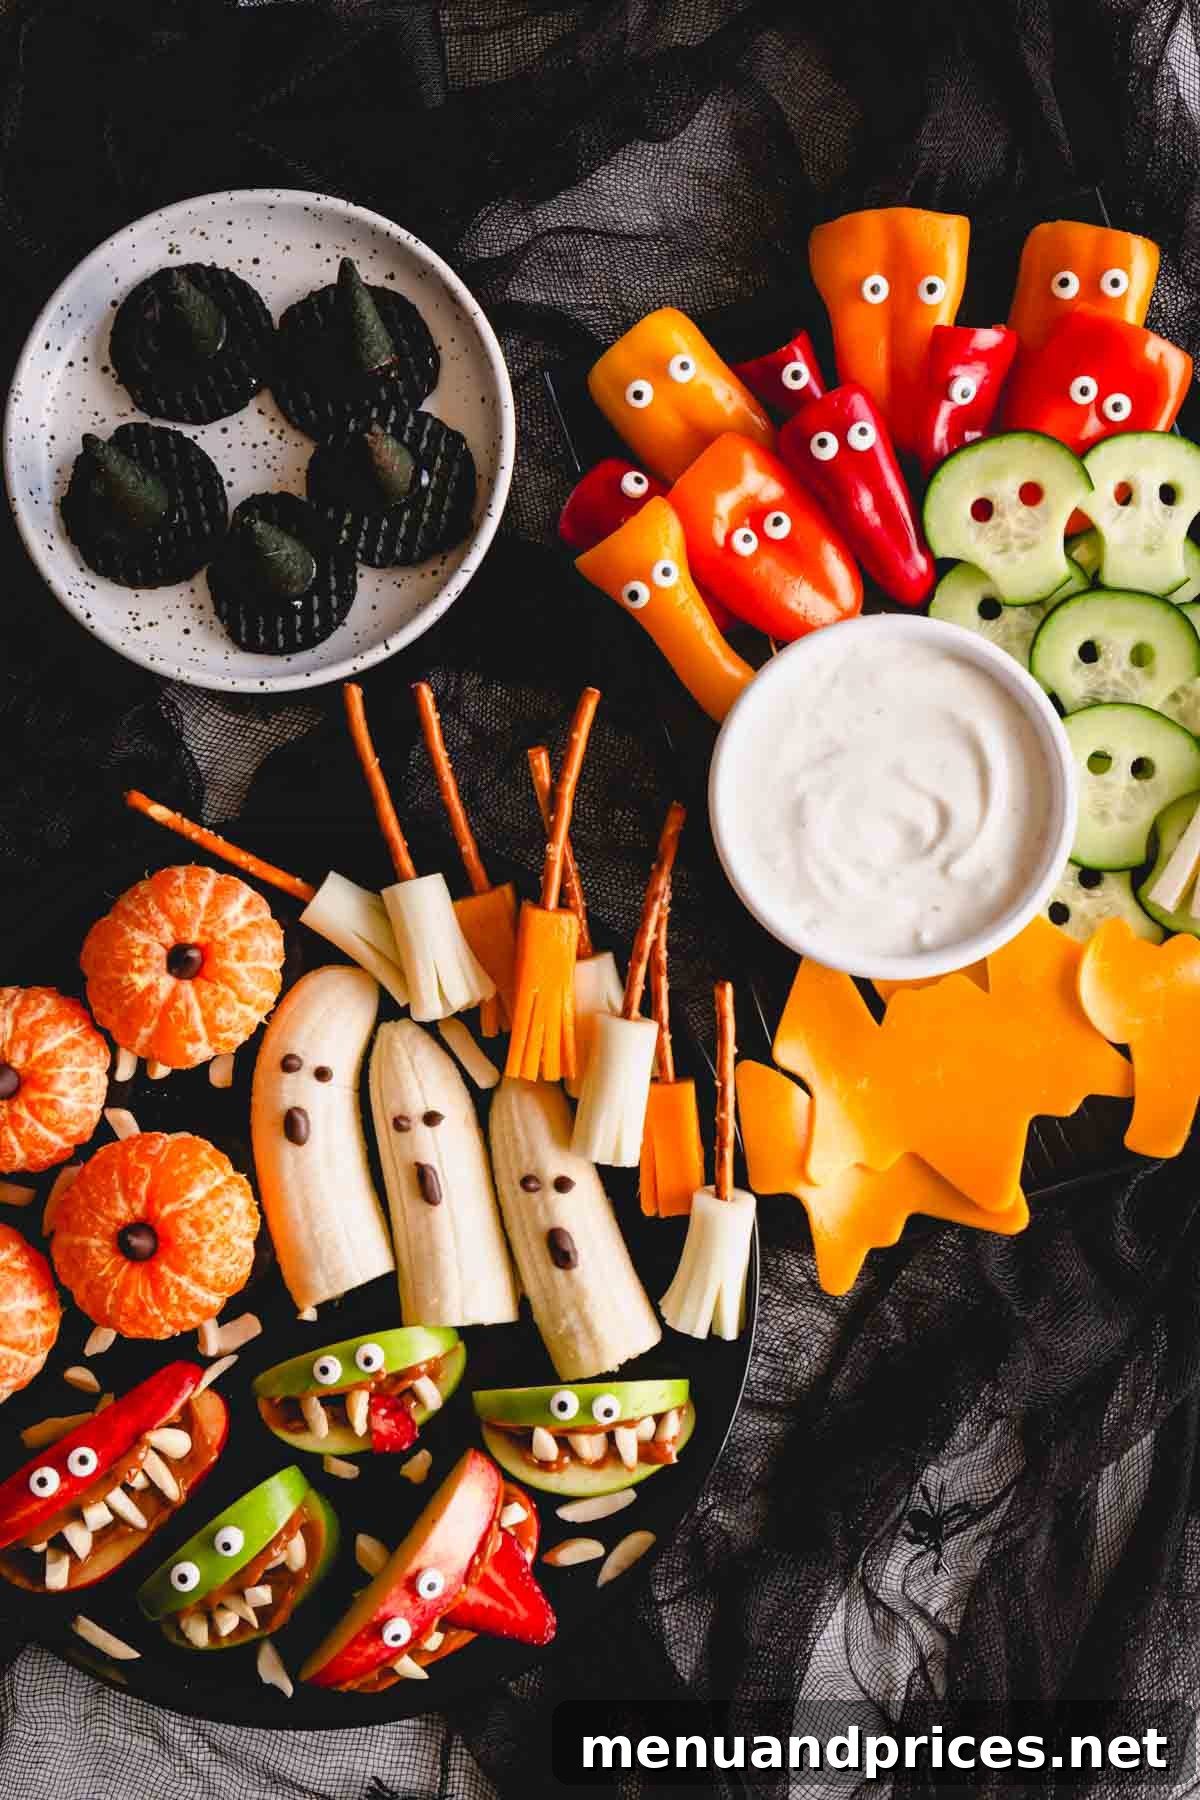
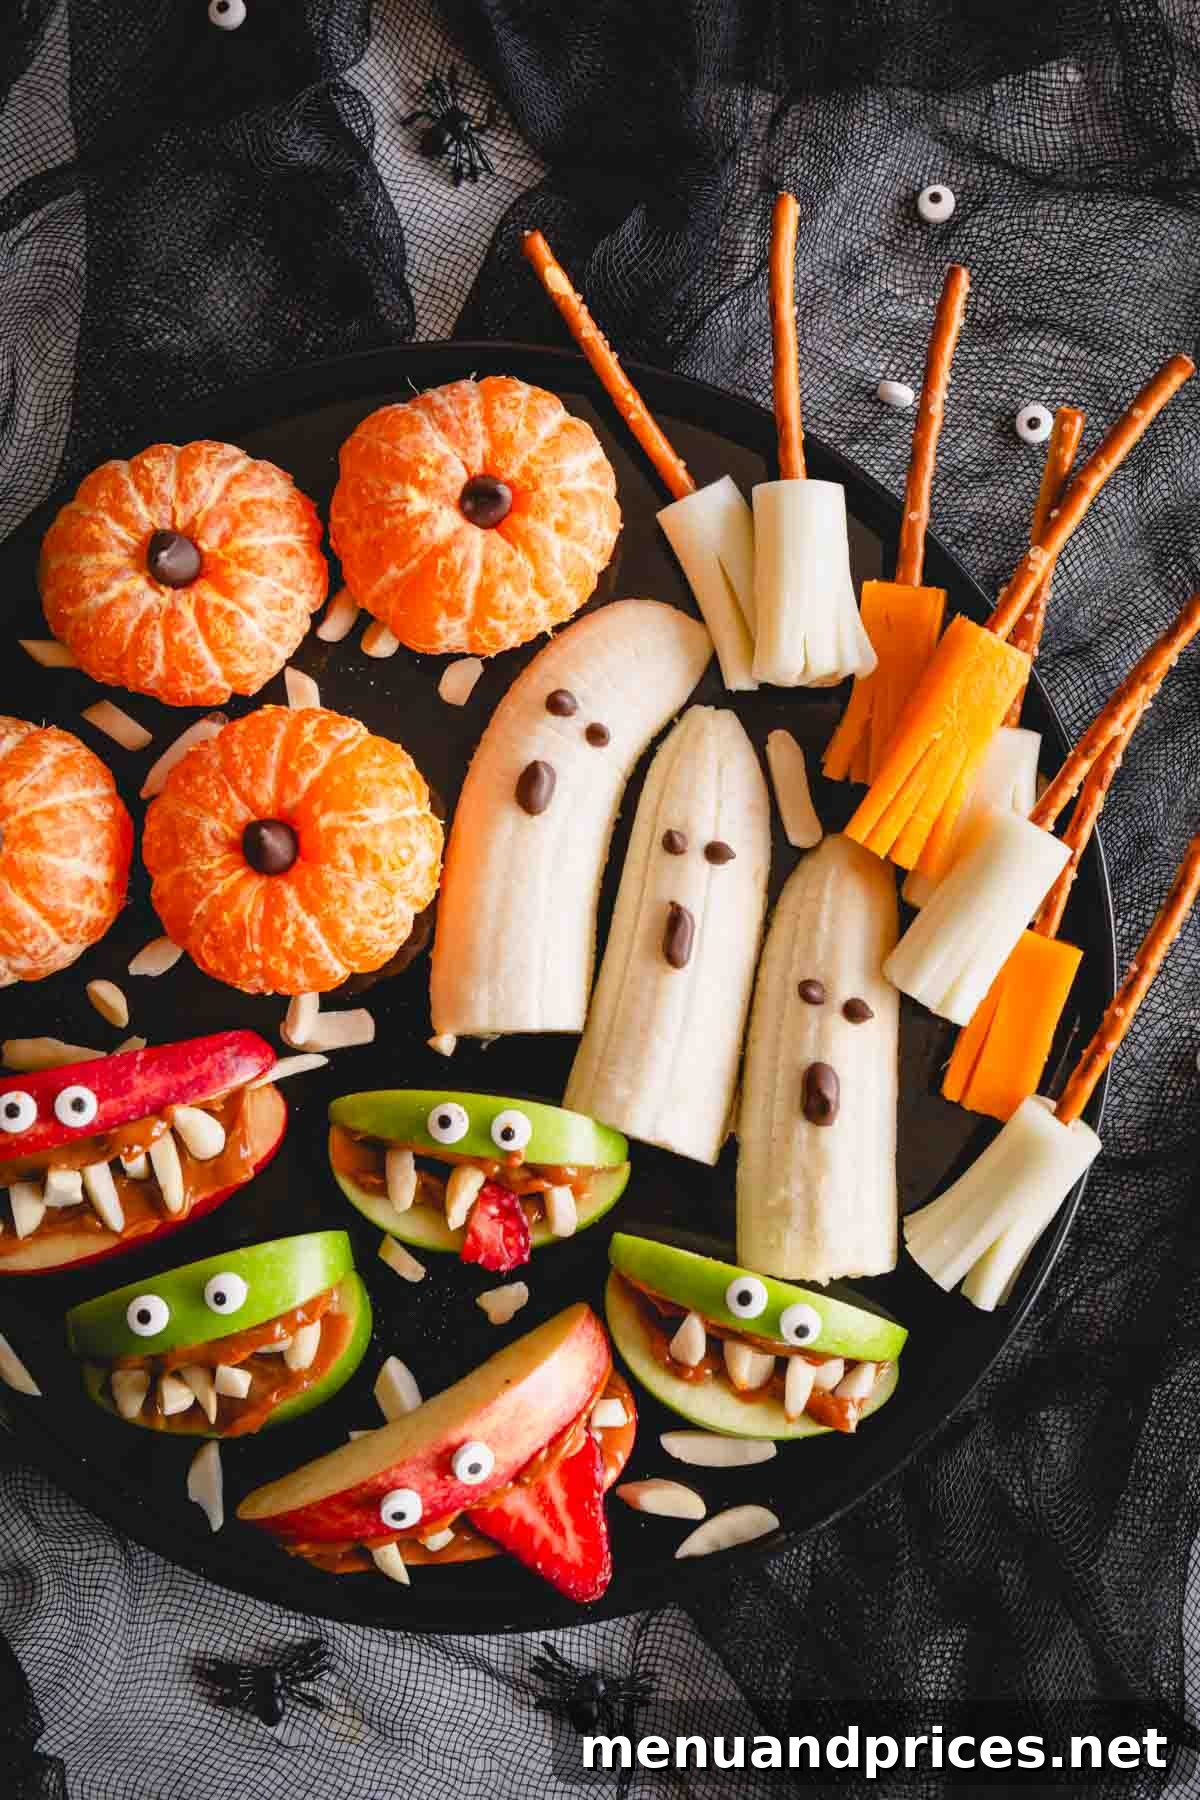
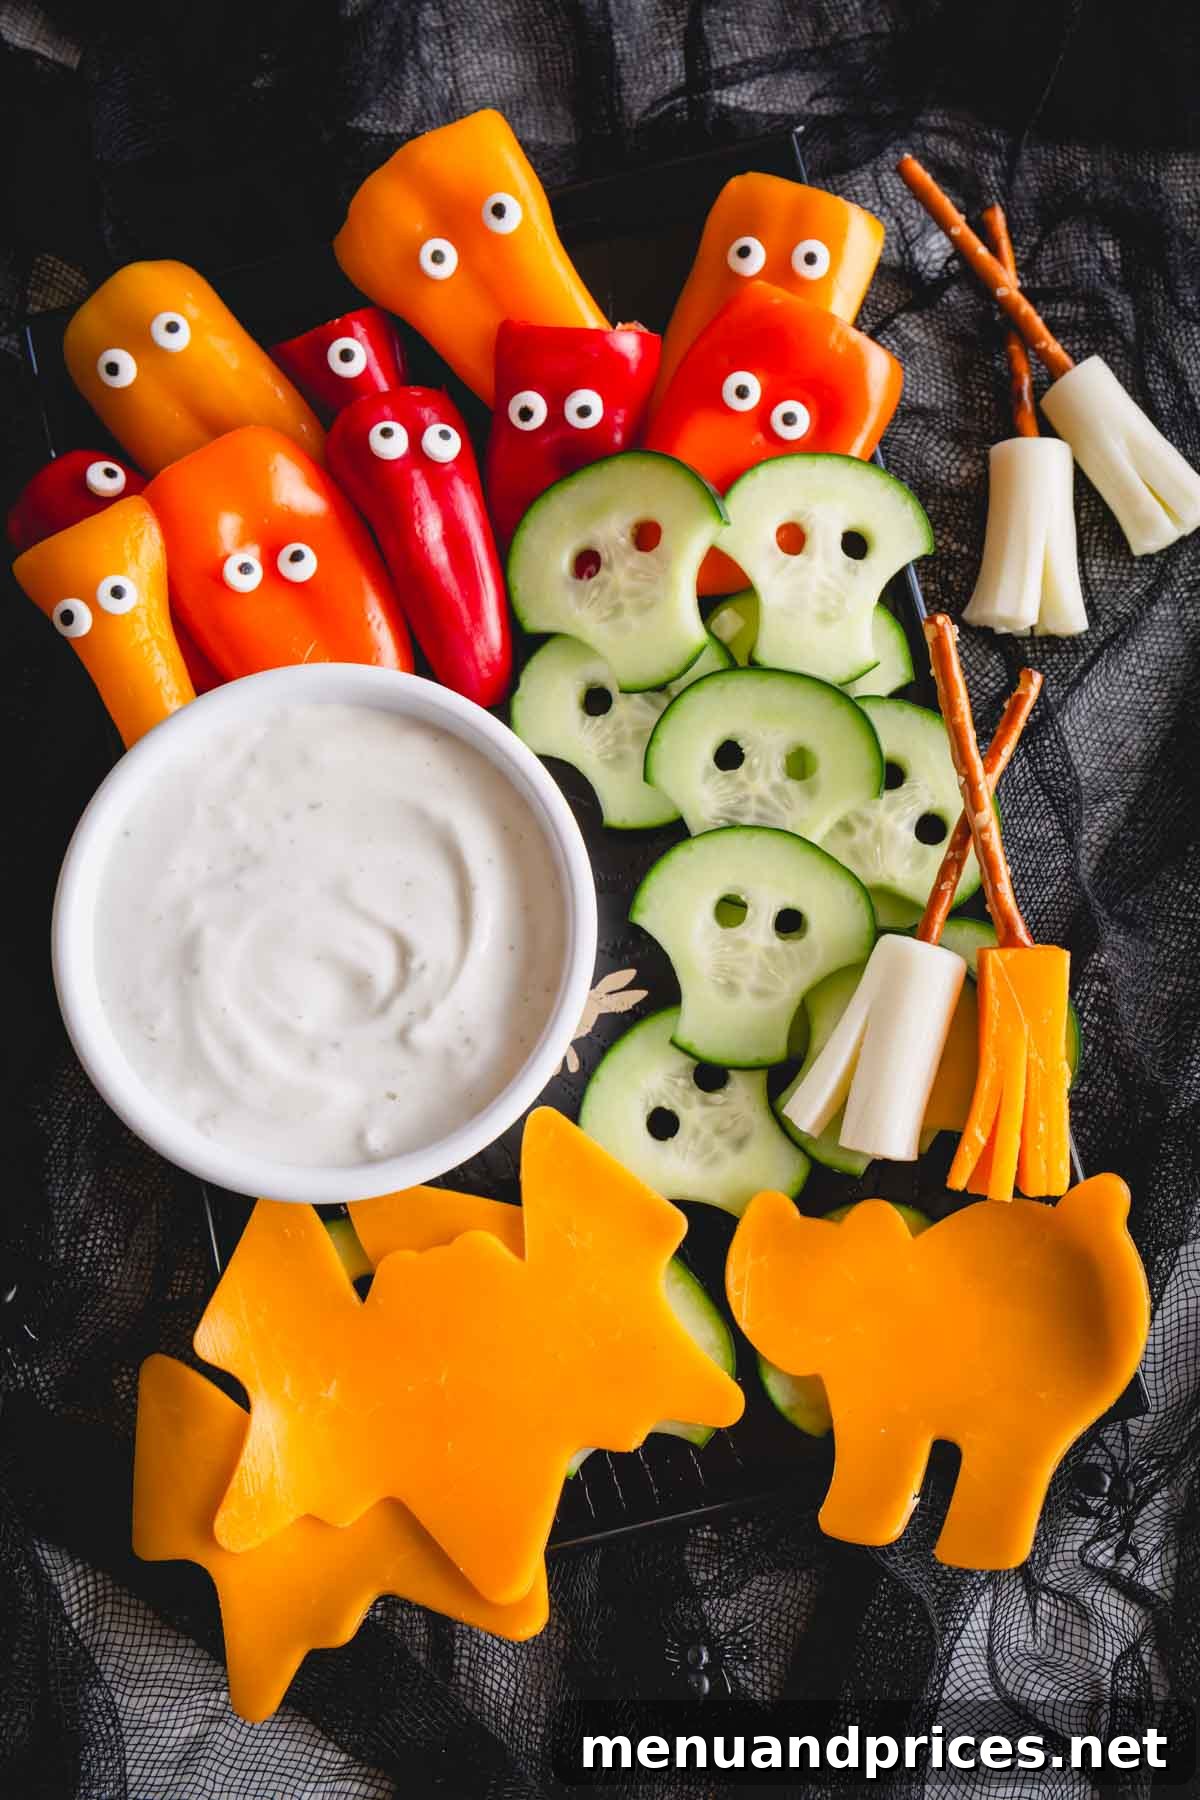
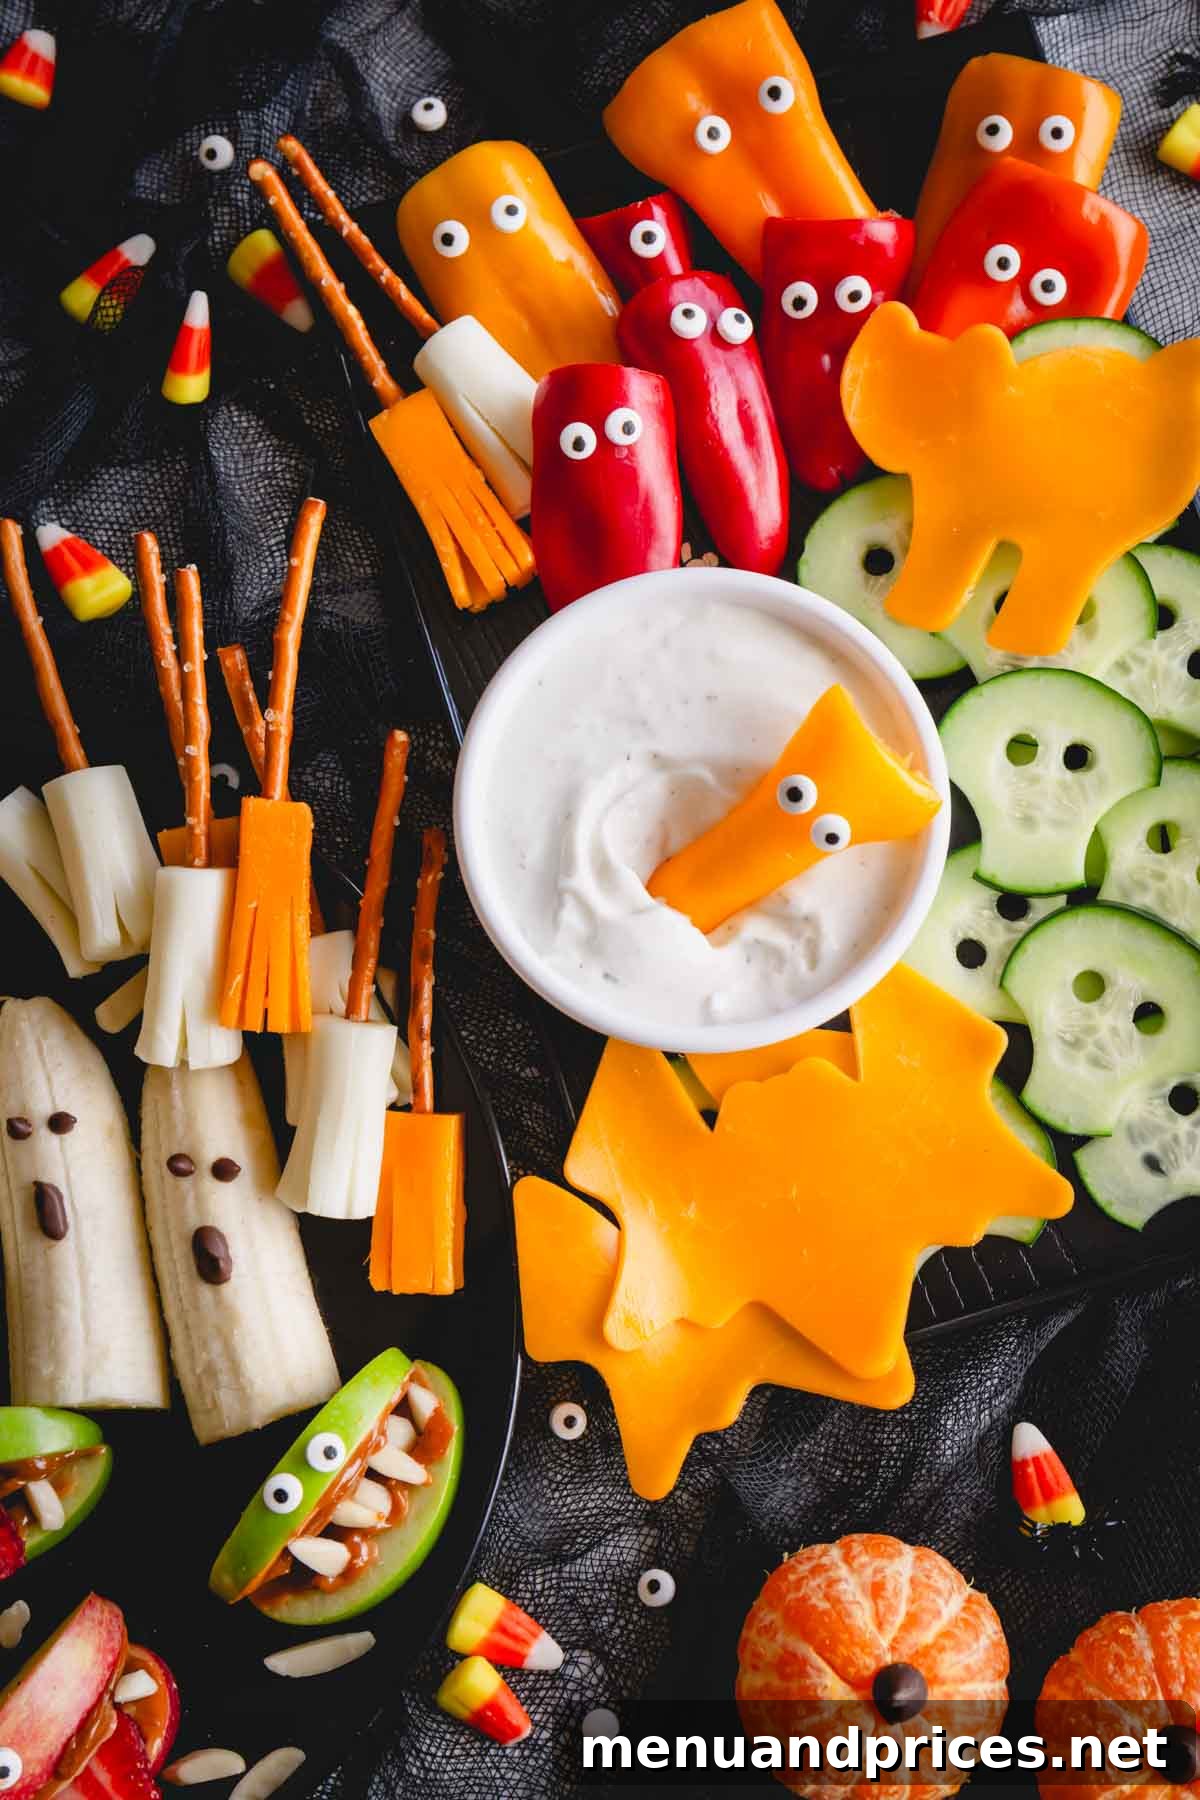
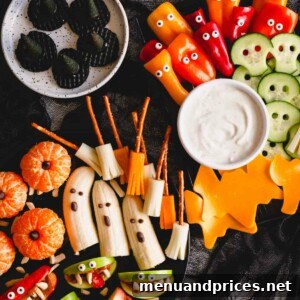
Get ready for a hauntingly good time with these spook-tacular healthy Halloween snacks! Perfect for school Halloween parties, festive playdates, or simply a fun after-school treat, this snack board features delightful ghost-nanas, vibrant orange pumpkins, crunchy apple monster mouths, savory broomsticks, and eerie cucumber skulls. Each item is designed to be healthy, fun, and utterly irresistible, offering a fantastic balance to the usual sugary onslaught of the season.
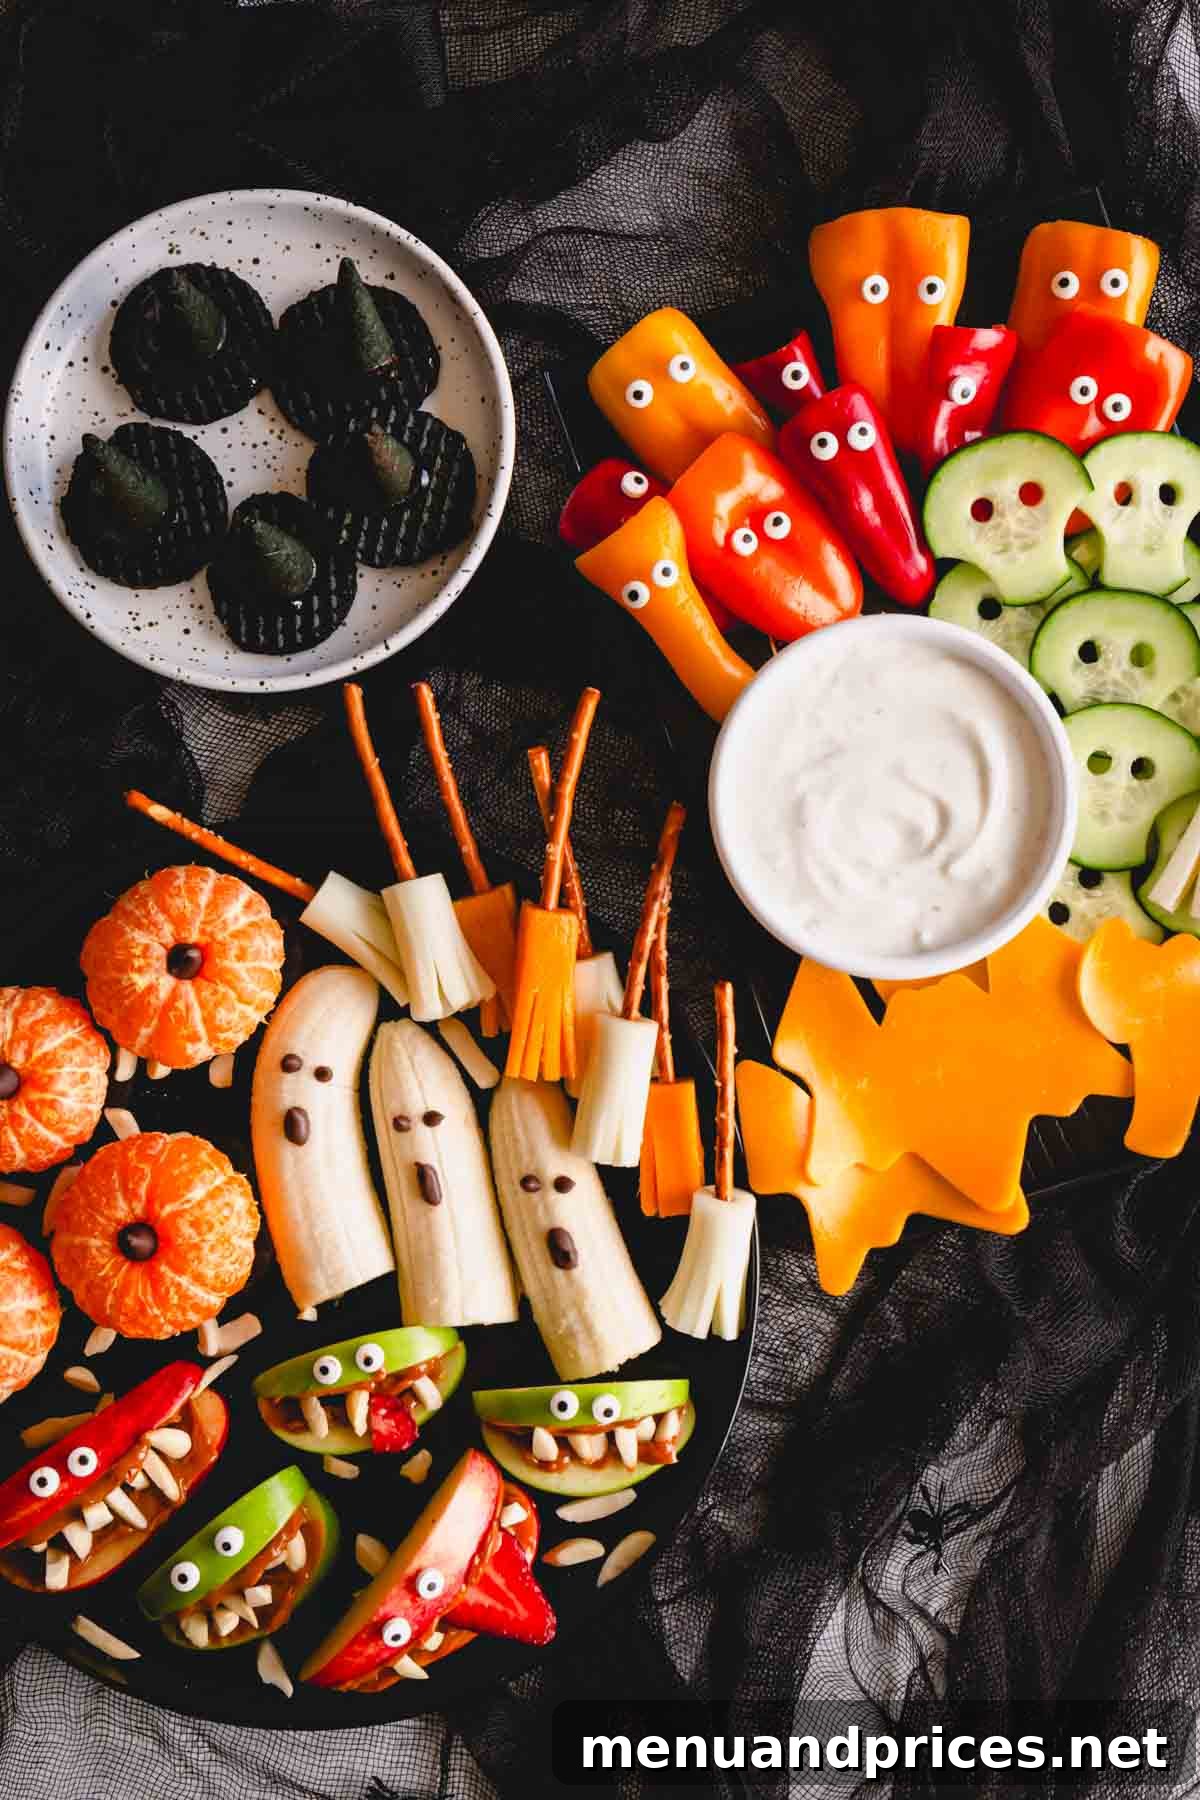
Why You’ll Love This Spook-tacular Snack Board:
Halloween often brings a tidal wave of sugary treats, and while a little indulgence is fine, it’s wonderful to offer children exciting, nutritious alternatives. This healthy Halloween snack board is designed to be a vibrant centerpiece that competes with, and often wins against, the allure of pure candy!
Your kids might typically turn up their noses at plain fruit and veggies, but transform them into apple monster mouths, cheesy broomsticks, and cucumber skulls, and watch them disappear! This board is a proven hit, even with the pickiest eaters!
- Fun & Healthy: These Halloween-themed snacks are a brilliant way to sneak in essential vitamins and fiber, making them ideal for school parties or a balanced snack time at home. It’s a fantastic strategy to curb excessive sugar intake while keeping the festive spirit alive.
- Effortlessly Easy: Crafting this delightful snack board takes less than 30 minutes! It’s a simple appetizer that looks incredibly impressive without requiring hours in the kitchen. Perfect for busy parents who want to add a touch of magic to Halloween.
- Spark Creativity: With a little imagination, ordinary fruits and vegetables become magical (and just a little bit spooky!) characters. This encourages kids to engage with their food in a playful way, potentially opening them up to trying new things.
- A Balanced Halloween: Providing these wholesome options helps children stay energized and avoid the dreaded sugar crash. It ensures they get valuable nutrients even amidst the excitement of trick-or-treating.
While the kids delight in their “cha-BOO-terie” board, don’t forget to prepare an epic charcuterie and cheese board for the grown-ups to enjoy!
Key Ingredient Notes for Your Spooky Creations:
Selecting the right ingredients is key to making your Halloween snack board both delicious and visually appealing. Here’s a detailed guide to ensure your treats are perfect.
For the Fruit Platter:
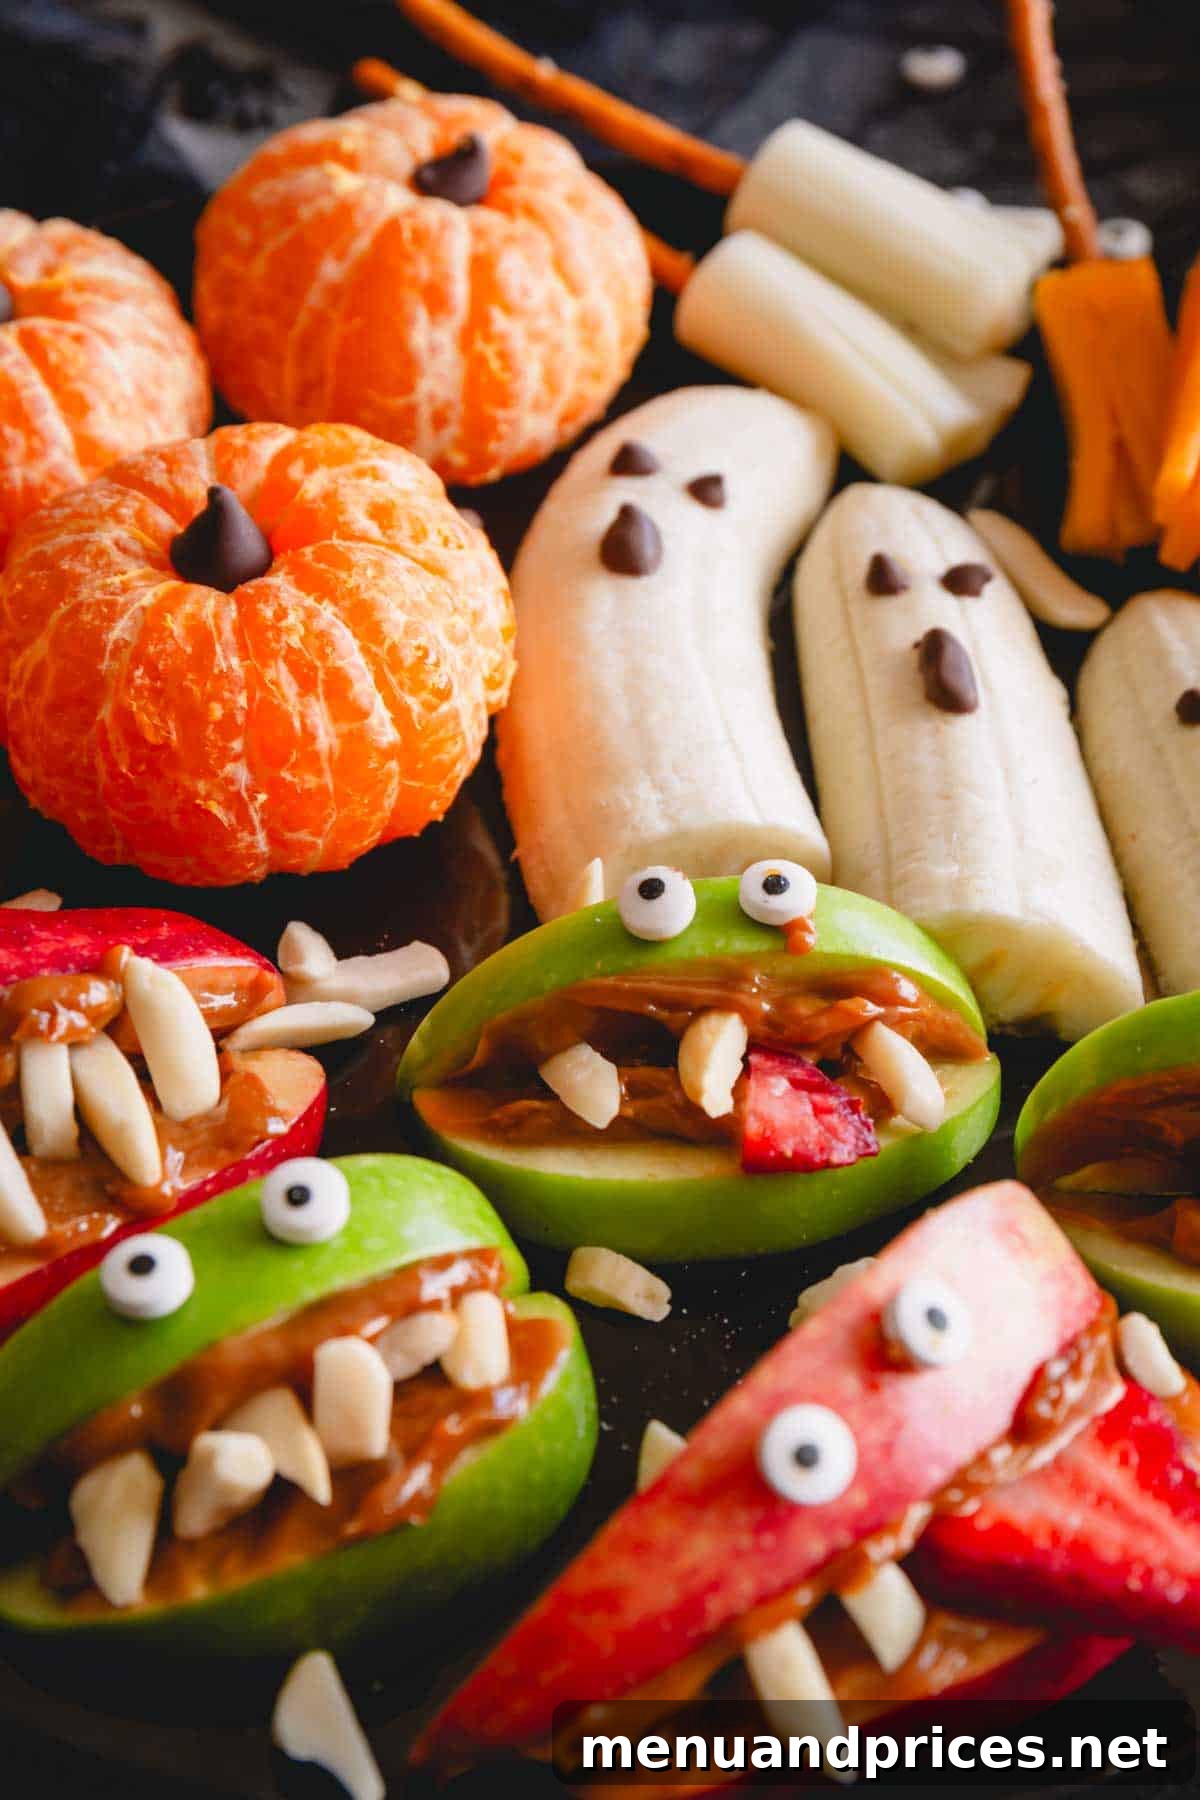
- Mandarin Oranges: Choose mini, easy-to-peel, and seedless varieties. Mandarins are ideal, but tangerines, clementines, or even “cuties” will work wonderfully as your adorable mini pumpkins. Their bright orange color naturally fits the Halloween theme.
- Mini Chocolate Chips: These are essential for adding the “stems” to your pumpkin oranges and creating the ghostly faces on your bananas. Both milk chocolate and semi-sweet chocolate chips are excellent choices.
- Bananas: Opt for just-ripened bananas that are firm and free of brown spots. Overly ripe bananas will be too soft and mushy to hold their ghost shape, and brown spots can detract from their ghostly white appearance.
- Apples: Large, crisp apples are best for creating those fearsome monster mouths. You can use green apples for a vibrant, Frankenstein-esque look, red apples for a blood-curdling effect, or a mix of both for added visual interest. Remember to slice them just before serving to prevent browning, or a quick dip in lemon water can help.
- Dulce de Leche, Caramel, or Peanut Butter: These sweet spreads act as a delicious “glue” for the monster teeth and candy eyes. Spread a generous layer on your apple slices. If you’re preparing this for a school party or daycare, be mindful of nut allergies and opt for a nut-free butter or stick to dulce de leche/caramel.
- Slivered Almonds: These form the spooky, jagged teeth of your apple monsters. For a nut-free option, mini marshmallows or sunflower seeds make excellent substitutes, providing a similar visual effect without the allergen.
- Candy Eyes: No monster is complete without a set of super scary or hilariously silly googly eyes! Experiment with one large eye in the center or a row of three smaller eyes for varied monster personalities. These instantly bring your fruit creations to life.
For the Dip:
- Cottage Cheese: This protein-rich ingredient forms the creamy, smooth base of your savory veggie dip. When blended, it transforms into a texture similar to mayonnaise or sour cream. For the creamiest consistency, full-fat cottage cheese is recommended, though any percentage will work.
- Ranch Dressing Mix: A powdered ranch dressing mix packet is your secret weapon for a quick and flavorful dip. It infuses the cottage cheese with that classic tangy, savory, garlic, and onion flavor profile that kids (and adults!) adore.
For the Veggie Platter:
- Cheese Sticks: Mozzarella string cheese is the top choice for crafting charming cheese broomsticks due to its flexibility. While cheddar cheese sticks can be used for variety, be aware that cheddar is less pliable and may break more easily when sliced into thin strips for the broom bristles.
- Pretzel Sticks: These serve as the perfect sturdy handles for your cheese broomsticks. Choose a robust brand, avoiding any labeled “extra thin” to ensure they don’t snap when inserted into the cheese.
- Cucumbers: Seedless varieties, such as English cucumbers, are highly recommended for their uniform texture and fewer interruptions from seeds. Leaving the skins on adds a lovely green contrast and extra nutrients.
- Sweet Peppers: Look for bags of mini sweet peppers in the produce section. These mild and slightly sweeter alternatives to bell peppers come in a variety of colors, adding vibrancy to your board and are perfect for creating phantom pepper faces.
- Cheddar Cheese Slices: Sandwich-sized slices of cheddar cheese are ideal for cutting out fun Halloween shapes using Halloween-themed cookie cutters. Orange cheddar or Colby Jack cheese are excellent choices for their festive color, which really pops on the platter.
Add Extra Spooky Surprises!
Don’t let any blank spaces haunt your snack board! Utilize any leftover veggies, fruits, or small snacks you have on hand to fill in gaps. Think baby carrots, grapes, small pretzels, or even a few decorative pieces of candy corn (if you’re embracing a touch of sugar!).
Key Equipment Notes:
- Halloween Cookie Cutters: Essential for transforming cheese slices into bats, pumpkins, witch hats, and black cats. Make sure your collection includes at least one bat shape for that classic Halloween silhouette!
- Blender: Any high-speed blender will effortlessly whip your cottage cheese into a smooth, creamy dip.
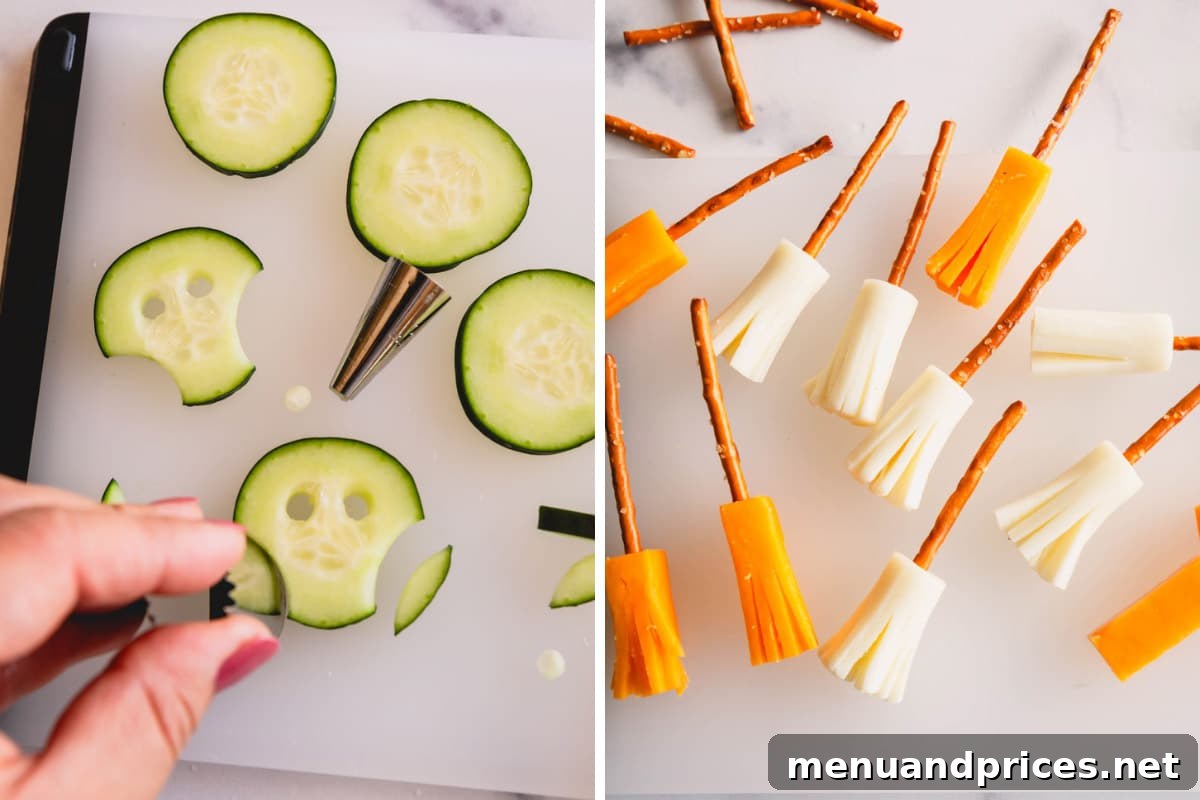
- Round Piping Tip: This small but mighty tool is surprisingly versatile. It’s perfect for precisely cutting out the “lower cheeks” and “eye sockets” of your cucumber skulls, adding an authentic eerie touch.
- Paring Knife: A sharp paring knife is indispensable for making clean, precise cuts, especially when creating the delicate broomstick bristles from cheese.
- Piping Bag (or Ziploc Bag): You’ll need an empty piping bag (or a sturdy Ziploc bag with a corner snipped off) for drawing faces on the banana ghosts with melted chocolate.
How to Make This Ghoulishly Good Halloween Snack Board:
Before you begin, gather all your ingredients and equipment. Having your cookie cutters, blender, piping tip, and an empty piping bag (or Ziploc bag) ready will streamline the process and make creating these spooky snacks a breeze!
How to Make Adorable Pumpkin Oranges:
- Peel the mandarin oranges carefully, ensuring all white pith is removed for a clean, bright orange surface.
- Place a single mini chocolate chip on the very top center of each peeled orange to serve as a tiny pumpkin stem.
How to Make Friendly Ghost-nanas:
- Melt your mini chocolate chips in a microwave-safe bowl. Heat in 30-second increments, stirring well after each interval, until the chocolate is completely smooth and melted.
- Transfer the melted chocolate into your piping bag (or a small Ziploc bag). Snip off a tiny corner of the piping bag to create a fine tip for drawing.
- Peel the bananas and then cut each banana in half horizontally.
- Slice each horizontal half down the middle vertically, starting from the top. This will give you four ghost-nanas from each full banana. The top part will be rounded, resembling a ghost’s head.
- Using your piping bag filled with melted chocolate, draw two eyes and a wavy mouth onto each banana ghost. Alternatively, for a simpler approach, you can just press two mini chocolate chips for eyes and one regular-sized chocolate chip for a mouth onto each ghost.
How to Make Grinning Apple Monster Mouths:
- Slice the apples into thin, even wedges. Aim for about ¼ to ½ inch thickness.
- If the apple wedges have any moisture, gently wipe them dry with a paper towel. This helps the spread adhere better. Then, spread a layer of dulce de leche, caramel, or peanut butter onto one flat side of each apple wedge. This will be the “inside” of the monster’s mouth.
- Stick a few slivered almonds into the spread along the edge of one apple wedge to resemble sharp, monster teeth.
- Stack two apple wedges on top of each other, with the spread sides facing inwards, to form an open monster mouth. The “teeth” should be peeking out.
- Add candy eyes to the top apple wedge, using a tiny dab of dulce de leche or your chosen spread as glue to secure them in place.
How to Make Creamy Ranch Dip:
- Blend the cottage cheese in a high-speed blender until it achieves a wonderfully smooth and creamy consistency, with no curds remaining.
- Mix the entire packet of Ranch dressing mix into the blended cottage cheese. Stir thoroughly until the powder is fully incorporated and the dip is well combined and flavorful.
How to Make Witches’ Broomsticks:
- Cut each cheese stick horizontally into three equal sections.
- Using a sharp paring knife, slice each cheese stick section halfway up into thin strips. These strips will fan out to resemble the bristles of a broom. Be careful to keep the top half of the cheese stick intact and connected.
- Gently poke a pretzel stick into the unsliced top of each cheese stick section, creating a sturdy handle for your edible broomstick.
How to Make Eerie Cucumber Skulls:
- Chop the cucumbers into thin, round slices, approximately ¼ inch thick.
- Using the wide end of a round piping tip, carefully cut out a small curved section from the lower sides of each cucumber slice. This creates the distinctive lower cheekbones and jawline of the skull shape.
- Next, switch to the smaller end of the piping tip (a Wilton 10 round piping tip works well here) and cut out two small circles for the eye sockets of the cucumber skulls.
How to Make Phantom Pepper Ghosts:
- Cut the tops off the sweet peppers and then slice them in half lengthwise. Carefully remove any seeds and internal membranes.
- Arrange the pepper halves on your platter with the outside of the peppers facing upwards, creating a smooth surface.
- Using a small dollop of the creamy cottage cheese dip as adhesive, add candy eyes to each pepper half, bringing your phantom peppers to life.
How to Make Spooky Bat Cheese Shapes:
- Cut various Halloween-themed shapes (bats, pumpkins, ghosts) out of the cheddar cheese slices using your festive cookie cutters.
- Arrange these fun cheese shapes artfully across your snack board, scattering them amongst the other treats.
Mastering Your Monsterpiece: Tips for Success:
- Simplify Ghost-nana Faces: While drawing faces with melted chocolate offers precision, for ultimate ease, simply use mini chocolate chips for the eyes and a regular-sized chocolate chip for the mouth of your banana ghosts. It’s still wonderfully effective!
- Chill Your Ranch Dip: For the most robust and melded flavors, prepare your creamy ranch dip first and allow it to chill in the refrigerator for at least 30 minutes before serving. This cooling period allows all the savory ingredients to truly shine.
- Precision with Broomsticks: When slicing the cheese sticks for the broom bristles, a very sharp paring knife will be your best friend. It allows for more precise, clean cuts, ensuring beautifully fanned bristles.
- Cold Cheese for Crisp Cuts: Always work with cold cheese when using cookie cutters. Cold cheese is much firmer and easier to cut, resulting in crisp, well-defined Halloween shapes without tearing or smushing.
- Plan Your Portions: Consider the number of children and their ages when preparing your snack board. You can easily adjust the quantities to suit your crowd. Any prepared extras can often be saved for another snack time!
- Timing is Everything for Fruit: Bananas and apples tend to brown quickly once cut and exposed to air. To keep them looking fresh and appetizing, slice them no more than an hour before you plan to serve the snack board. A quick brush with lemon juice can also help apples retain their color.
- Artful Arrangement: The visual appeal of a snack board is half the fun! Don’t just pile items. Arrange similar colors or textures next to each other, use small bowls for dips, and fill in any gaps with smaller fruits, nuts (if no allergies), or extra cheese cut-outs to create a lush, abundant look.
Prepare in Advance: Your Time-Saving Tricks:
Halloween prep can be hectic, but many components of this healthy snack board can be made ahead of time, freeing you up for other spooky tasks!
- You can prepare the pumpkin oranges, cheesy broomsticks, cucumber skulls, phantom pepper ghosts, bat and shaped cheese, and the creamy Ranch dip up to 1-2 days in advance.
- Once prepared, wrap each component tightly in plastic wrap or store them in separate airtight containers. Keep them refrigerated until you’re ready to assemble your magnificent Halloween snack board platter.
- For optimal freshness and appearance, it’s best to prepare the banana ghosts and apple monster mouths no more than an hour before serving. Their delicate nature means they are best enjoyed fresh.
Storing Leftovers: Keeping the Spook Alive:
While these healthy treats are undoubtedly best enjoyed fresh, you might have a few leftovers. Here’s how to handle them:
- Generally, the assembled snack board, especially with sliced fresh fruit, doesn’t keep exceptionally well and might lose some of its appeal after being refrigerated.
- However, you can save individual snack board toppings that haven’t turned brown or dried out. Transfer any such leftovers to an airtight container and store them in the refrigerator for 2-3 days. This includes the ranch dip, cheese shapes, broomsticks, and unbrowned cucumber or pepper pieces.
Frequently Asked Frights About Healthy Halloween Snacks:
What Halloween treats can I add to a charcuterie board?
Beyond the fresh fruits and vegetables, you can easily incorporate other fun Halloween-themed items. Popular choices include chocolate-covered almonds (if nut-friendly), candy corn for decoration (if you don’t mind a little sugar), mini peanut butter cups, M&M’s, yogurt-covered pretzels, mini cookies, and of course, candy eyeballs. You could even add savory options like mini mummy hotdogs or Halloween cake pops for an extra special touch. The beauty of a snack board is that anything goes – feel free to mix and match whatever festive items you have on hand!
What is the most popular Halloween snack (candy)?
It’s challenging to definitively name the number one Halloween snack, as preferences vary widely. However, classic candies like candy corn, Tootsie Pops, Reese’s Peanut Butter Cups, and Twizzlers consistently rank among the most popular choices during the Halloween season. If it’s chocolate or a classic chewy candy, it’s almost guaranteed to be flying off the shelves in October!
What kind of board should I use for my Halloween snacks?
You can use any large platter or serving tray you have available for presenting your Halloween snacks. For an extra festive touch, black or orange platters are perfect. However, a regular wooden cutting board, a slate board, or even a good old baking sheet lined with parchment paper can be transformed into a fantastic and spooky serving vessel for your delicious treats!
What makes these snacks “healthy” compared to traditional Halloween treats?
These snacks are considered healthy because they primarily feature fresh, whole ingredients like fruits (bananas, apples, mandarins) and vegetables (cucumbers, sweet peppers), which are packed with vitamins, minerals, and fiber. The dip is made from cottage cheese, a good source of protein. By creatively transforming these nutritious items into fun Halloween shapes, we offer a balanced alternative that provides essential nutrients and sustained energy, rather than just empty calories from excessive sugar typically found in many Halloween candies.
Can I make this board entirely nut-free for school parties?
Absolutely! This snack board can easily be adapted to be entirely nut-free. For the apple monster mouths, simply substitute the peanut butter with a nut-free butter alternative (like sunflower seed butter) or stick to dulce de leche or caramel. Replace slivered almonds with mini marshmallows or sunflower seeds for the “teeth.” Always double-check ingredient labels on candy eyes or other packaged items to ensure they are certified nut-free if allergies are a major concern.
How can I make the snack board even more visually appealing?
Beyond the fun shapes, consider adding small, non-edible Halloween decorations like plastic spiders, tiny skeletons, or decorative leaves (ensure they are food-safe and kept separate from food where appropriate). Use small ramekins or colorful bowls for dips and smaller items to add height and texture. Arranging items by color can also create an eye-catching display. Don’t be afraid to make it look abundant and overflowing – that’s part of the charm of a great snack board!
More Inspiration for Your Snack Boards:
- The BEST Charcuterie Board
- Ultimate Snack Board for Game Day
- How to Make an Epic Charcuterie and Cheese Board
- Cheese Platter for Two
Halloween Snack Board
By Shinee Davaakhuu
A Halloween sugar rush is bound to happen! Balance it out with a healthy and fun Halloween snack board for kids, packed with fresh produce and a delicious, creamy dip. This board is perfect for festive gatherings, school parties, or simply a creative afternoon snack.
- Prep Time: 30 minutes
- Total Time: 30 minutes
- Servings: 4-8 servings
- Rating: 5 out of 5 stars (from 1 vote)
Ingredients:
For the Fruit Platter:
- Mandarin oranges
- ¼ cup mini chocolate chips (plus more for decorations)
- Bananas (Note 1)
- Apples (green and red recommended)
- Dulce de leche, caramel, or peanut butter
- Slivered almonds (Note 3)
- Candy eyes
For the Dip:
- 24 oz (680g) cottage cheese (Note 2)
- 1 oz packet Ranch dressing mix
For the Savory Veggie Platter:
- Cheese sticks
- Pretzel sticks
- Cucumber
- Sweet peppers
- Candy eyes
- Cheddar cheese slices
Equipment:
- Halloween cookie cutters
- Blender
- Round piping tip
- Paring knife (optional, for precision cuts)
- Piping bag (or small Ziploc bag)
Instructions:
For Pumpkin Oranges:
- Peel the oranges and place a mini chocolate chip on top for stems.
For Ghost-nanas:
- Melt the ¼ cup chocolate chips in a microwave in 30-second increments until smooth. Transfer into a piping bag and cut a tiny tip off.
- Peel the bananas and cut them in half horizontally, then slice each half down the middle vertically. You’ll get 4 ghosts out of 1 banana.
- Draw eyes and a mouth on the banana ghosts with the melted chocolate. (Alternatively, use mini chocolate chips for eyes and a regular chocolate chip for a mouth if you prefer a simpler approach).
For Apple Monster Mouths:
- Slice the apples into thin wedges.
- Spread dulce de leche (or caramel, or peanut butter) on one side of each apple wedge. (If moisture prevents adherence, gently wipe the apple wedges with a paper towel).
- Insert a few slivered almonds into the spread to resemble monster teeth.
- Stack two apple wedges together to form a mouth.
- Using dulce de leche as glue, stick candy eyes on the top apple wedge.
For the Ranch Dip:
- In a blender, blend the cottage cheese until it is completely smooth and creamy.
- Add the ranch dressing mix and blend or mix until well combined.
For Broomsticks:
- Cut a cheese stick into 3 equal parts.
- Cut half of each cheese stick section into thin strips to resemble broom bristles, keeping the top half connected. (A sharp paring knife aids this step).
- Gently poke a pretzel stick into the unsliced top of the cheese stick for the handle.
For Cucumber Skulls:
- Slice the cucumber into thin round slices.
- Using the wide end of a piping tip, cut out the lower sides of each cucumber slice to form the “cheeks” of the skull.
- Then, using the smaller end of the piping tip, cut out the eye sockets. (A Wilton 10 round piping tip works well).
For Pepper Ghosts:
- Cut the tops off the sweet peppers and slice them in half lengthwise. Remove any seeds.
- Arrange the peppers on your platter with the outside facing up.
- Add candy eyes using a small dab of cottage cheese dip as glue.
For Bat Cheese:
- Arrange the cheddar cheese slices on a cutting board. (Tip: It’s easier to cut shapes out of cold cheese).
- Cut out desired Halloween shapes using cookie cutters.
- Arrange the cheese shapes on your snack board.
Tips & Notes:
- Note 1 (Bananas): Use just ripe bananas that are slightly firm. If they are too soft, they won’t hold their shape well and will be difficult to work with.
- Note 2 (Cottage Cheese): Plain, full-fat cottage cheese is ideal for the creamiest dip, but any percentage will work fine.
- Note 3 (Slivered Almonds): For a nut-free Halloween snack board, substitute mini marshmallows or sunflower seeds for the slivered almonds.
- Storing Tips:
- Prepare the orange pumpkins, broomsticks, cucumber skulls, pepper ghosts, bat cheese, and Ranch dip up to 1-2 days in advance. Wrap them in plastic wrap or store in airtight containers in the fridge.
- Transfer any untouched leftovers (that haven’t browned or dried out) to an airtight container and store them in the refrigerator for 2-3 days. Banana ghosts and apple monster mouths are best made fresh.
Nutrition Information:
- Servings: 1 serving
- Calories: 777 kcal
- Carbohydrates: 91g
- Protein: 40g
- Fat: 32g
- Sugar: 59g
- Sodium: 1605mg
Recipe Details:
- Course: Appetizer, Snack
- Cuisine: American
Did you make this?
Leave a rating and your feedback. Thank you!