

Indulge in the perfect summer dessert with this incredible Lemon Raspberry No-Bake Cheesecake. This recipe delivers a delightful combination of creamy sweetness, tangy lemon, and the vibrant burst of fresh raspberries, all without ever needing to turn on your oven. Ideal for hot days or when you simply crave a hassle-free yet impressive treat, this cheesecake is a guaranteed crowd-pleaser that brings sunshine to every bite.

Why This Lemon Raspberry No-Bake Cheesecake is Your New Summer Obsession
Forget oven-baked fuss and complicated techniques. This no-bake cheesecake stands out as an exceptional dessert for numerous reasons, making it an absolute must-try for any occasion, especially during the warmer months. Its unique qualities elevate it beyond a simple treat to a memorable culinary experience:
- Unbelievably Creamy and Perfectly Balanced: Unlike some cheesecakes that can be overly rich or dense, this recipe achieves a heavenly, delicate texture that melts in your mouth. It’s super creamy without being cloying, and strikes the perfect balance of sweetness, ensuring every spoonful is pure bliss.
- A Burst of Fresh Lemon and Raspberry Flavors: The combination of bright, zesty lemon and sweet-tart raspberries creates a truly refreshing flavor profile. Each ingredient complements the other beautifully, offering a vibrant taste that awakens the palate and feels distinctly summery. It’s like a sunny day captured in a dessert!
- Addictively Crumbly Lemon Oreo Crust: The foundation of this cheesecake is a spectacular crust made from lemon-flavored Oreo cookies. This isn’t just any crust; it’s incredibly crumbly, packed with an extra citrusy kick, and wonderfully addictive, providing the perfect counterpoint to the smooth, creamy filling.
- Effortless Elegance with No Baking Required: The sheer convenience of a no-bake dessert cannot be overstated, particularly when temperatures rise. You can create this elegant masterpiece without ever turning on your oven, keeping your kitchen cool and your stress levels low. It’s the ultimate easy cheesecake recipe for any home baker.
- Make-Ahead and Freezer-Friendly: Planning a party or need a dessert that can be prepared in advance? This lemon raspberry no-bake cheesecake is your answer. It sets beautifully in the refrigerator and even freezes well, meaning you can whip it up days or weeks ahead of time and serve it straight from the freezer for an instant cool-down treat.
Seriously, if you’re looking for a perfect dessert for hot summer days, when you don’t want to turn on the oven, or just a delightful fruity cheesecake, this recipe is a game-changer. Its ease, vibrant flavors, and luscious texture make it an irresistible choice.

Essential Ingredients for Your Perfect Lemon Raspberry No-Bake Cheesecake
Creating an exceptional no-bake cheesecake begins with selecting the right ingredients. Here’s a closer look at what you’ll need and some crucial tips to ensure the best possible flavor and texture for your creamy cheesecake.
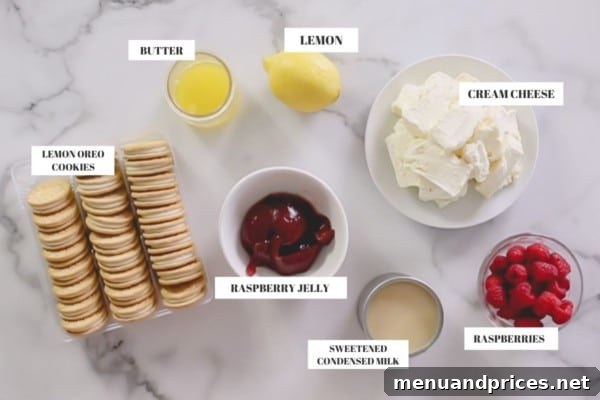
- Oreo Cookies: For a truly spectacular crust, we recommend using lemon-flavored Oreo cookies. These provide an extra layer of citrusy brightness that beautifully complements the filling. If lemon Oreos aren’t available, classic golden Oreos or even regular chocolate Oreos can work, though the lemon kick will be less pronounced. Pulse them into fine crumbs in a food processor, fillings and all, for the best base.
- Butter: Melted butter is key to binding the cookie crumbs for a firm crust. It’s best to start with unsalted butter, allowing you to control the overall saltiness of the dessert. When adding the butter to the crumbs, don’t pour it all in at once. Depending on the type and moisture content of your cookies, you may not need the full amount. Add gradually until you achieve a “wet sand” texture.
- Cream Cheese: The heart of any great cheesecake! Always opt for a block of plain, full-fat cream cheese. Low-fat or whipped cream cheese varieties contain more water and less fat, which can result in a runny or less flavorful filling. Ensure your cream cheese is softened to room temperature for at least 1-2 hours before beating. This is a critical step for achieving that ultra-smooth, lump-free texture.
- Sweetened Condensed Milk: This is our secret weapon for an ultra-creamy, luscious cheesecake filling that’s perfectly sweetened. It provides not just sweetness but also body and an incredibly smooth consistency that’s hard to achieve with regular sugar. Do not substitute this with evaporated milk.
- Raspberry Jelly: For a beautifully smooth and refined filling, we highly recommend using seedless raspberry jelly. The absence of seeds ensures a silky texture without any distracting bits. You can use your favorite store-bought brand, or for an extra special touch, our homemade raspberry jelly works wonderfully and adds an incredible depth of flavor.
- Fresh Lemon: The vibrant tang of fresh lemon is indispensable for this cheesecake. You’ll need both the juice of at least one large lemon (typically yielding about 3 tablespoons) and freshly grated zest. The zest carries potent lemon oils, providing an aromatic burst of citrus that bottled lemon juice simply cannot replicate. Avoid using bottled lemon juice for the best, brightest flavor.
- Red Food Coloring (Optional): While optional, a small amount of red food coloring (gel or liquid) can enhance the visual appeal of your cheesecake. The natural color from the raspberry jelly might be a dull pink, so a touch of food coloring can brighten it to a more vibrant, appetizing hue.
Pro Tip for Creamy Filling
For an ultra-smooth, velvety cheesecake texture, ensure your cream cheese is thoroughly softened at room temperature for 1-2 hours. Cold cream cheese will result in a lumpy filling that is difficult to mix evenly.
Crafting Your Delightful No-Bake Lemon Raspberry Cheesecake: A Step-by-Step Guide
Creating this stunning lemon raspberry no-bake cheesecake is surprisingly simple, broken down into two main parts: the irresistible crust and the dreamy, creamy filling. Follow these steps for a perfect dessert every time.
STEP 1. Prepare the Lemon Oreo Crust
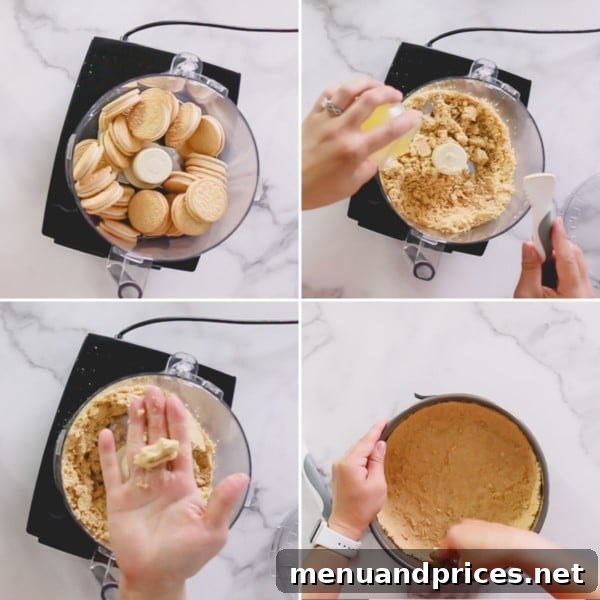
- Process the Cookies: In the bowl of a food processor, add your lemon Oreo cookies (fillings included). Pulse until the cookies are finely crushed into a uniform, powdery consistency. Ensure there are no large chunks left, as this will affect the crust’s texture.
- Incorporate Butter: Begin by adding about half of the melted unsalted butter to the cookie crumbs. Pulse again until the butter is well combined and distributed. Assess the texture: it should resemble wet sand. If it feels too dry and doesn’t hold together when squeezed, add more melted butter, a tablespoon at a time, pulsing after each addition, until the desired consistency is achieved.
- Form the Crust: Transfer the buttery cookie mixture into a 9-inch springform pan. Using the back of a spoon or your fingertips, firmly press the mixture evenly across the bottom of the pan and about 1-inch up the sides. Aim for a compact and level crust.
- Chill the Crust: Once the crust is formed, place the springform pan in the refrigerator for at least 30 minutes. This chilling period is crucial for the butter to solidify, setting the crust and preventing it from crumbling when the filling is added and sliced.
Crust Consistency Check
To ensure your crust has the perfect consistency, squeeze a small amount of the cookie mixture in your hand. If it holds its shape firmly without crumbling excessively or feeling greasy, then it’s ready. You want a mixture that’s neither too dry (which will fall apart) nor too oily (which will make it soggy).
STEP 2. Create the Creamy Lemon Raspberry Filling
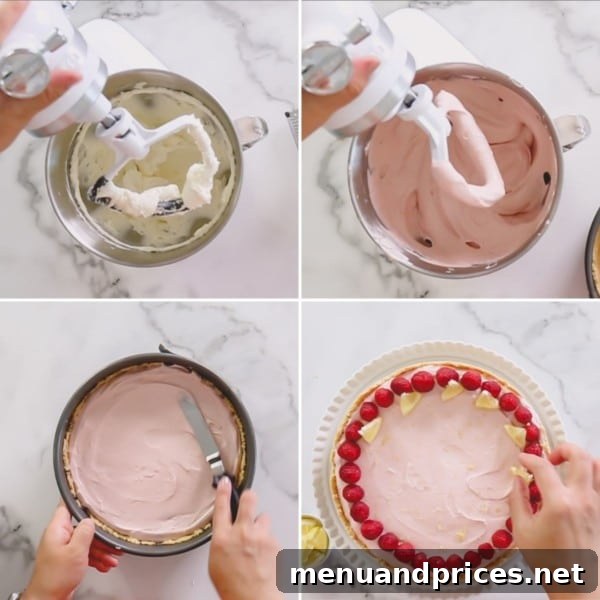
- Whip the Cream Cheese: In a large mixing bowl, using a stand mixer with the paddle attachment (or a hand mixer), beat the softened cream cheese on medium speed until it is light, fluffy, and completely smooth, with no lumps remaining. This usually takes 2-3 minutes.
- Combine Wet Ingredients: Gradually add the sweetened condensed milk, lemon juice, fresh lemon zest, and seedless raspberry jelly to the whipped cream cheese. If you’re using red food coloring to enhance the hue, add it now. Mix on low speed until all ingredients are just combined and the mixture is smooth. Be careful not to overmix, as this can incorporate too much air and lead to a less dense texture. Scrape down the sides of the bowl halfway through mixing to ensure everything is thoroughly incorporated.
- Assemble and Chill: Pour the smooth and creamy filling evenly over your chilled cookie crust in the springform pan. Gently tap the pan on the counter a few times to release any air bubbles and ensure a level surface. Refrigerate the cheesecake for at least 3 hours, or preferably overnight, until it is completely set and firm. For a quicker set or an even colder dessert, you can place it in the freezer for 1-2 hours.
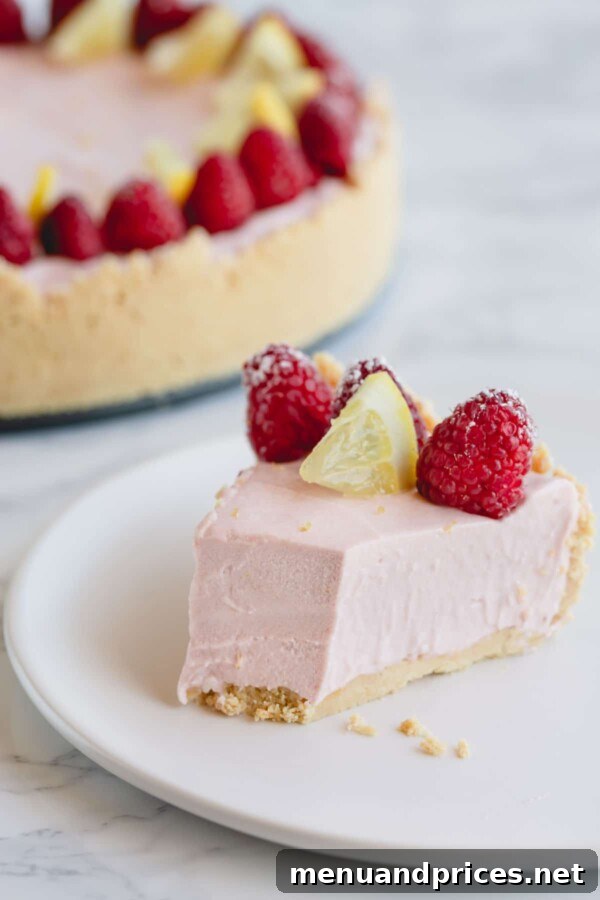
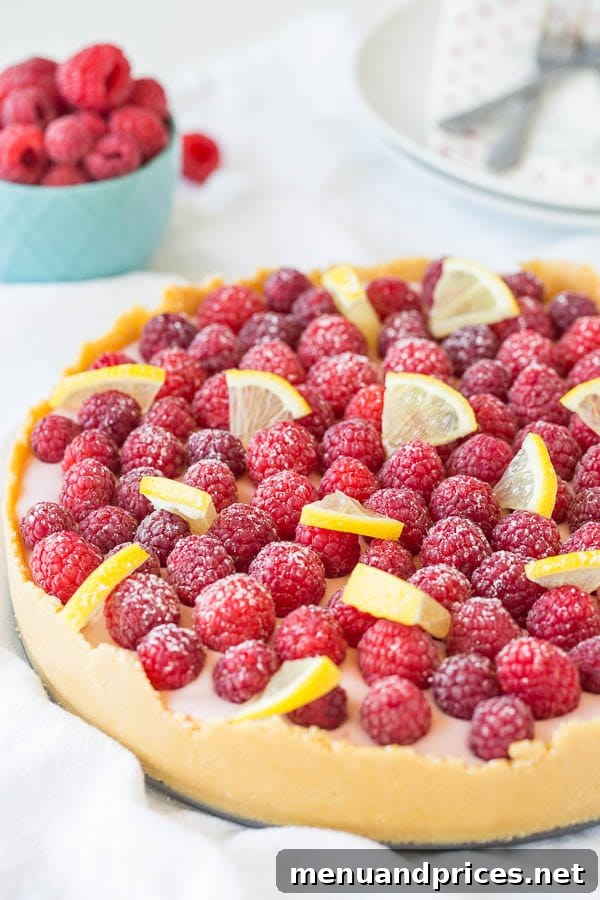
- Decorate and Serve: Once the cheesecake is fully set, carefully remove the sides of the springform pan. For a beautiful presentation, decorate the top with an abundance of fresh raspberries and thin lemon slices, as desired. A light dusting of powdered sugar can also add an elegant finish. Slice and serve this delightful fruity cheesecake!
Storing Your Lemon Raspberry No-Bake Cheesecake for Optimal Freshness
Proper storage is essential to keep your delicious no-bake cheesecake fresh and enjoyable. Here are some simple tips:
- Refrigeration: Keep any leftover cheesecake tightly covered with plastic wrap or in an airtight container in the fridge for up to 5 days. This will maintain its creamy texture and vibrant flavors.
- Freezing: This cheesecake is also wonderfully freezer-friendly! To freeze, place the entire cheesecake (or individual slices) in an airtight container. It can be stored in the freezer for up to 1 month. When you’re ready to enjoy, simply transfer it to the refrigerator to thaw for a few hours, or serve it slightly frozen for a refreshing, ice-cream-like treat.
Watch the Full Video Tutorial
Visual learners, rejoice! Sometimes, seeing the steps in action makes all the difference. Watch our comprehensive video tutorial below to guide you through every stage of making this super easy No-Bake Lemon Raspberry Cheesecake. From preparing the perfect crust to mixing the silky-smooth filling and achieving that flawless set, this video ensures your success.

No-Bake Lemon Raspberry Cheesecake
Shinee Davaakhuu
15 minutes
3 hours
3 hours
30 minutes
12
servings
Comment
Print Recipe
Ingredients
For the Crust:
-
1
package
Lemon Oreo cookies
Note 1
-
4
tablespoons
(56g) unsalted butter
melted Note 2
For the Filling:
-
16
oz
(450g) cream cheese
softened Note 3 -
1
can
(400g) sweetened condensed milk -
3
tablespoons
freshly squeezed lemon juice
Note 4
-
1
tablespoon
lemon zest -
½
cup
seedless raspberry jelly
Note 5
-
Red food coloring
optional Note 6
For Decoration:
-
Fresh raspberries -
Lemon slices -
Powdered sugar
optional
Instructions
To make the crust:
-
In a food processor, pulse the lemon Oreo cookies, including their creamy filling, until they form fine, even crumbs.
-
Add half of the melted unsalted butter to the cookie crumbs and mix until well combined. Continue to add more butter, a tablespoon at a time, if needed, until the mixture achieves the consistency of wet sand and holds its shape when squeezed. (TIP: Squeeze a small amount of cookie mixture in your hand. If it holds its shape, then it’s ready. You don’t want a mixture that is too dry and crumbly or too oily.)
-
Transfer the prepared cookie mixture into a 9-inch springform pan. Use the back of a spoon or your hands to firmly and evenly press the mixture onto the bottom of the pan and about 1-inch up the sides. Place in the refrigerator to chill and set while you prepare the filling.
To make the filling:
-
In a large mixing bowl with a paddle attachment (or using a hand mixer), beat the softened cream cheese on medium speed until it is completely smooth, airy, and fluffy, ensuring no lumps remain.
-
Add the sweetened condensed milk, seedless raspberry jam, freshly squeezed lemon juice, lemon zest, and red food coloring (if using) to the cream cheese mixture. Mix on low speed until all ingredients are just combined and the filling is silky smooth. Remember to stop and scrape the sides of the bowl once or twice to ensure even mixing.
-
Carefully pour the creamy lemon raspberry filling over the chilled, prepared crust in the springform pan. Gently spread it to create an even top layer. Refrigerate the cheesecake until it is completely set and firm, which will take at least 3 hours or preferably overnight. Alternatively, for a quicker set or a colder dessert, you can place it in the freezer for about 1-2 hours.
-
To serve: Once fully set, gently remove the sides of the springform pan. Garnish the top of the cheesecake generously with fresh raspberries and decorative lemon slices, if desired. Slice and enjoy your refreshing no-bake treat!
⭐️ Made this delightful recipe?
We’d love to hear from you! Please leave a review and let us know how much you enjoyed it!
Video
Tips & Notes
Note 1: One package of lemon Oreo cookies typically refers to approximately 370g (minus about 5 cookies if you want to be precise).
Note 2: Always add melted butter gradually to your cookie crumbs. The exact amount needed can vary based on the specific type and moisture content of your cookies. Using unsalted butter is recommended for better flavor control.
Note 3: For the most luxurious flavor and texture, always use a block of plain, full-fat cream cheese. Ensure it’s fully softened at room temperature for 1-2 hours before beating to achieve a perfectly smooth, lump-free filling.
Note 4: You’ll typically get around 3 tablespoons of fresh juice from one large, ripe lemon. Freshly squeezed is always best for optimal flavor.
Note 5: Opt for seedless raspberry jelly for a wonderfully smooth and refined cheesecake filling. Our homemade raspberry jelly is an excellent choice for an enhanced flavor.
Note 6: Red food coloring is completely optional but can significantly enhance the visual appeal. The natural color from the raspberry jelly can sometimes appear as a dull pink, so a tiny drop of gel food coloring or 1/8 teaspoon of liquid can brighten it to a more vibrant shade.
Storing Tips:
Keep any leftover cheesecake, tightly covered, in the refrigerator for up to 5 days. This cheesecake also freezes beautifully; store it in an airtight container for up to 1 month for a future treat.
Nutrition
1
slice
478
kcal
54
g
7
g
27
g
39
g
299
mg
Dessert
American

Did you make this?
Leave a rating and your feedback. Thank you!
This delightful recipe for Lemon Raspberry No-Bake Cheesecake was originally published on July 27th, 2017, and has been a firm favorite ever since.